I had a chance to try out the new feature of the Find My app that lets you send your location via Satellite. This is perhaps not so easy to demonstrate, since it requires you to be at a location without WiFi or cell service. I was traveling in some areas of North Carolina without cell coverage, so I took advantage of that to try out this new feature.
Prerequisites
iPhone 14 or 14 Pro (or later, presumably)
iOS 16.1 or later
Friend(s) previously added to “Share my Location” in Find My
Be away from cell and WiFi coverage
Be outdoors with a clear view of the sky
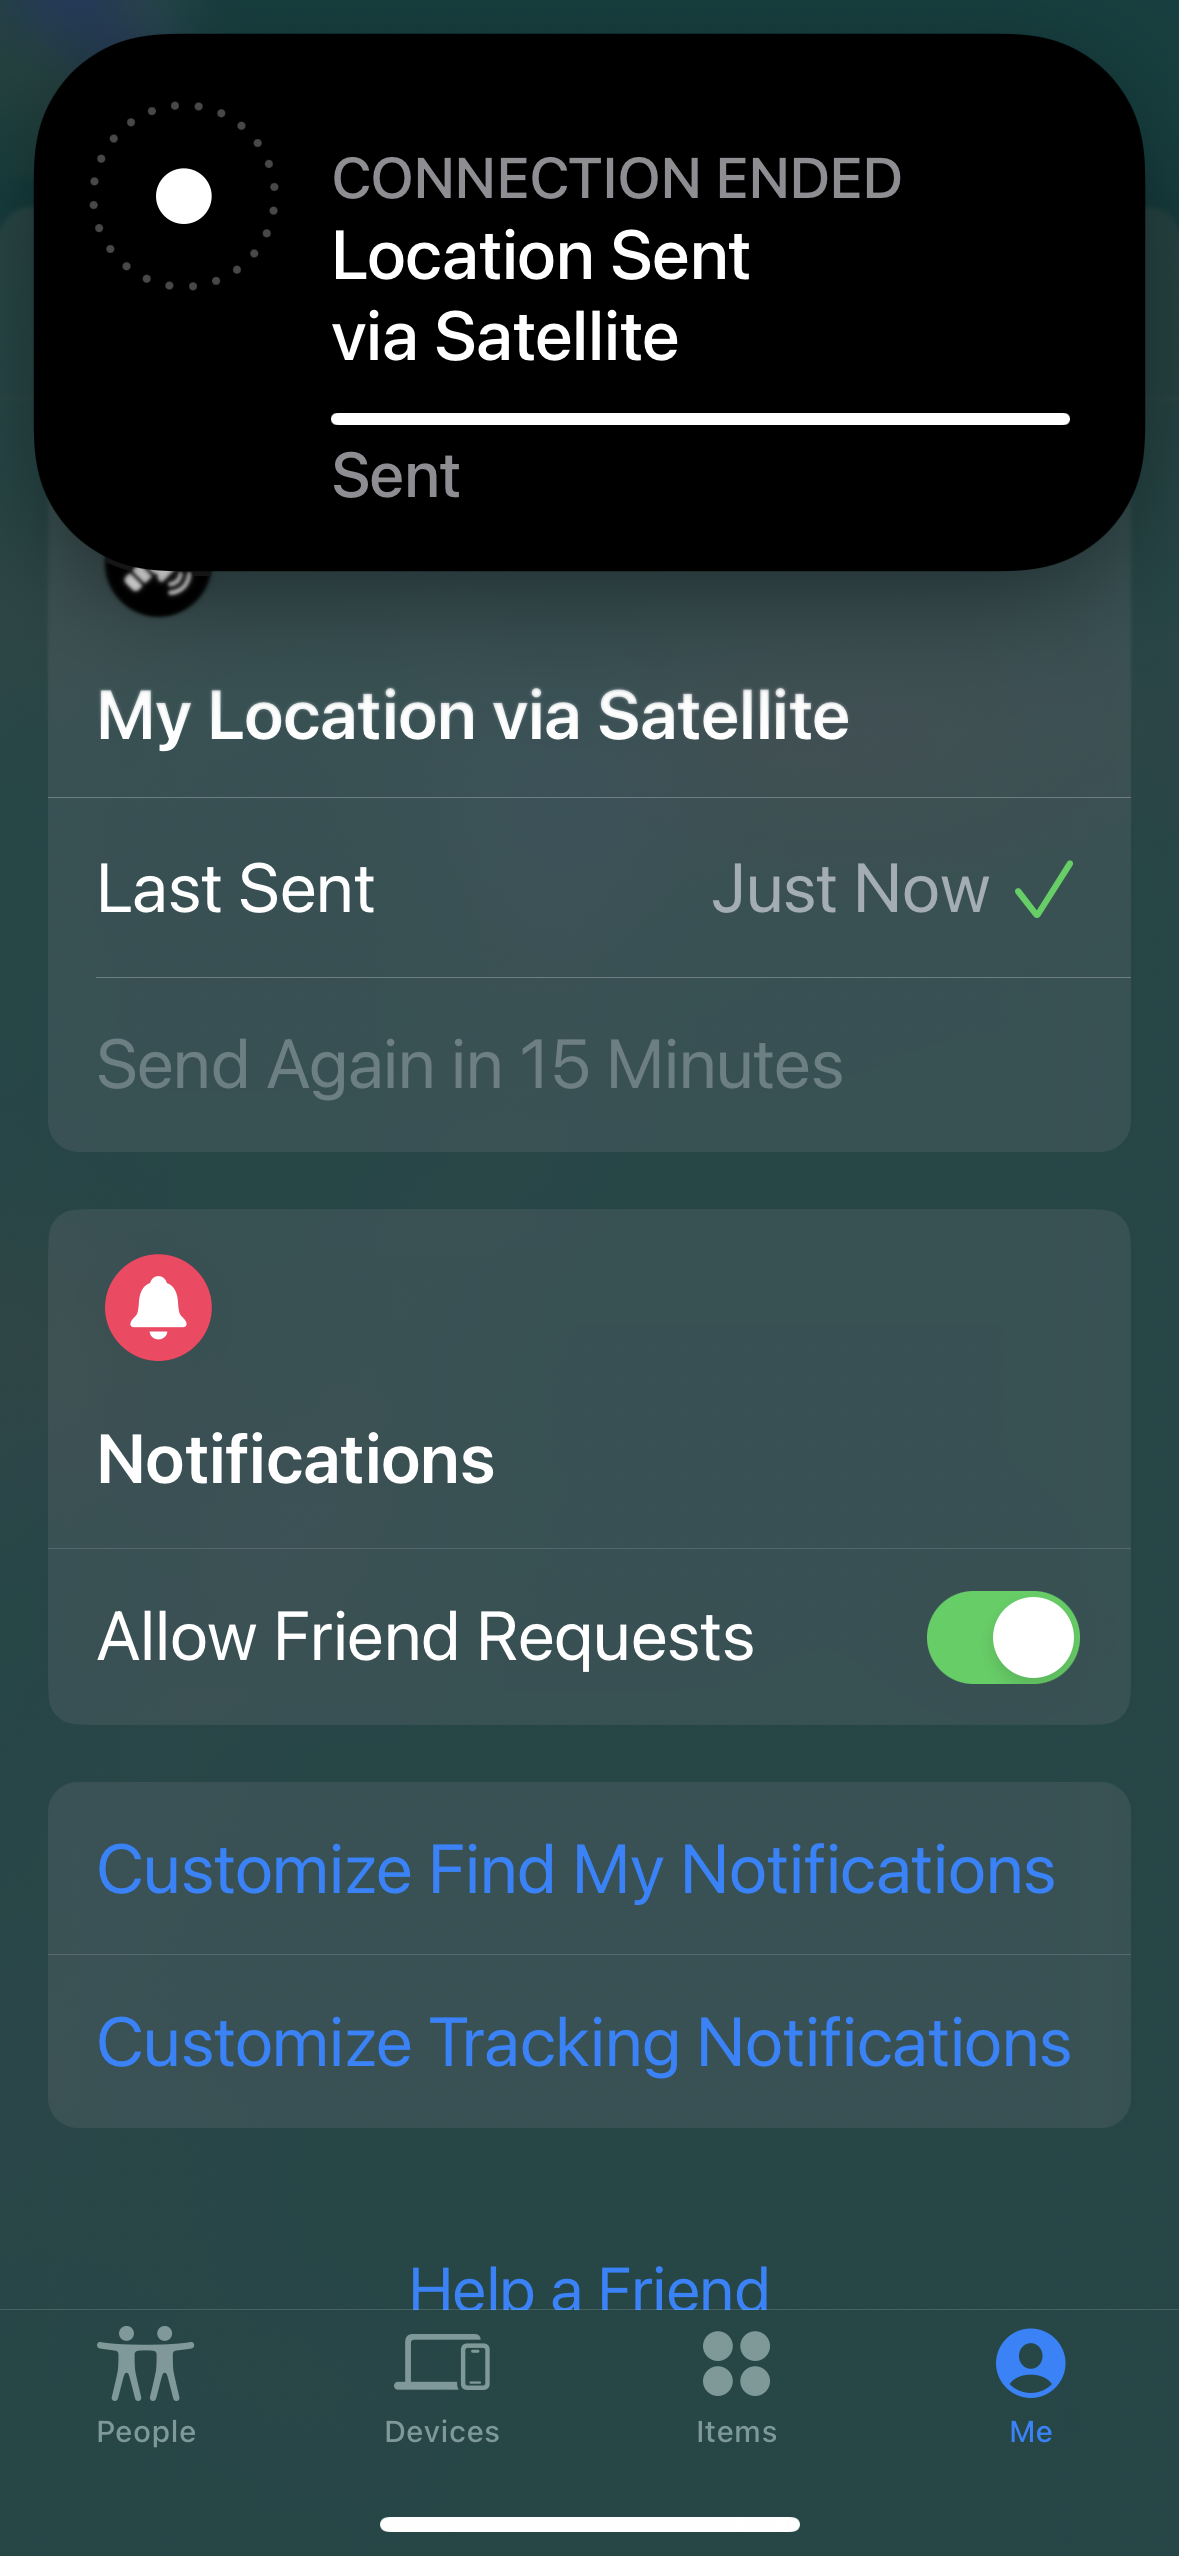
Sharing your location via Satellite in Find My doesn’t send your location to anyone in particular. It just makes your location available so that friends who already have access to your location can access it. It never asked me who I wanted to send it to. Sending your location is a one-way transmission. You do not receive anyone else’s location, or any other data, except a confirmation that your location was sent.
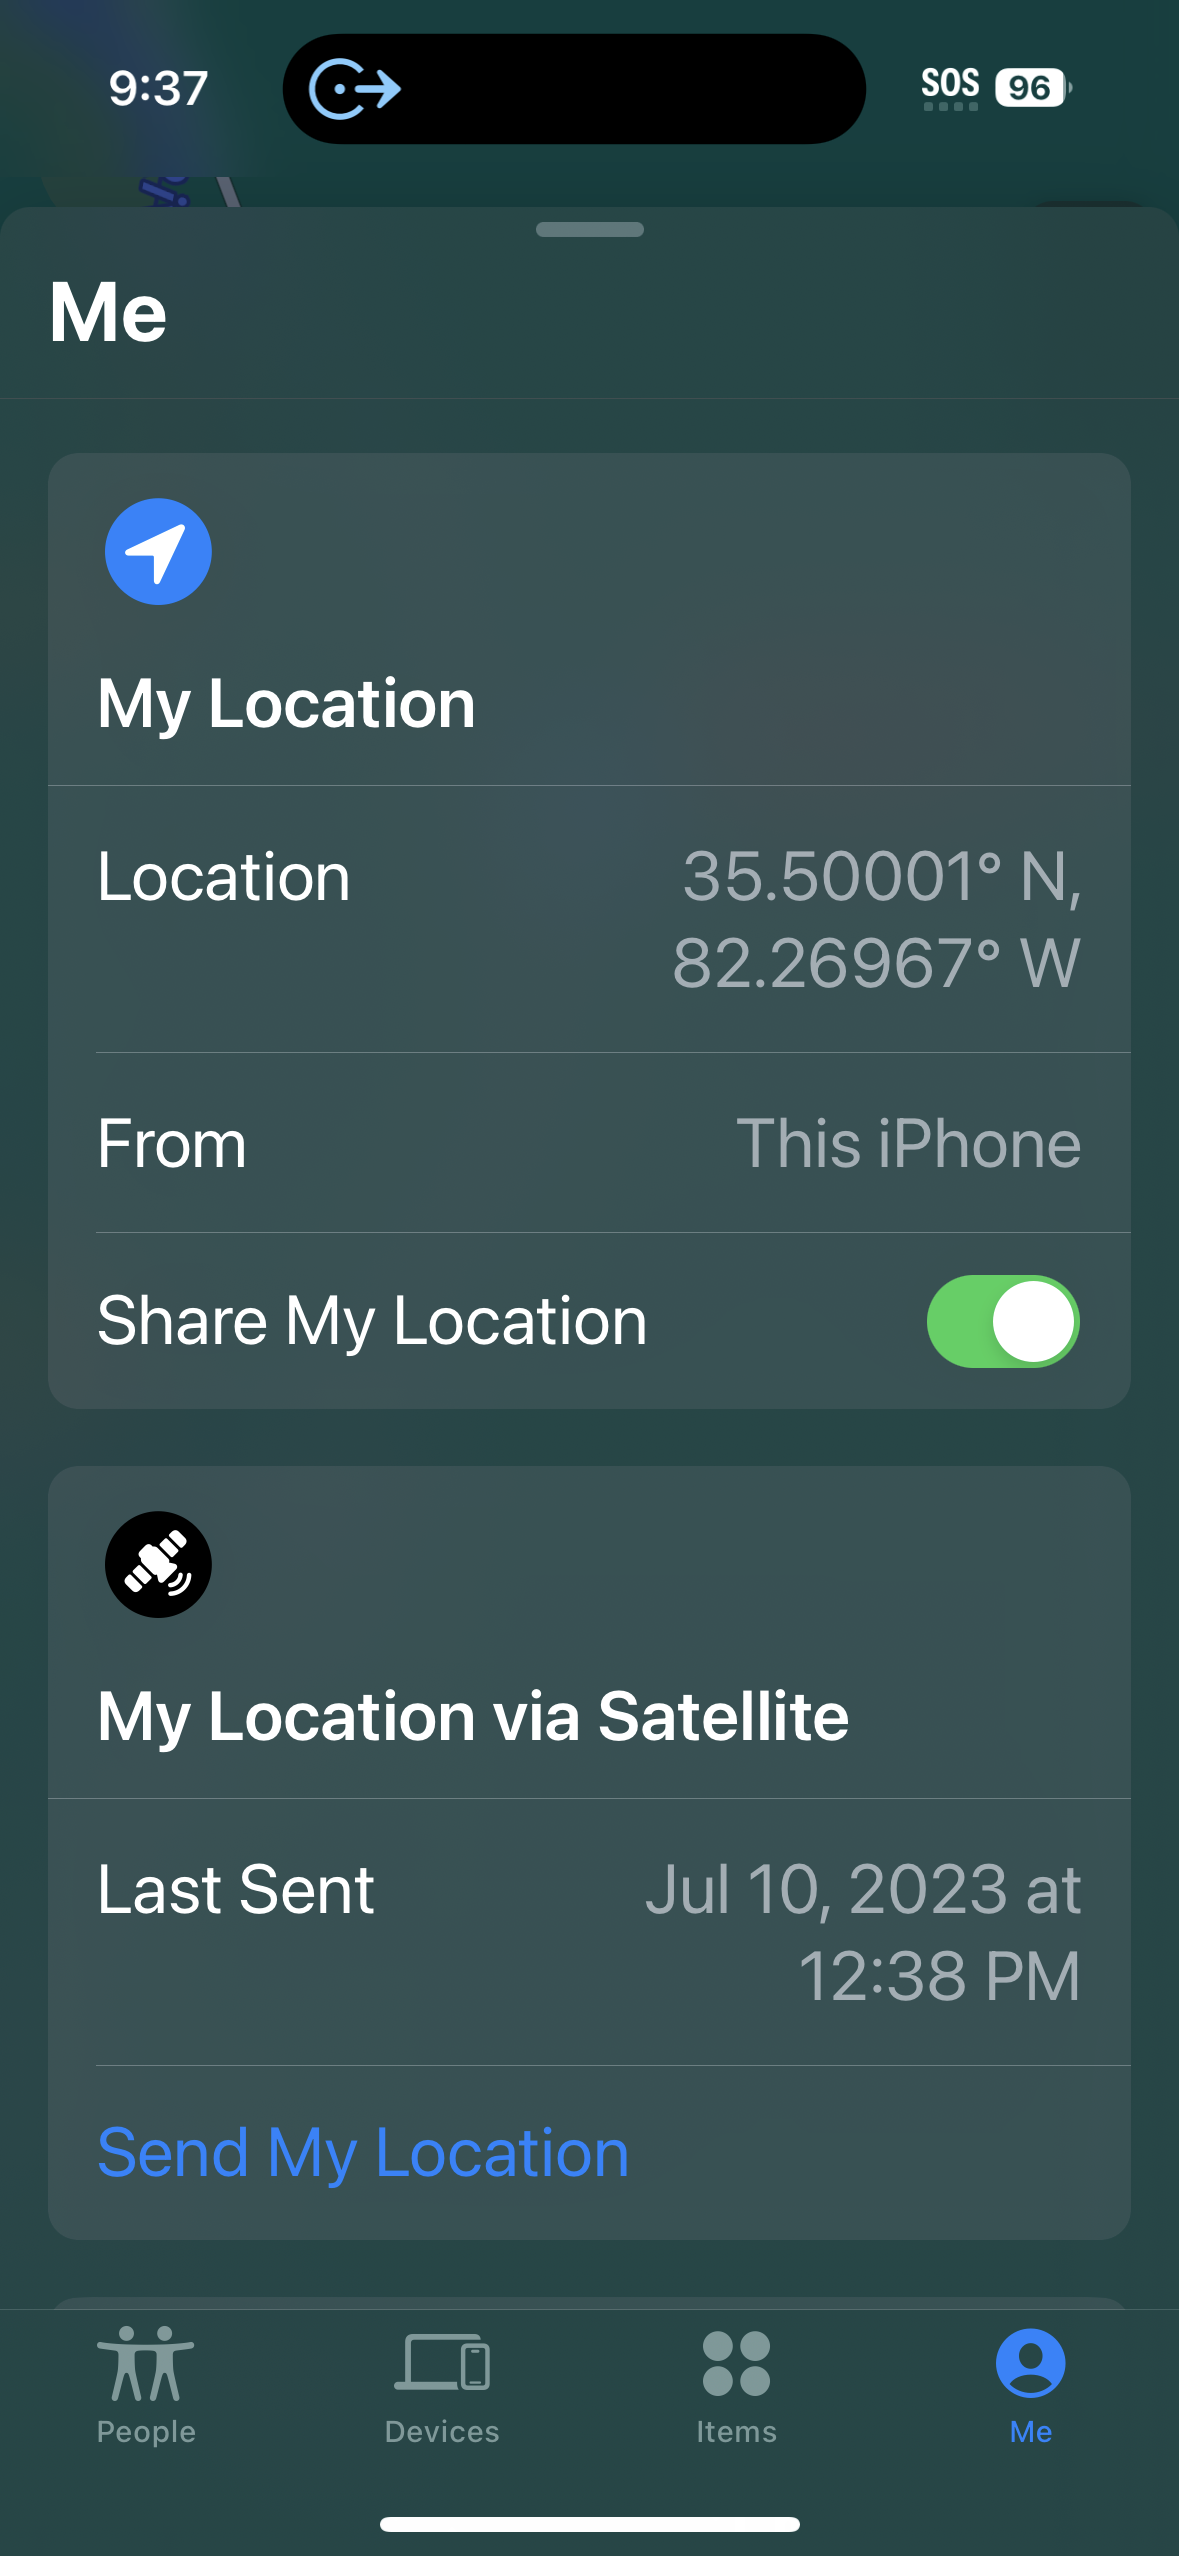
You start off by pressing Me at the bottom of the Find My app.
You will then see an option to Send My Location under My Location via Satellite.
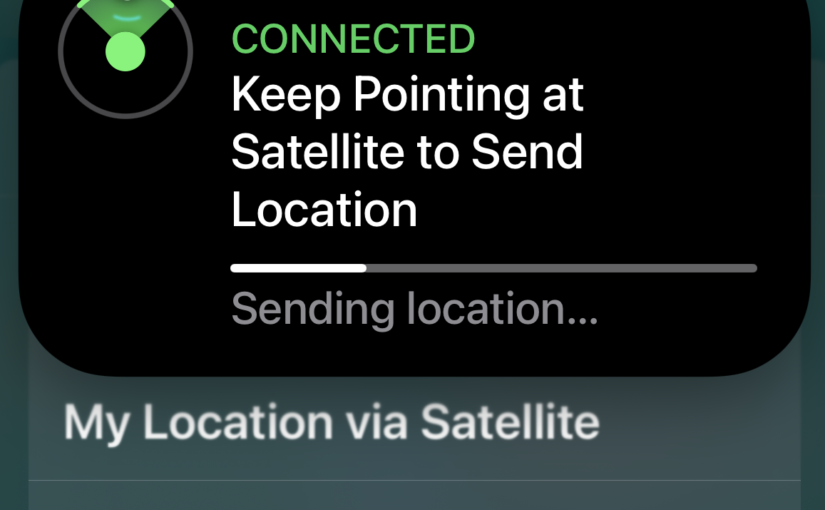
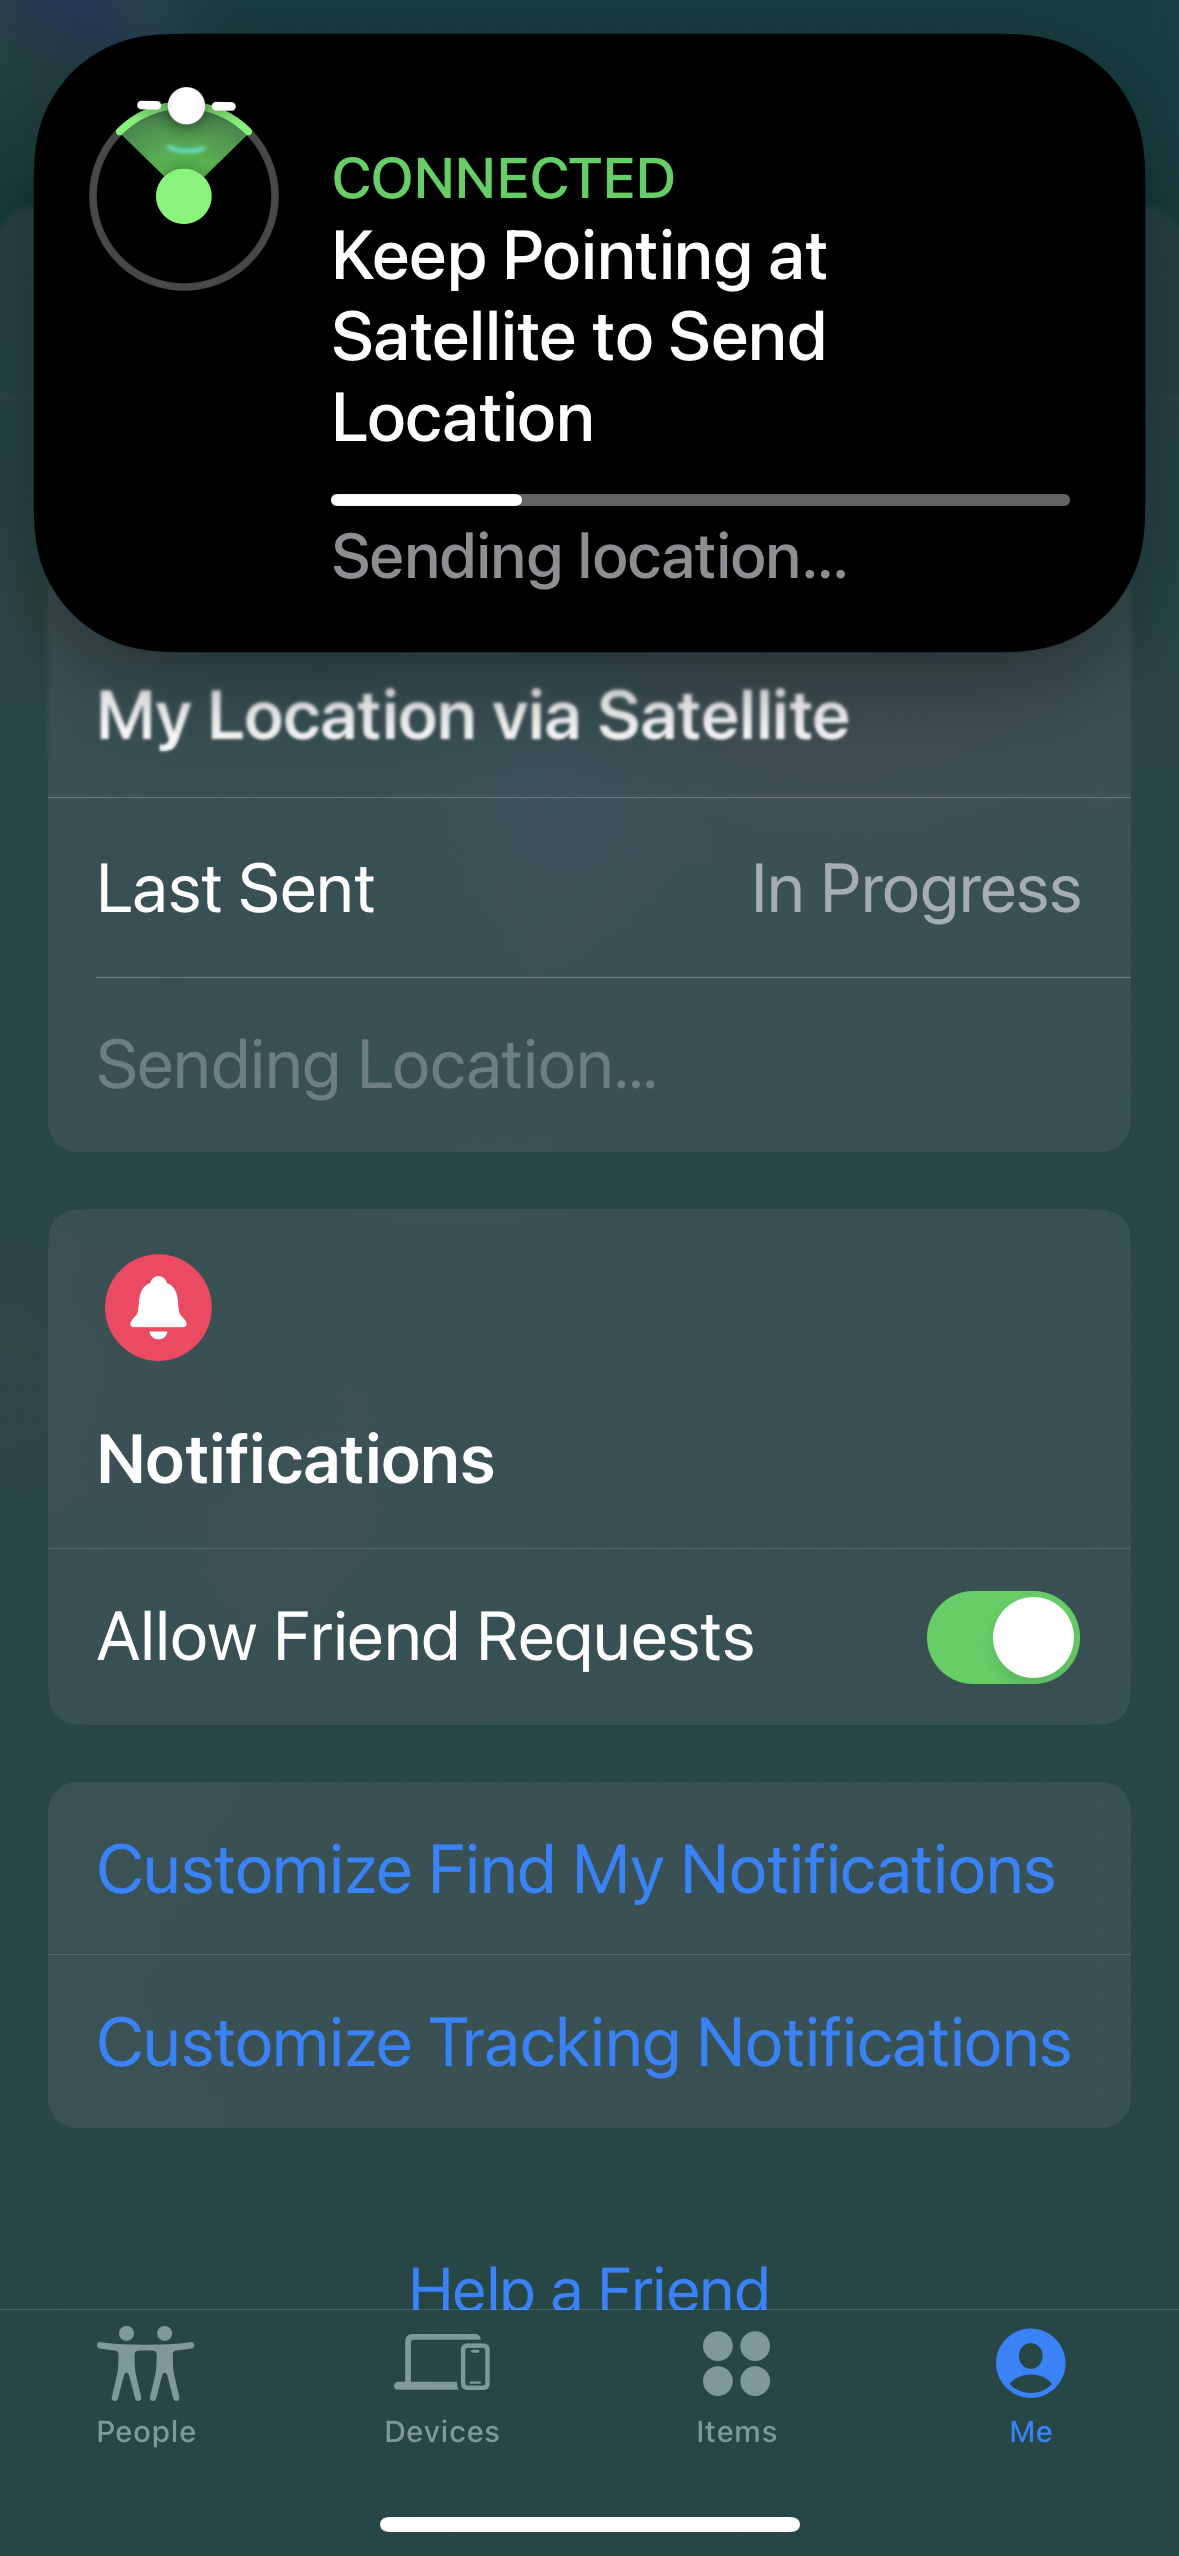
In Progress. Note Satellite tracking icon at top.
Note the little green satellite tracking icon at the top.
Tapping the tracking icon brought up this screen. You turn to face left and right to keep the white dot centered in the green arc. The iPhone acquired the satellite and sent my location quickly and easily. It seemed like it would have worked without me doing anything special to aim my phone.
I hope this little preview gives you some idea of what to expect if you ever need to send your location via satellite. The most important thing is that you must set up sharing your location with friend(s) in the Find My app before leaving on your trip to a remote location.
For our April meeting, we’re covering sites and apps that might be especially useful to those living in Brevard County, Florida.
Printing at the Library
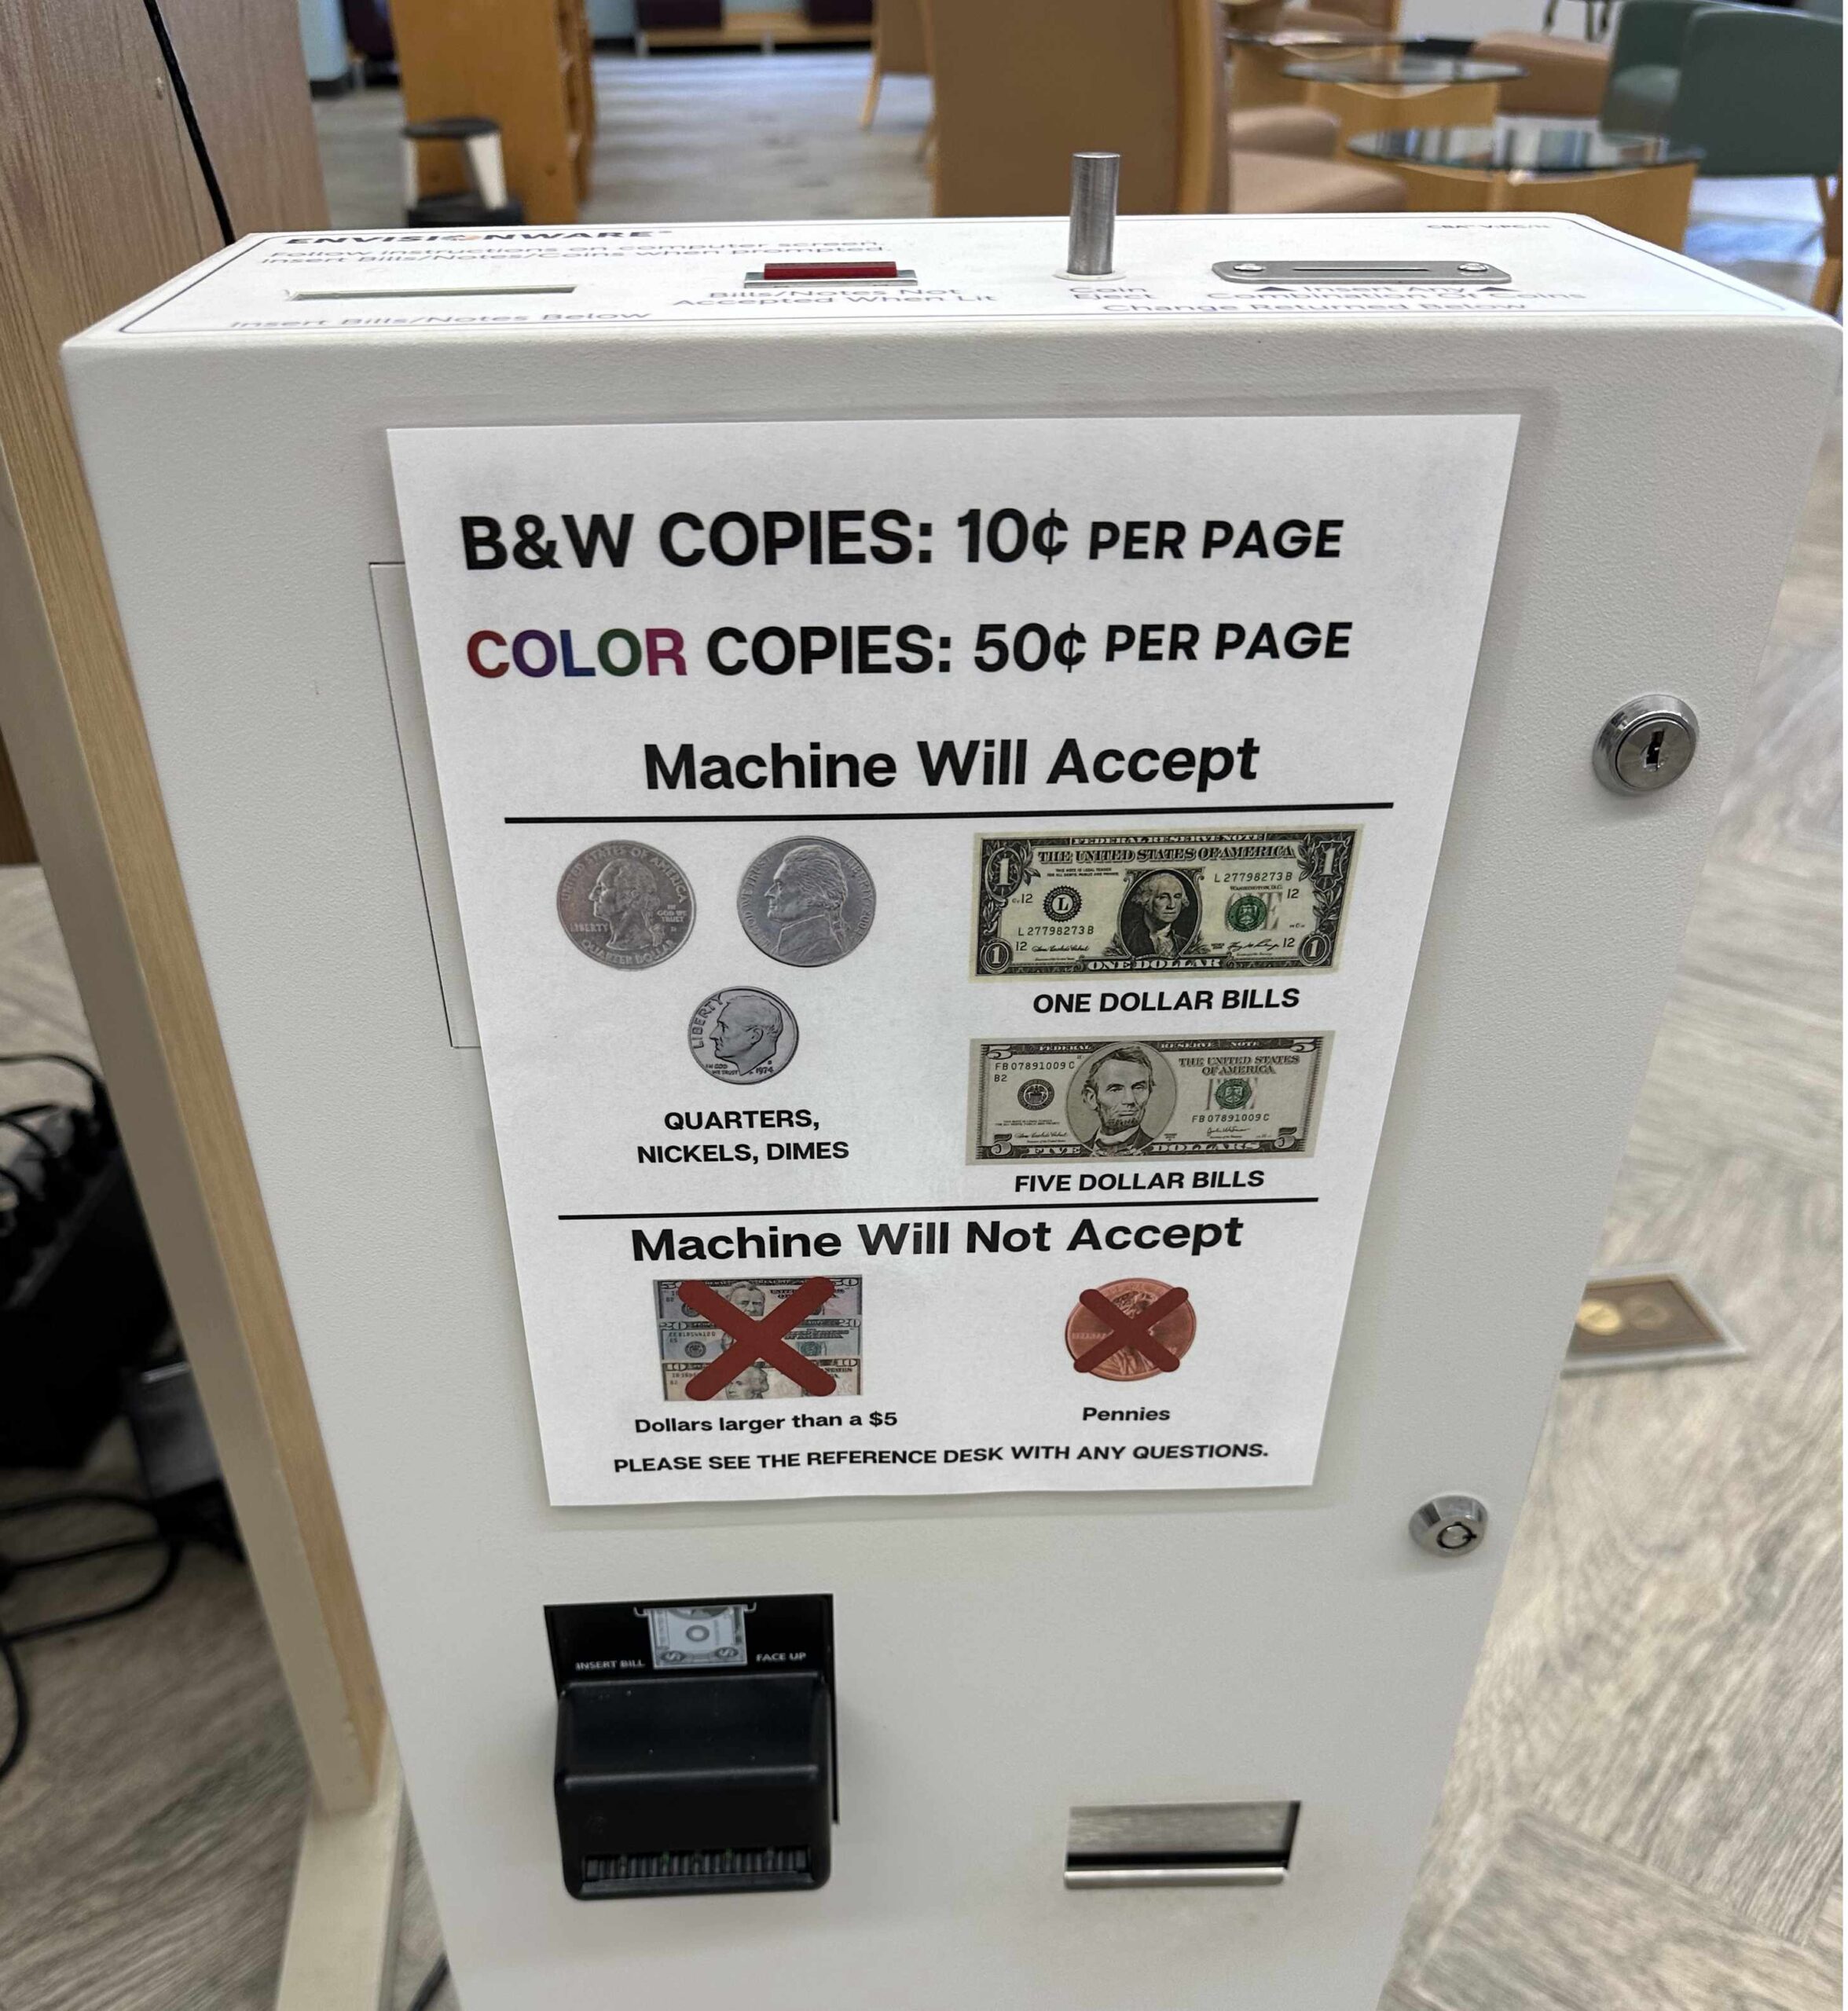
The Brevard County Libraries allow you to print on their printers for a small fee. (10 cents per page for black and white, 50 cents for color). If you have a printer at home, you might not need this. But, if, like me, you have a monochrome printer, and only occasionally need a color print, this is a great option. Also, if you are away from home when you realize you need to print something, you can pick it up at the nearest library, which may be much closer than your house.
Printing at your library is accomplished through services known as printeron.net and printspots.com. You must know the unique web address or email address for your desired library branch. They are different for each of 17 branch libraries. If in doubt, contact your local library. Here are a few sample links.
If you print via email, give your email a descriptive subject line so that you can recognize which print job(s) you want to pay for and print. When you go to pick up your print job, look for the coin operated machine like this.
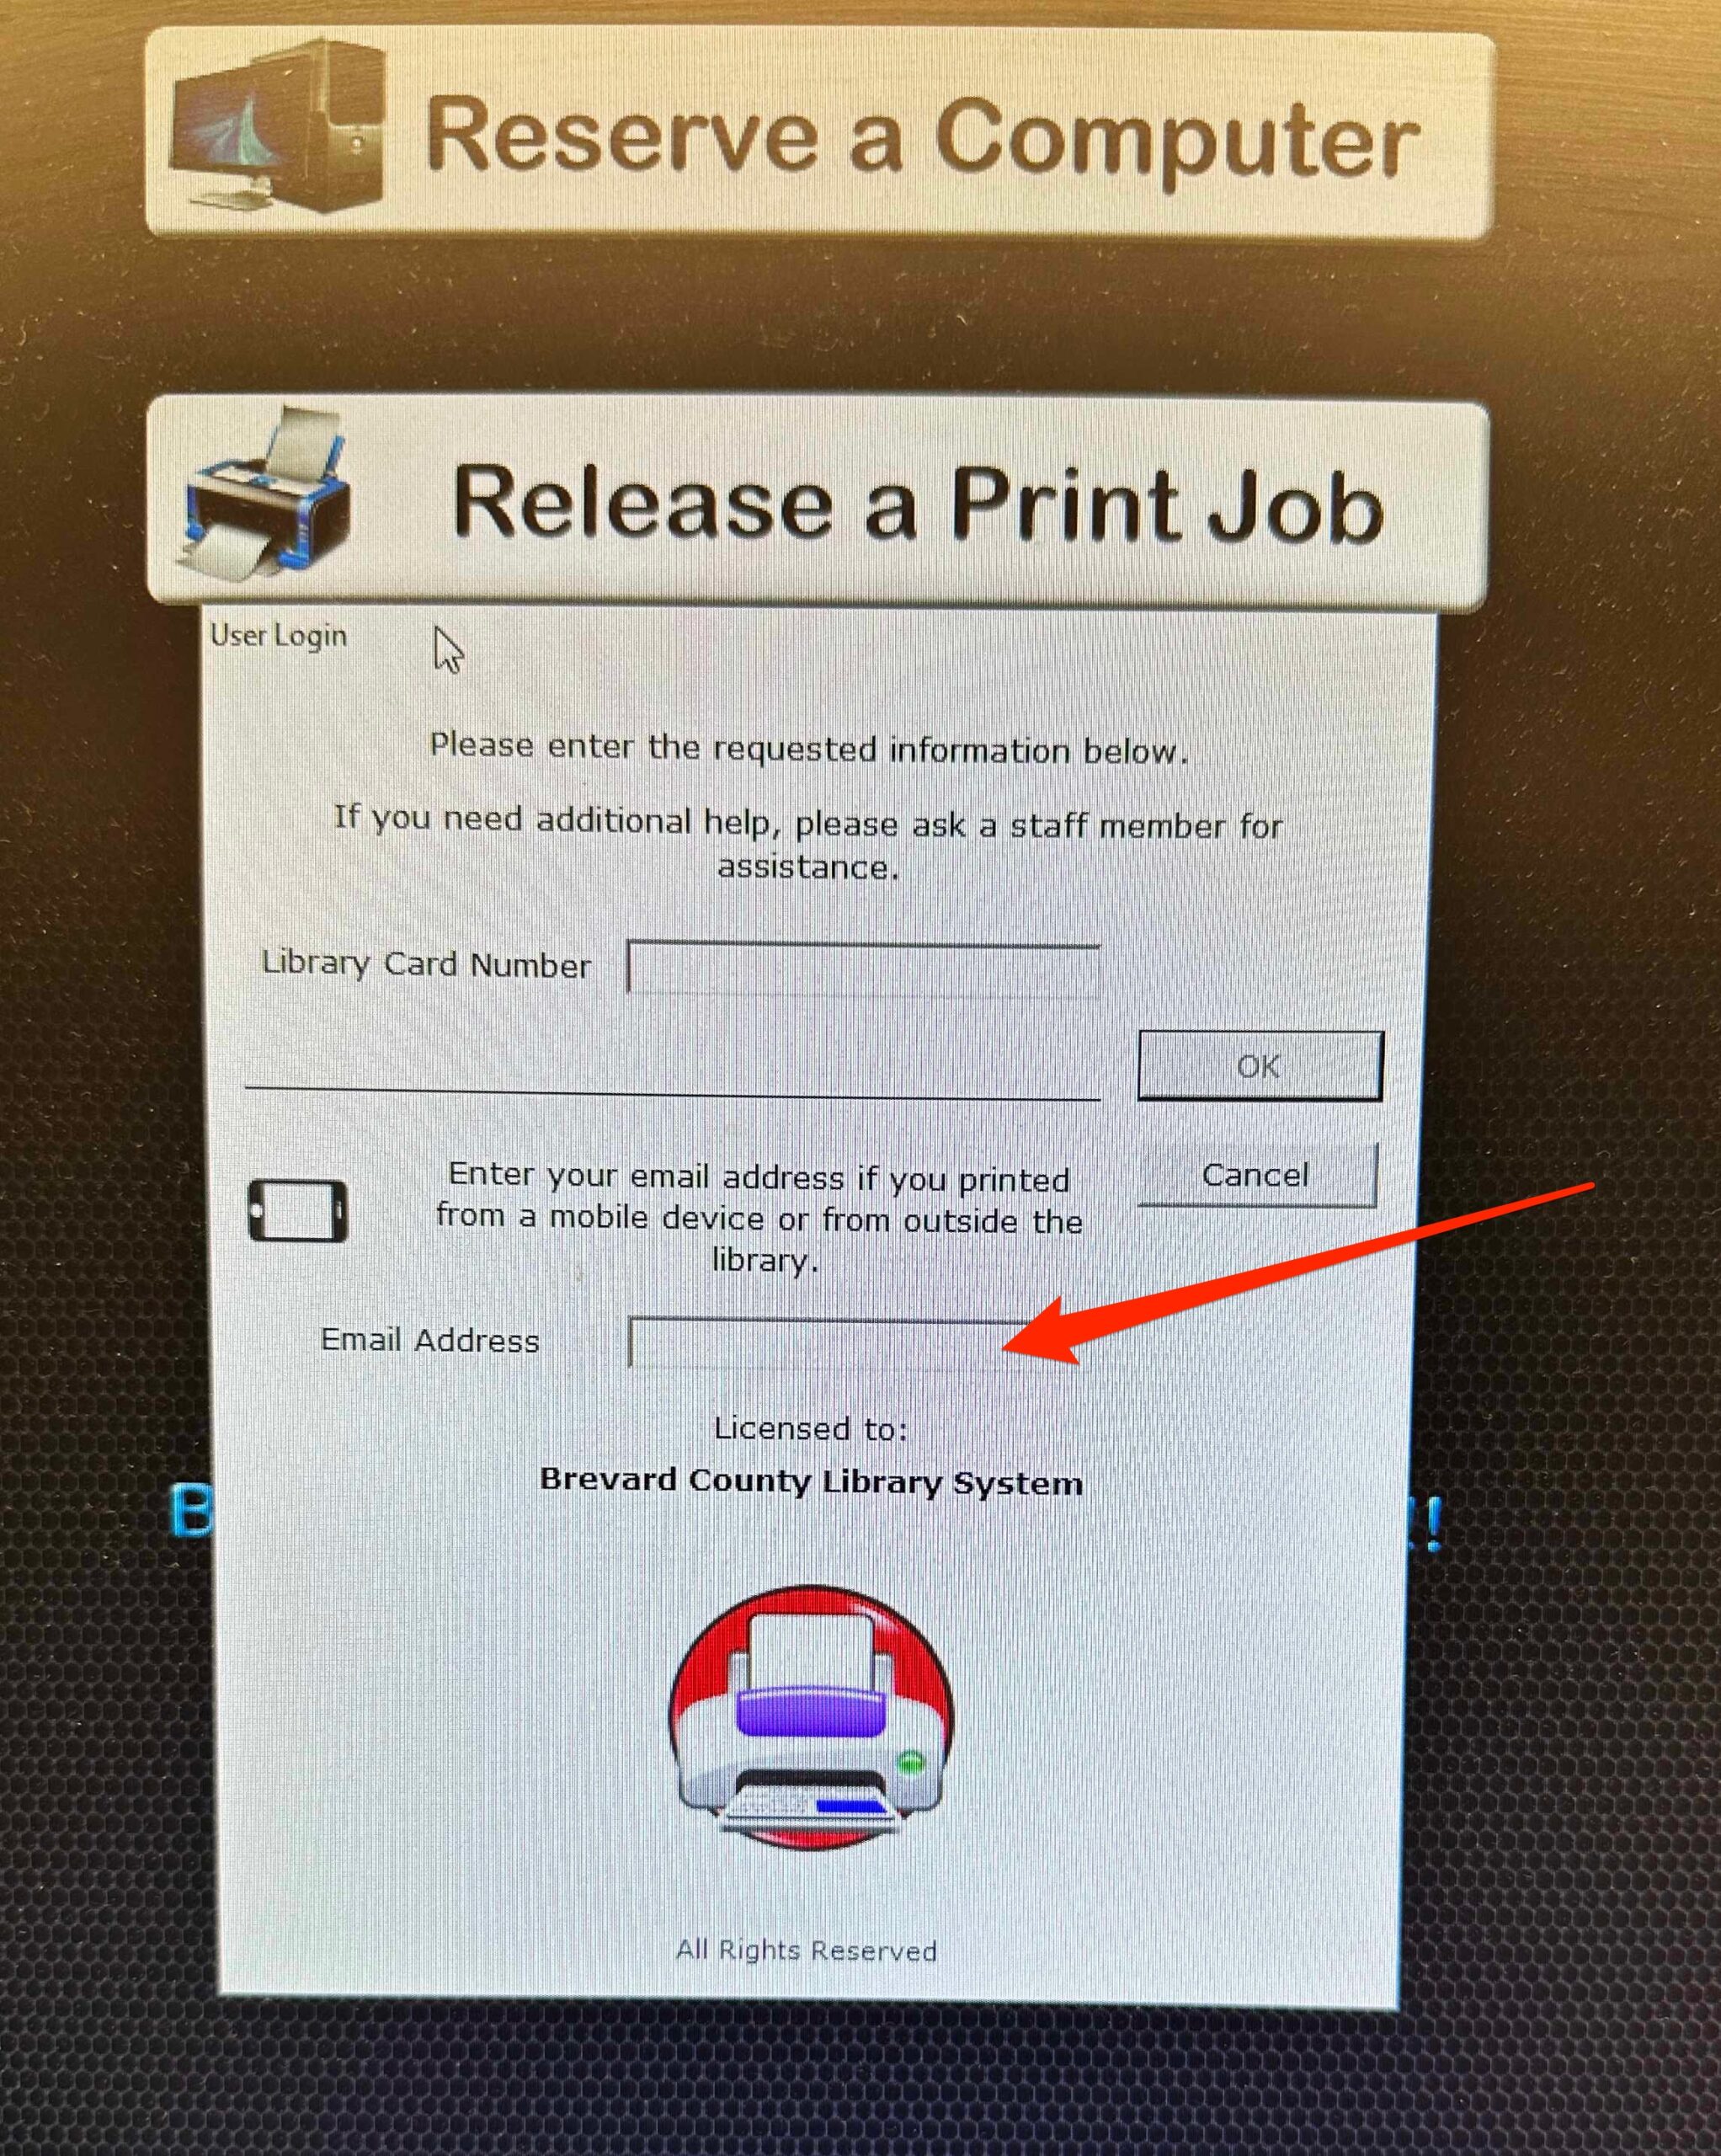
This should be next to a computer that you can use to select the job to be printed.
To begin, enter your email address. I did not have to enter a library card number to print. You can pay for your print either using coins and bills in the machine, or you can pay the reference librarian. If you are already at the library when you send the print job, just be aware that it does take a few minutes for the print job to be ready.
Libby and Hoopla Media Apps
Our libraries also offer two nice services that allow you free access to ebooks, audiobooks, movies and TV shows for free on your device. You can use these from your computer, iPad, iPhone or Apple TV. Hoopla is better for TV, Libby is for books. These are connected to your Brevard County Library account, so you need a (free) library card.
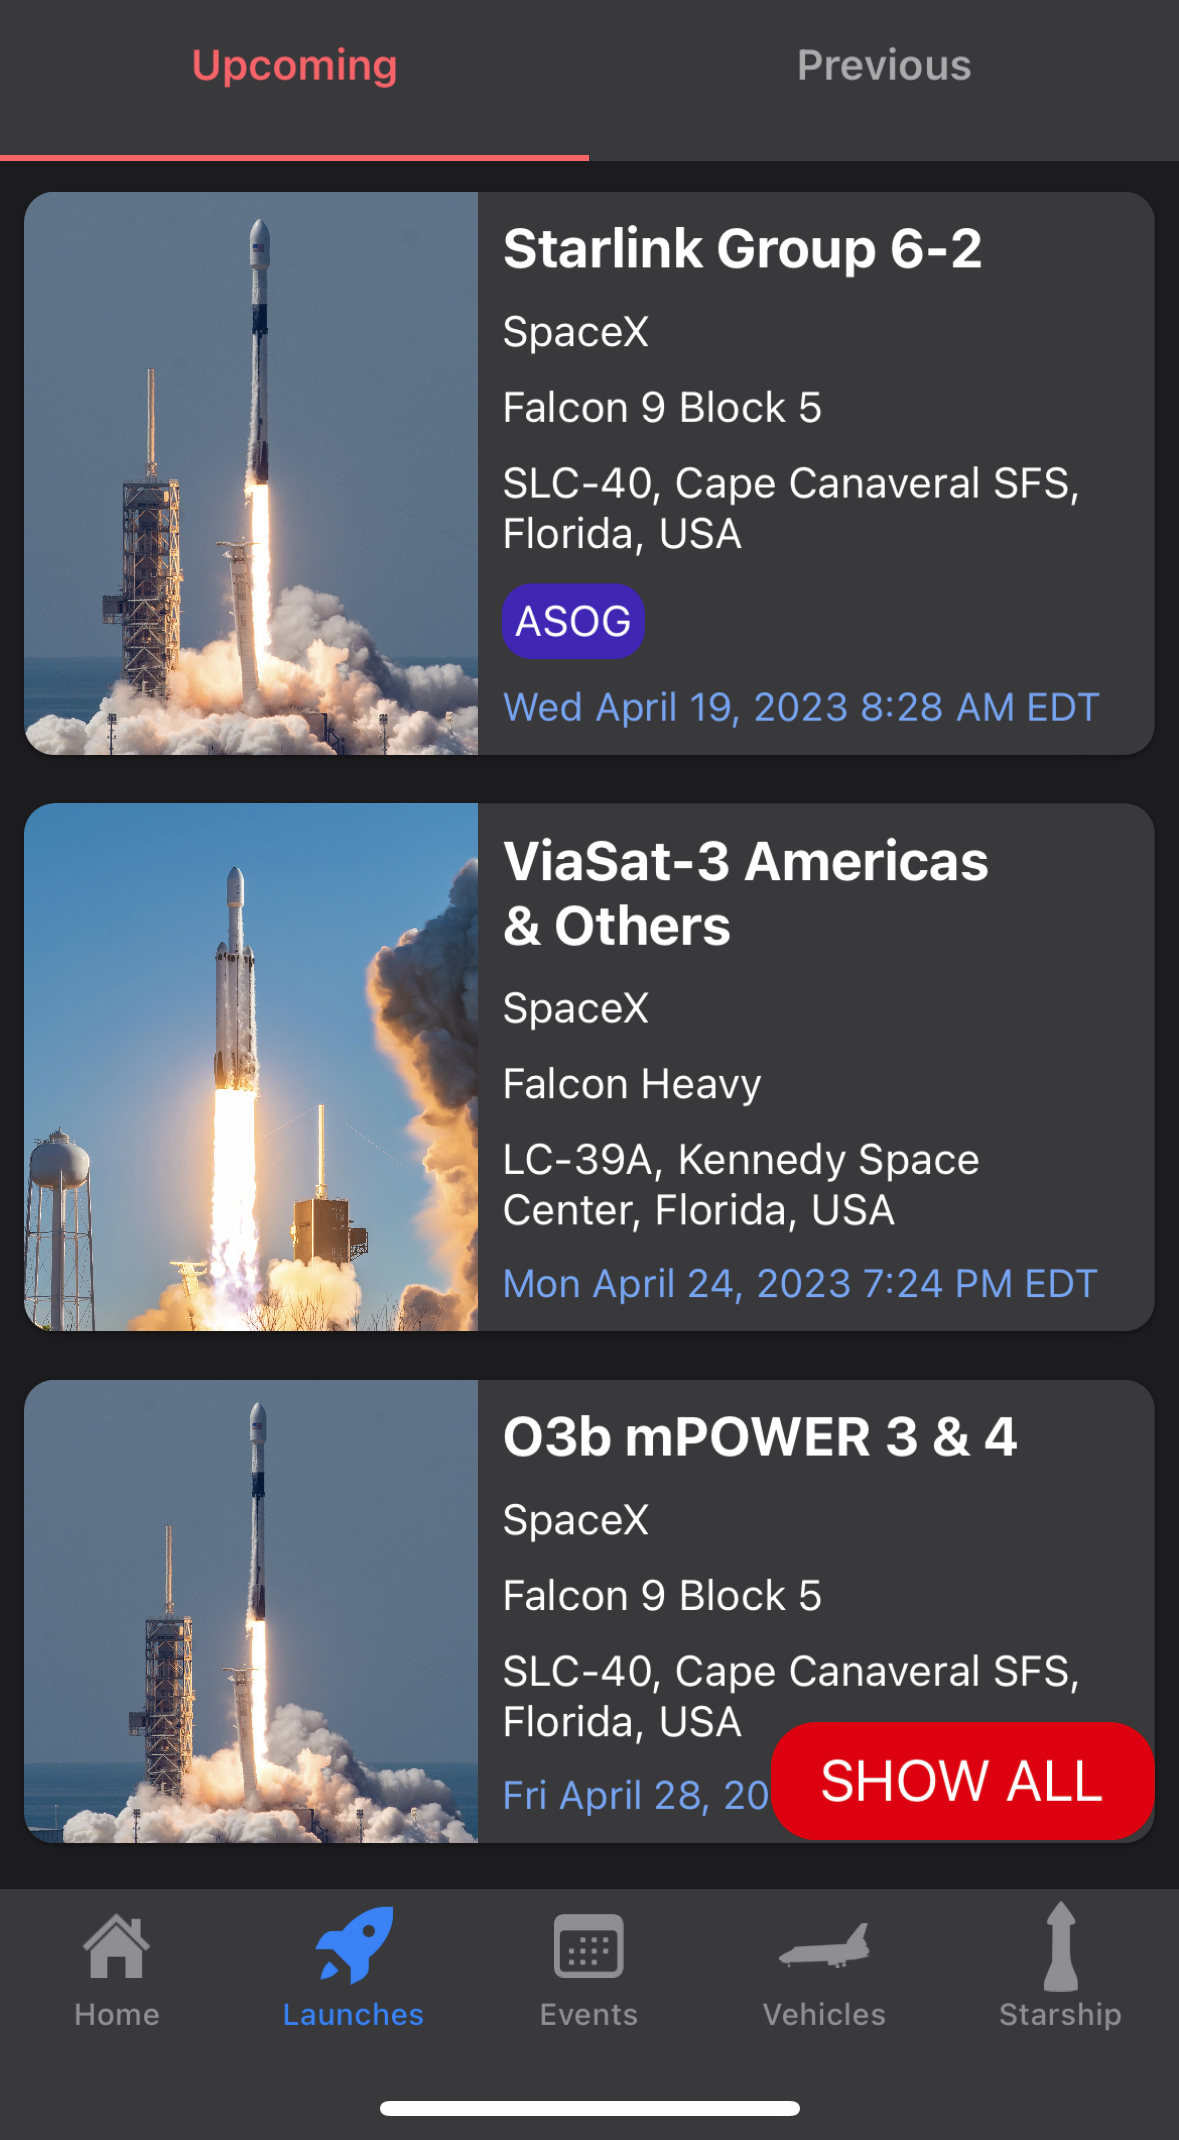
I highly recommend the Next Spaceflight app. Because it lists upcoming launches from all over the world, you should probably set your favorite launch location(s) to Florida, and whatever else interests you in order not to be overwhelmed by distant launches.
Spectrum News 13 has a Brevard County page. That’s useful to everyone. If you are a Spectrum TV subscriber, you may find the Spectrum News App useful. There are iPhone, iPad and Apple TV versions.
The Brevard edition of Hometown News is a small, but nice local paper. Their “E-Editions” show an image of the print version of the paper. From their homepage you can sign up for daily news emails.
Text Alerts from the Brevard County Emergency Operations Center – You can sign up for alerts which you can opt to receive by email, text or phone. These alerts include severe weather, fires, rocket launches, boil water notices, law enforcement alerts, etc.
The Florida 511 page might be useful to people who drive a lot. This site has more to it than you might expect from a state agency. You can create a free account, and set up alerts for various specific traffic situations. For instance, you can ask for notifications when traffic is unusually slow on particular routes, on particular days of the week and at specific times. If there is an incident, construction zone, road closure or unusual congestion affecting your route you will be notified by text or email. The site only handles routes involving Interstates or major highways.
Nixle Public Safety Alerts – Nixle.com handles public safety alerts for many cities and counties in the US. You don’t need to create an account. To sign up for alerts, text your zip code to 888777.
Maps and Photographic Views
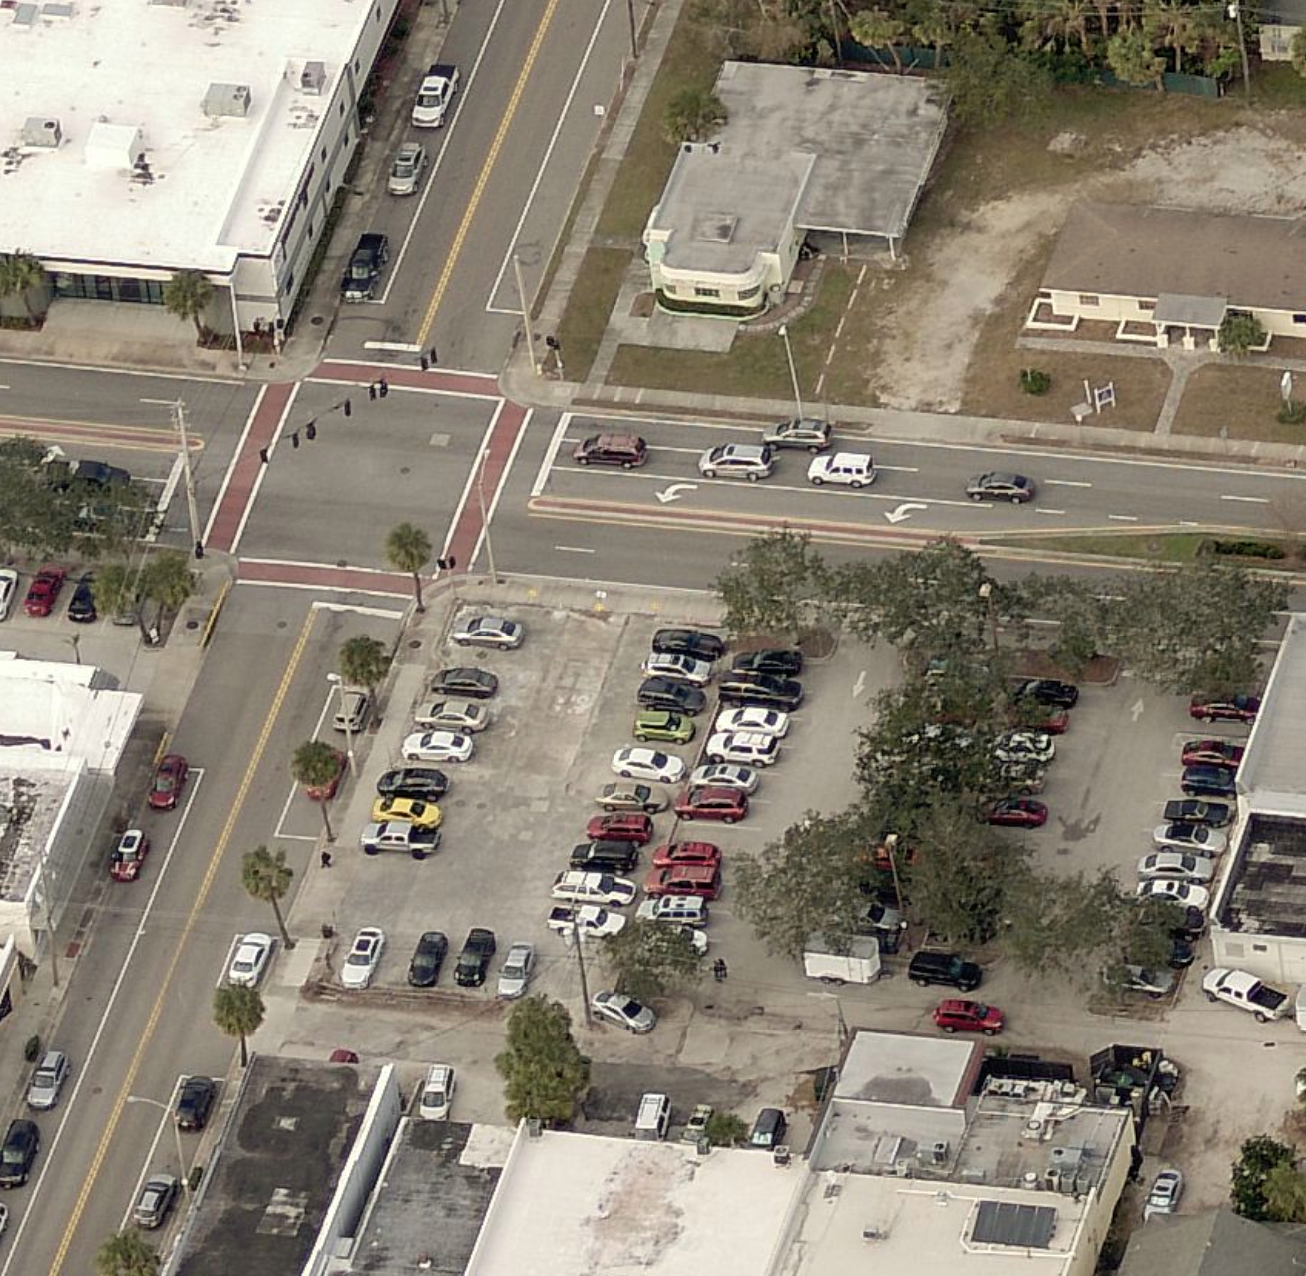
The Brevard County Property Appraiser’s Office has a lot of information which might be interesting to homeowners, home buyers and sellers. I was very impressed with their Map View page, especially Eagle View. You can take a look at any property in Brevard County from various angles, and going back in time as far as 2007. The image resolution is much better than you would get from satellite coverage from Google Maps, for instance.
The Hotel Melby in 2023.The same location in 2018 was a parking lot.
WiFi Hotspots
Publix, Home Depot, McDonalds, Brevard Public Libraries and many other businesses have free WiFi hotspots. Quality and convenience varies. Publix and Home Depot are public guest networks, with no password required. Once you have connected your phone to one of these, it will automatically be used next time you are in range. The Brevard Libraries use a captive portal design, where you must visit a sign-in page each time you connect. Even though no password is required, this creates a lot of friction and makes the network less useful.
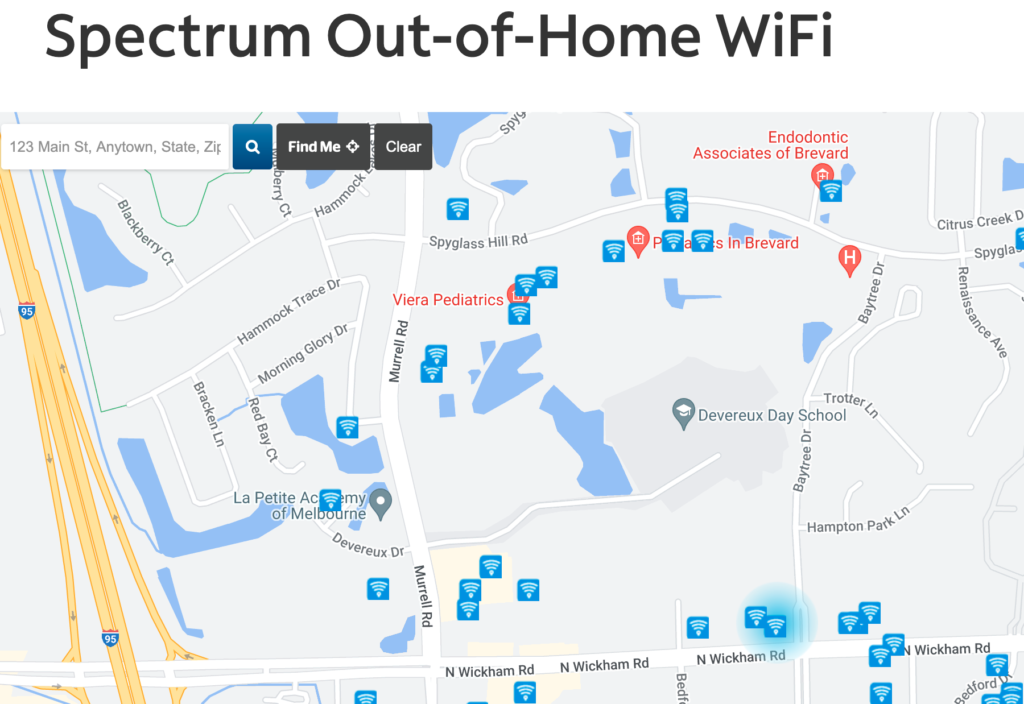
If you are a Spectrum Internet or Mobile customer, you can use their network of thousands of WiFi hotspots around the country. They have plenty in popular locations here in Brevard. You can check Spectrum’s WiFi map here.
Spectrum’s network includes WiFi networks named Spectrum, Spectrum Free Trial and Spectrum Mobile.
You can connect automatically to Spectrum hotspots if you use the My Spectrum App to install the Spectrum Config Profile. The profile gives your phone a list of WiFi networks to connect to automatically, and provides your credentials automatically, so you don’t need to log in each time.
You can also log in to the WiFi access points each time, which is obviously less convenient. The trick to logging into the App, or logging into the Spectrum access points is to use the correct username and password. You may have more than one. You want to use your account password — the one you use for billing purposes. This might be identified as a Spectrum or Brighthouse “My Services” account, or “Account Partner”. Your Spectrum email account and password is probably not the right one. Once logged into the App, you can turn on Face ID or Touch ID, so you can easily log in again.
The profile that the App installs contains certificate information which expires every six months or so. You will need to occasionally delete the old profile and install a new one from the App. They are not automatically updated.
If you have photographs taken before you started using a digital camera, probably before about 2005, those photos may never have been digitized and are not available for viewing and sharing in your on-line digital world.
What’s your best strategy for getting those digitized and into your computer or phone?
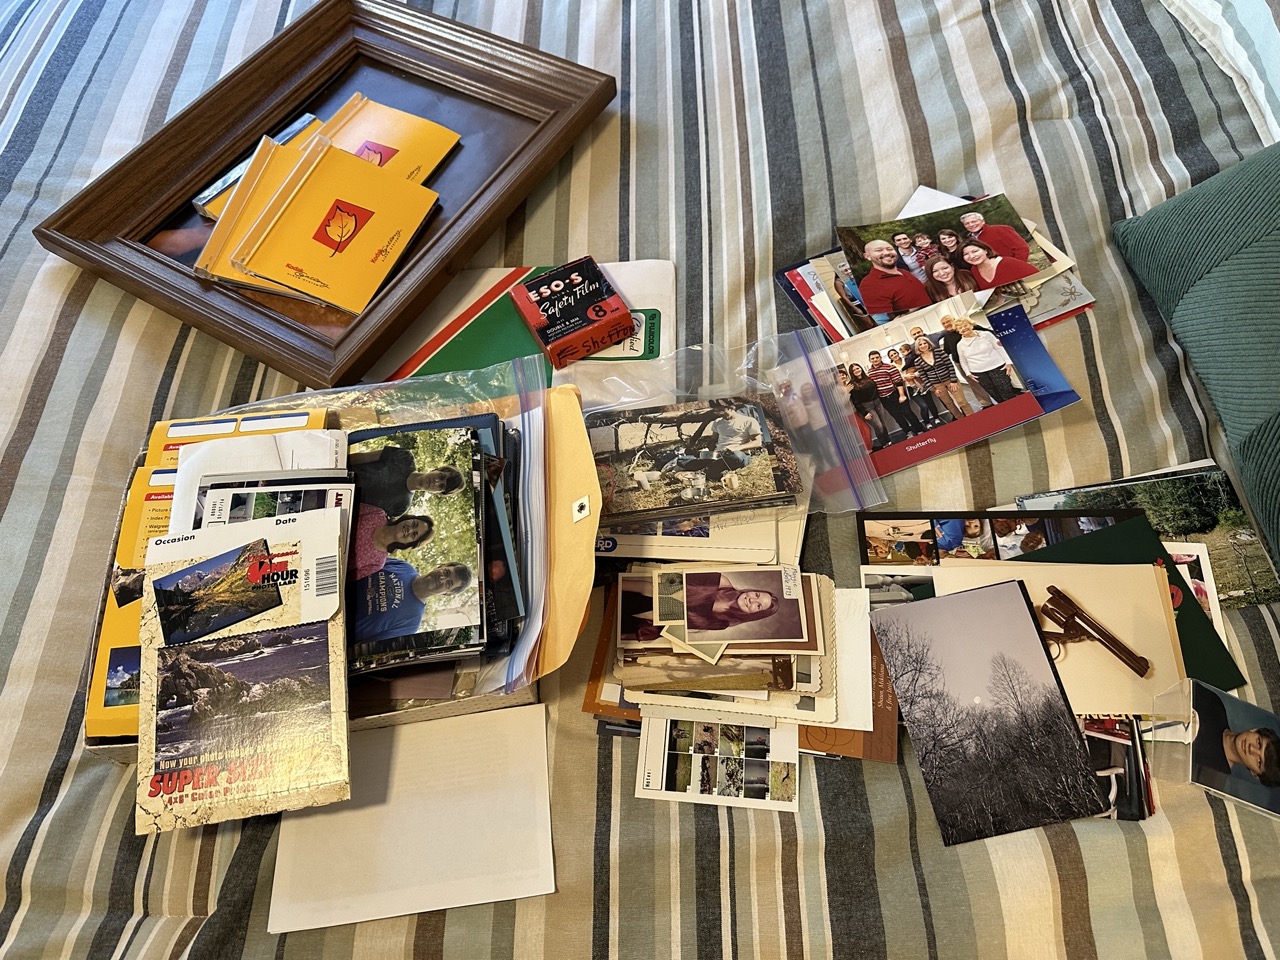
Pile of photos
This Could Take a While
Even the small pile of pictures above contains over a hundred photographs. You should expect that digitizing them all will take a while, even in the best case.
Service, Camera or Flatbed Scanner?
There are three basic strategies:
1.) Send them out to a service to be digitized
2.) Digitize them with a flatbed scanner
3.) Digitize them using your iPhone camera or another digital camera
Digitizing services can be expensive but are worthy of serious consideration. They can save you a lot of time and frustration. Because they charge by the photo, you should be selective as to which photos you send them. This is by far the fastest method. If you have a lot of photos and don’t want to spend years working on them, just get your wallet out.
A flatbed scanner gives high-quality results and you are in charge of the quality, the cropping and everything else. You’ll get the best results that your originals, your equipment and your abilities allow.
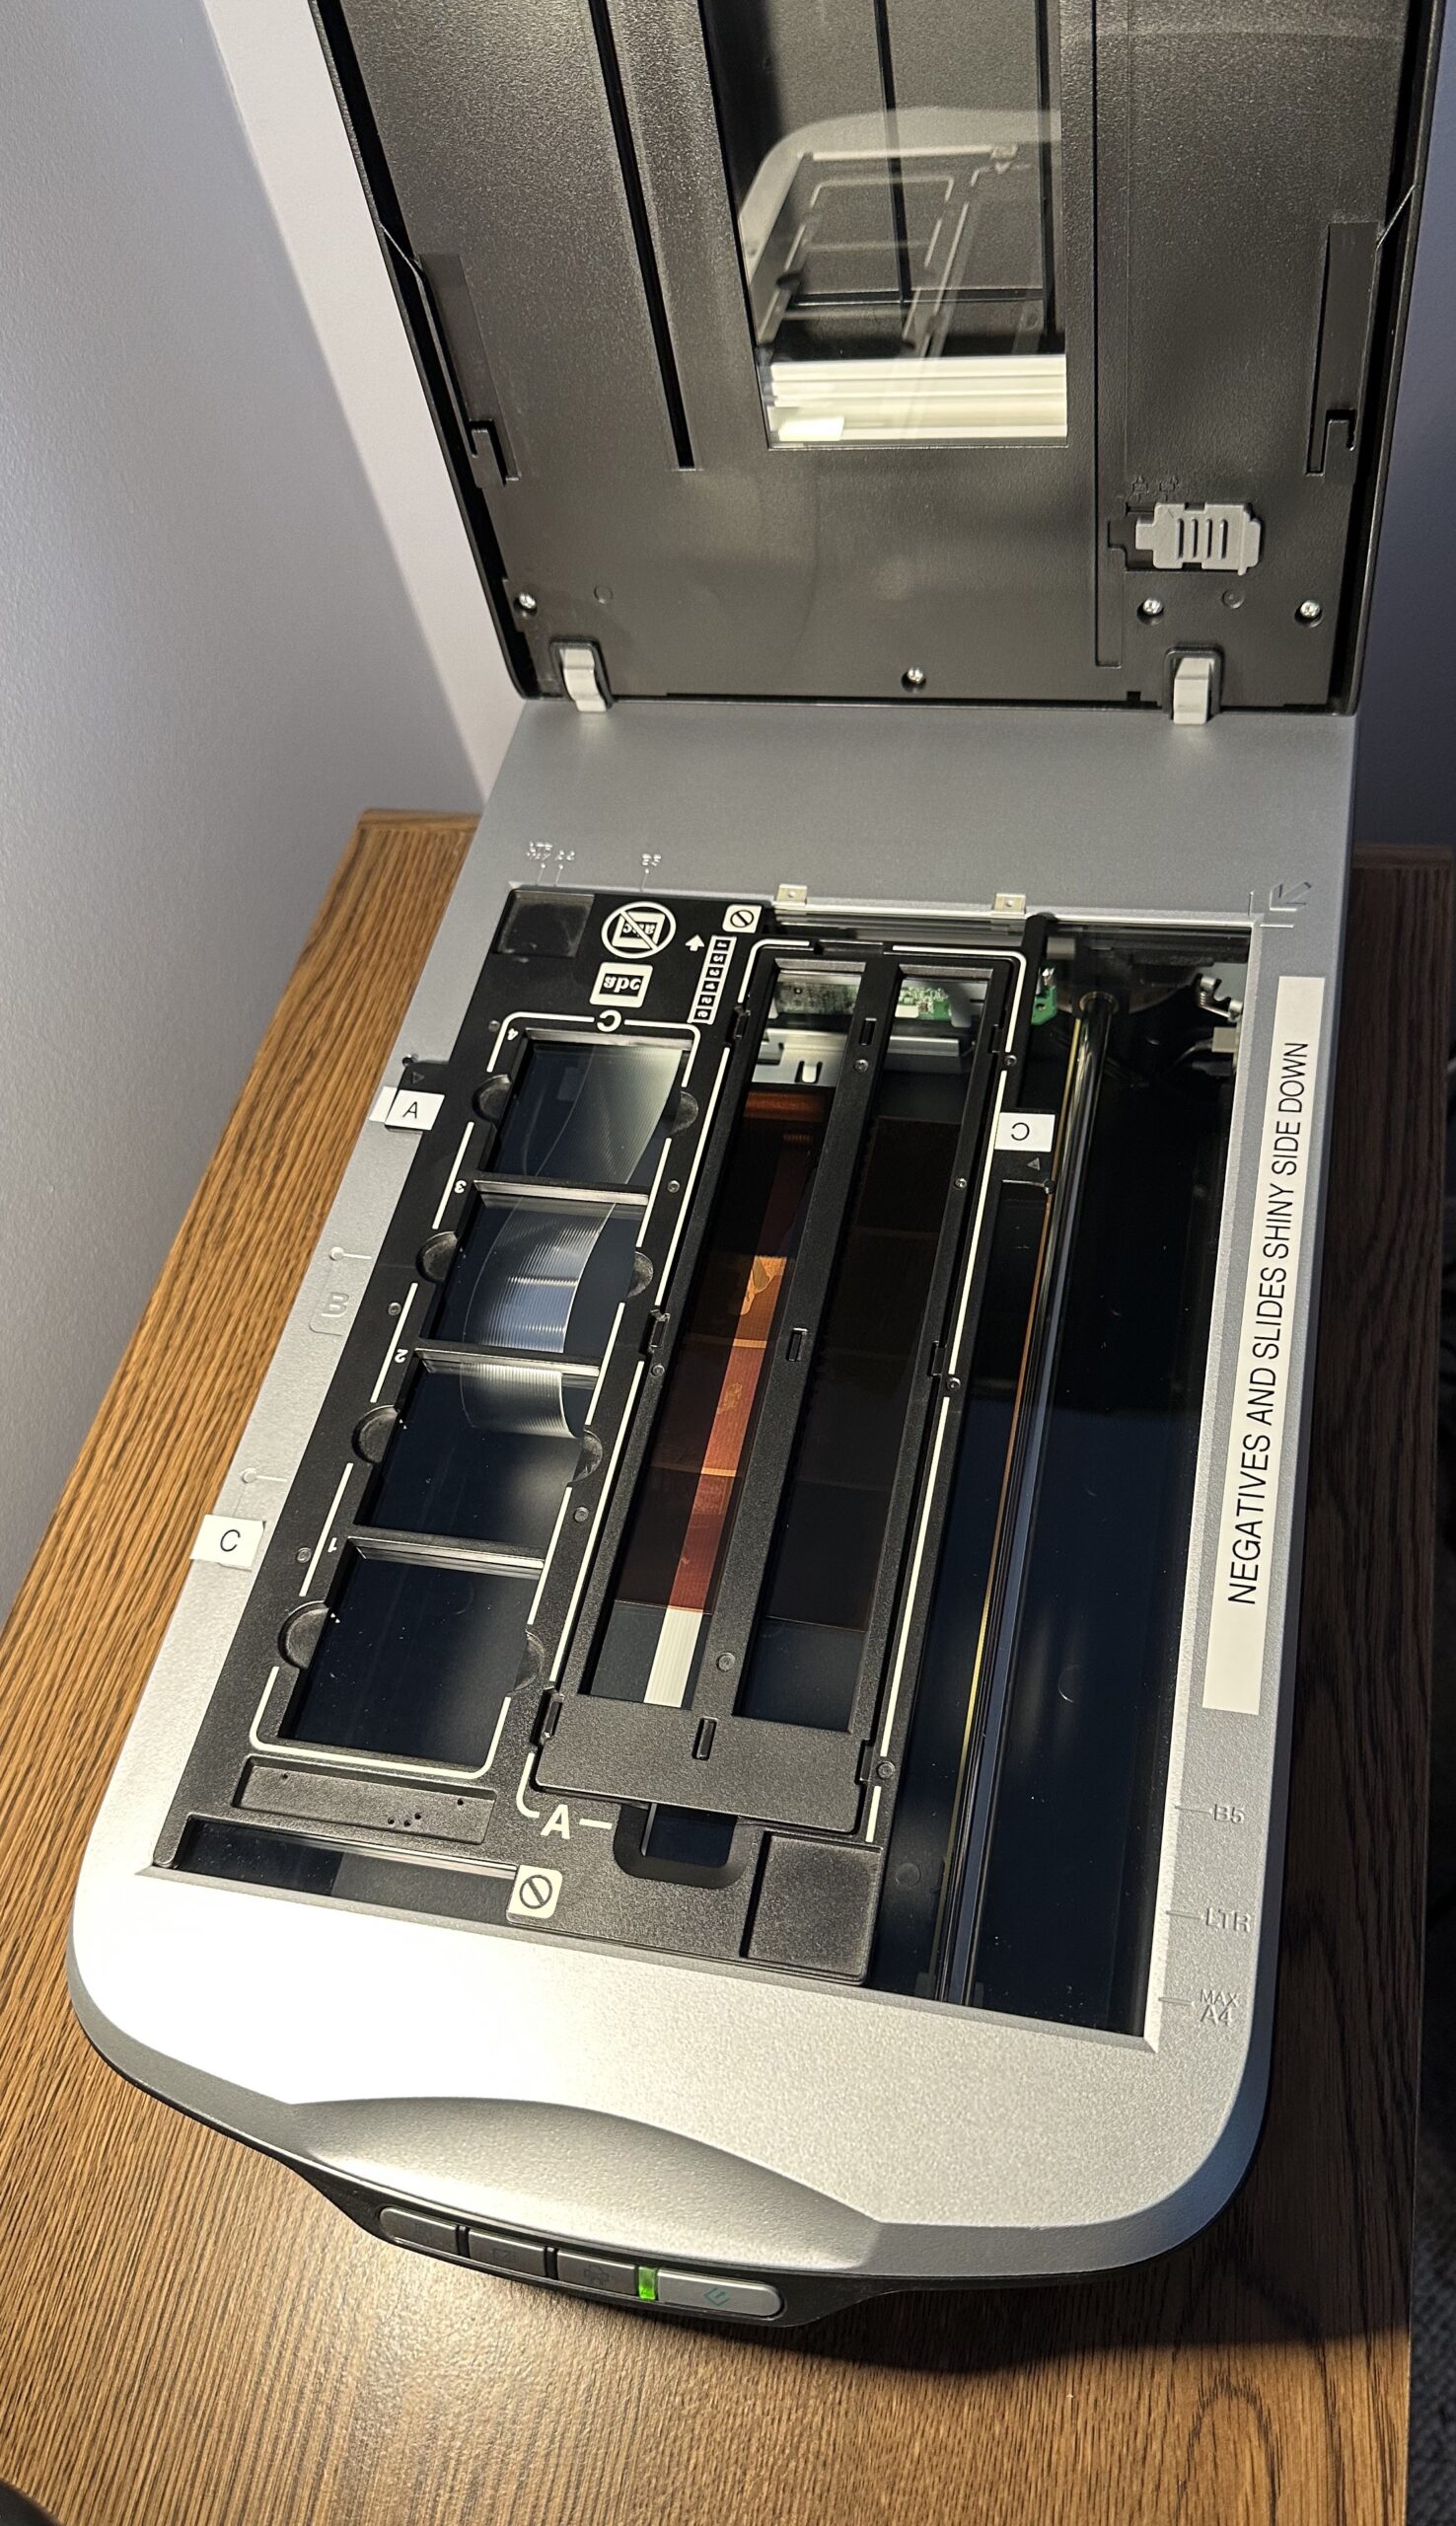
A scanner with a transparency feature allows you to also scan slides and negatives.
Flatbed Scanner Ready to Scan Negatives
Using your phone or a camera to “scan” or take a photograph of the original can produce reasonably high quality copies. This method has some advantages you should consider:
It’s faster than a scanner
Can digitize large or awkward photos that don’t fit on the scanner
Can digitize photos in a frame
You can digitize while traveling without a flatbed scanner
Can produce better results for originals printed on matte paper
Works if you don’t own a computer
Using a phone or camera can also produce poor results unless you take the time to get proper lighting.
Organize – Before and After
As you take your originals out of the albums or envelopes to be digitized, look for context. Who’s in the photos? Where were they taken? What was the date? You should write on the back of the originals for future reference. Don’t just write “grandmother”. That’s not very helpful. Maybe “Mrs. Mary Jane (Doe) Smith” would be better. Use a non-smearing ink pen that doesn’t require too much pressure to write. I like Bic Round Stic ball-point pens for this.
After digitizing a photo, write something on the back of the photo saying so, like “digitized in 2023”. This will keep you from wasting time or money scanning the same photo again.
Assign long meaningful file names to your photo files. If you give them meaningful names, you and your descendants might be able to find them later. VueScan will create files with a serial number like 2023-02-17-0007. This would be the seventh photo scanned on February 17, 2023. I keep those serial numbers as a suffix to my file names to avoid having multiple photos all with the same name. Suppose I have a bunch of photos of John Doe, all taken in 1999. If I name them “John Doe, 1999”, they would all have the same name which will cause problems when I try to put them into a folder together. But if they have a unique suffix, no problem.
Long file names are allowed, so take advantage of it.
The Best Way to Restore an Old Photograph is to Find a Better Original
Prioritize and Select
Take some time to find the best existing versions of your photos to digitize. That version may be a print, or a negative, or a slide. In the 2000s, some film development services included a CD-ROM with your photos on it. If you find one of those, you can save yourself a lot of time and trouble, although the CD images may not be high-resolution by today’s standards.
Prioritize slides. Slides are often photographic gold. Usually whoever was shooting slides had a nice camera and was a better-than-average photographer. Slides often haven’t been seen since the slide projector broke decades ago. So, there could be some nice surprises. And, if they have been stored in a closed box, they might be cleaner and in better shape than prints which might be torn, faded and dirty. Slide film often captures and preserves color better than print film.
Sort your photos so you are digitizing a batch of similar photos at once. It is easier if you don’t have to change your settings between photos. So, separate the black and white photos from the color photos, and the 3x5s from the 4x6s.
Be selective. Many of your photos are losers. Skip them. Digitize the best versions of each series.
Sample Workflow
Scan with VueScan to TIF files in Downloads Folder
Add descriptive filenames
Crop, adjust and clean-up in Affinity Photo
Export final photos as JPG into Download Folder
Copy final JPGs to preferred storage folder(s)
Delete temporary TIFs and JPGs from Downloads
(you do have a backup plan, right?)
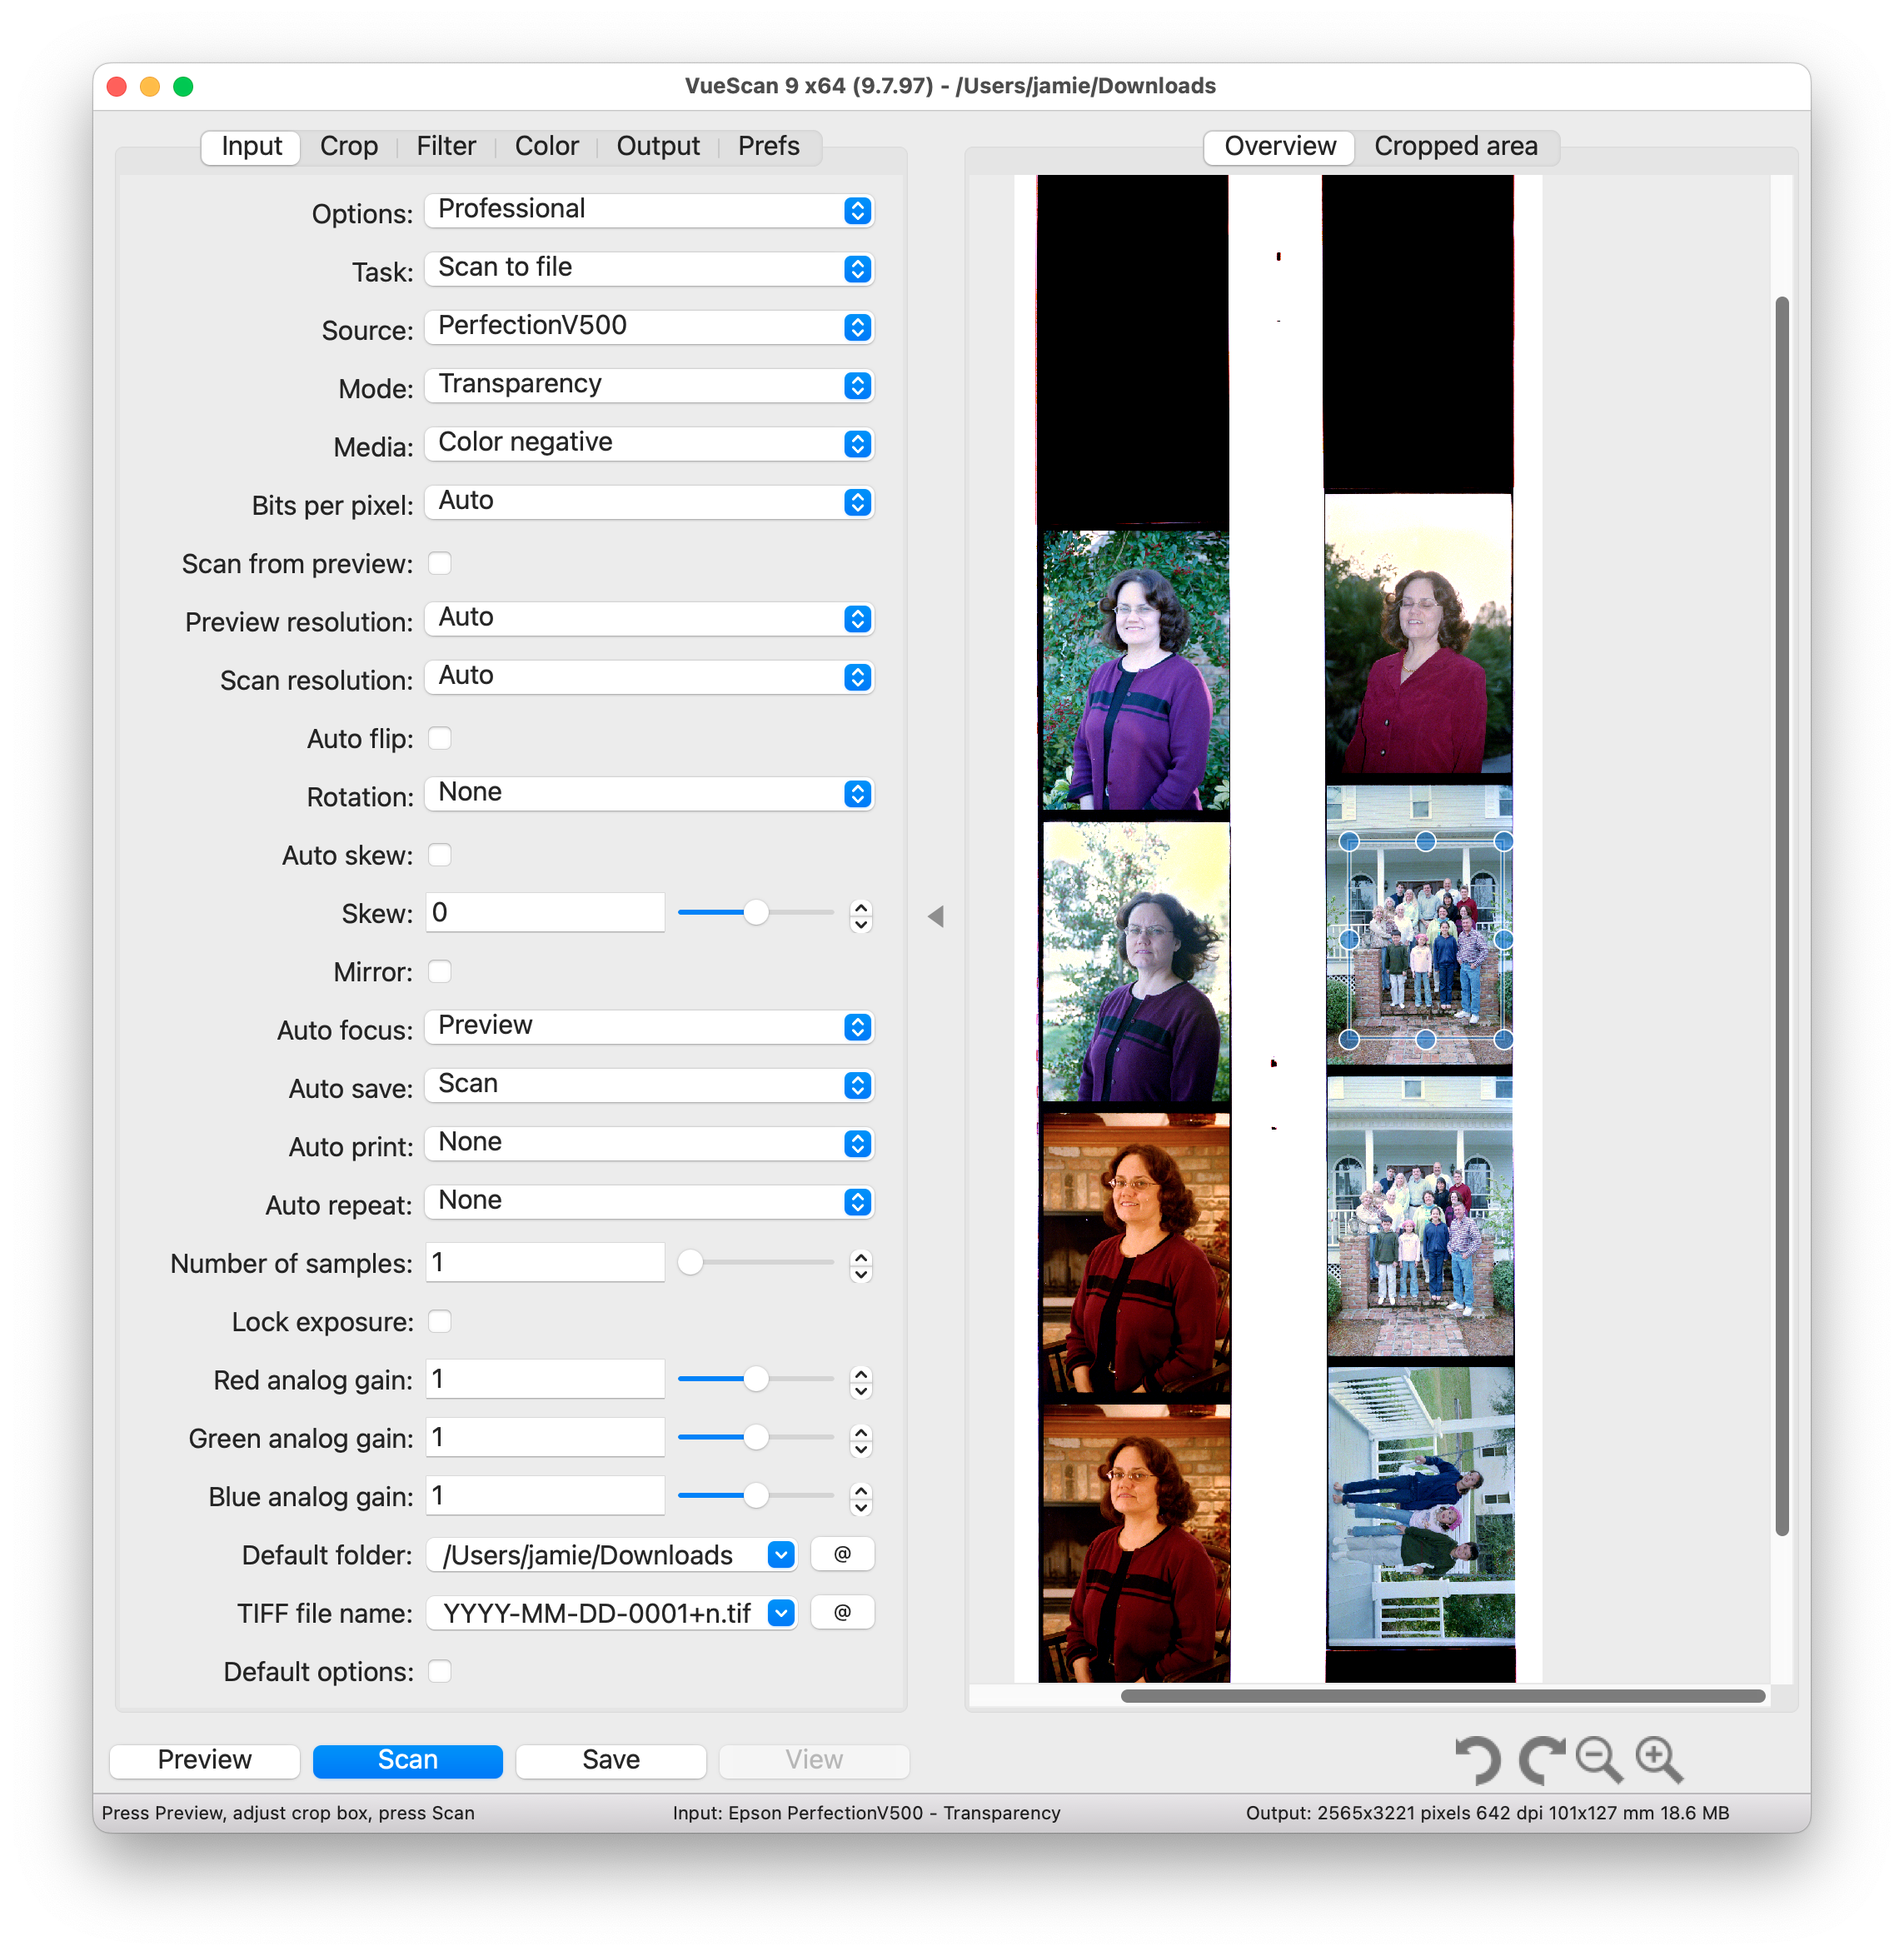
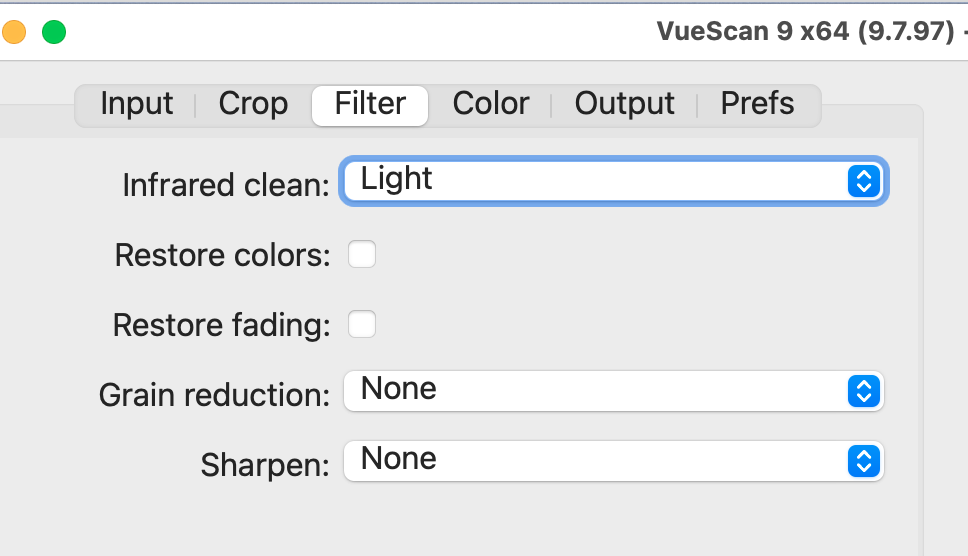
VueScan’s Complex “Professional” Options Scanning NegativesUseful Filter Options in VueScan
The Infrared clean option is good on negatives and slides. It largely eliminates dust. It does require an extra scan step, so takes twice as long to scan. I think it’s worth it for almost all slides and negatives. A similar option is available in other software.
Restore colors and Restore fading can be amazing for old prints. You have to try these to see if they help your specific photos or not. The Restore colors option does a better job than I have been able to do with photo editing software.
Image Capture Screen and Options
Above is the Image Capture software included with MacOS. It is easy to use, and automatically identifies multiple images to be scanned.
Tips for Digitizing with your phone or camera
Find good lighting. Indirect sky light is best, but avoid direct sun. A shady porch where lots of sky is visible is ideal.
If you are setting up your own lights try to position them off to each side of the photo shining at a 45° angle. If you only have one, that’s okay, but one on each side is better.
Don’t use flash unless:
You have an off-camera flash
You are using the PhotoScan App or similar with anti-glare feature
Epson makes good scanners, but their software support for MacOS is pretty terrible. You should plan on using 3rd party scanning software (below) eventually. The Epson scanning software is pretty nice, but whether or not it will work on any given version of MacOS is a gamble.
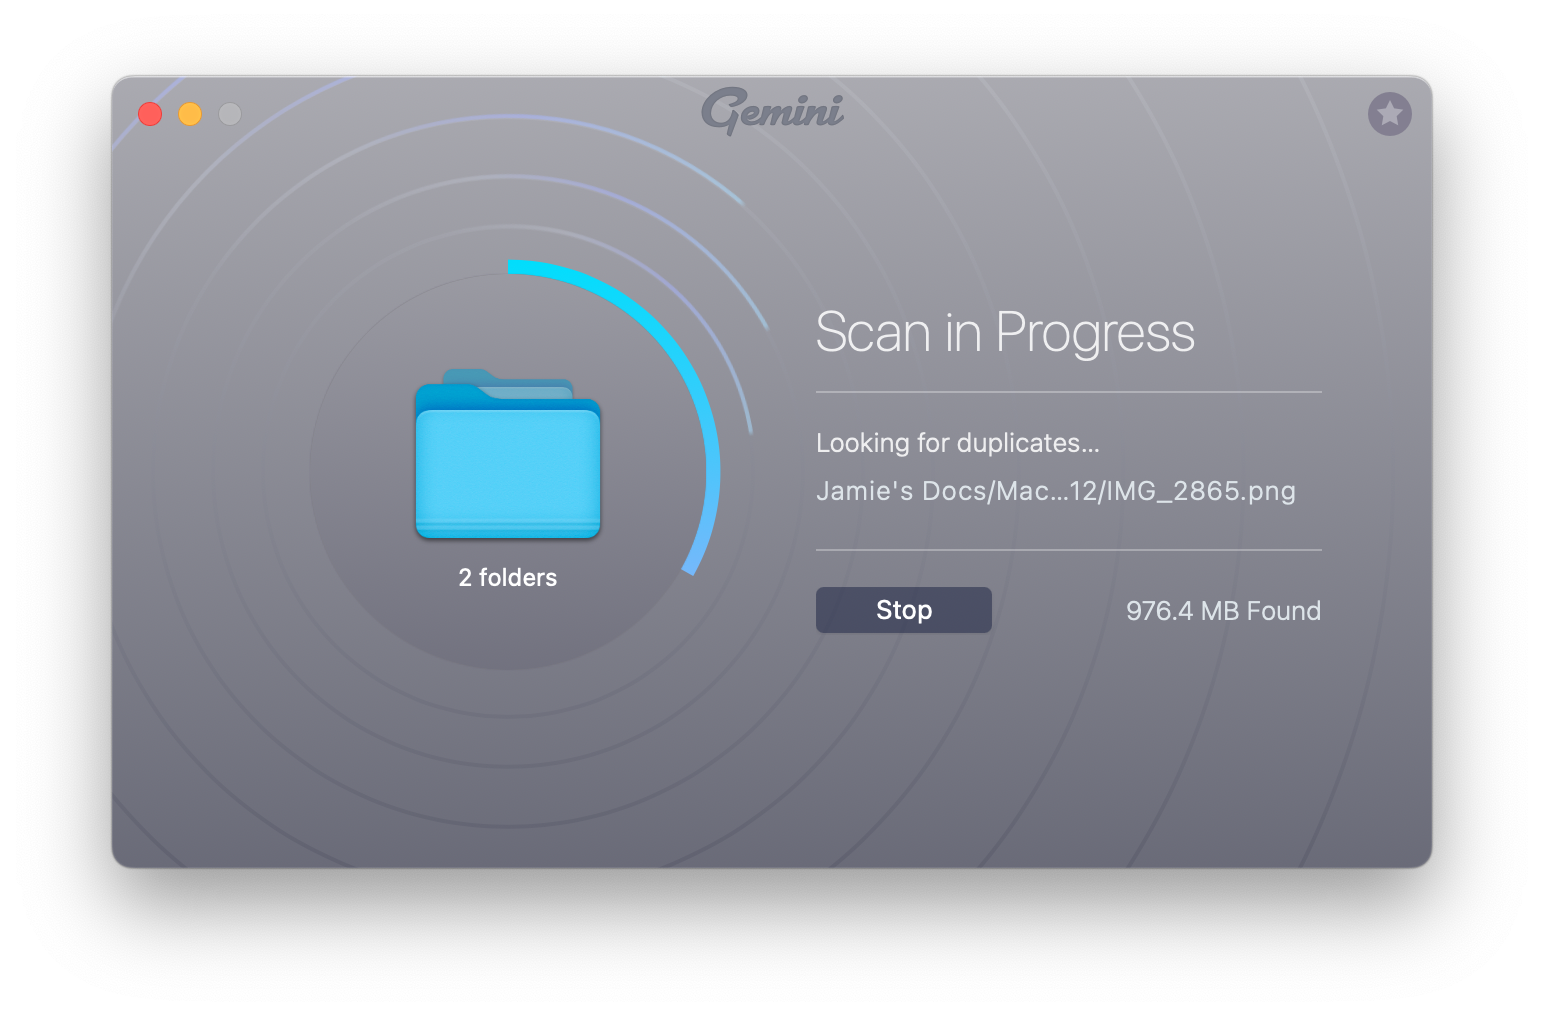
You tell Gemini which folder or folders you want it to scan, including your Photo library. It scans them pretty darn fast.
Scanning Your Files
It finds duplicate files of all kinds, not just photos.
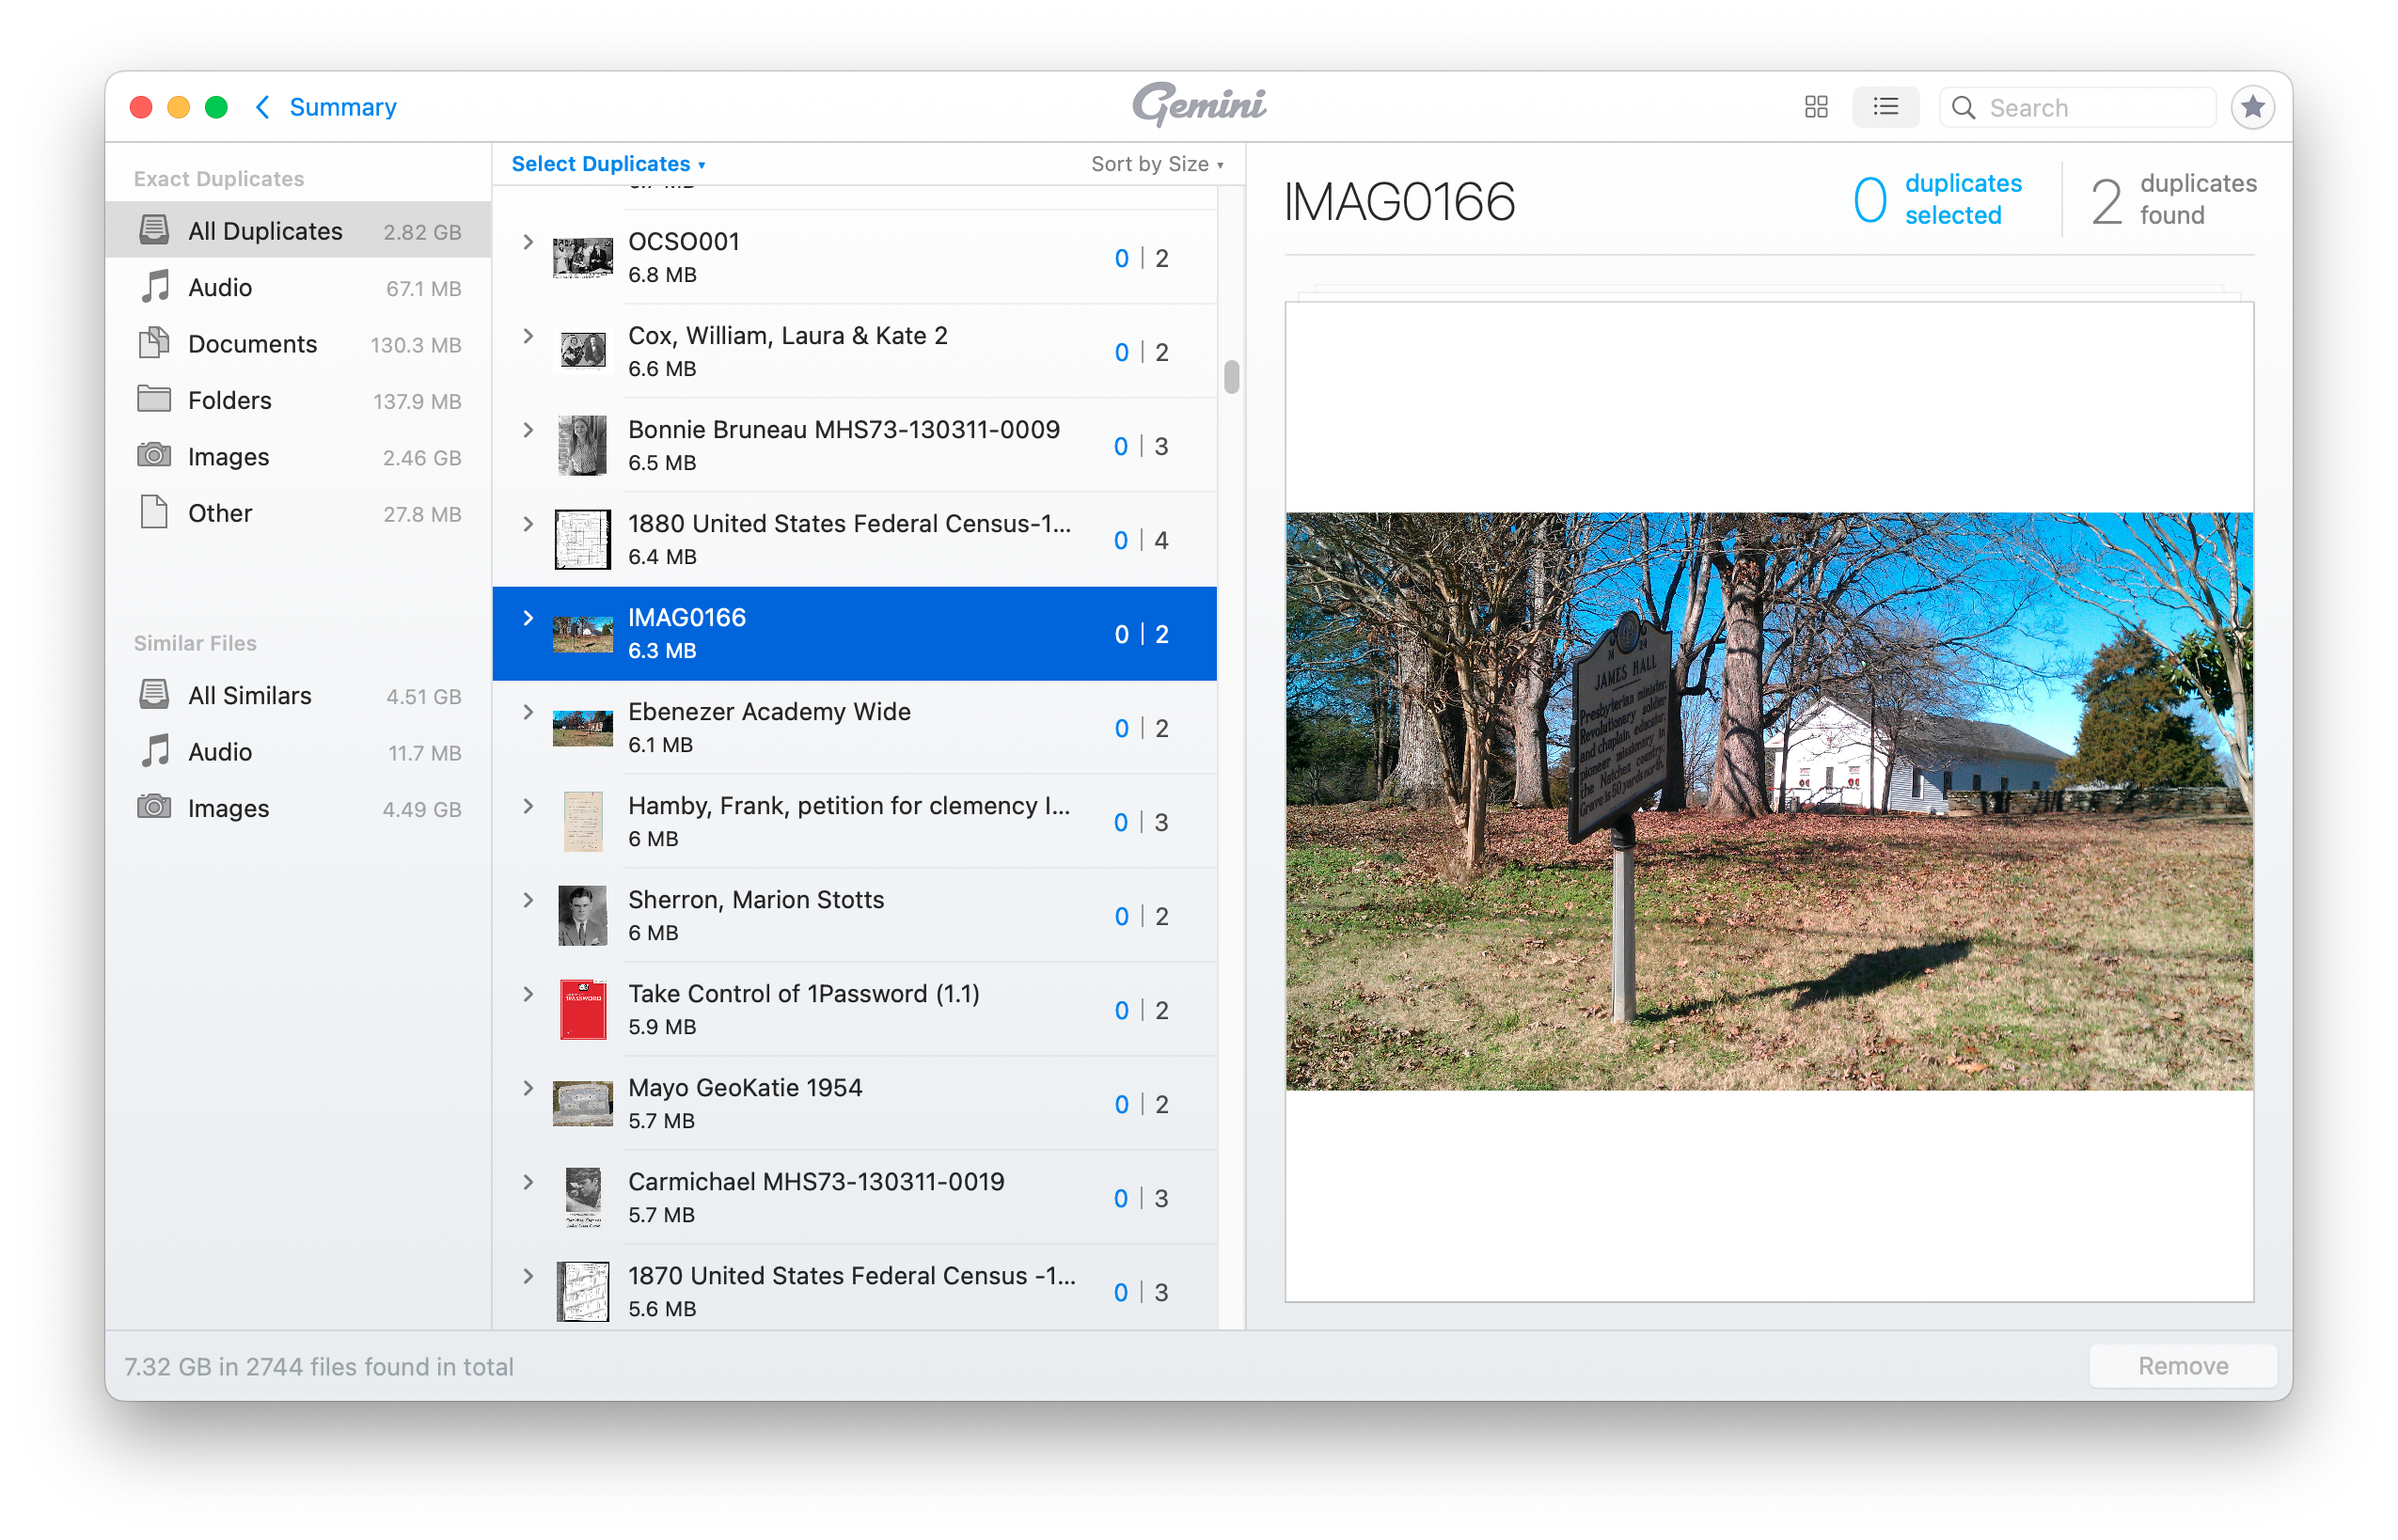
Gemini’s Main Screen with List of Duplicates
You can sort and search these in various ways. You can then select groups of the duplicates for deletion.
Details of a Duplicated Photo
You should be very cautious about deleting duplicates en masse. The duplicates may be in folders belonging to specific applications which expect to find them in those locations. Or, you may want to have duplicates in specific locations for your own organizational purposes.
It probably isn’t worthwhile trying to remove all duplicates. If you can find a few large files that can be deleted, or find entire folders that you no longer need, you may recover a lot of space with a minimum of effort and risk.
Gemini 2 is available on a subscription basis starting at $19.95 per year, or an outright purchase starting at $44.95. It is also available through a subscription to SetApp (also from MacPaw).
In the coming months, you will probably change how you sign on to your favorite web sites.
Passkey support is coming to your devices and web sites to provide a sign-on process that is both more secure and more convenient than the familiar but annoying username and password system.
Passkeys were developed and supported jointly by Google, Apple and Microsoft through the FIDO Alliance.
Passkeys are superficially similar to the Logon with Apple or Logon with Google buttons you may have seen on some web sites. Passkeys, however, represent a single, unified standard logon mechanism that a web site can implement once, which then supports all platforms. The buy-in from major tech companies means that passkeys will probably be widely adopted.
This short video from iThemes (2:58) gives a quick overview of Passkeys. Although it is specific to WordPress and iThemes Pro, most of what is described is general-purpose.
To use passkeys to logon to a site, passkeys must be supported by both the web site and by your device. For a device to fully support passkeys, it must have biometric authentication. On Apple devices, that means Touch ID or Face ID.
However, you can use your phone (which has Touch ID or Face ID) to logon to a web site on a computer that lacks biometric authentication. You will simply scan a QR code presented by the site with your phone, and passkeys can log you in.
Biometric authentication is used only to identify you to your device. Your face or fingerprint is never transmitted to the website or outside your device.
To sign in, you will first enter your username or email address as usual. But, instead of entering a password, you will simply click Login with Passkeys, and your device will log you in securely. Since you don’t have a password, it can’t be stolen, either from you, or from the web site.
Once you have set up a passkey for a site on one of your Apple devices, it will be automatically available on your other Apple devices through iCloud. Remember, that it can only work on newer devices that have Touch ID or FaceID.
At present, there is no way to share passkeys between platforms, so your Passkeys created on an Apple device won’t easily transfer to your Microsoft Windows PC, or vice versa.
PassKeys is already supported in current versions of iOS (iOS 16.x) and MacOS 13 (Ventura). Microsoft’s implementation of passkeys is part of “Windows Hello”.
If you want to try passkeys yourself, there is a demonstration web site which lets you try creating a passkey and logging on with it.
Password Managers
Whatever password manager you are using, don’t get rid of it yet. Some sites will continue to use passwords. Passkeys will work in conjunction with Apple’s own password manager, Keychain. The popular password managers, Bitwarden and 1Password will probably have some sort of support for passkeys in the future.
If you are in the habit of writing your passwords down in a little black book, all you will need to record is the name of the website, your username or email, and “Use passkeys”. Anyone looking at that book would not be able to logon as you, because they won’t have your device or your face or fingerprint.
The same (lack of) information is probably what would be recorded in a password manager app. Again, it’s nice that there is no password for anyone to steal.
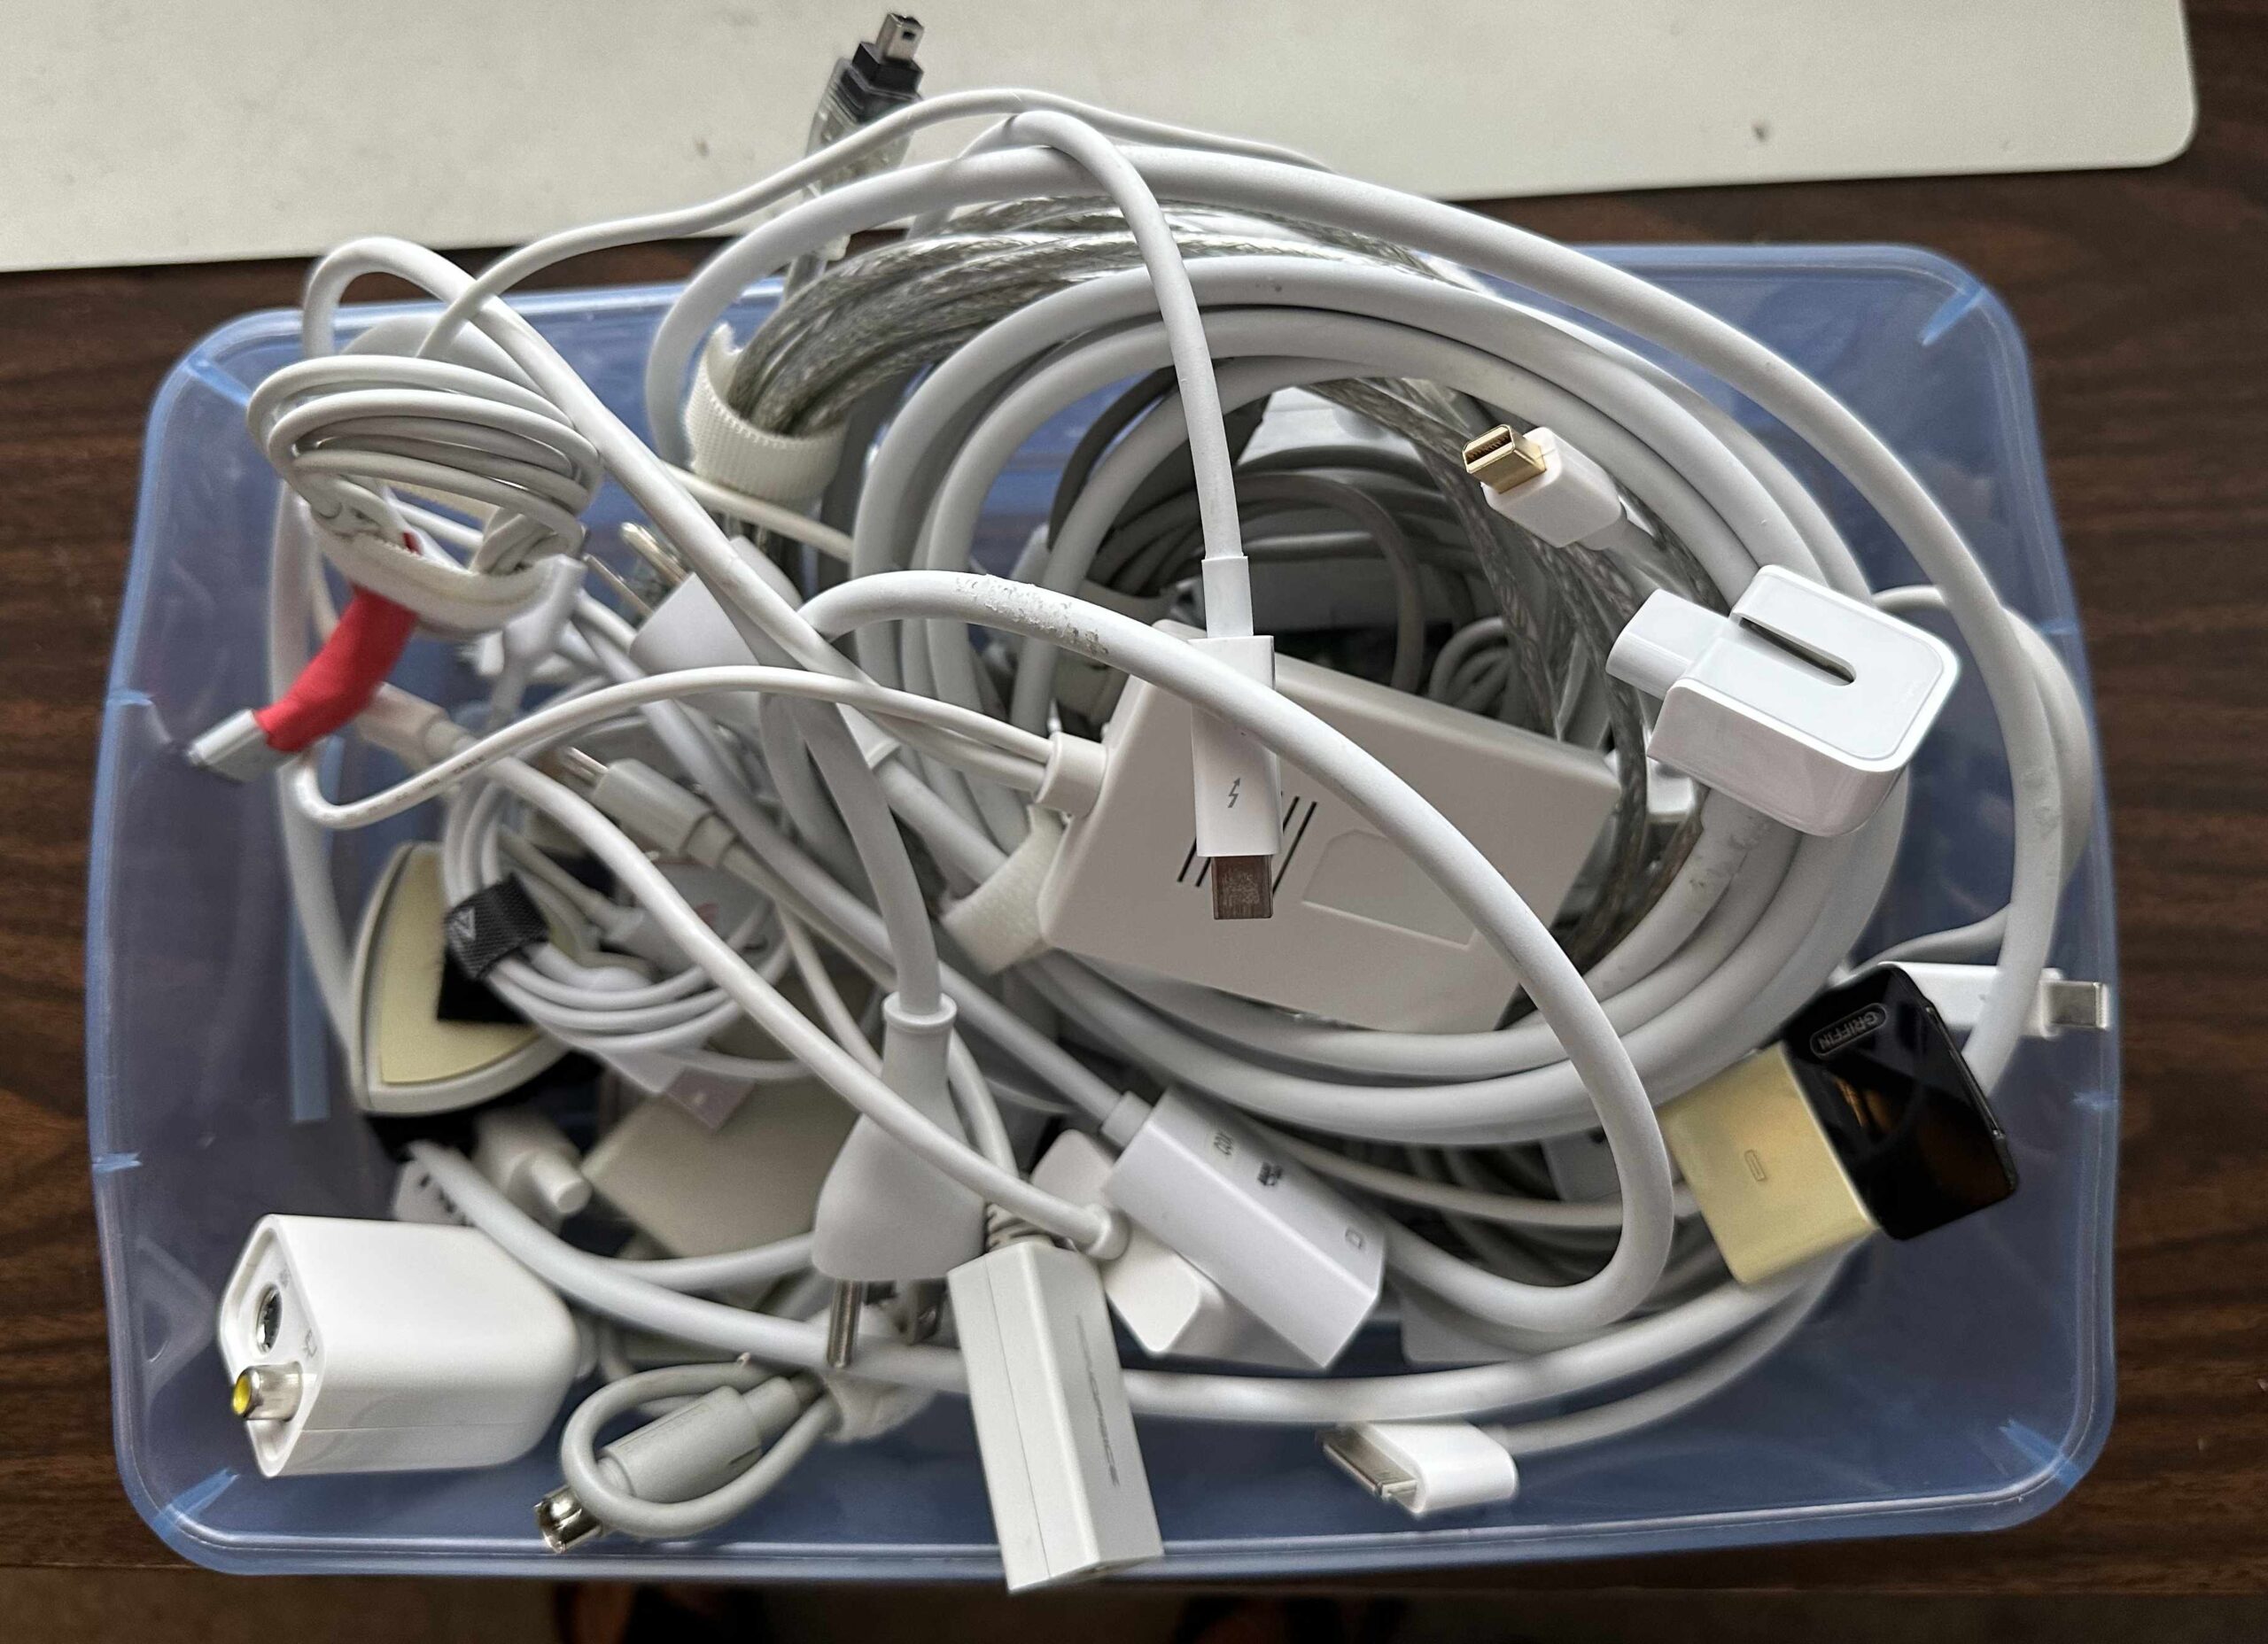
Cables are the unwanted stepchildren of our digital lives. More things are becoming wireless, but, we can’t get away from cables entirely. There are a bewildering variety of cable types, which are ever-changing. I’m sure many of you have a box of obsolete Apple cables like this one:
Rat’s nest of obsolete white cables
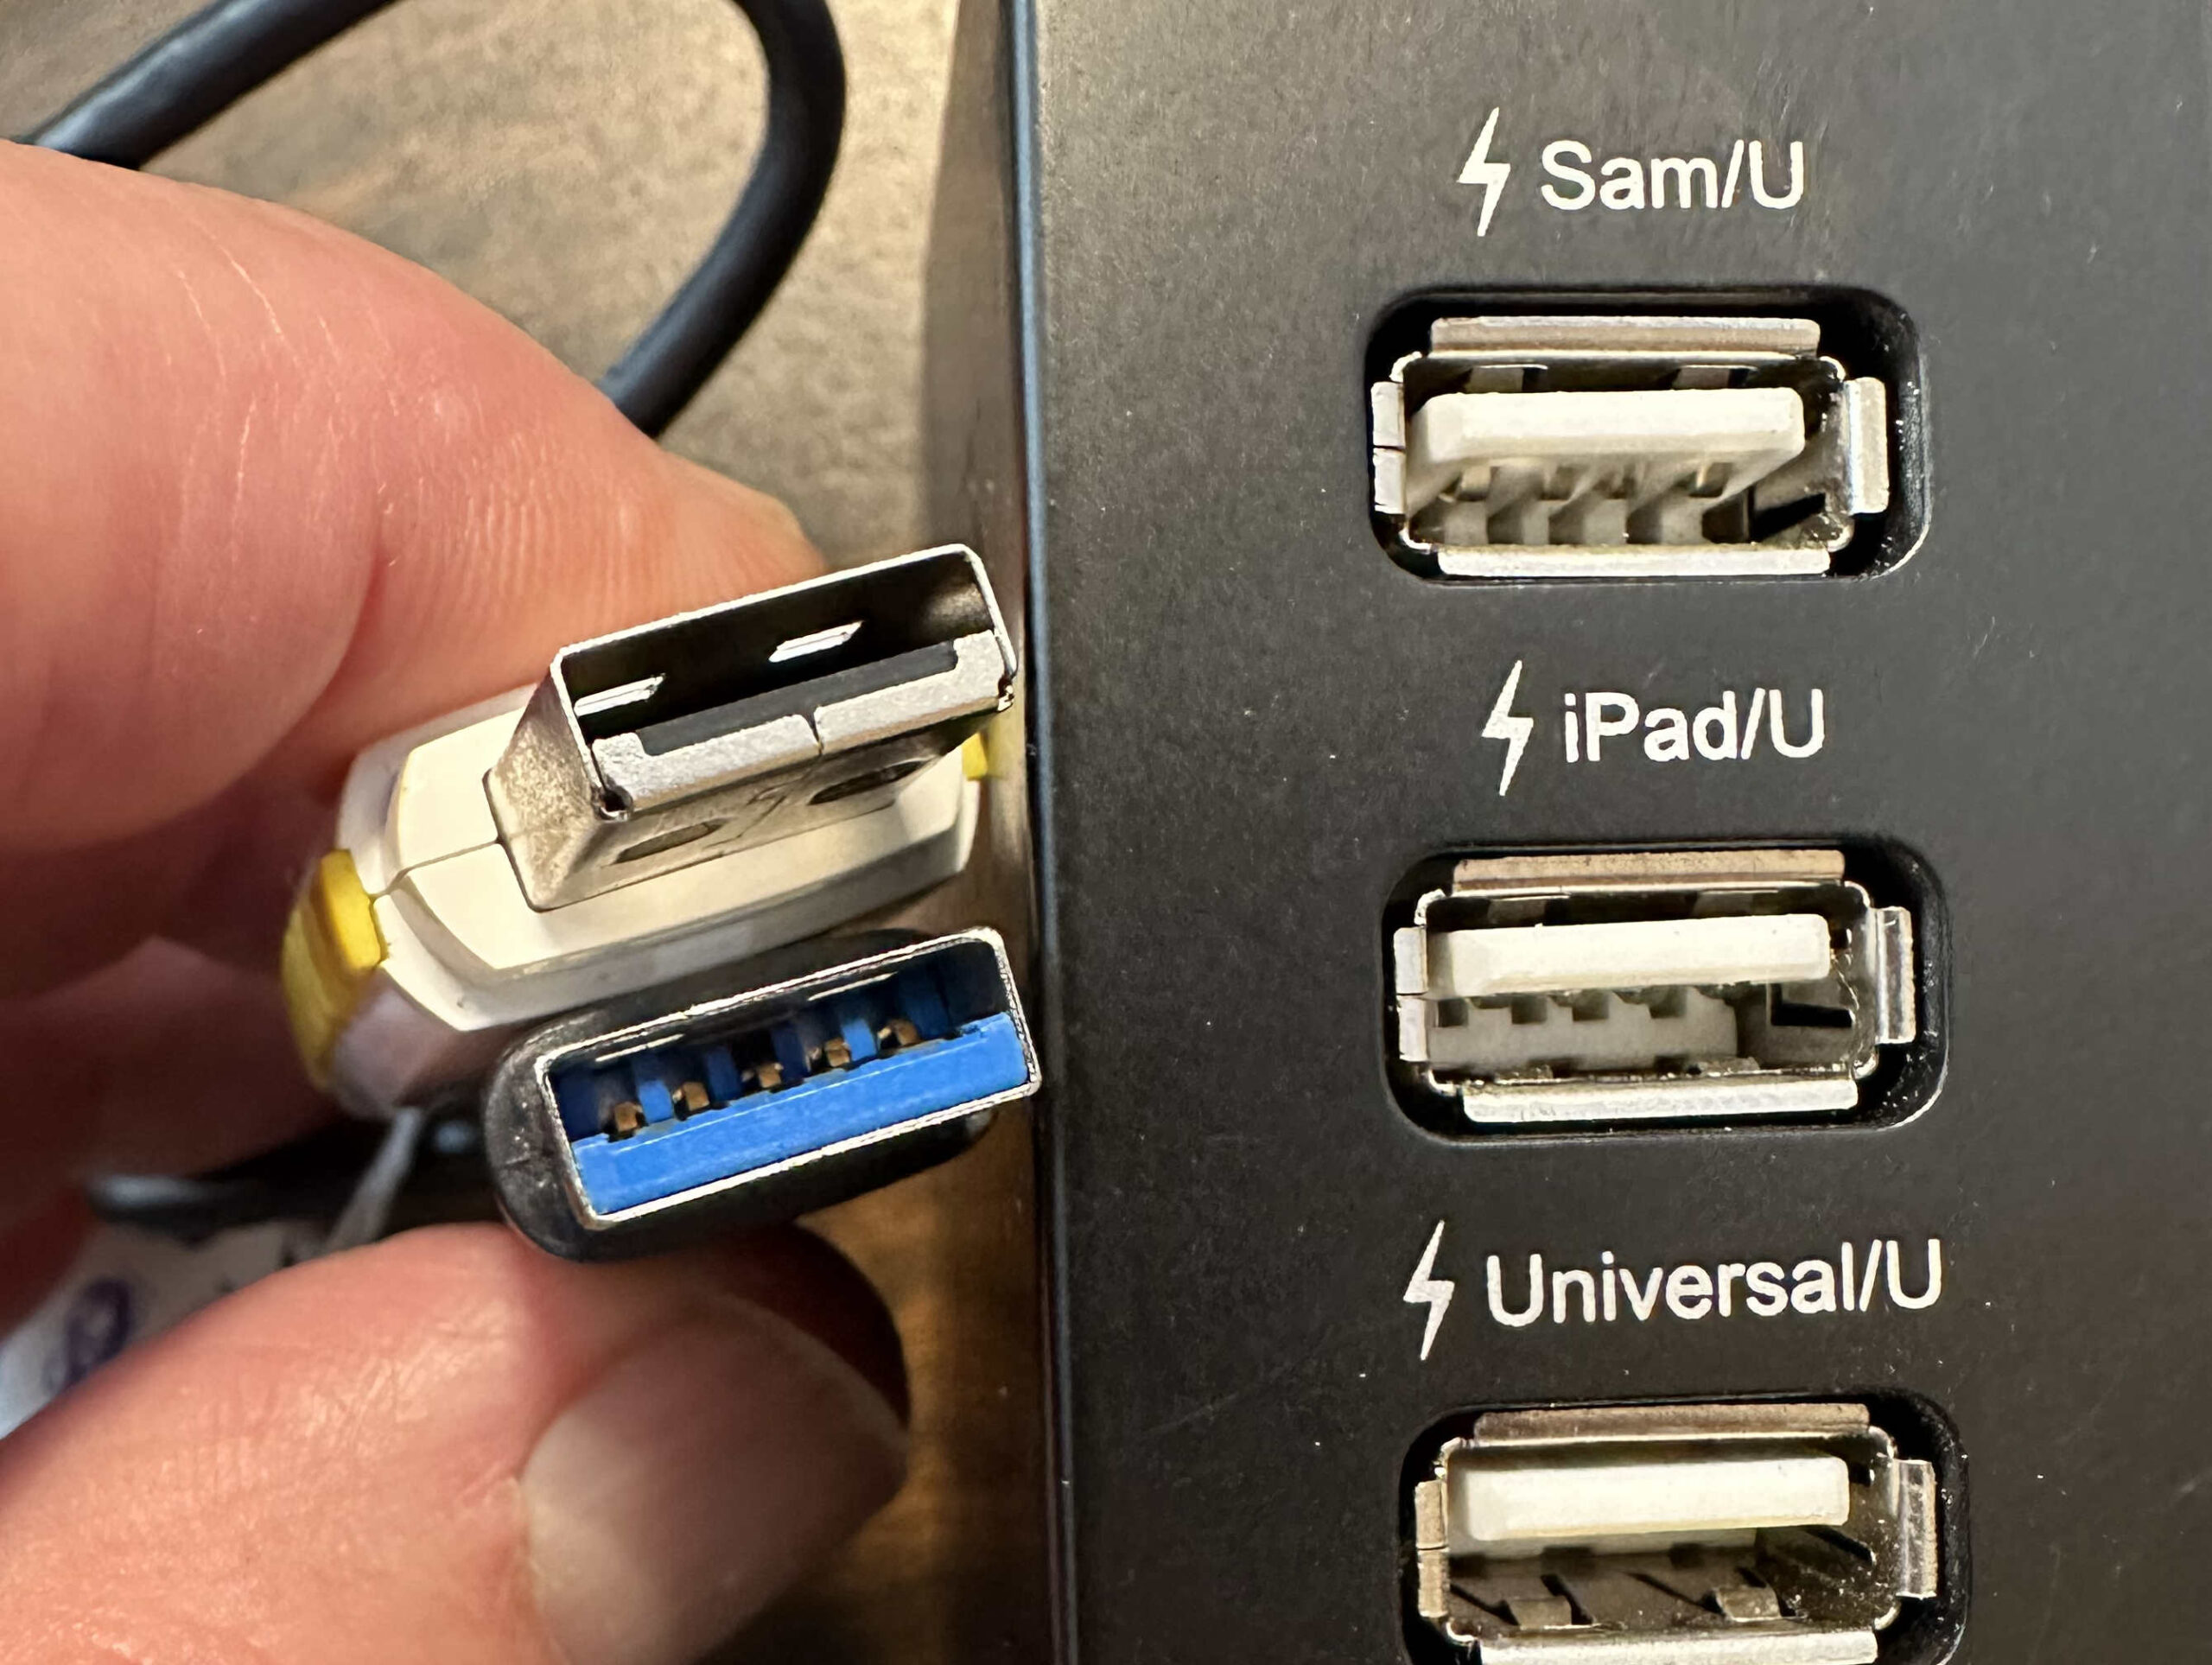
USB – Universal Serial Bus
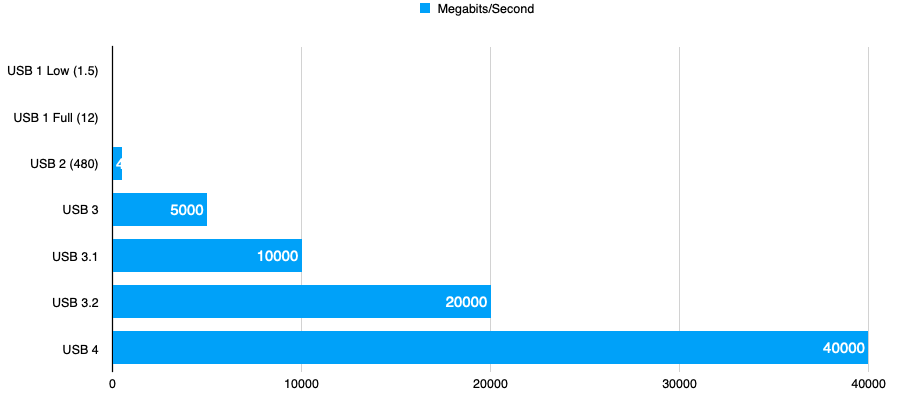
USB (Universal Serial Bus) is probably the most-used cable and interface type you will come across. The secret to understanding USB naming is that, generally, USB numbers have to do with speed, but USB letters tell you the connector type. So, USB 3 is faster than USB 2, which is faster than USB 1.
The ABCs of USB
The Familiar USB A Plugs and Jacks – Blue Indicates USB 3 Compatibility
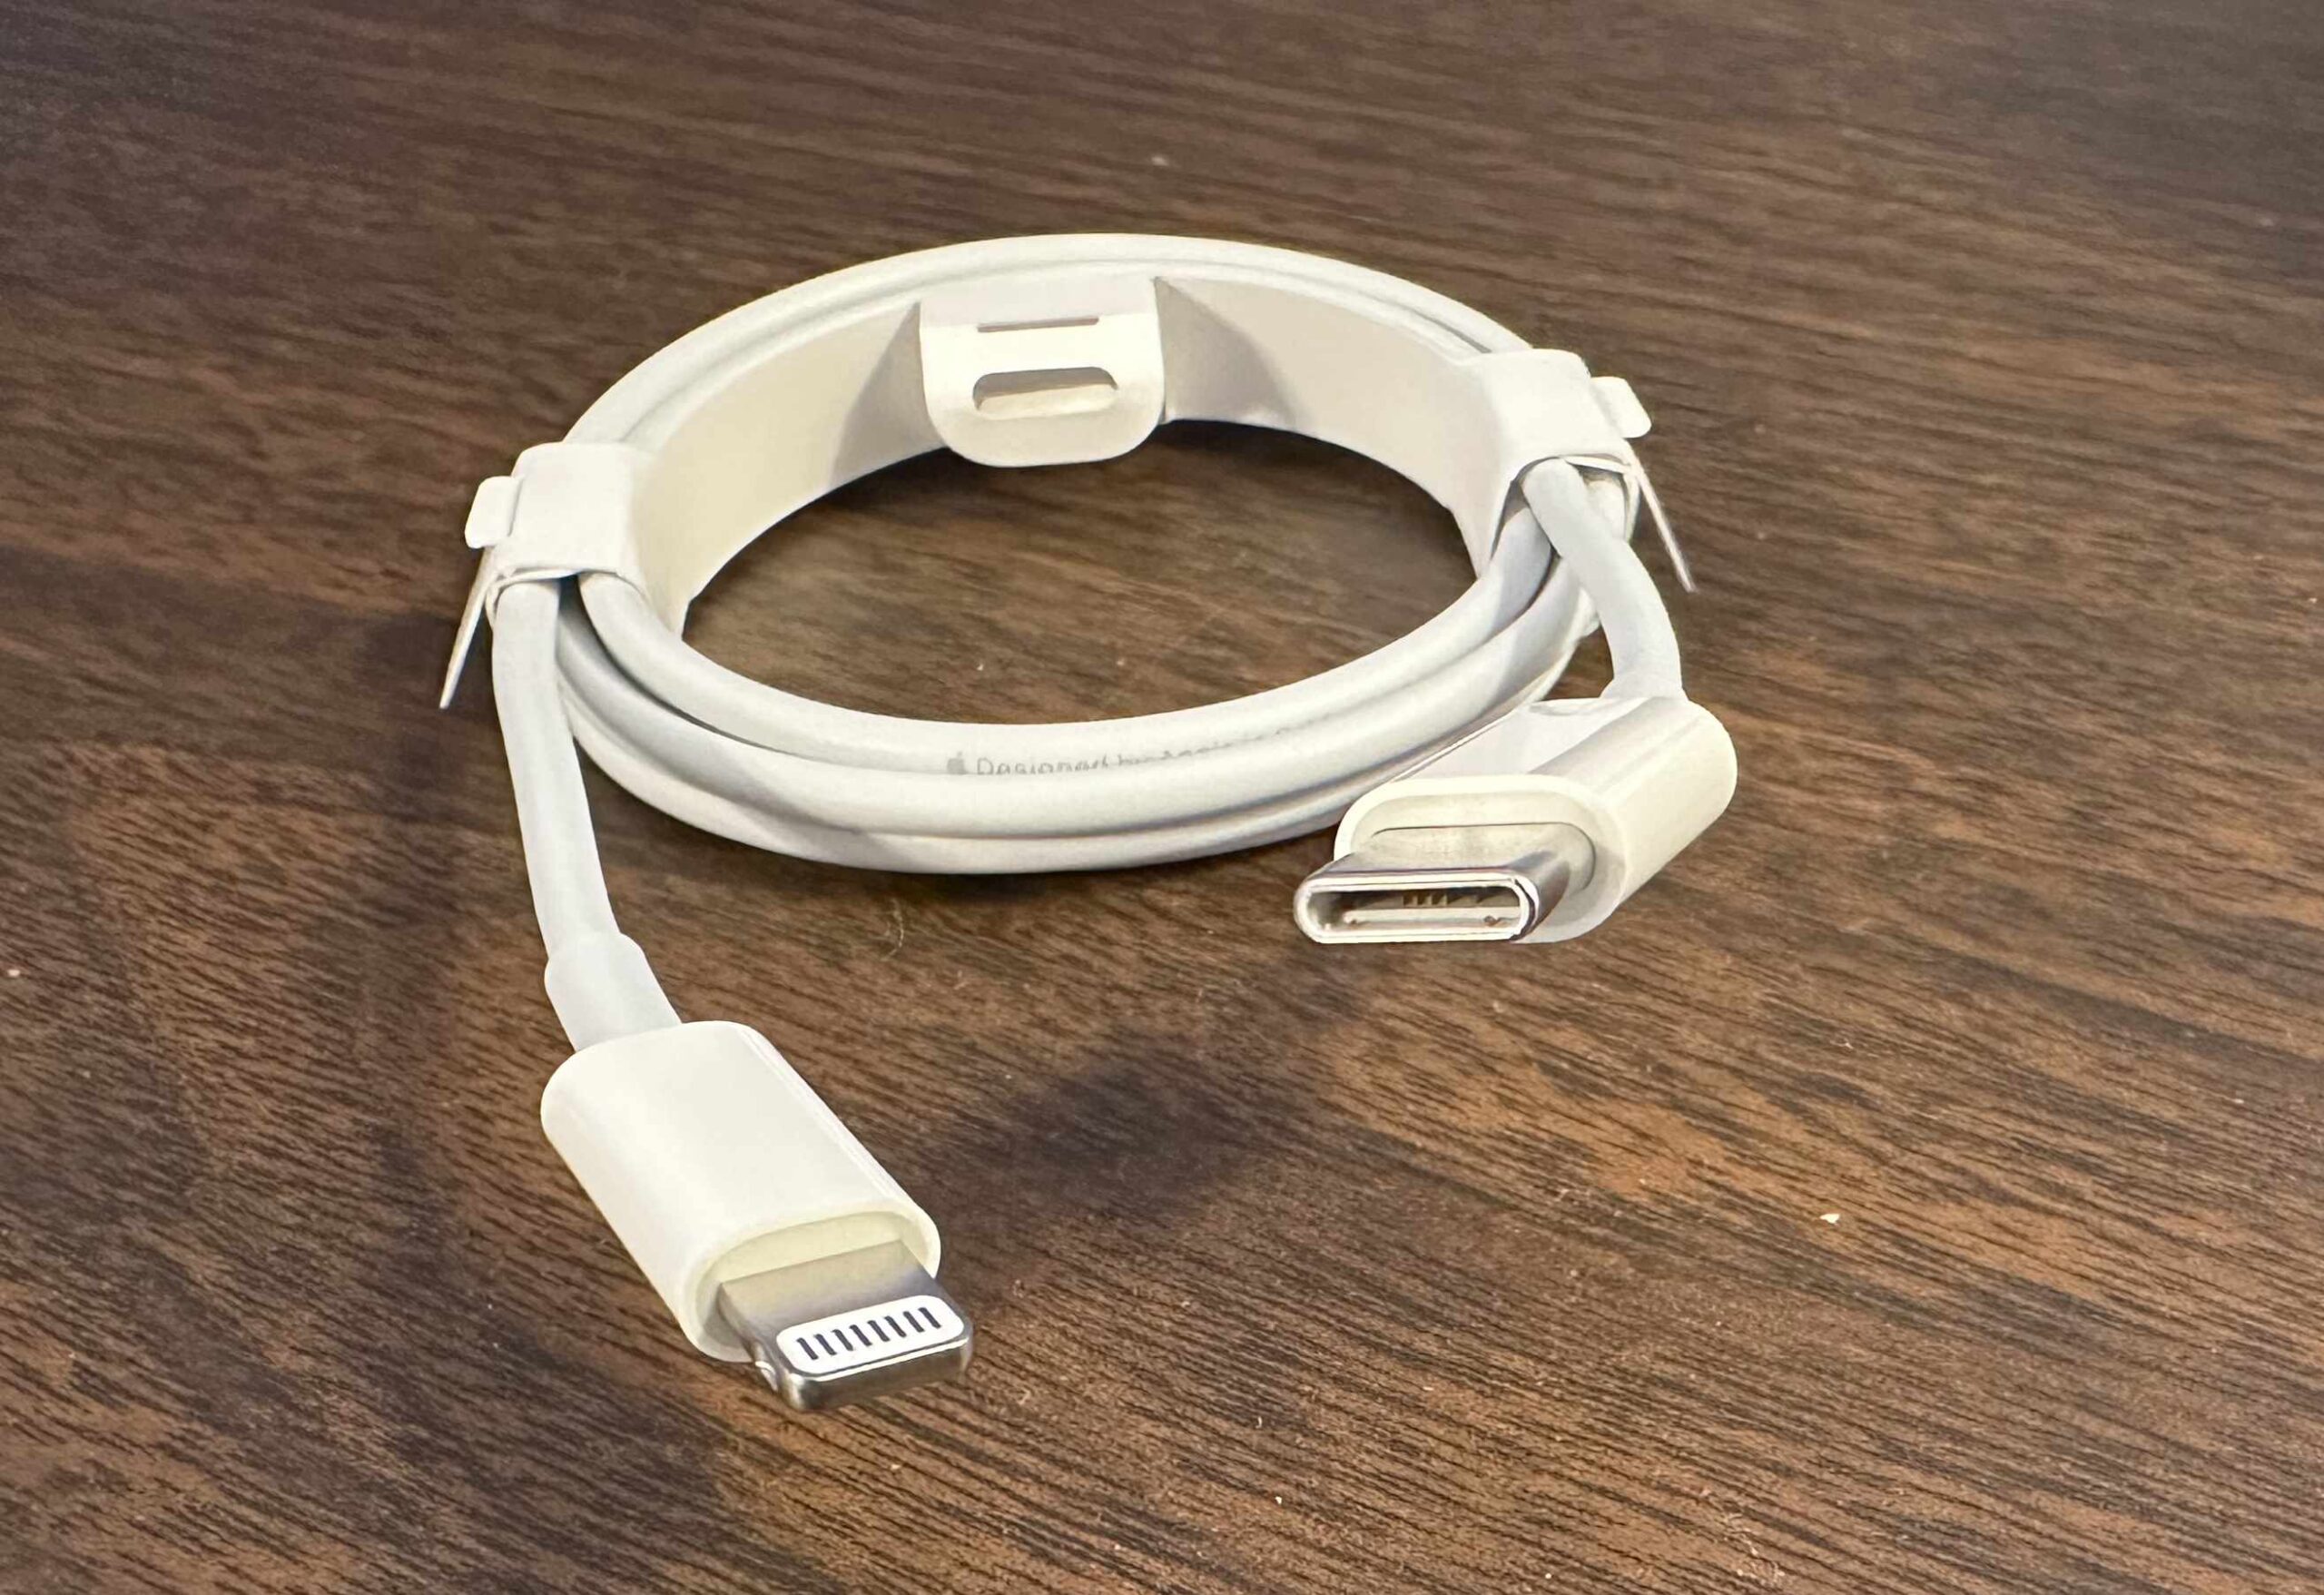
If you bought an iPhone in the last 10 years, it came with a lightning connector, and a lightning-to-USB cable. These were USB A cables for older iPhones, and USB C since (about iPhone 11?).
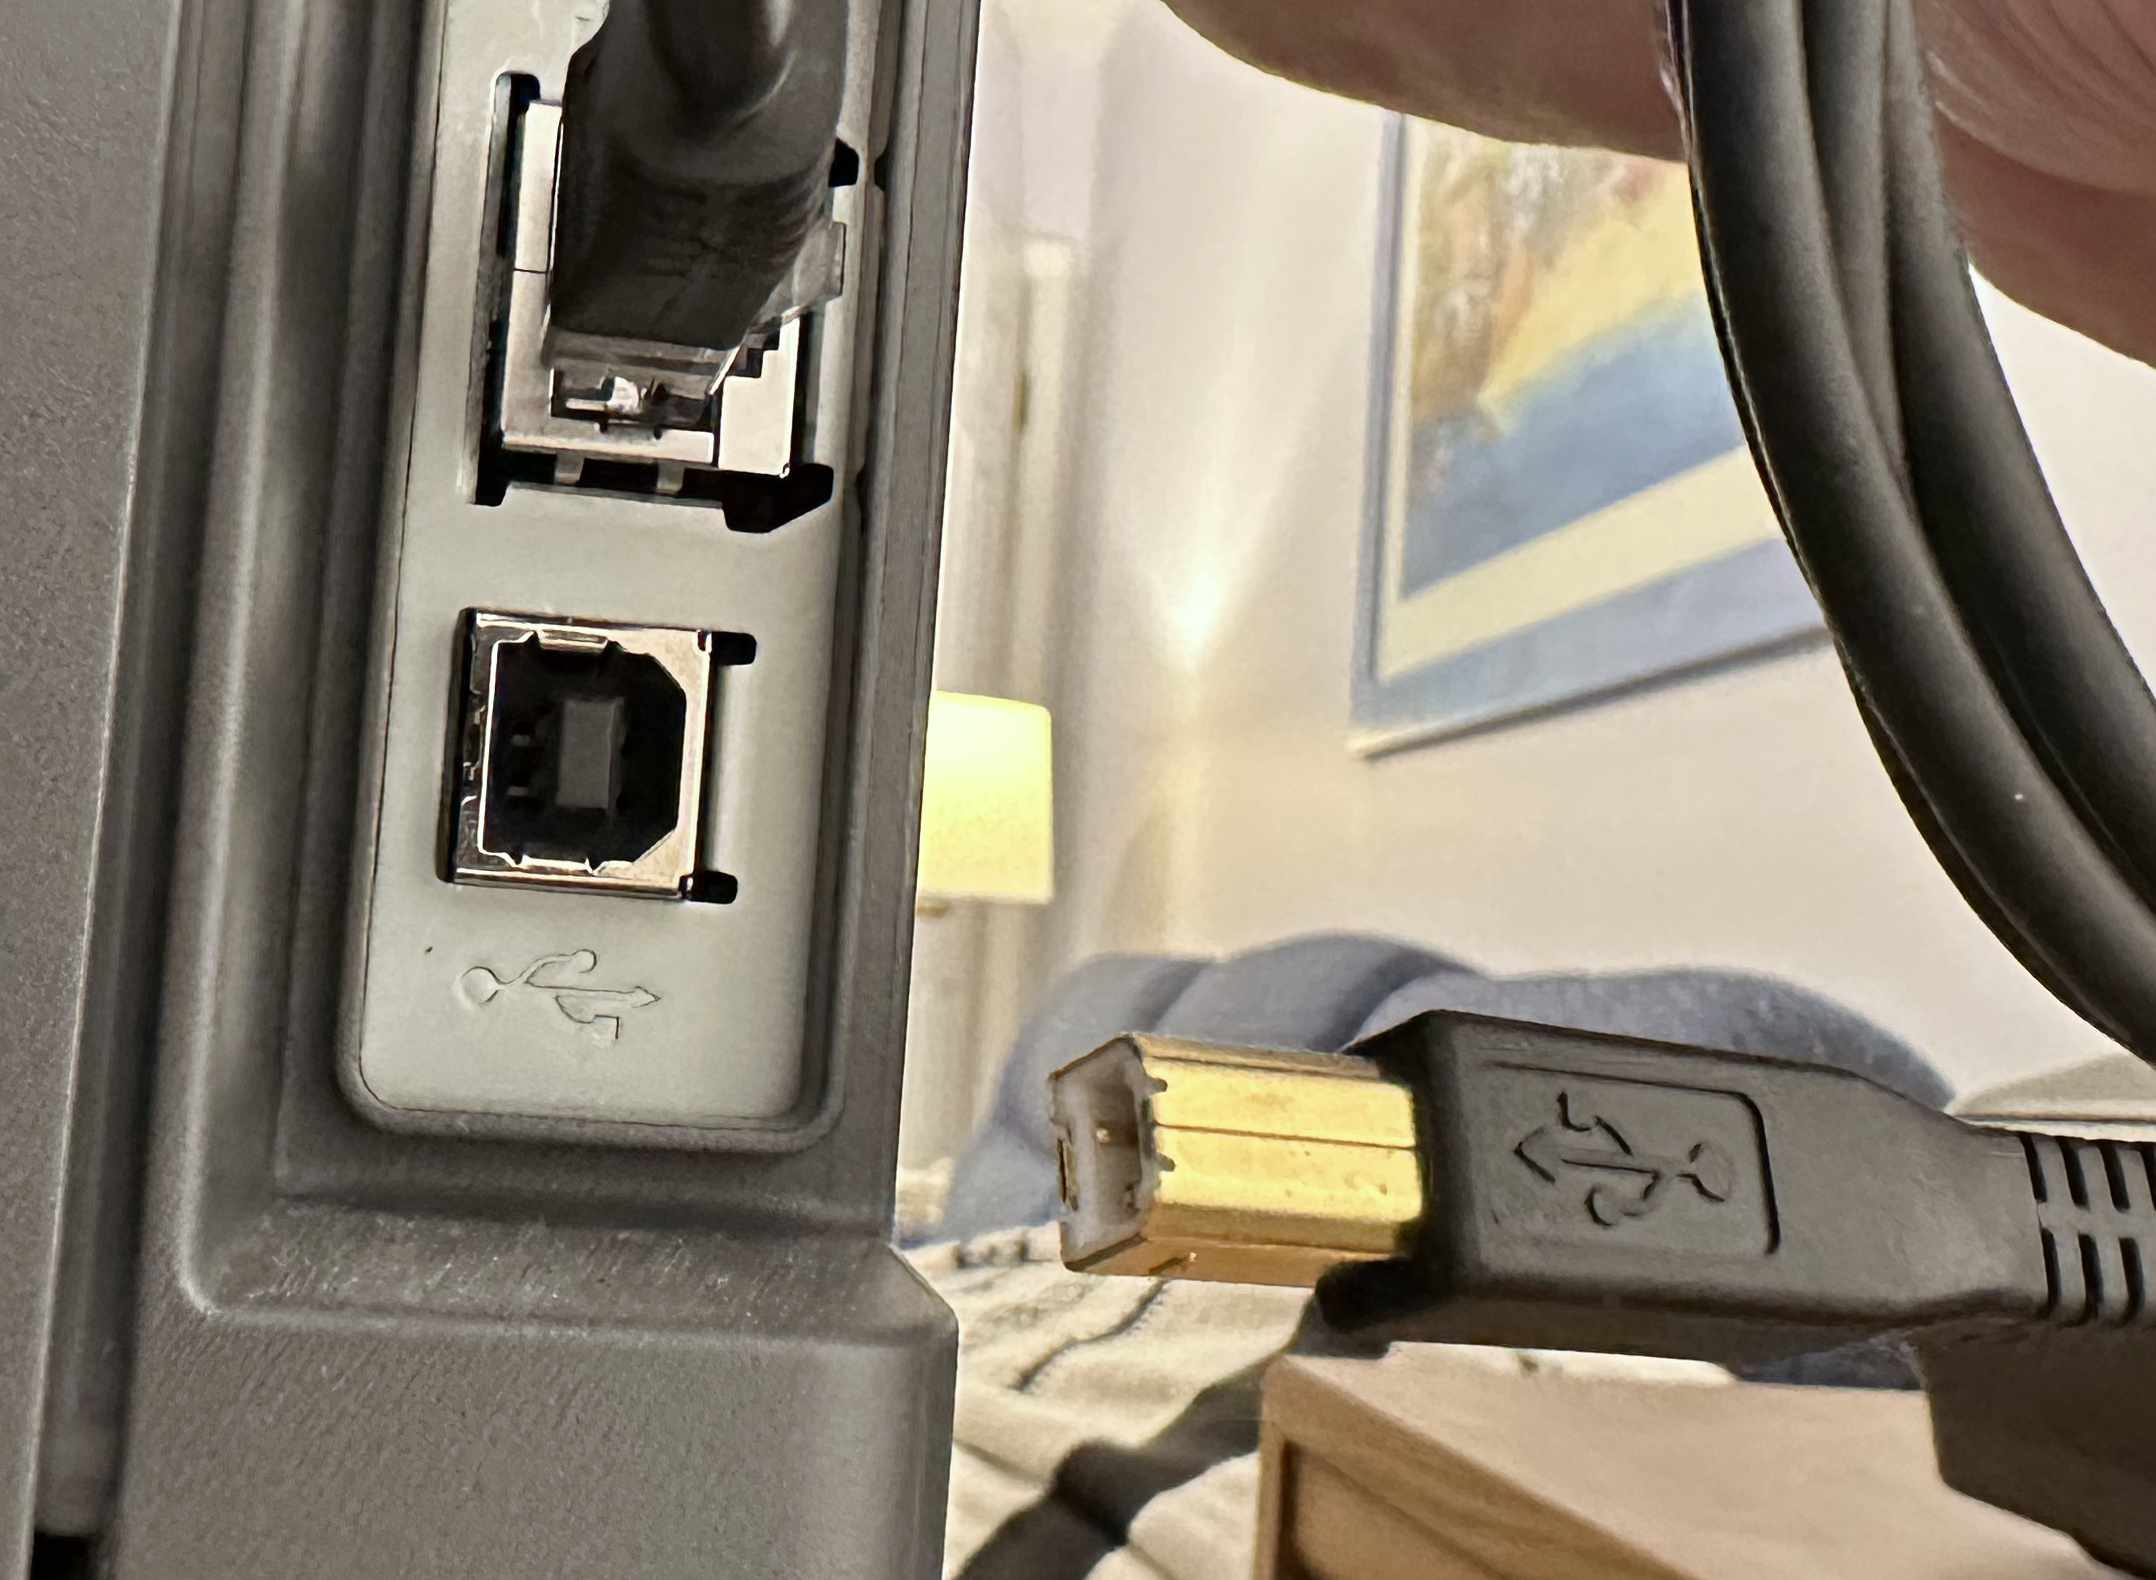
USB B was mostly for Printers – Rarely Used Now
USB B Jack and Plug for Printers
USB C is the Most Common Connector for New Devices
An Apple USB C to Lightning Cable
USB C has two popular features: The connector is very compact, and the connector is symmetrical, meaning that it will connect in either orientation. The USB C connector also carries the high-speed Thunderbolt hardware interface which used to require a separate cable and connector. Thunderbolt is used primarily for display devices and high-speed mass storage. The complex USB and Thunderbolt standards appear to be merging such that USB 4 is the same protocol as Thunderbolt 3.
The 1,2,3s of USB Speed
USB Speeds Increase Dramatically with Recent Versions
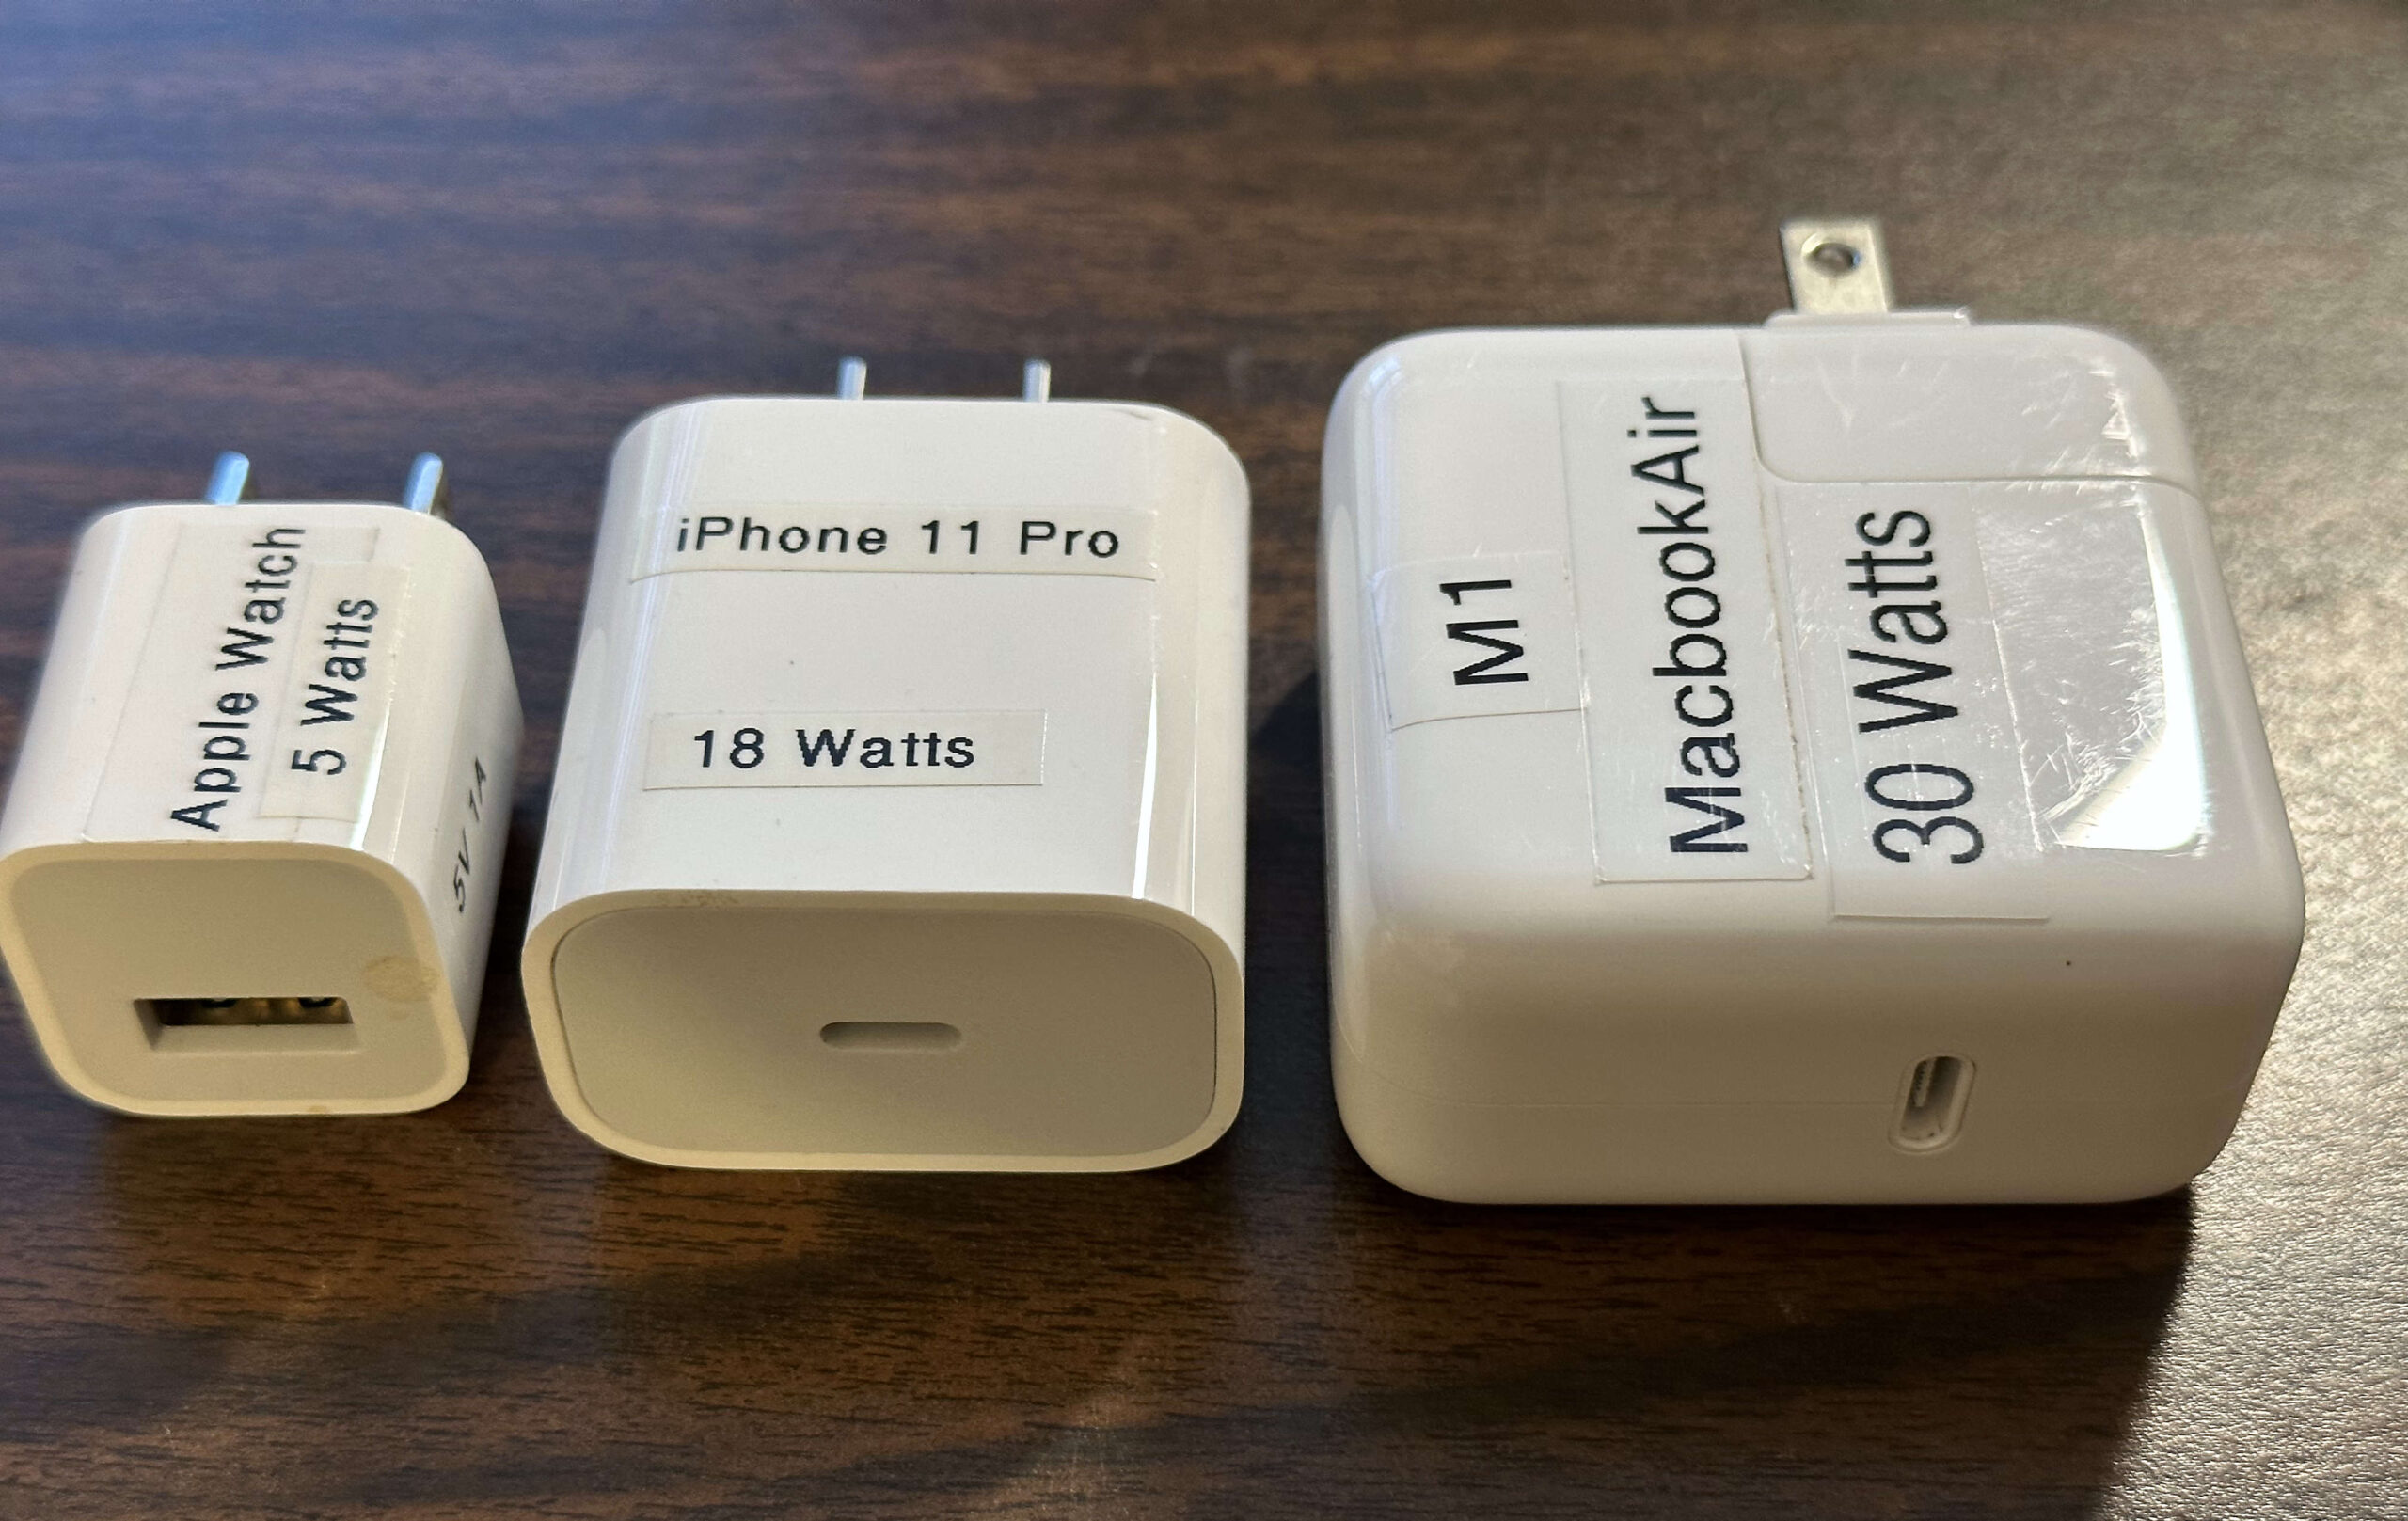
Choose Your Power
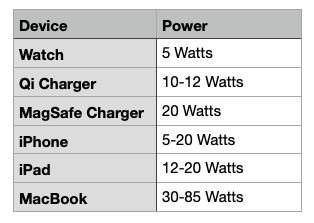
Recent iPhones and iPads may not have come with a power adapter, so it is up to you to make sure you have an appropriate one. Apple currently sells a bewildering variety of power adapters. Considering only the USB power adapters, there are are adapters with power ratings of 5W, 12W, 20W, 30W, 35W (dual), 67W, 96W, and 140 Watts. These are all USB-C, except for the older 5 and 12 Watt models. These are all for household plug-in use and do not include adapters for use in the car. A similar range of compatible adapters are also available from other companies.
Your device will not be harmed by a higher-wattage adapter. It will only draw the amount of current it actually needs. If you connect your device to a lower powered adapter, it may charge slowly, or not at all. If you connect your device to a higher powered adapter, it will charge faster, up to the device’s maximum charge rate.
USB is a complex standard which includes multiple data and multiple power standards within the one USB name.
You may “know” that USB provides 5 volt power. However, for adapters providing more than 15 Watts, USB adjusts to 20 Volts. For power above 100 Watts, USB uses 48 Volts. This is all while maintaining compatibility with older 5 Volt devices.
If you still have the power adapter from a phone you got 10 years ago, even if it is “perfectly good”, it is probably not sufficient for your newer devices.
Recommended Power Estimates
Use an Adapter Appropriate to Your DeviceApple Brand USB Chargers 5 Watts, 18 Watts and 30 Watts
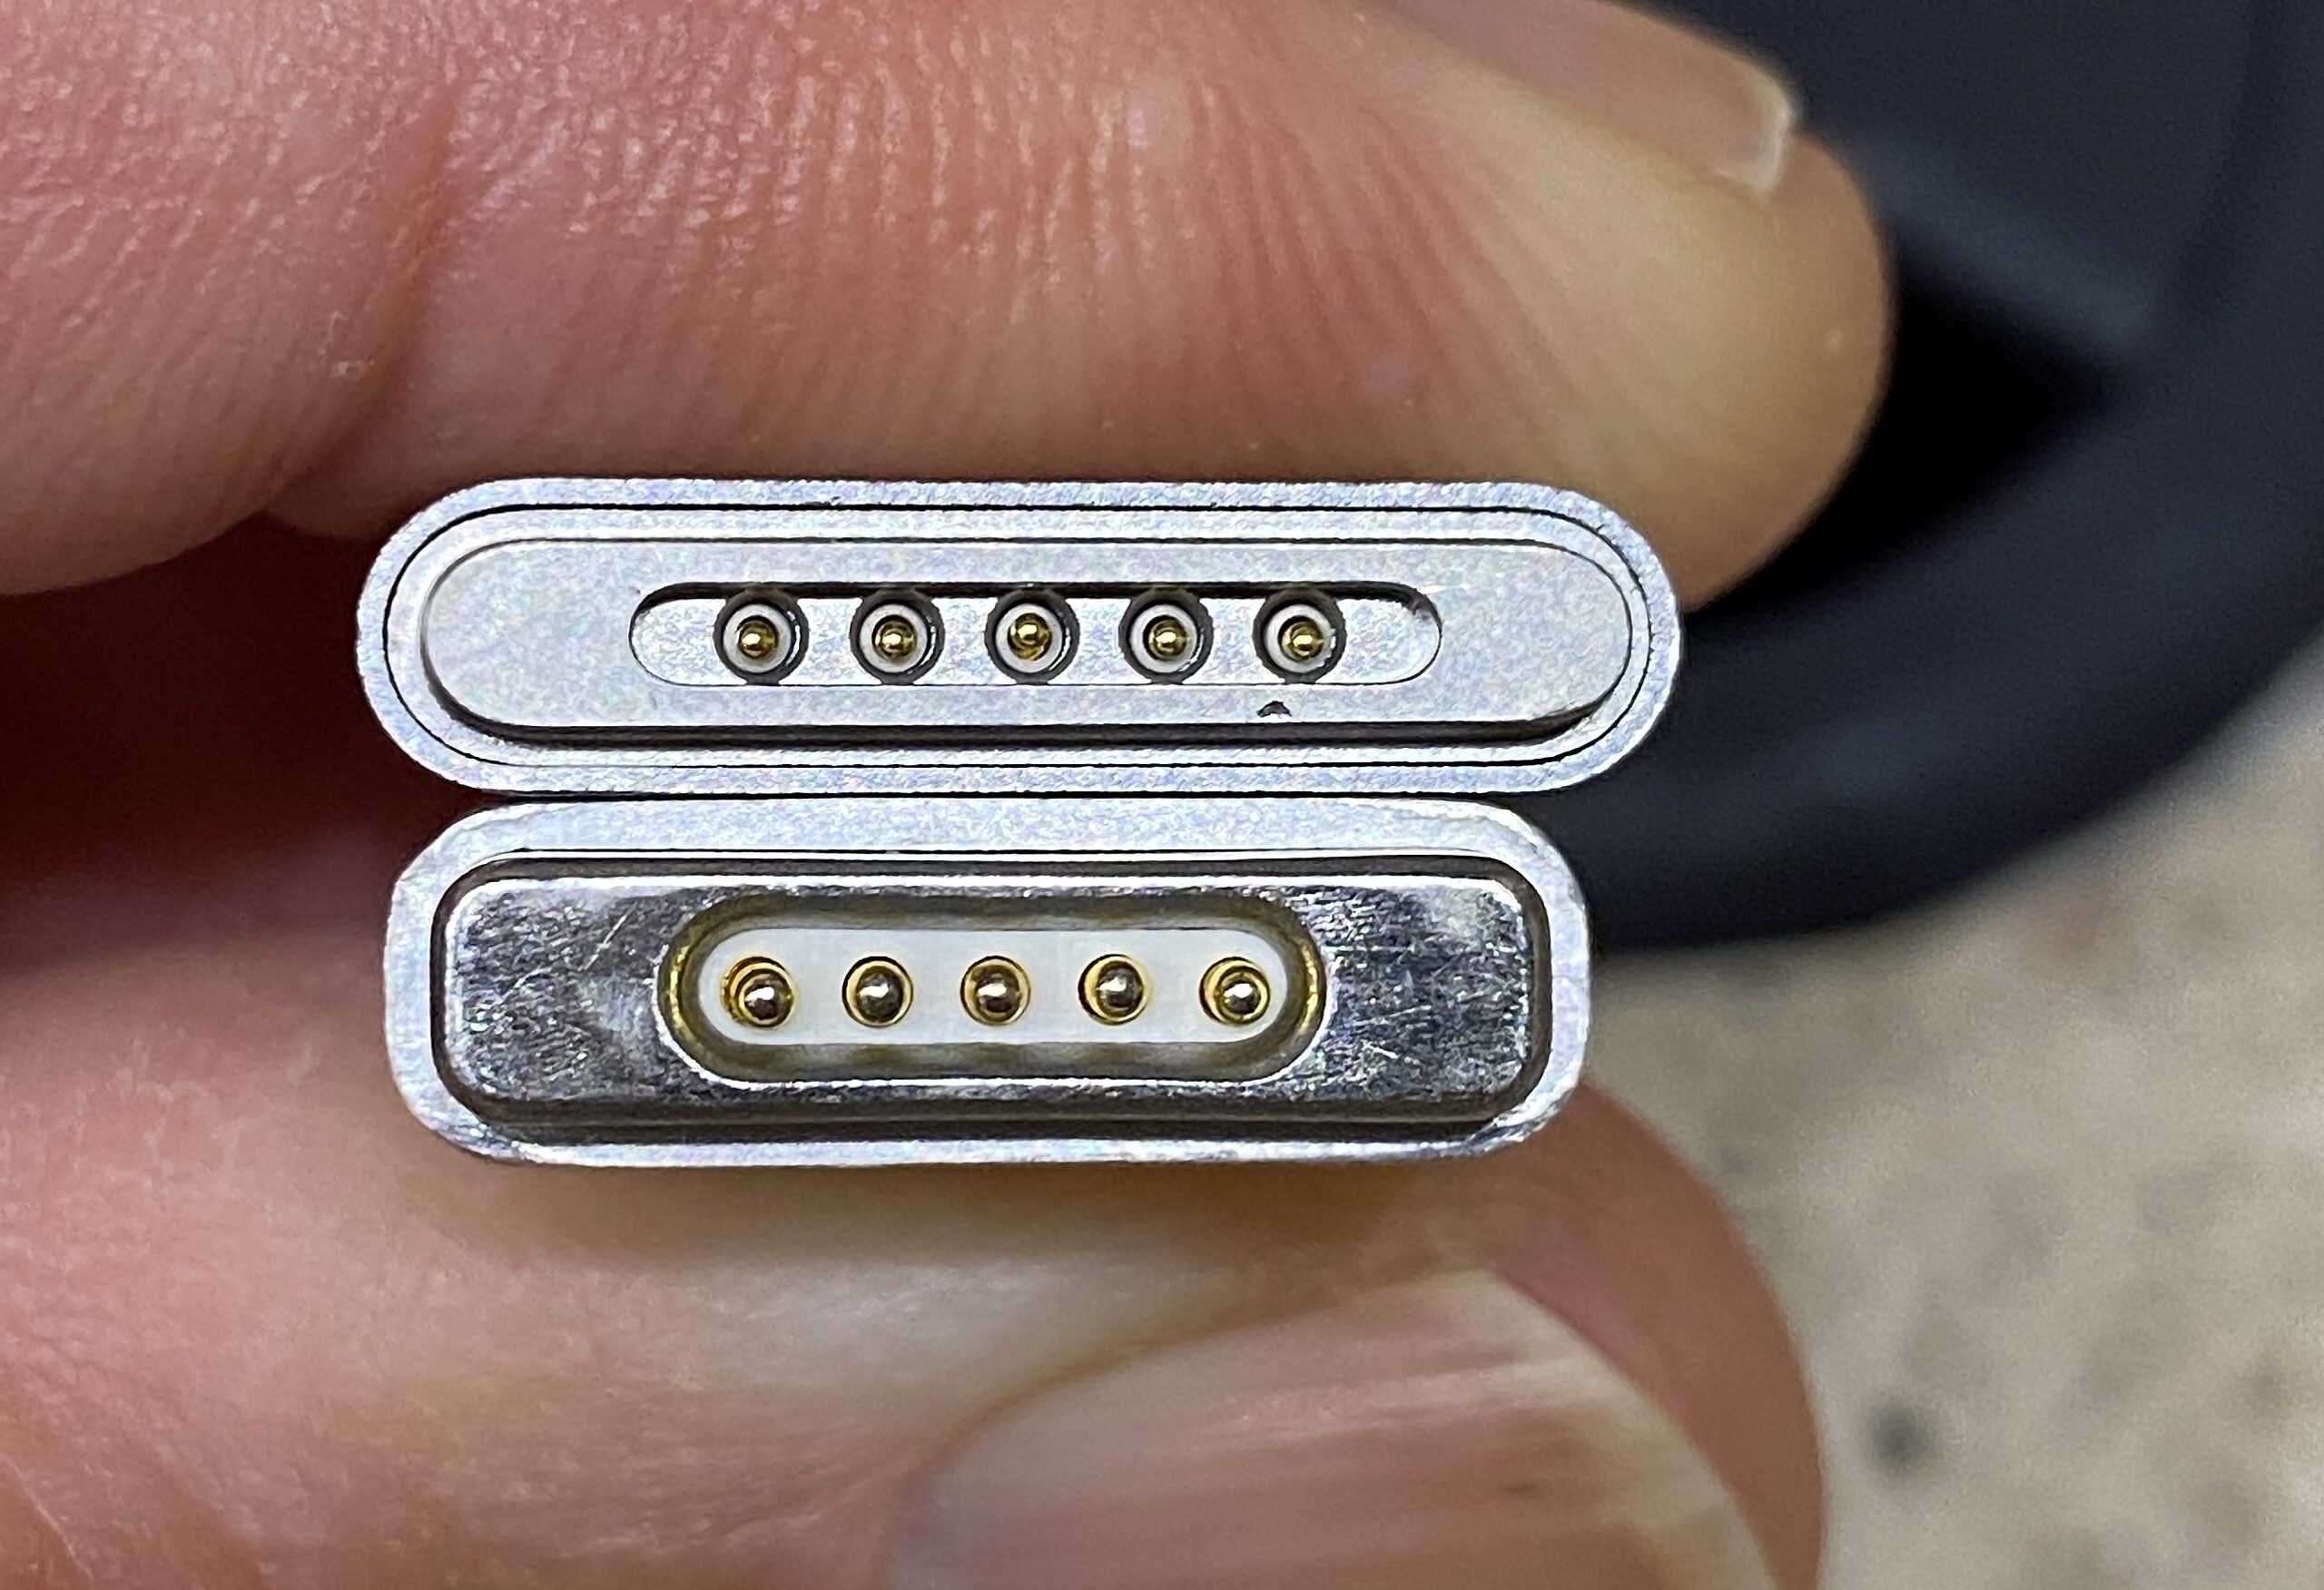
Which MagSafe Do You Mean?
Incompatible MagSafe 3 and MagSafe 2 Power Connectors (MagSafe 1 not shown)
Apple has had five different, incompatible things all called MagSafe: three cable types and two wireless chargers.
MagSafe and Qi Wireless Charging Pucks (Notice they all have wires)
Don’t Let Junky Power Damage Your Device
Flea Market Bargain Bin Chargers
Choose reputable cables and power adapters. Apple offers the “MFi” (Made for iPhone/iPad) certification to other vendors. These products have been tested and are up to standards.
Not all cables that look alike work alike. Older or cheaper cables may work with low power devices, but may perform poorly or not at all for higher power modern devices.
Reputable brands include, in alphabetical order: Ainope, Anker, Amazon Basics, Apple, Belkin and MonoPrice. Look for emphasis on safety and clean power. Look for “MFi”. Look for USB C and USB 3.x compatibility. Beware cheap deals that come in a six-pack.
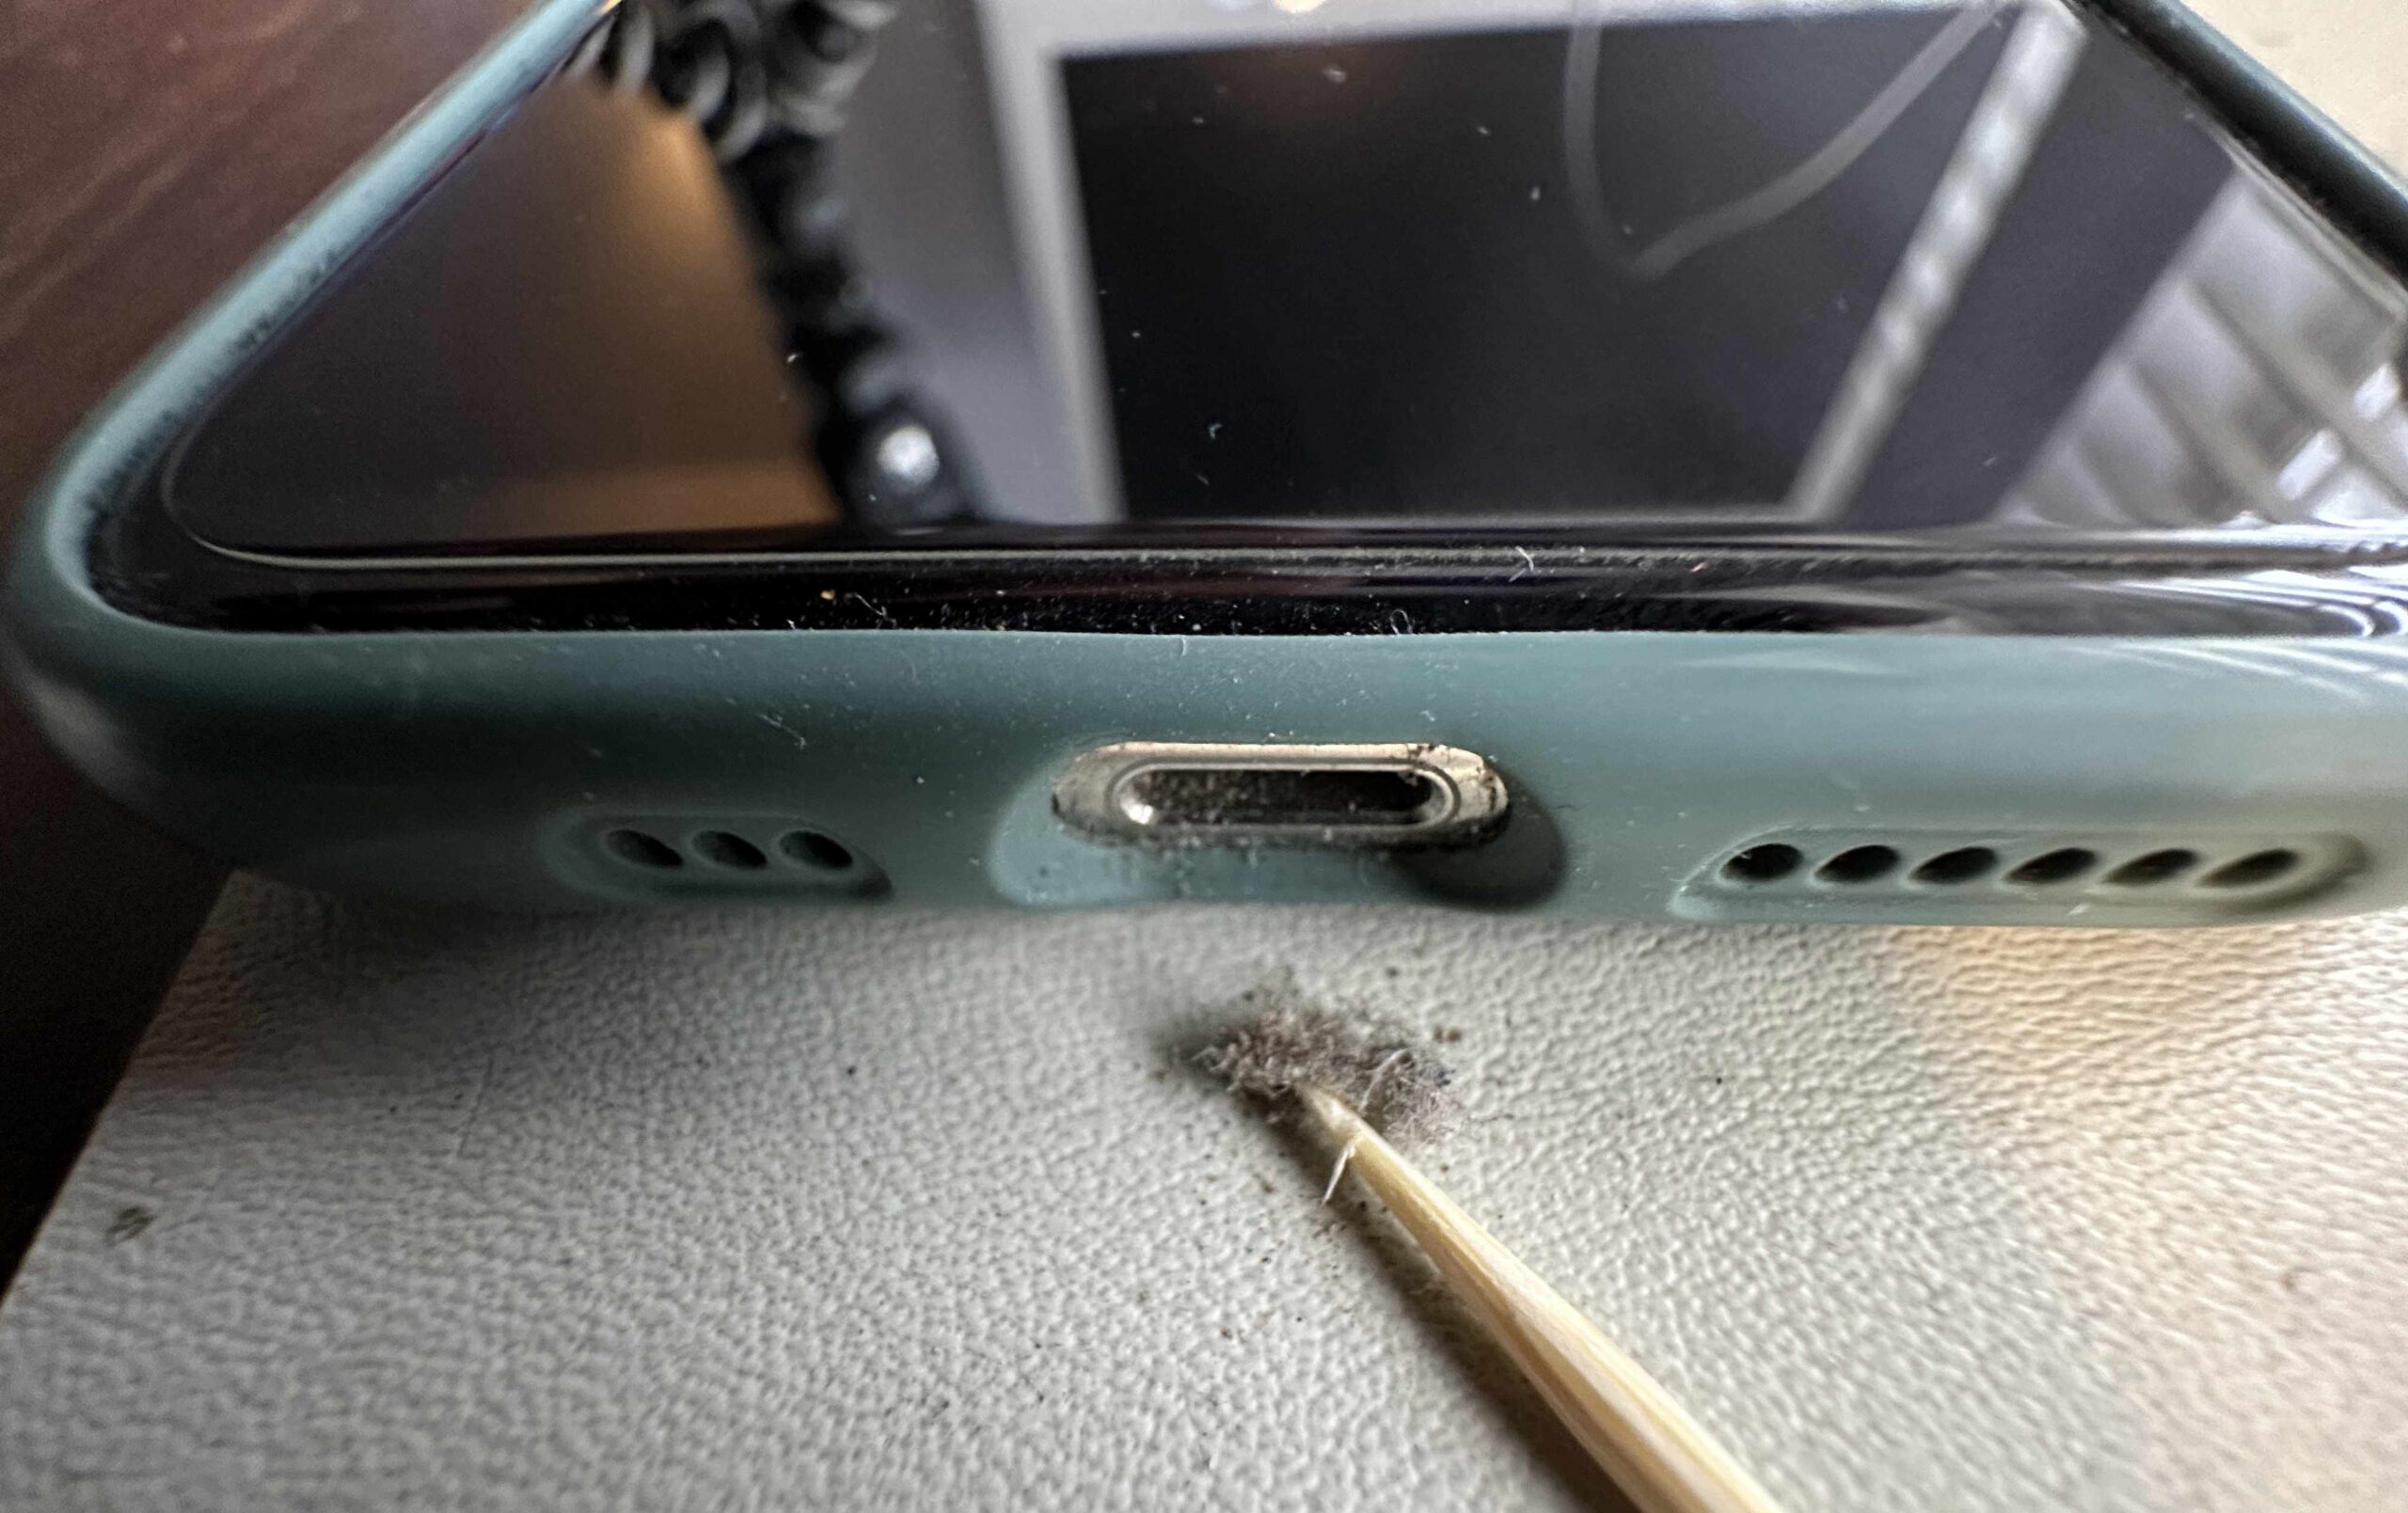
Having Problems? Clean Your Lightning Port
Clean Dust Bunnies Out of the Lightning Port With a Toothpick
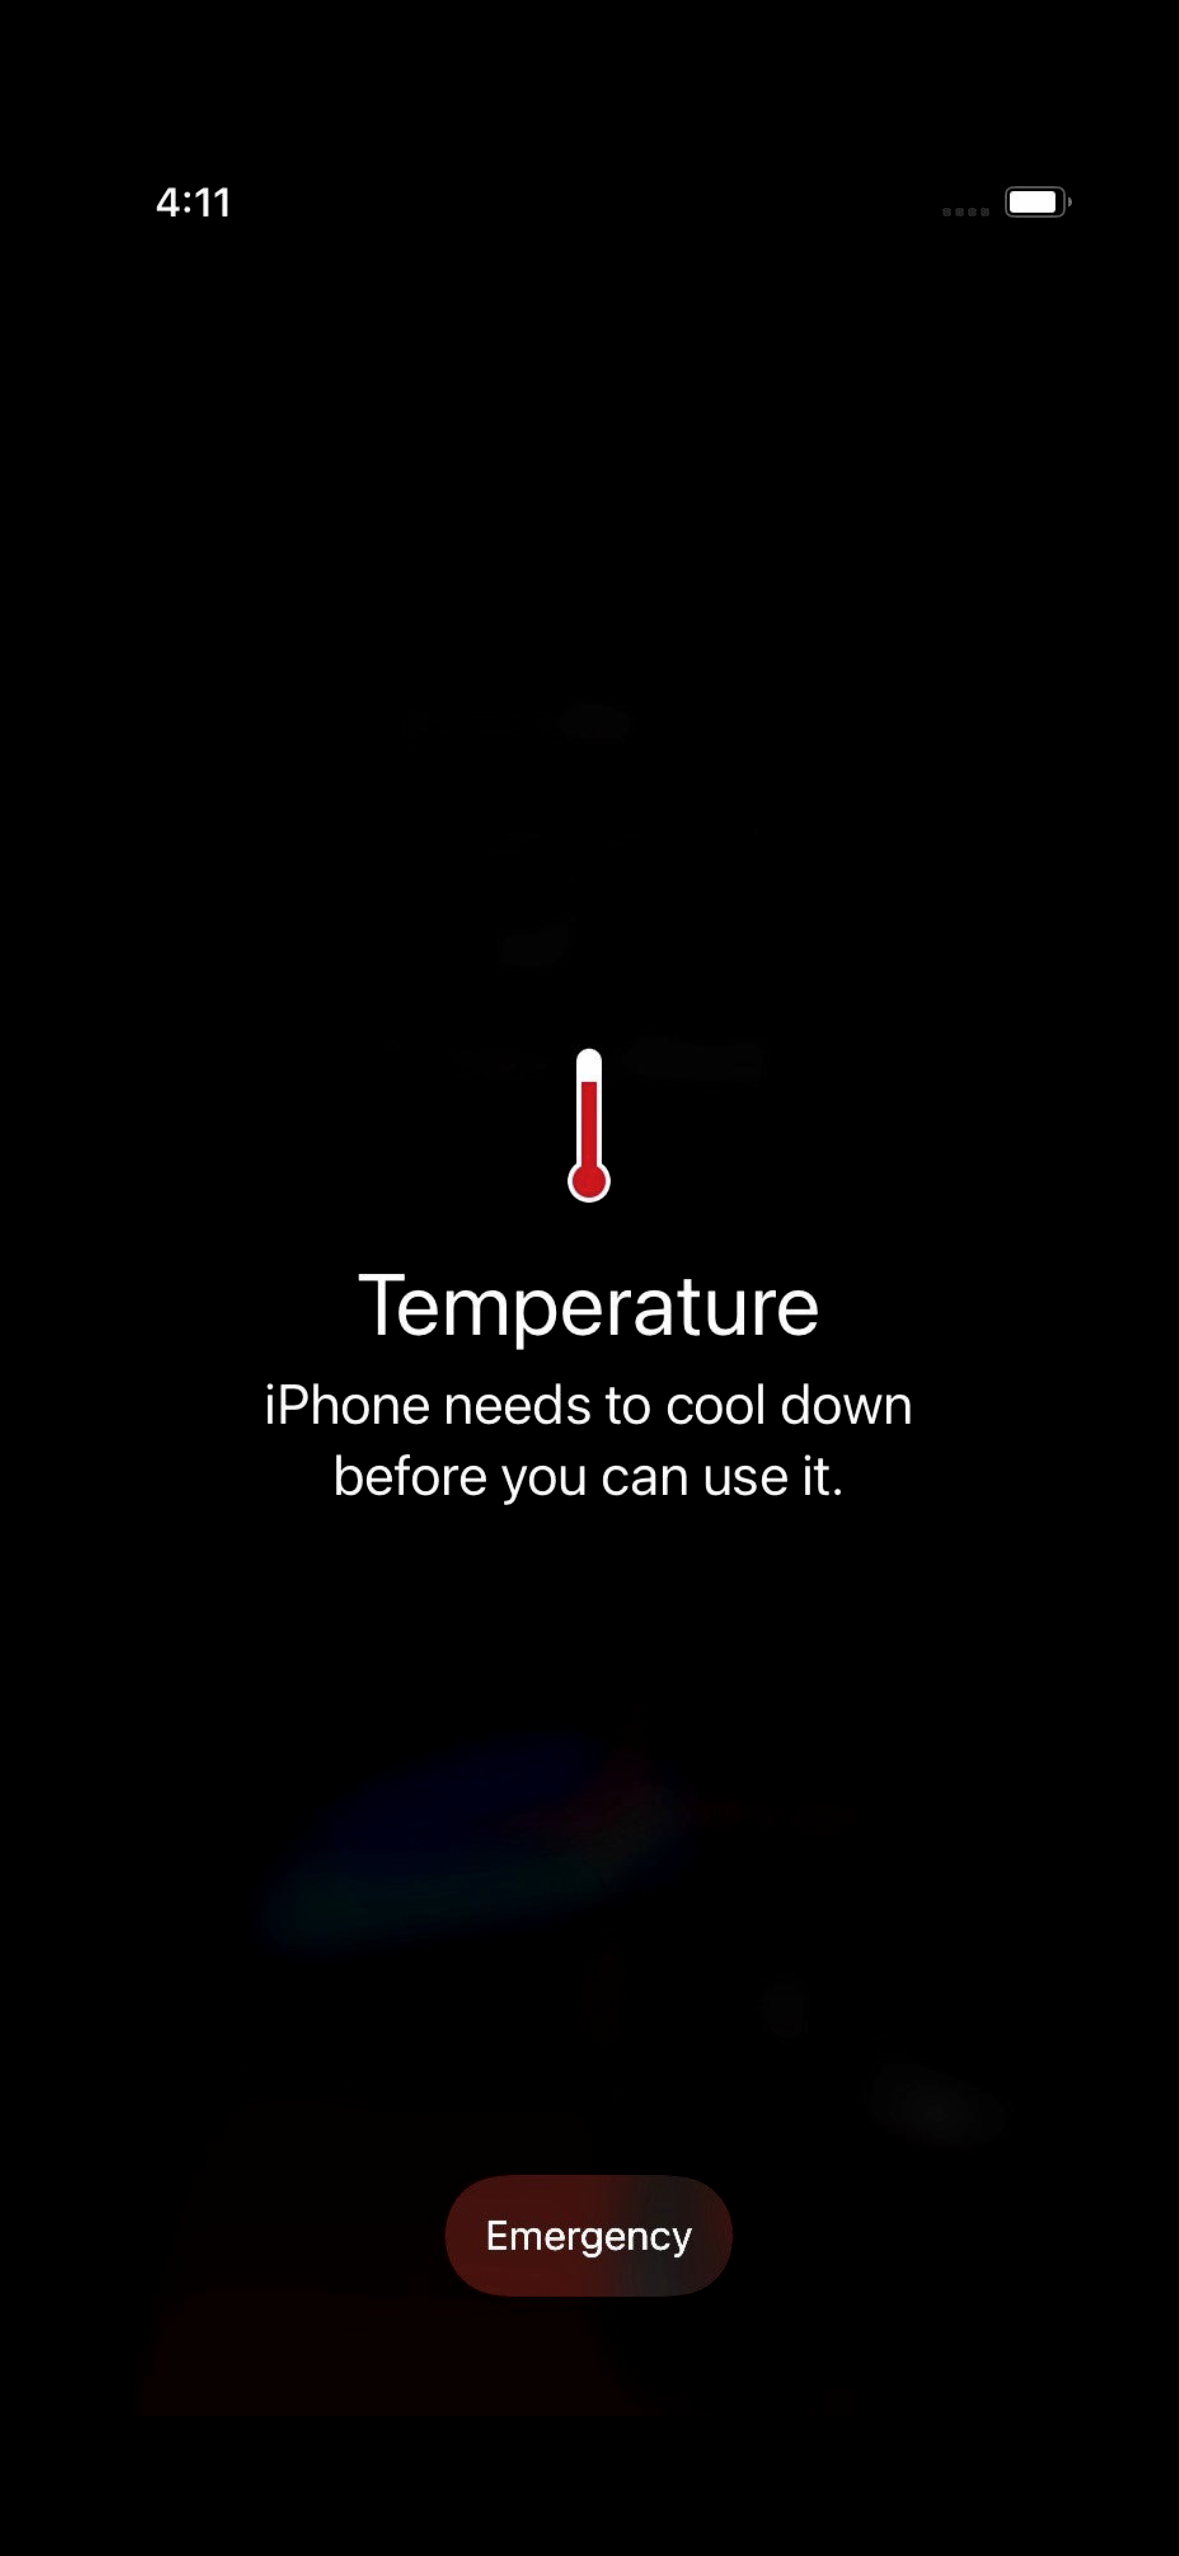
Beware of Heat
Your device may get hot when charging. Keep it out of the direct sun, especially on your car dashboard. In the car, positioning your phone in front of an air conditioning vent can keep it cool. A hot battery may charge more slowly, if at all.
iPhone Overheating Warning Screen
Fire Safety
Don’t charge your device on the bed or upholstery, especially overnight.
Throw away old, frayed, melted or intermittent cords.
Throw away power adapters that have overheated.
Charging in the Car
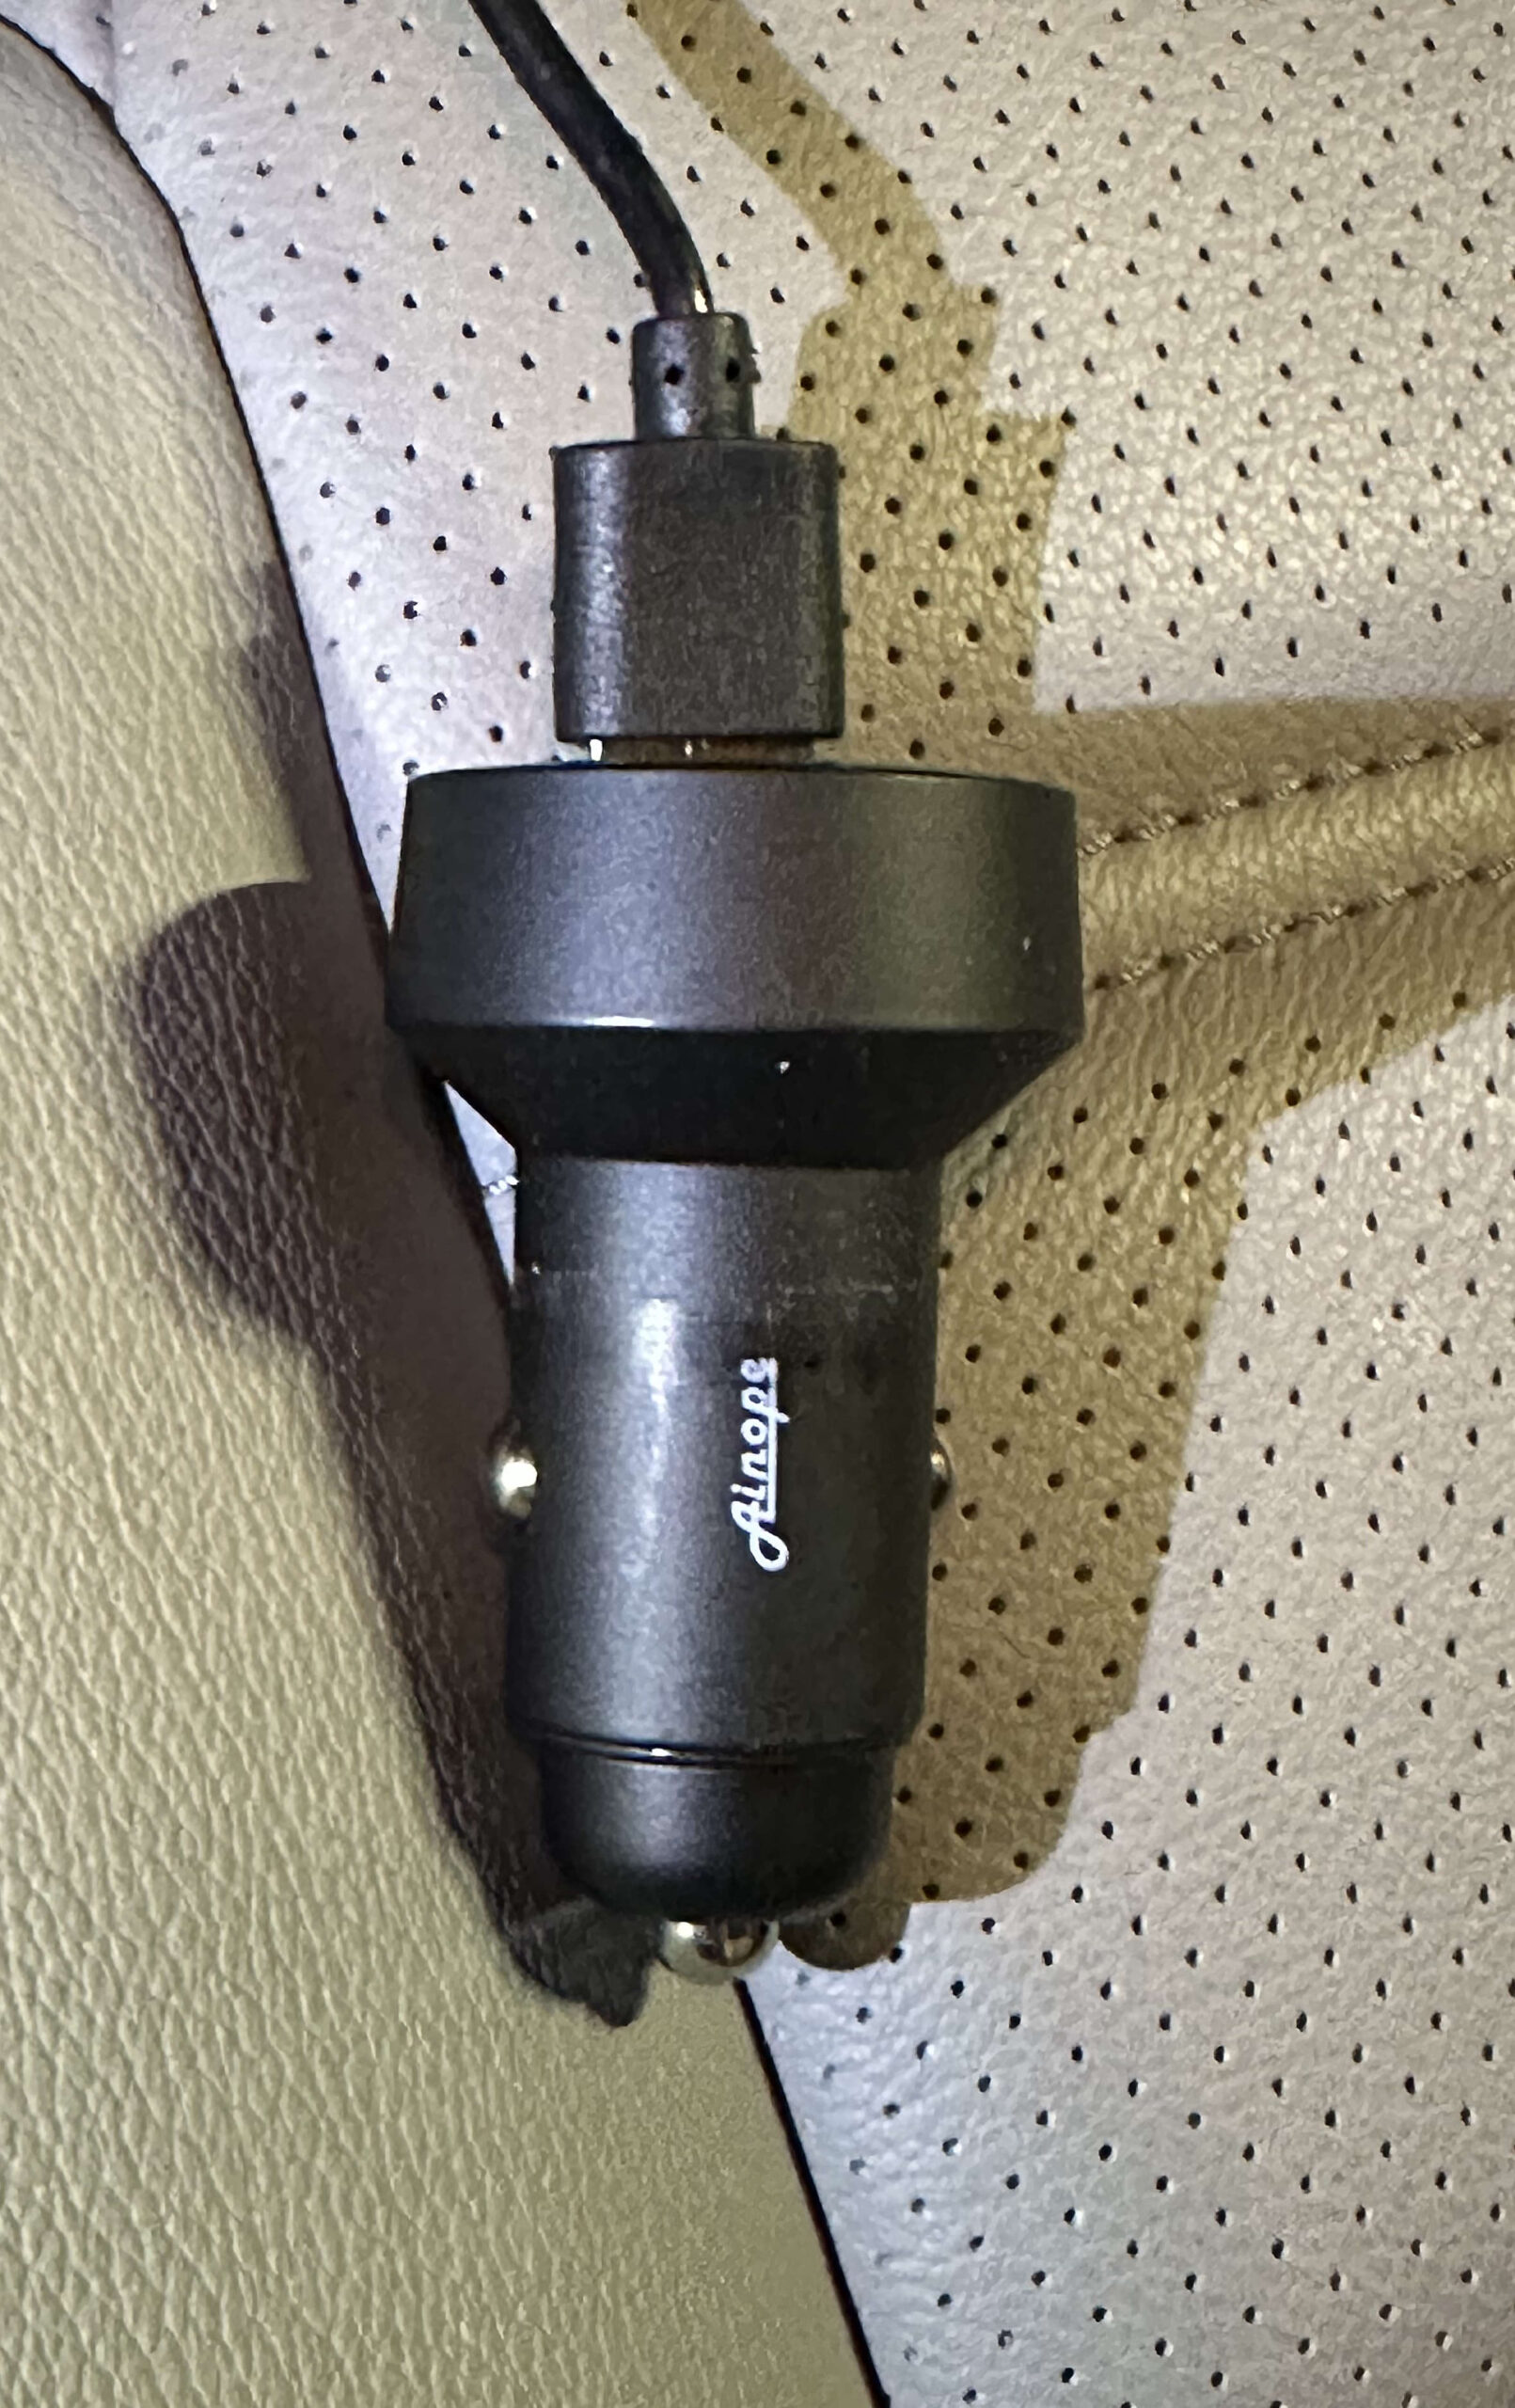
Modern cars probably have USB ports for charging and for Car Play or for playing audio. Cars tend to lag behind in technology. Many still have USB A ports. It pays to check your owner’s manual to find out which USB ports in your car will charge more quickly. My Honda has low-powered ports in the front, and higher-powered (12.5 Watt) ports behind the center console. Devices can charge twice as fast plugged into those ports.
Most cars have a 12 V accessory outlet somewhere (aka, the old cigarette lighter outlet). These can supply plenty of power. You can find modern adapters to get the USB power you need from these. They are much cheaper than a new car!
12 Volt Accessory Outlet to USB Adapter
The World is Moving Toward USB C
But, USB A will be around for a long while. You should get yourself some USB A to C adapters ( both directions) to make the transition easier. They are cheap.
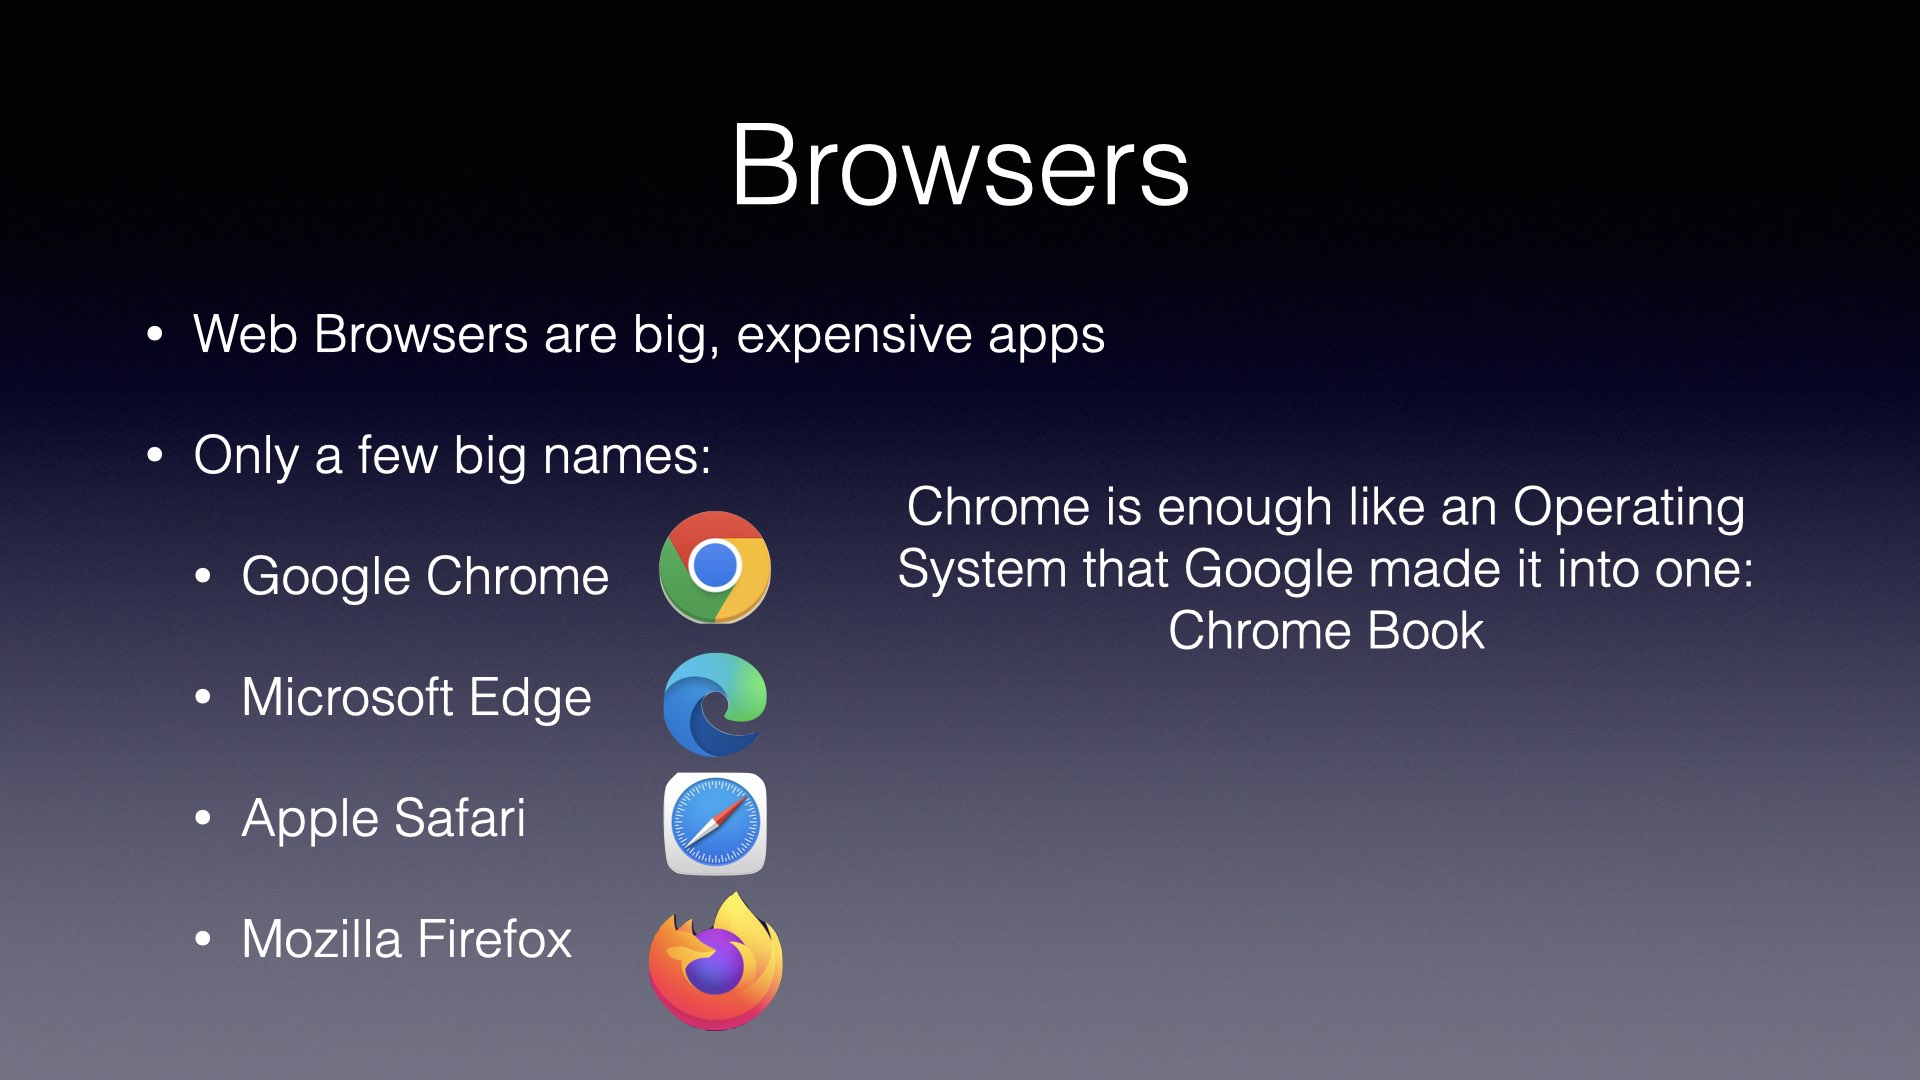
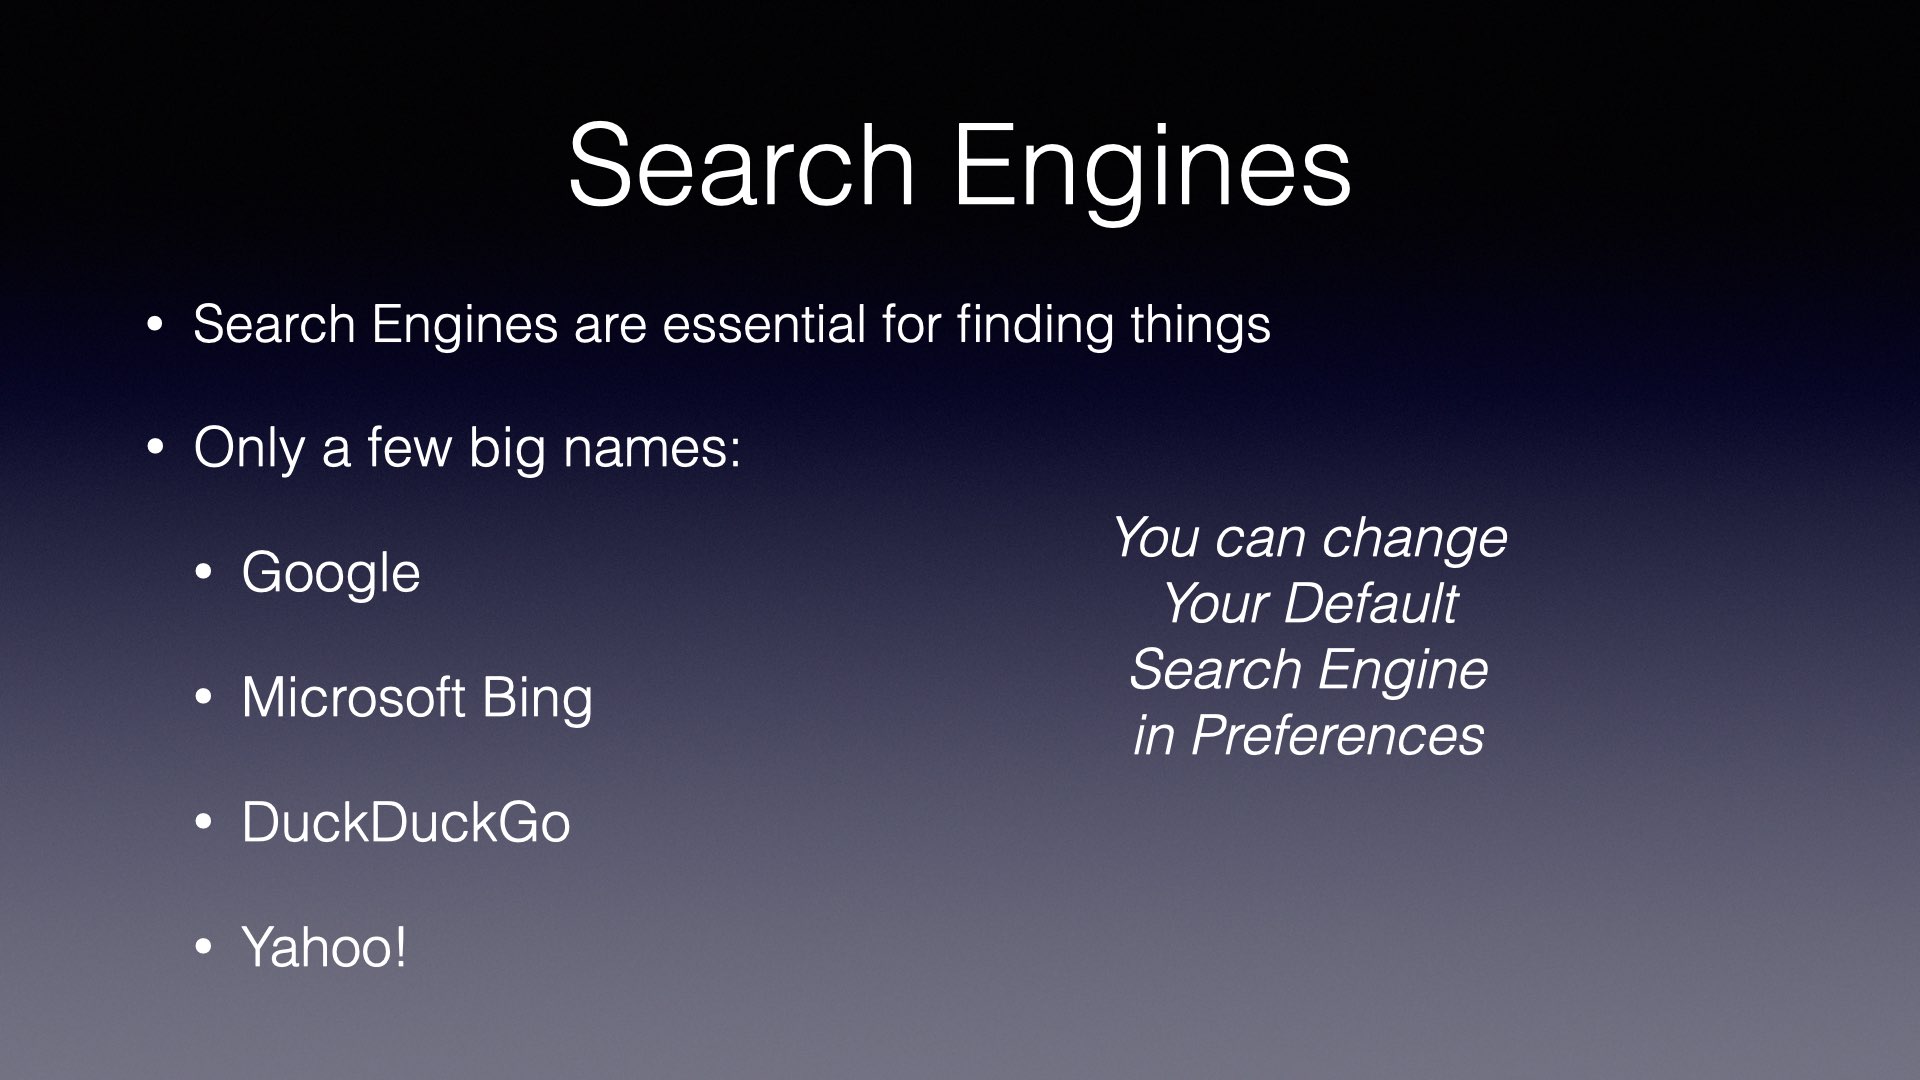
Here are the slides from the May, 2022 MacMAD meeting on browsing with Safari.
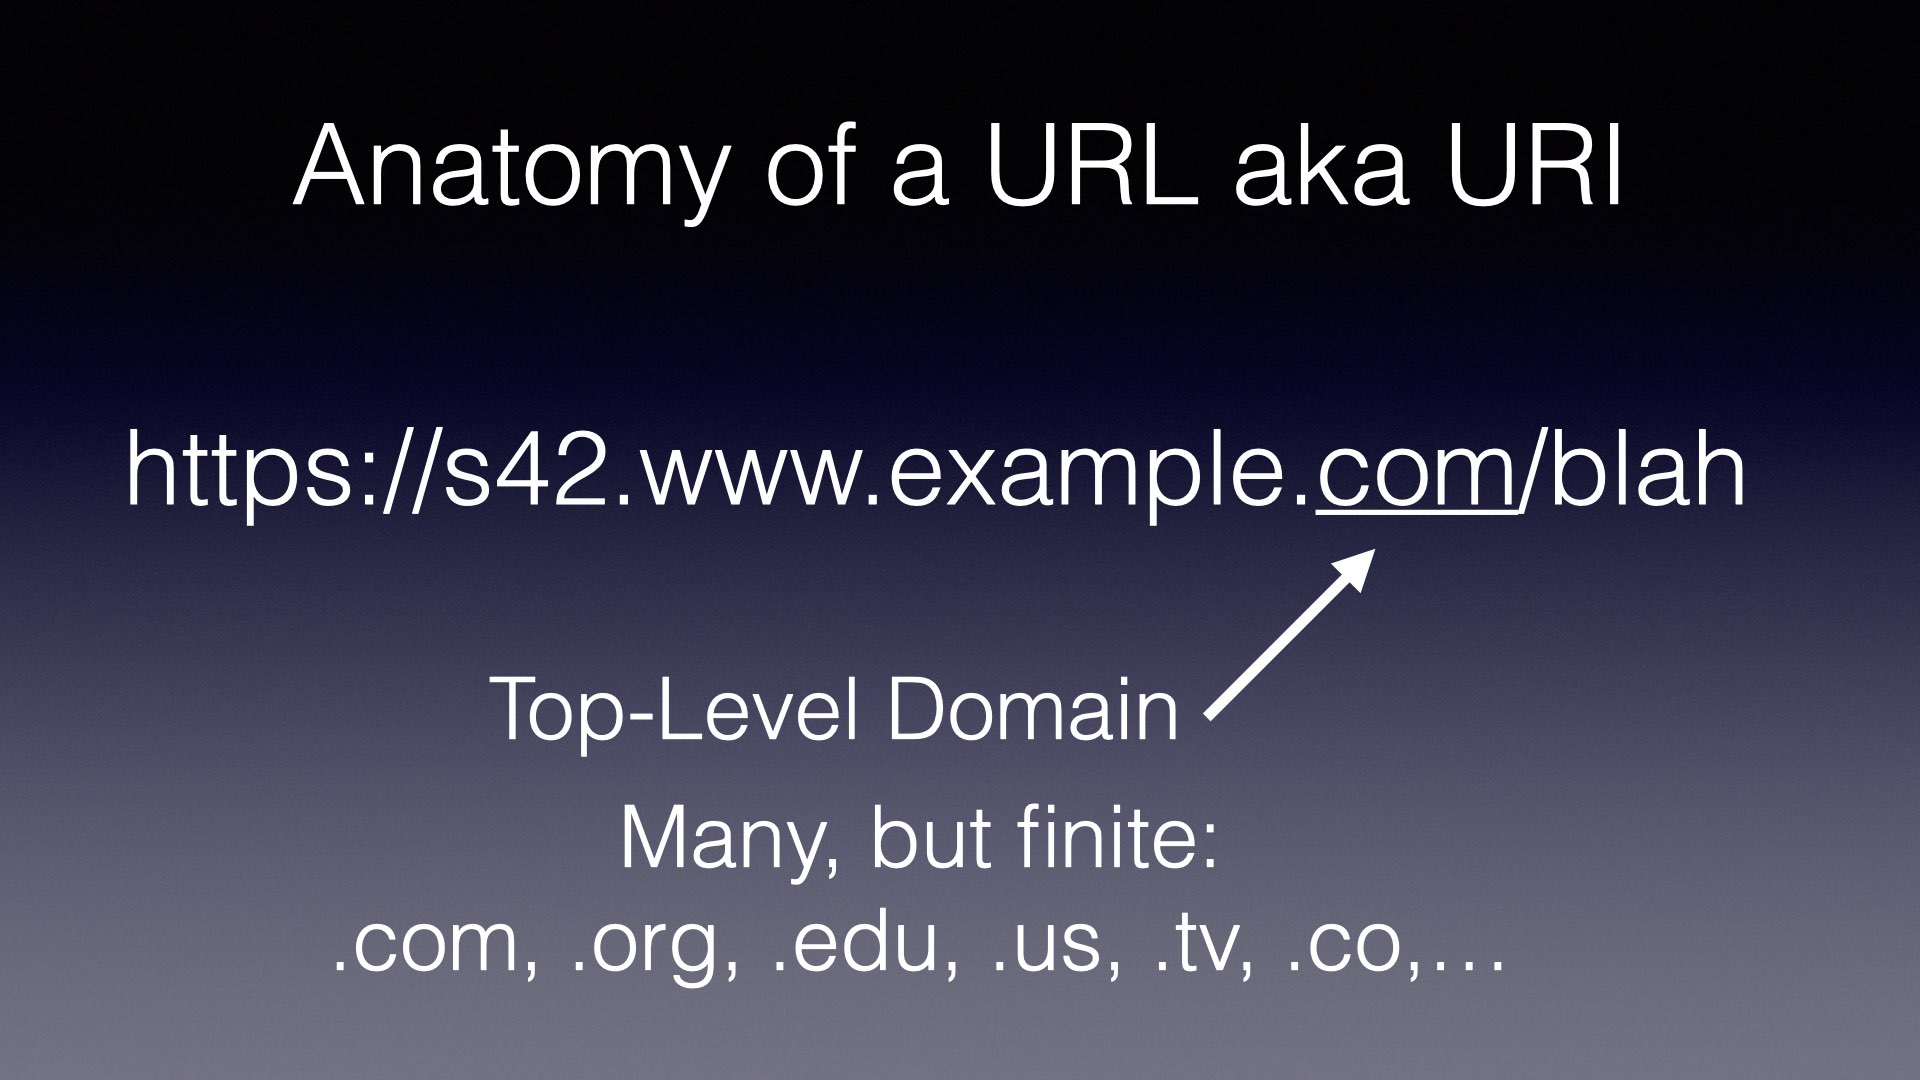
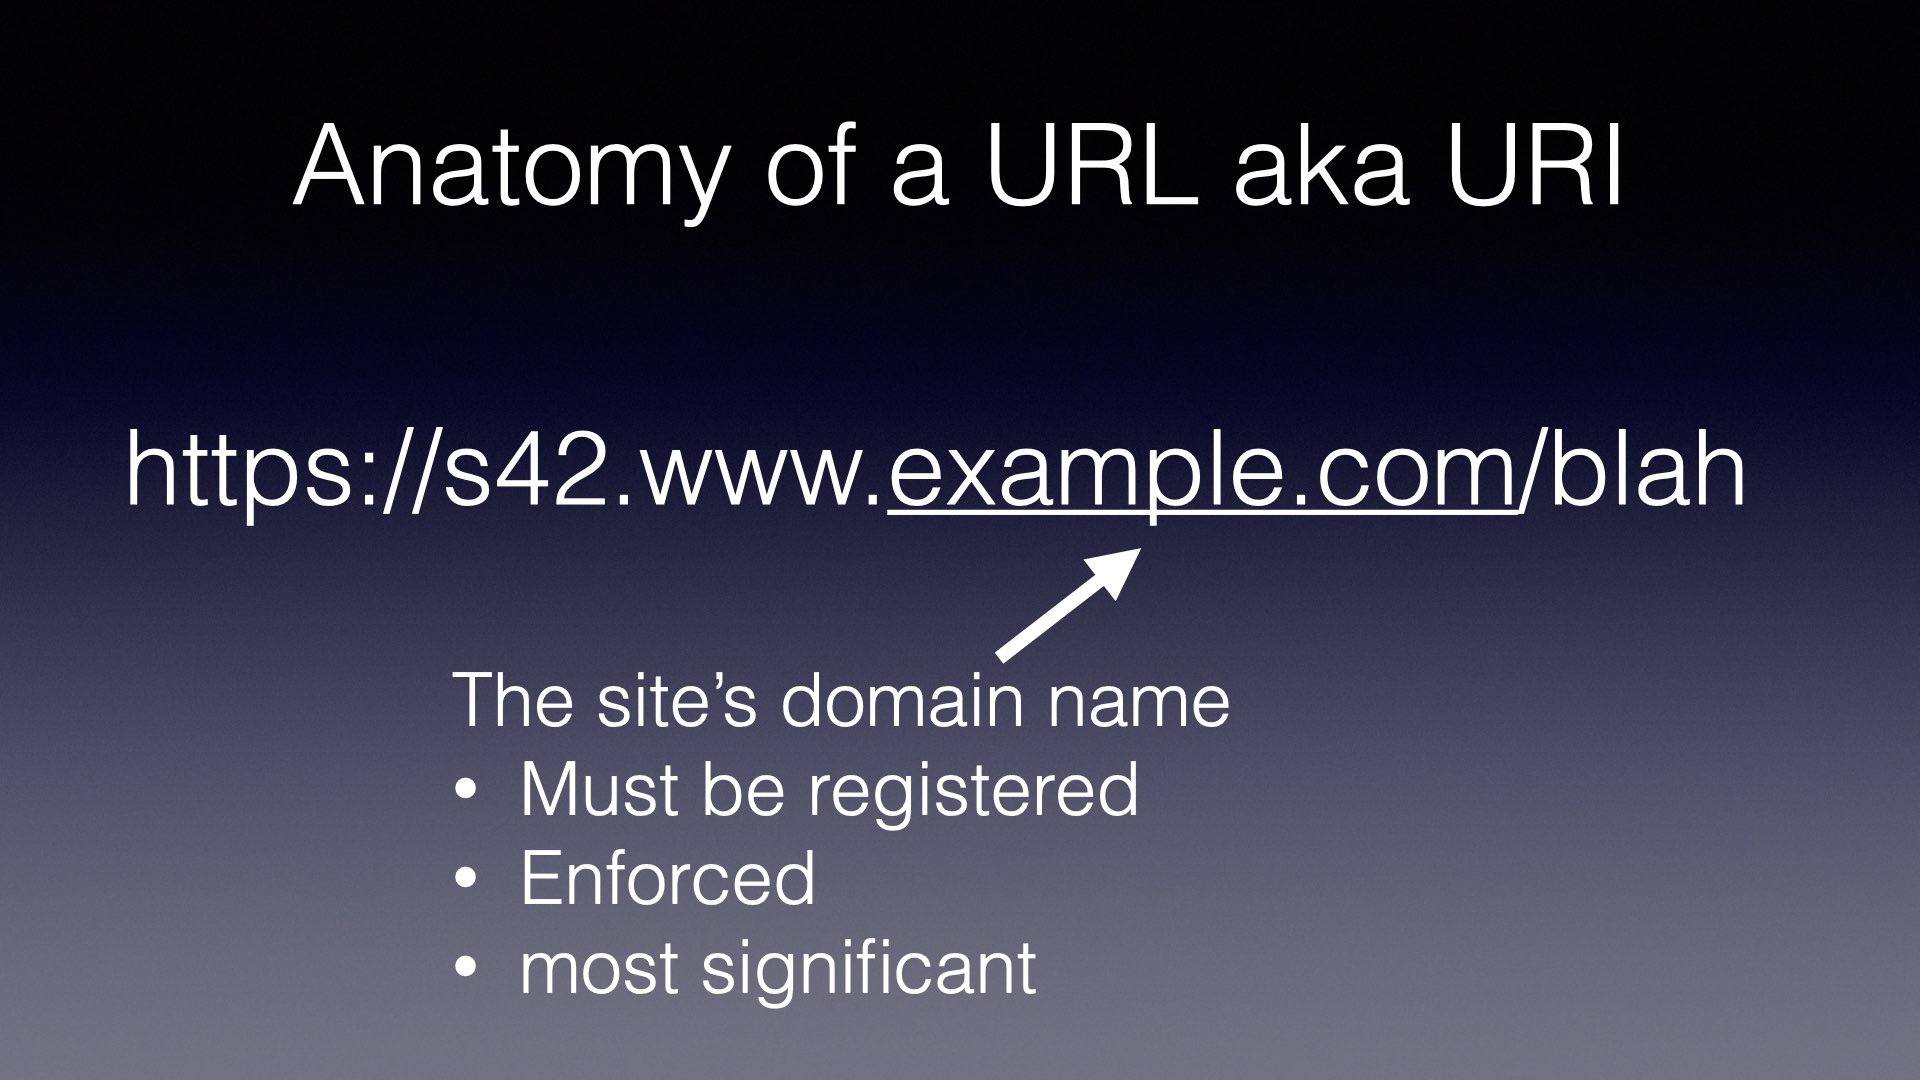
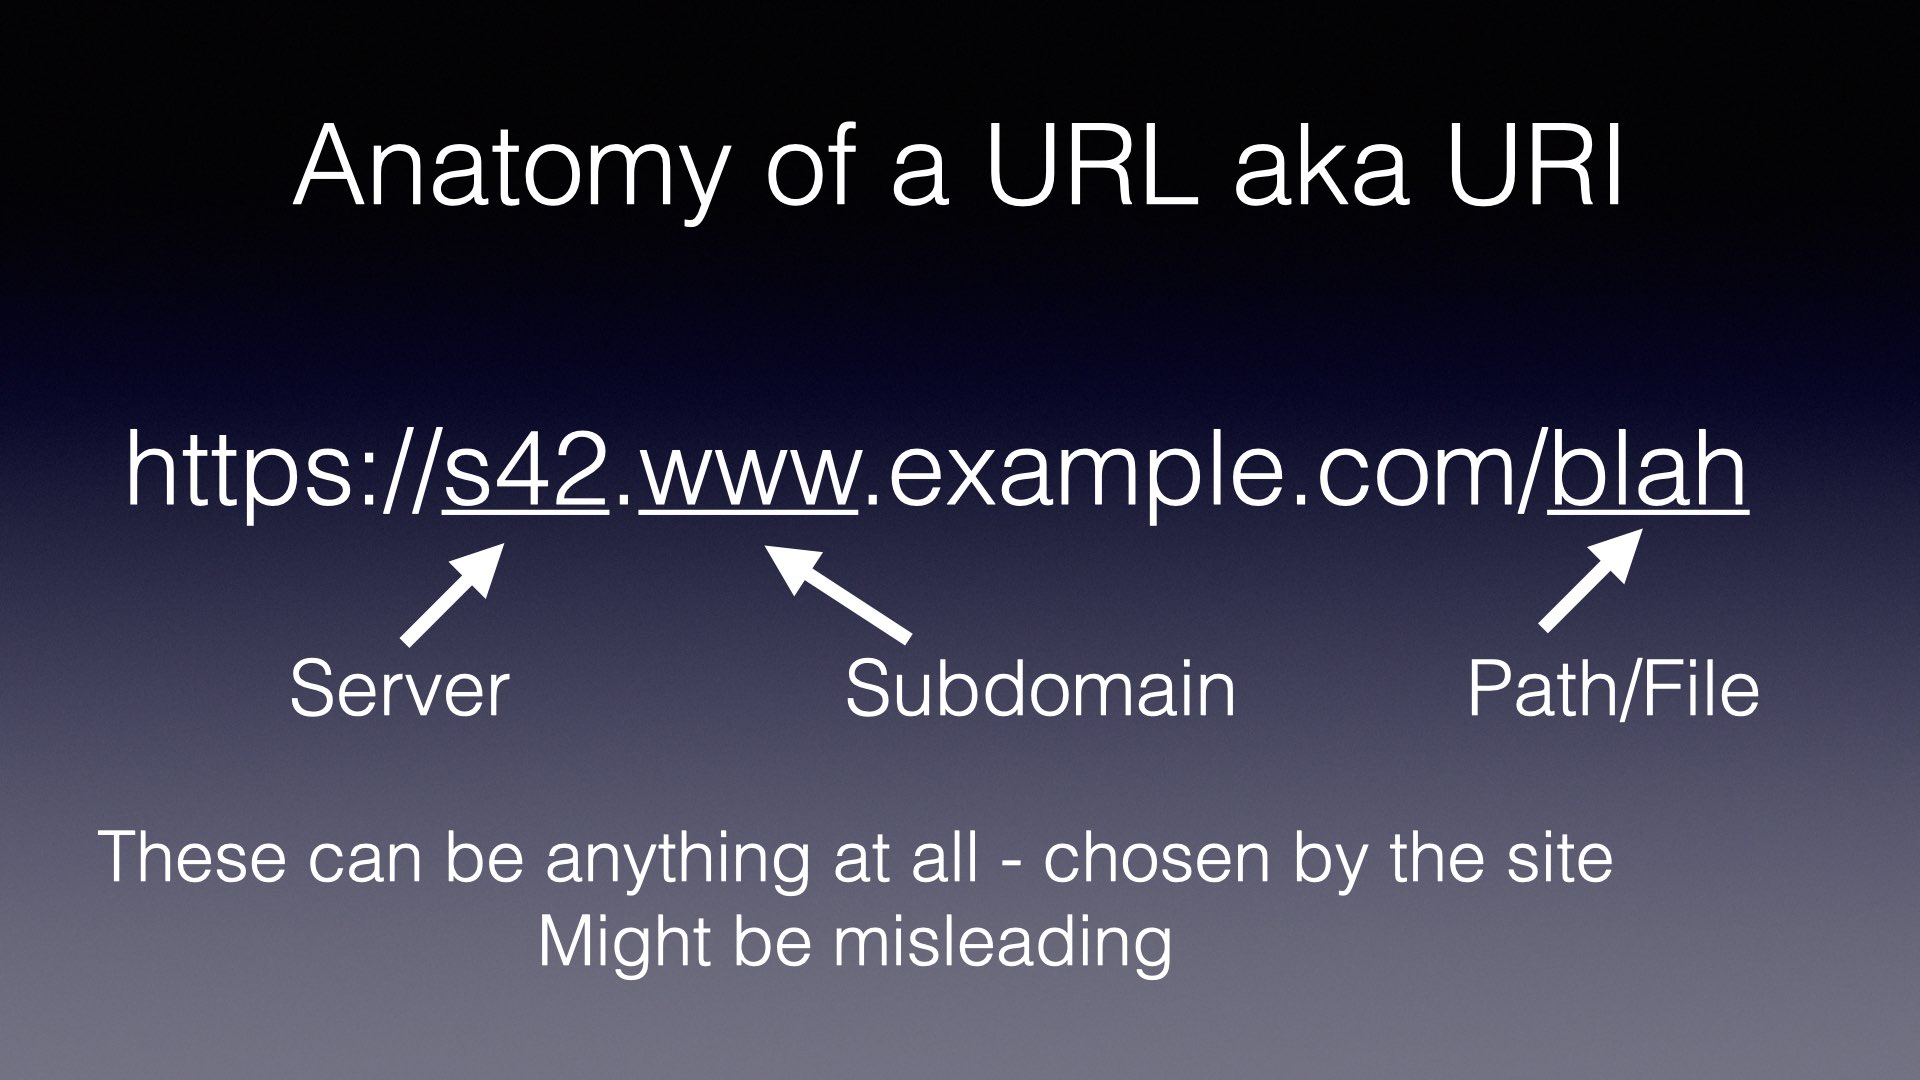
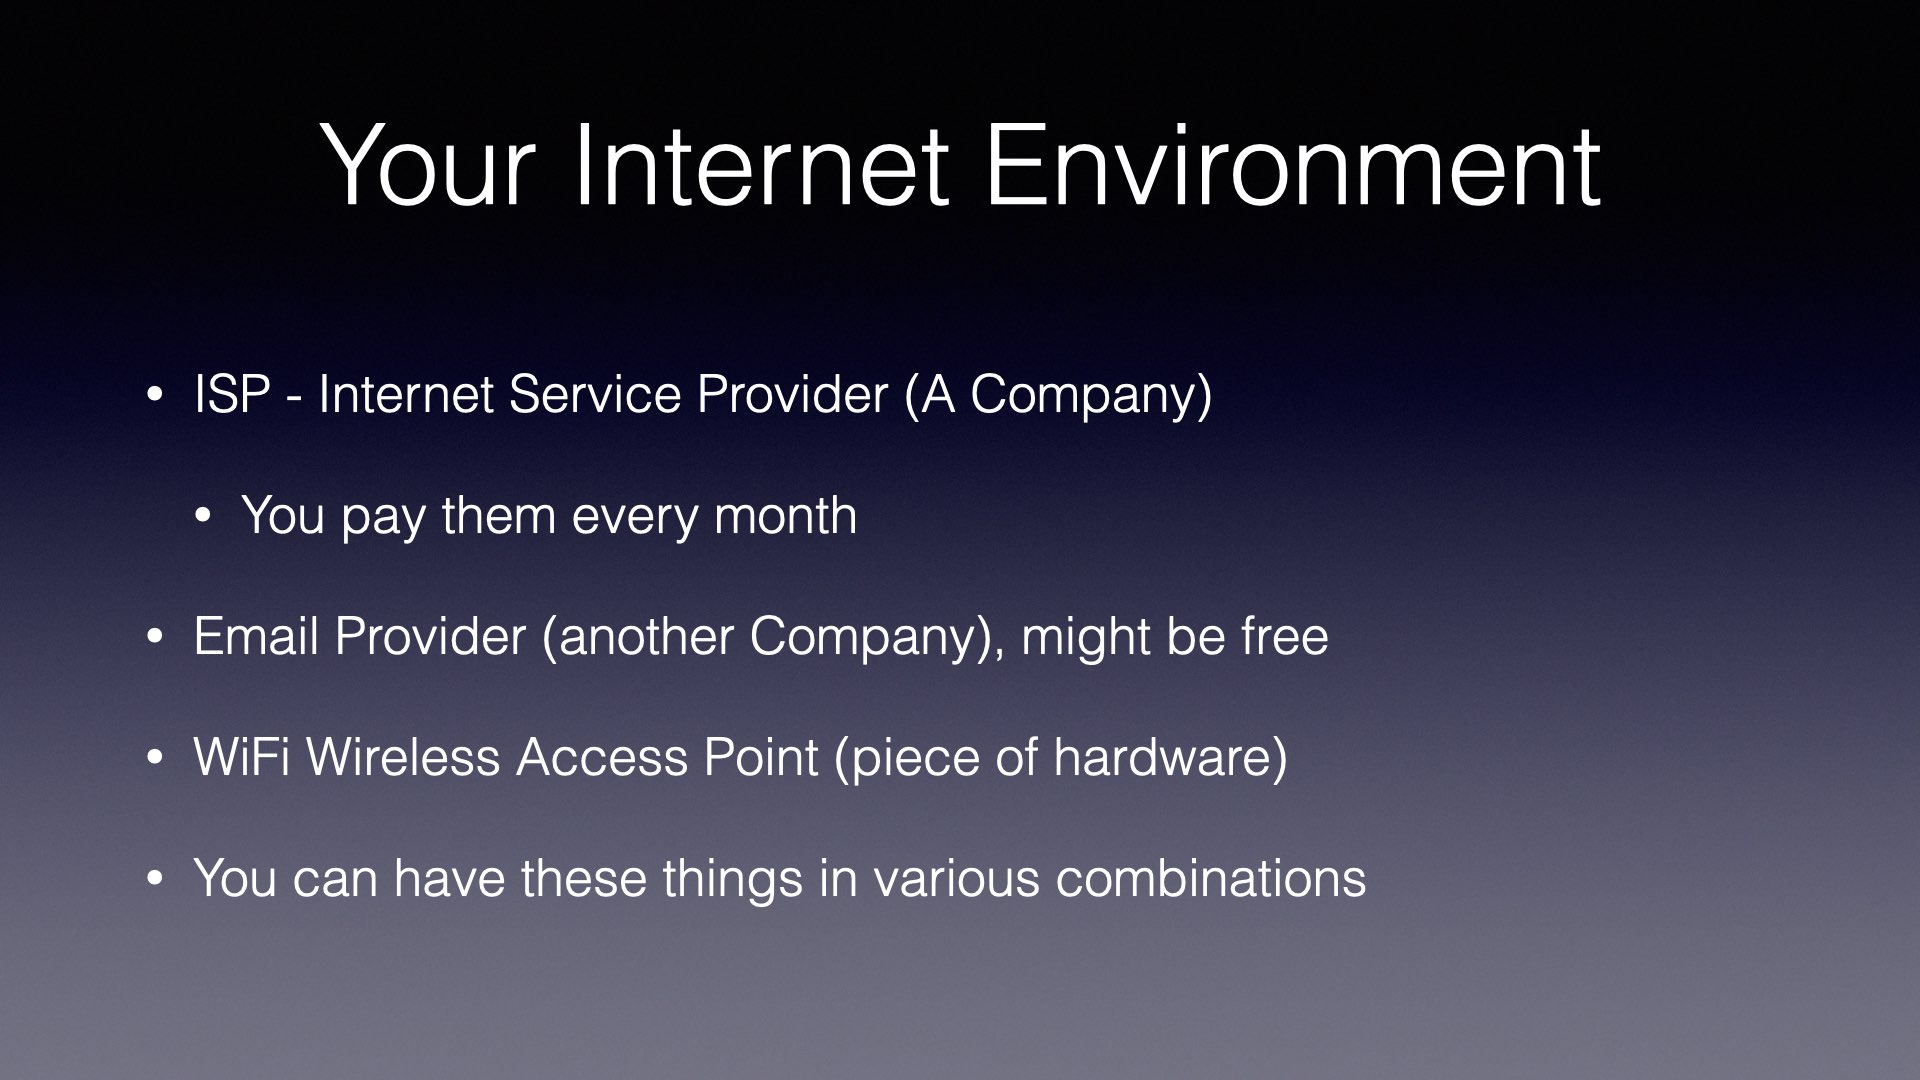
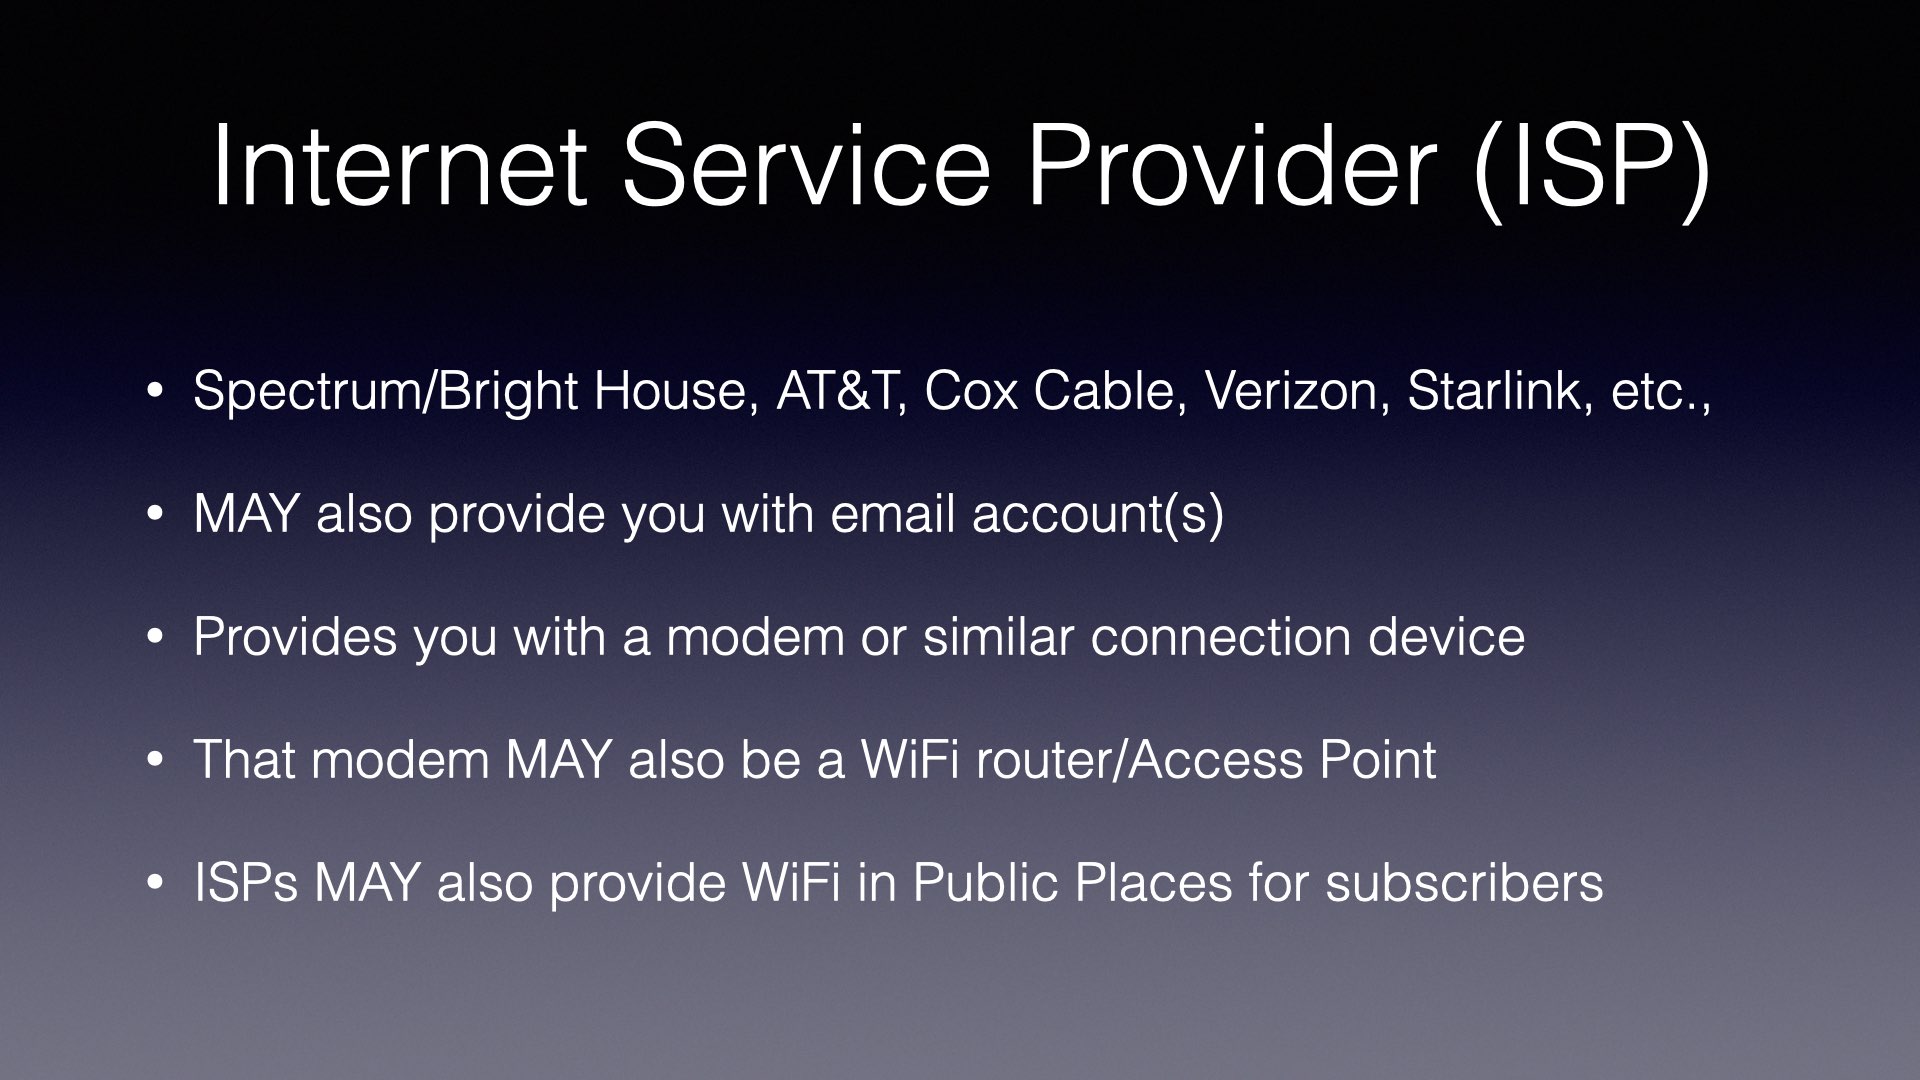
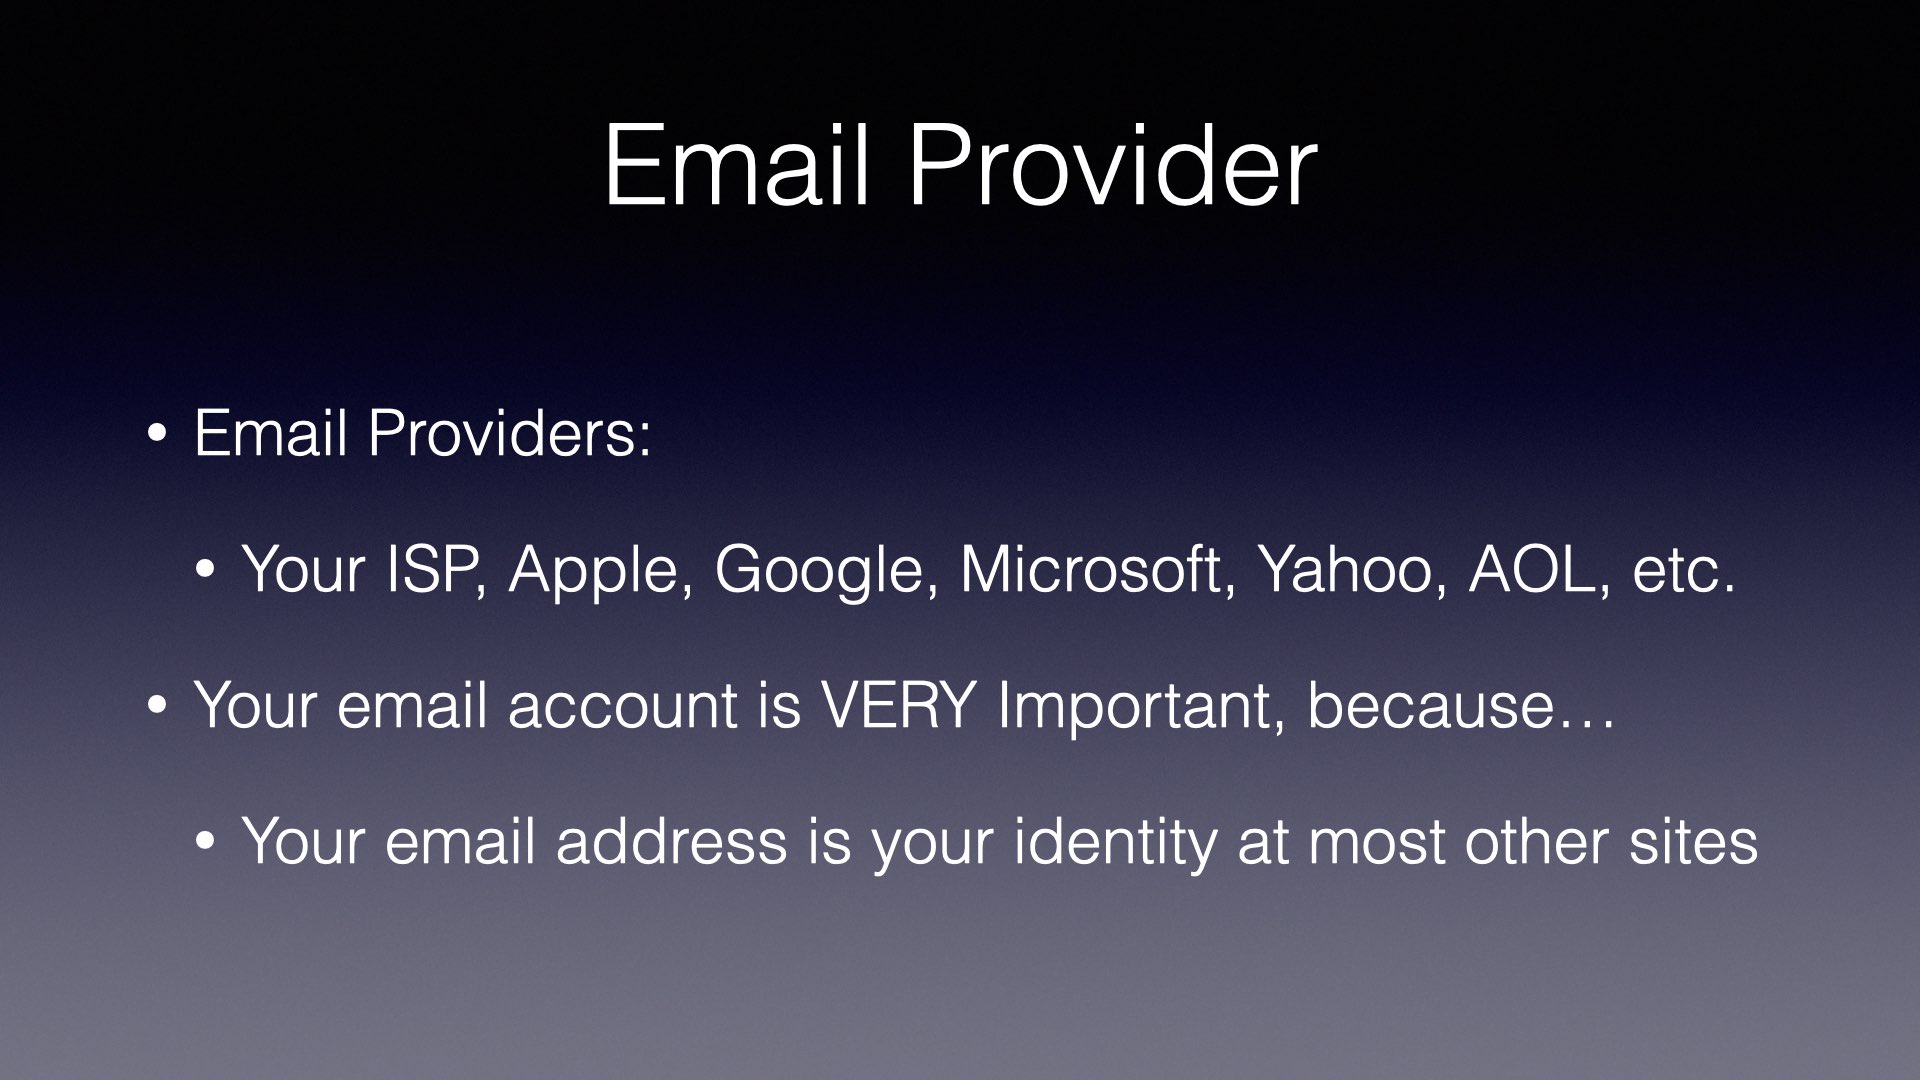
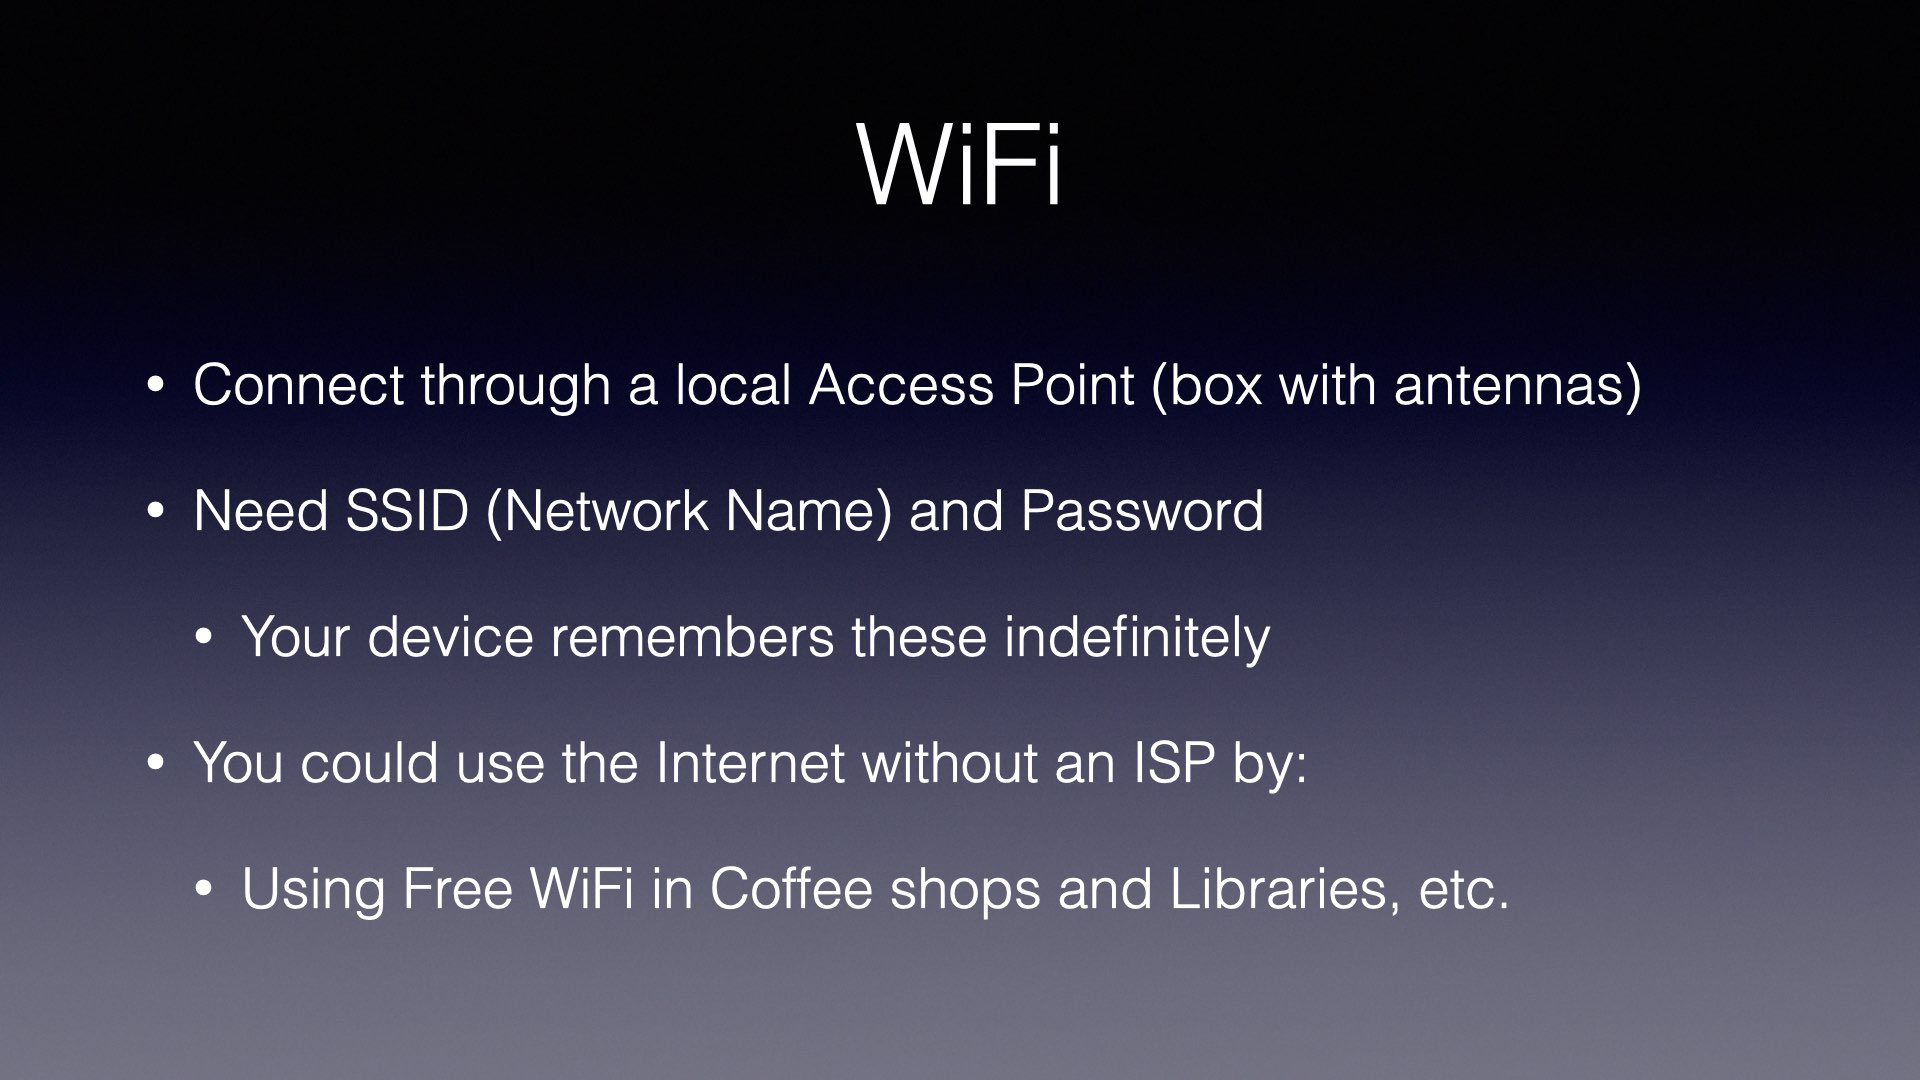
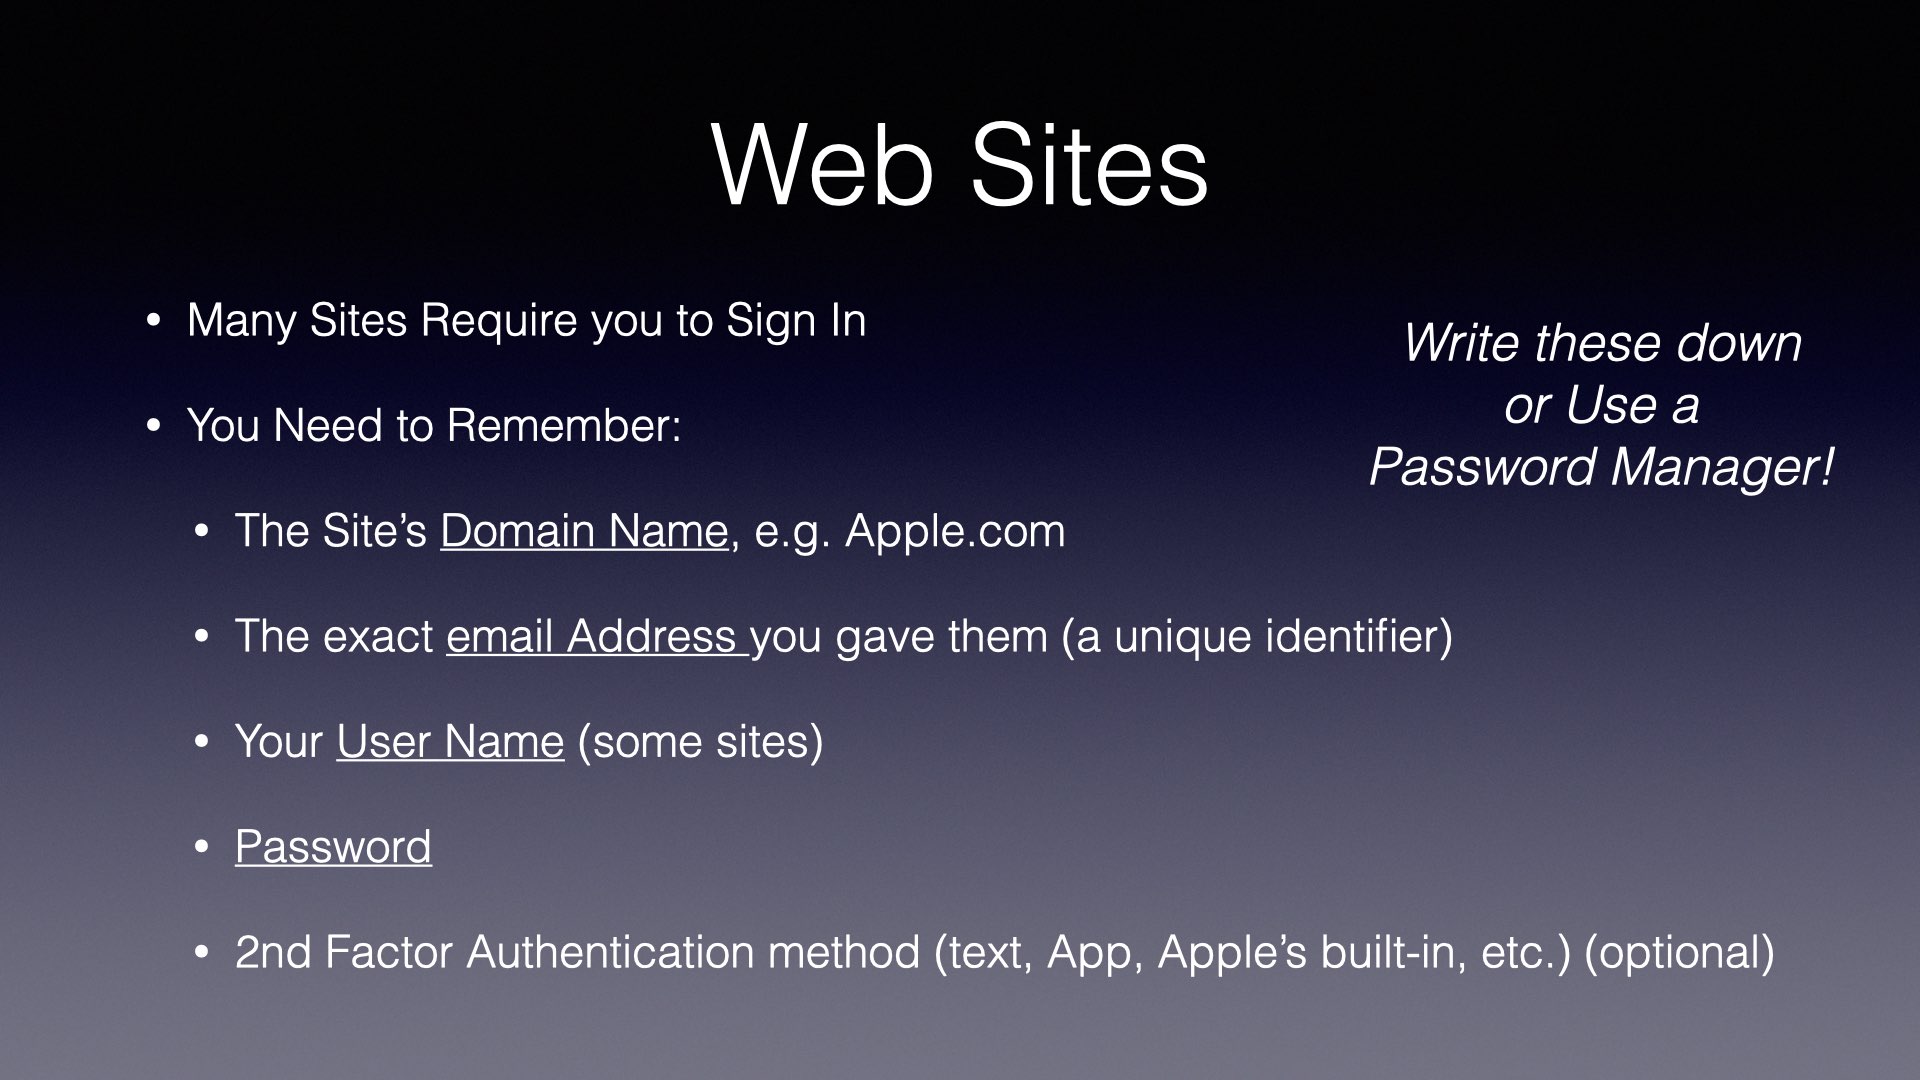
Web Browsers: Chrome, Edge, Safari, FirefoxSearch EnginesAnatomy of a URLTop Level Domain, e.g. .comDomain NameSubdomainYour Internet EnvironmentISP: Internet Service ProviderEmail ProviderWiFiWeb SitesPassword Manager: Apple Keychain
This post is part of the presentation for MacMAD’s meeting for Tuesday, March 15, 2022.
There are a number of Apps, web sites and cloud services that provide useful notifications. Of course, there are many, many Apps dying to notify you about trivial things. In this post, I’ll give you a few ways to be notified about interesting things in the real world that may be useful to you.
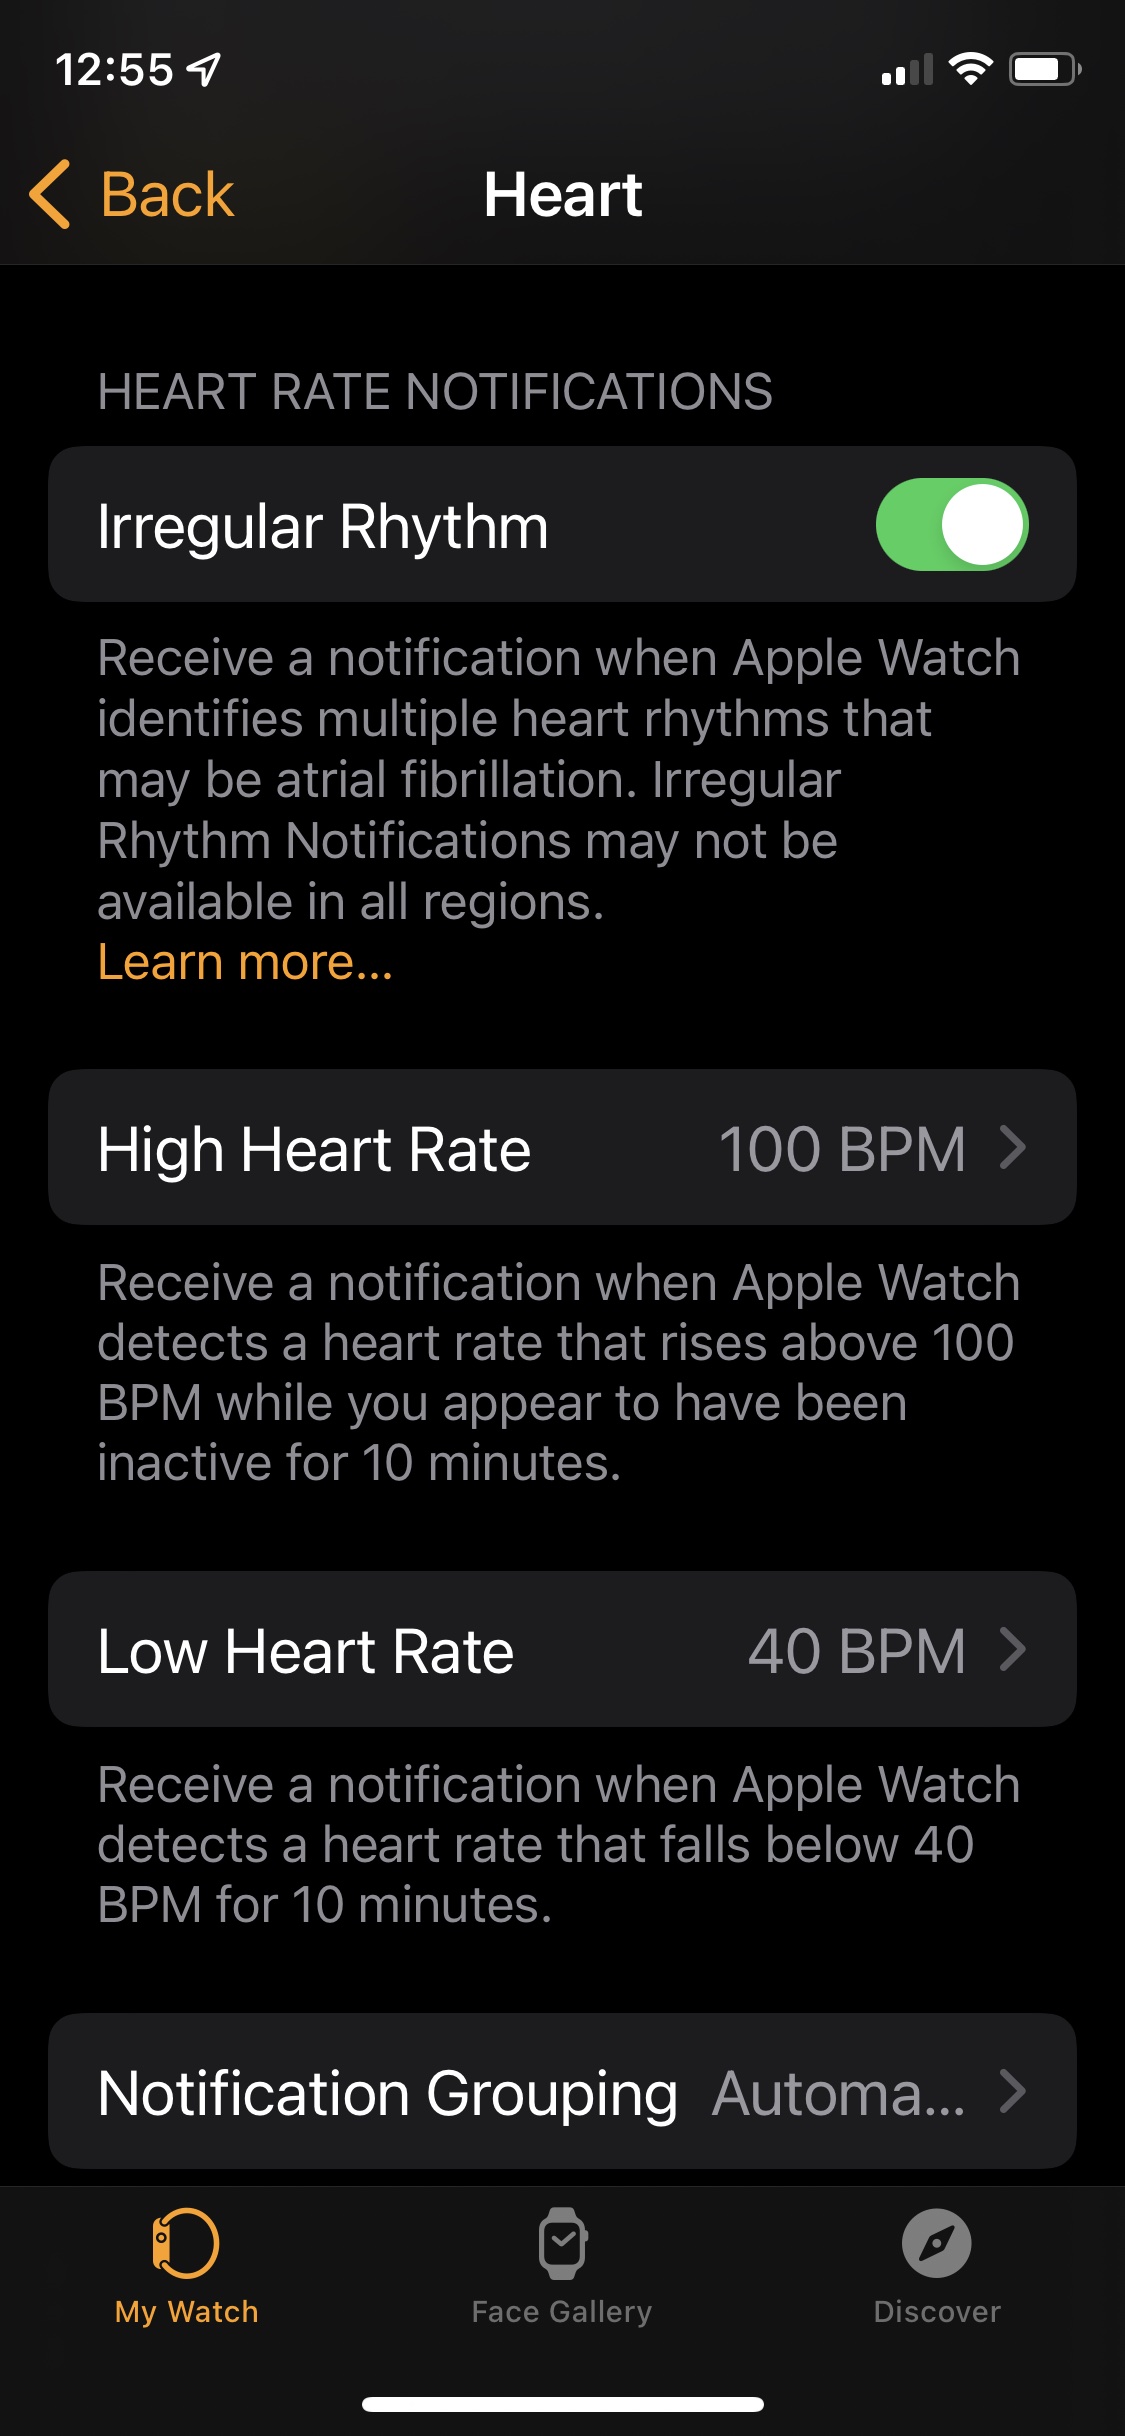
Heart Health Notifications
This is first, because it could be very important. If you have an Apple Watch, be sure to turn on the notifications for irregular rhythm in the Apple Watch App->Heart on your iPhone. These notifications have probably saved lives by prompting people to get prompt medical attention. You might want notifications for unusually high or low heart rates also.
Financial Institutions
Your bank, credit union or brokerage may support various notifications. These can range from conveniences to important security notifications. For example the Bank of America (BofA) App has notifications for various security alerts. Make sure the alerts you want are turned on in the App, and also check that your Settings allow notifications from that App. In this case, under Settings->Notifications->BofA.
BofA App Security Alerts Configuration Screen
Local Emergency Alerts
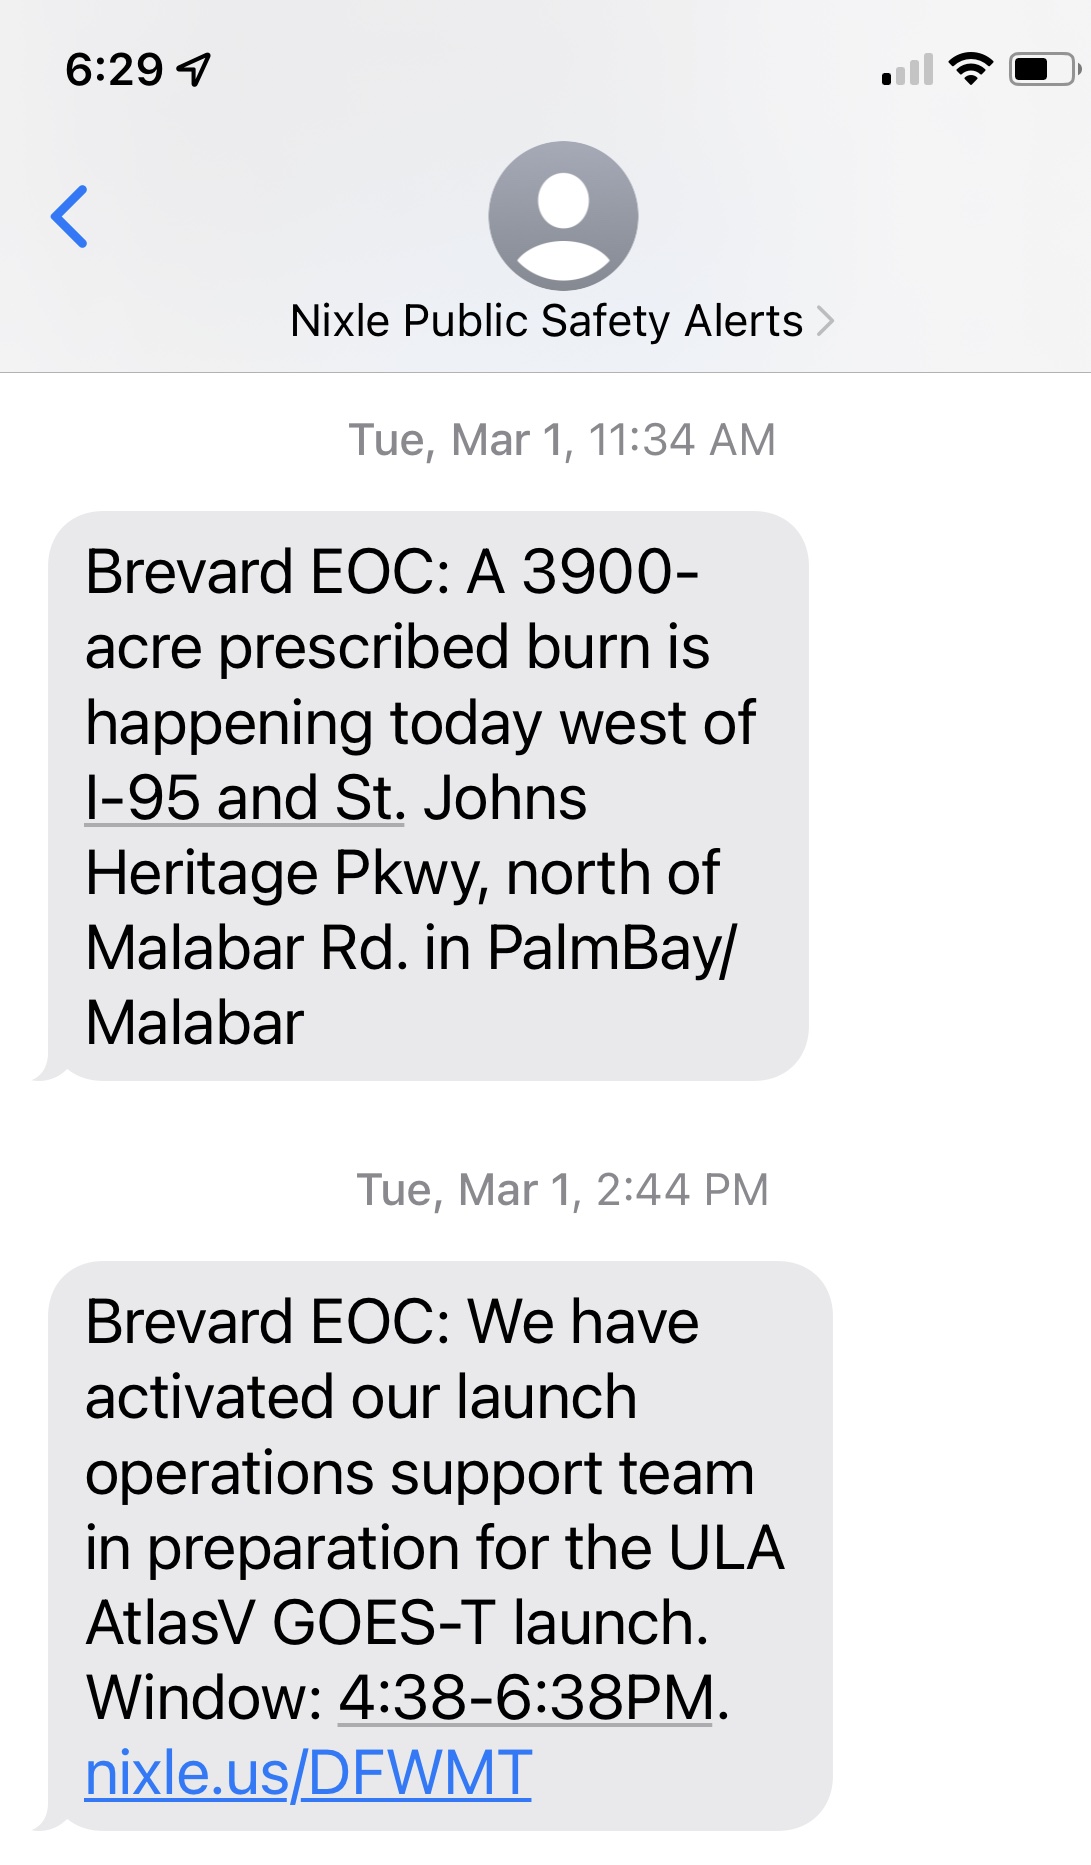
The web site Nixle.com is used by local governments to broadcast emergency and other information of local interest. You don’t need to sign in or anything. If you send your zip code by text message to 888777, that will subscribe you to text notifications for your local area. What that means depends on where you are. Not all locations in the U.S. use the Nixle service, but many do. Here in Brevard County, you’ll get texts notifying you of things like road closures, brush fires, hurricane information, and Rocket Launches. (The Brevard Emergency Operations Center (EOC) activates for each launch in case of a launch accident.)
Nixle Text Alerts for Controlled Burn and Atlas Launch
Roads and Traffic
Your local governments may provide notifications of traffic problems in your area.
Here in Florida, the site FL511.com provides very specific customizable alerts for traffic problems on Interstates. It is only for the Interstates and other major roads. Here in Brevard it applies to I-95, US-1, A1A, and maybe the major causeway roads. You have to create an account, and sign in, but then you can create favorite routes and set up alerts for those routes in case there are any “incidents”, etc. You can specify to be alerted only within certain hours, and certain days of the week or month. You can also specify to be alerted only when travel times are expected to exceed a certain percentage of normal. Notifications can be by text or email.
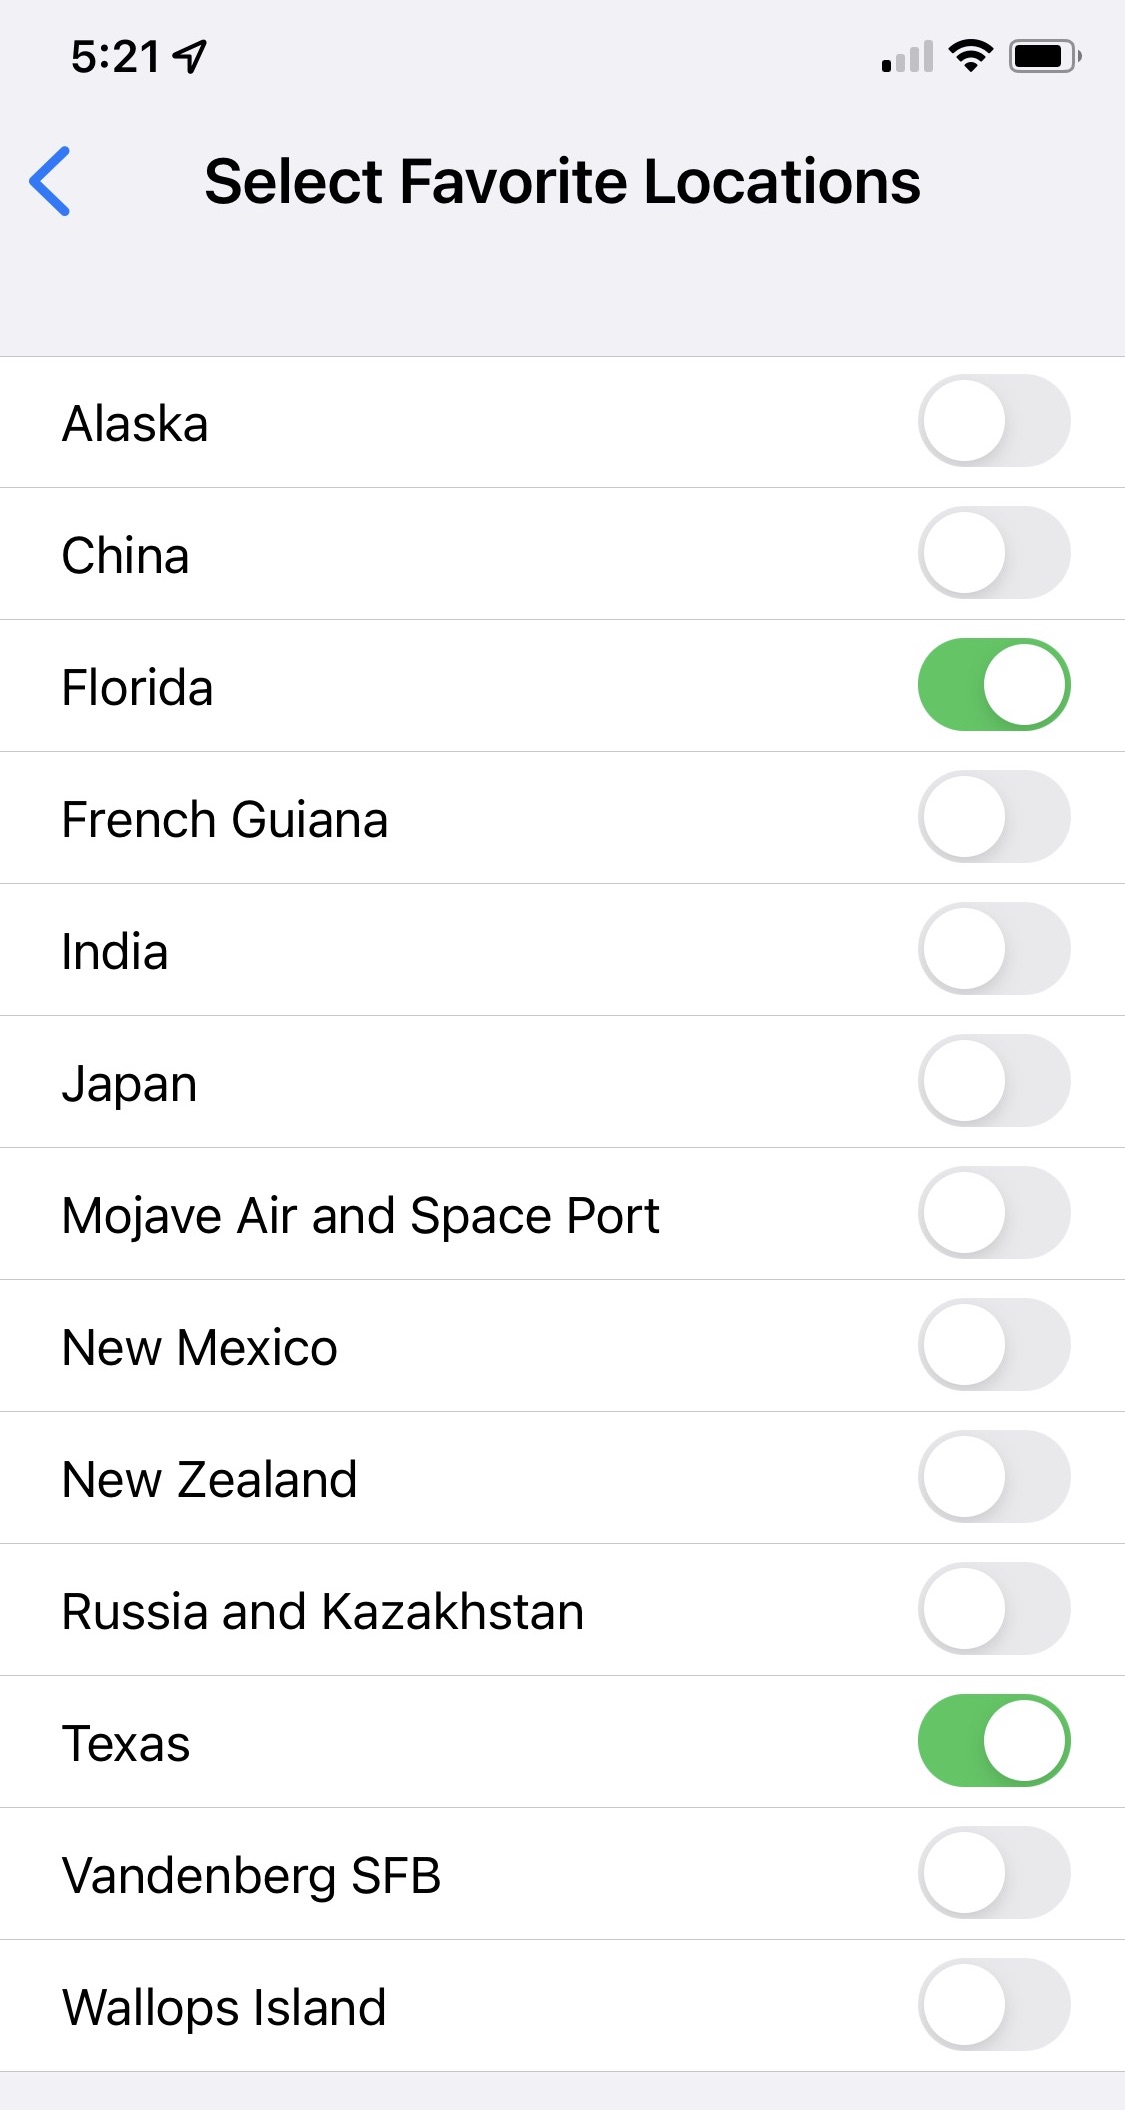
The Next Spaceflight App is great for those of us on the Space Coast who like to follow local rocket launches. Because the App covers rocket launches world wide, you will probably want to specify your favorite launch sites so that you are not bombarded with launch notifications from distant continents.
Favorite Launch Locations Selection
You can specify to be notified a day before each launch, an hour before the launch, or 10 minutes before the launch, or any combination of those.
Custom Searches
You can save a specific search on eBay. This can be helpful if you are looking for something that rarely comes up for sale. When your search term is matched, you will get an email. If you save a search for a common item, you will get eBay notification messages every day. The usefulness of this may depend on how carefully you choose your search terms. Remember, you can include a minus sign to exclude certain words from your search.
Of course, you must have an eBay account and be signed in to create saved searches. I use this to search for items that may be relevant to my family genealogy. I have found several interesting items by this method.
You can also use Google Alerts to perform similar searches on any web site or on the web in general. You can focus your search more exactly using hints from Google Advanced Search. Again, it might be helpful to exclude common but undesired words with the minus sign. You can limit your search to a particular site with the site: keyword. For example, searching for:
iPhone site:macmad.org
Will find the word iPhone, but only on macmad.org.
Other Notifications
Weather – The Dark Sky app, now owned by Apple, has timely, local notifications
Package Delivery – Amazon, and UPS can notify you of package deliveries
Utilities – FPL can notify you of power outages and power restoration estimates
Security – Burglar Alarms, Security Cameras, Motion Sensors, your car, etc.
Customize your Notifications
You can customize notifications to your preference for iOS and iPadOS in:
Settings->Notifications
In the Notifications settings, you can adjust the settings individually for each app, specifying whether it is allowed to send you notifications, and what type (badges, alerts, sounds and or banners). For notifications sent by email, you can prioritize them by adding the sender to your contacts list and marking them as a VIP (with the star). Add contacts to your VIP list using:
Mail App->Mailboxes->VIP->ⓘ
Then you can allow VIP-sent emails to give you different notifications than your other routine emails:
This post is part of the MacMAD presentation meeting for Tuesday, March 15, 2022. See also iPhone Super Powers.
The Best of the App Store for iOS
Many iOS/iPadOS Apps are free. Most Apps that are not free are less than $3.00. Some are more expensive, or have in-App purchases or subscriptions.
Many people consider that one of the best decisions made by Apple was to allow 3rd party apps on the iPhone. It’s hard to believe that when the iPhone was introduced in 2007, Apple wasn’t initially sure Apps would be supported. The App Store was only introduced in 2008.
There are now about 2 million Apps in the iOS App store. Because it is so easy to buy and install Apps, even the most technophobic of iPhone users have typically installed several favorite Apps. Many iPhone users have so many Apps installed that they have trouble keeping track of them all.
You Must Setup a Credit Card
Because it is a store, and you might buy things, you need to setup a credit card under
Settings ->Apple ID
Once you have done this, you are ready to shop for Apps.
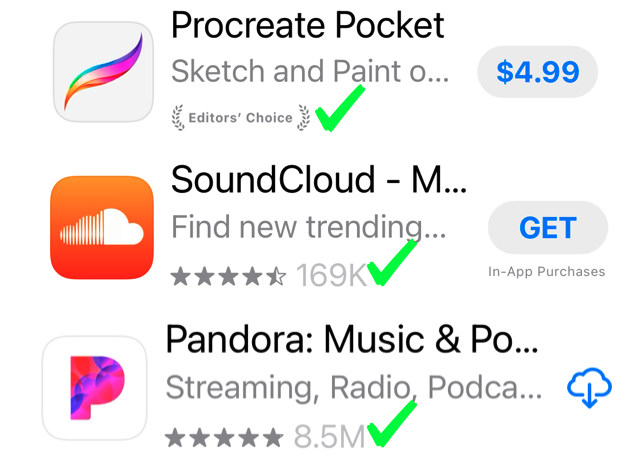
There are three categories of Apps with different information in the “Price” button.
Apps can have a price, or the word “GET”, or a cloud download symbol.
In the App Store, you will see some apps with the word GET instead of a price. Those apps are free. If you see In-App Purchases, then there are aspects of the App you will be asked to pay for later, while using the App.
If you see the cloud download symbol, that means that you already own that App, but it is not currently installed on your device. Maybe you bought or downloaded it on a different device, or maybe you previously had it installed but deleted it. In any case, you can click the icon to download it now for free.
In the figure above, you will see how to spot a reputable app. An App with the Editor’s Choice notation is highly recommended. An App that has hundreds of thousands or millions of downloads and four or five stars is also a very reputable App. Be a bit suspicious if an App only has a small number of downloads, or is “Too new to rate”, or has a low star rating.
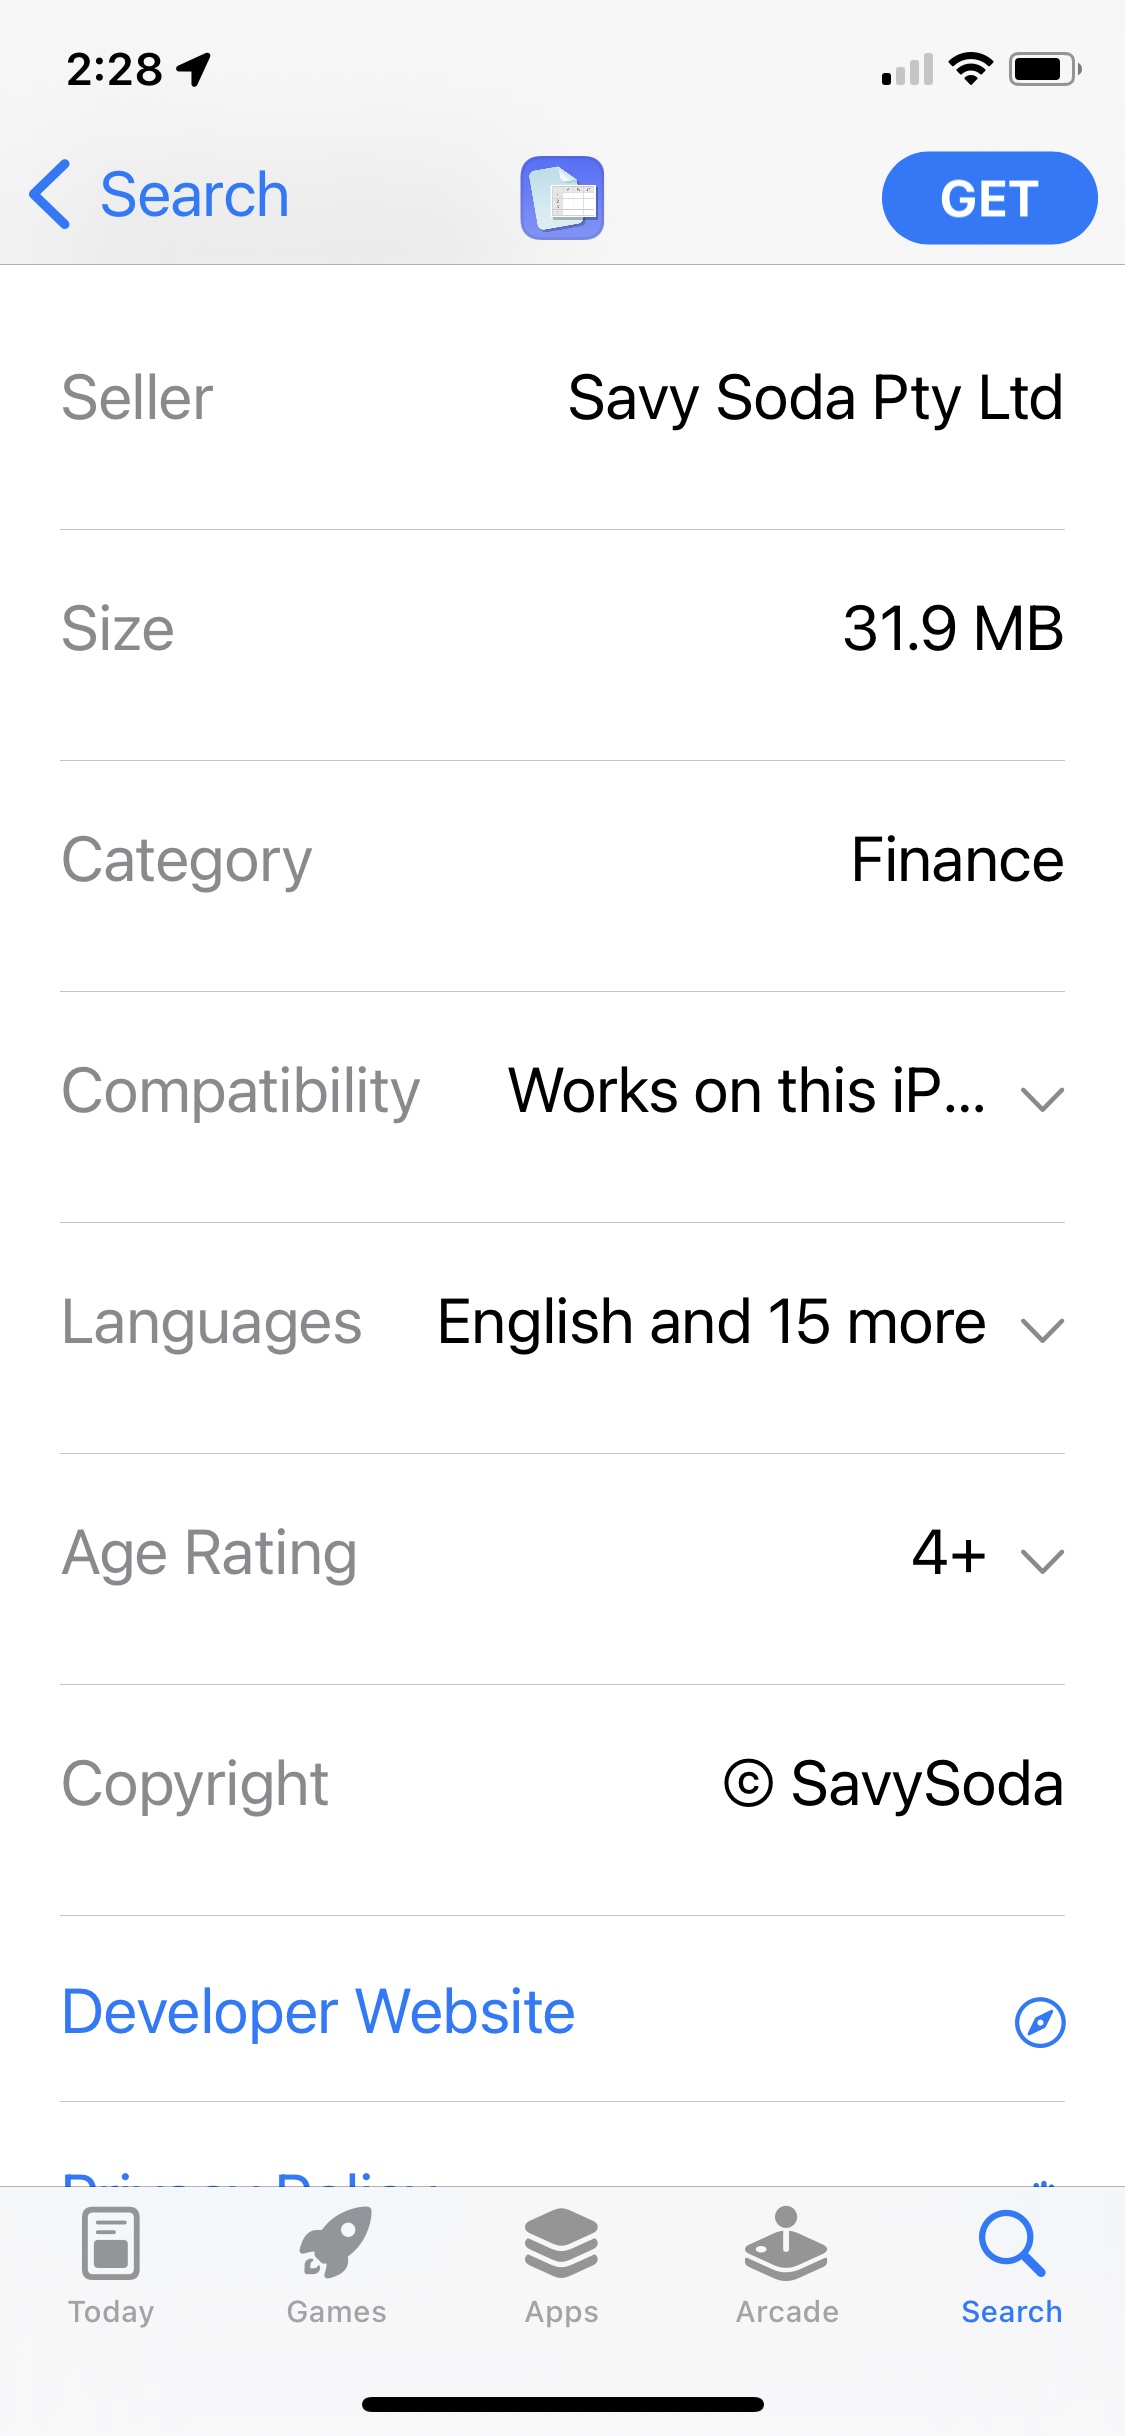
Check the Developer/Seller’s Name
If you are expecting the App to be something specific, make sure that the Seller and Copyright fields are what you are expecting. Some Apps have similar names or icons to other, more popular Apps.
Popular App Categories
Social Media
Games
Shopping
Audio, Video and Books
Travel and Navigation
Office Apps – Microsoft ‘s Office, Apple’s Apps
Consider Getting Apps for…
Favorite Stores & Restaurants
Local News, Weather and Information
Your Car and Home
Some car brands have their own apps. For your home, some devices such as locks, cameras and energy monitors have their own Apps. Of course, there is also Apple’s own Home App for all your HomeKit devices.
Mactracker – Guide to the many versions of Apple hardware
AnyList – Handy Family Shopping Lists and Checklists. iOS and Mac
Password Managers
I recommend you use some sort of password manager. Apple’s built-in Keychain feature is improving, but if that isn’t good enough for you, try these. No particular order:
A day of acquaintance, And then the longer span of custom. But first — The hour of astonishment.
– Bill Atkinson, c. 1987
This post is from MacMAD’s presentation meeting for Tuesday, March 15, 2022. See also The Best of the App Store.
These are some capabilities of the iPhone that typically make people’s jaw drop in amazement and say “It does what?” the first time they hear of them.
Your iPhone Receives Signals from Russian Satellites
It also receives signals from US military satellites, and those of the European Space Agency, and Japanese and Chinese governments. These are all part of the navigation features usually lumped together as “GPS”.
GPS – United States Global Positioning System, originally military only
GLONASS – Russian Navigation Satellites
Galileo – European Space Agency Global Navigation System
QZSS – Japanese Satellite Positioning System
BeiDou – Chinese Navigation Satellite System
iPhone uses all these systems as required to determine your position as quickly and precisely as possible.
What is that thing?
Your iPhone / iPad can often answer questions of the “What is that thing?” variety. Sometimes an App is required, and sometimes you already have what you need.
What is that Airplane?
“Hey Siri, What Airplanes are overhead?”
The response comes back in tabular form from Wolfram Alpha, listing nearby flights and their positions in the sky.
List of nearby aircraft in flight
Siri automatically invoked Wolfram Alpha in this instance, but Wolfram Alpha is a website which can answer many types of questions. It is primarily oriented towards mathematics and engineering, but can respond to a fantastic variety of queries about factual information. There is also the Wolfram Alpha App ($2.99 + extras), and the free Wolfram Alpha Viewer App.
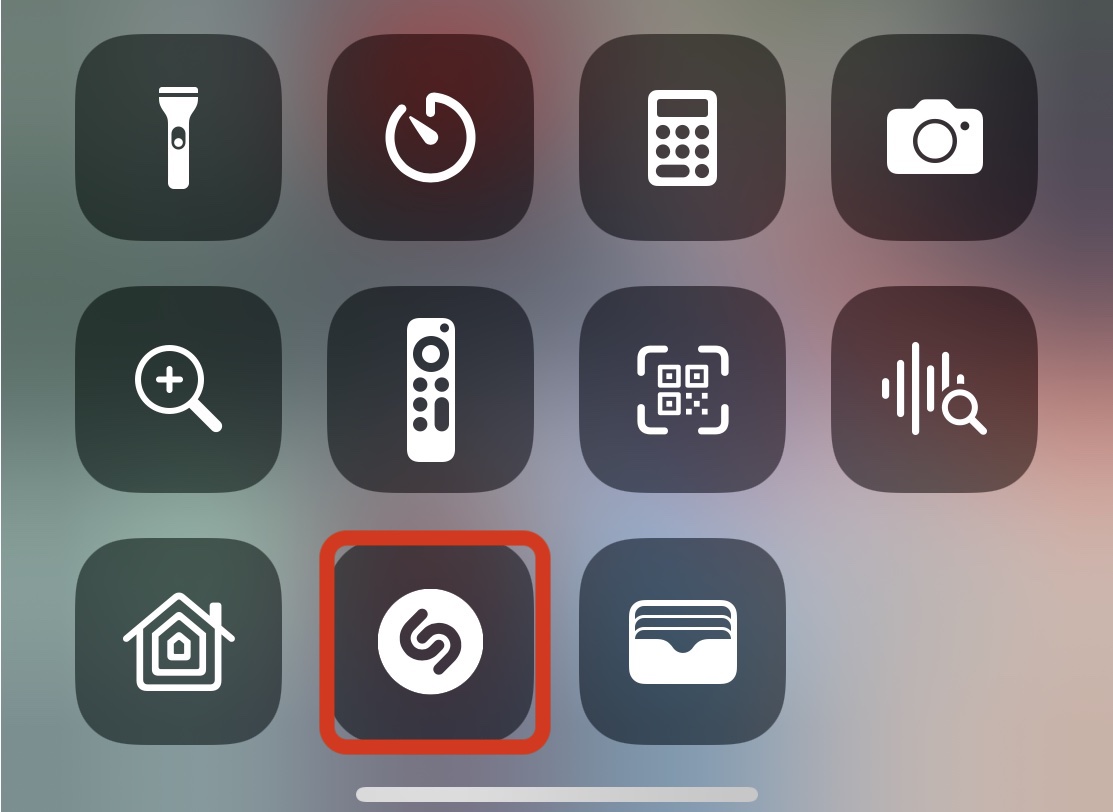
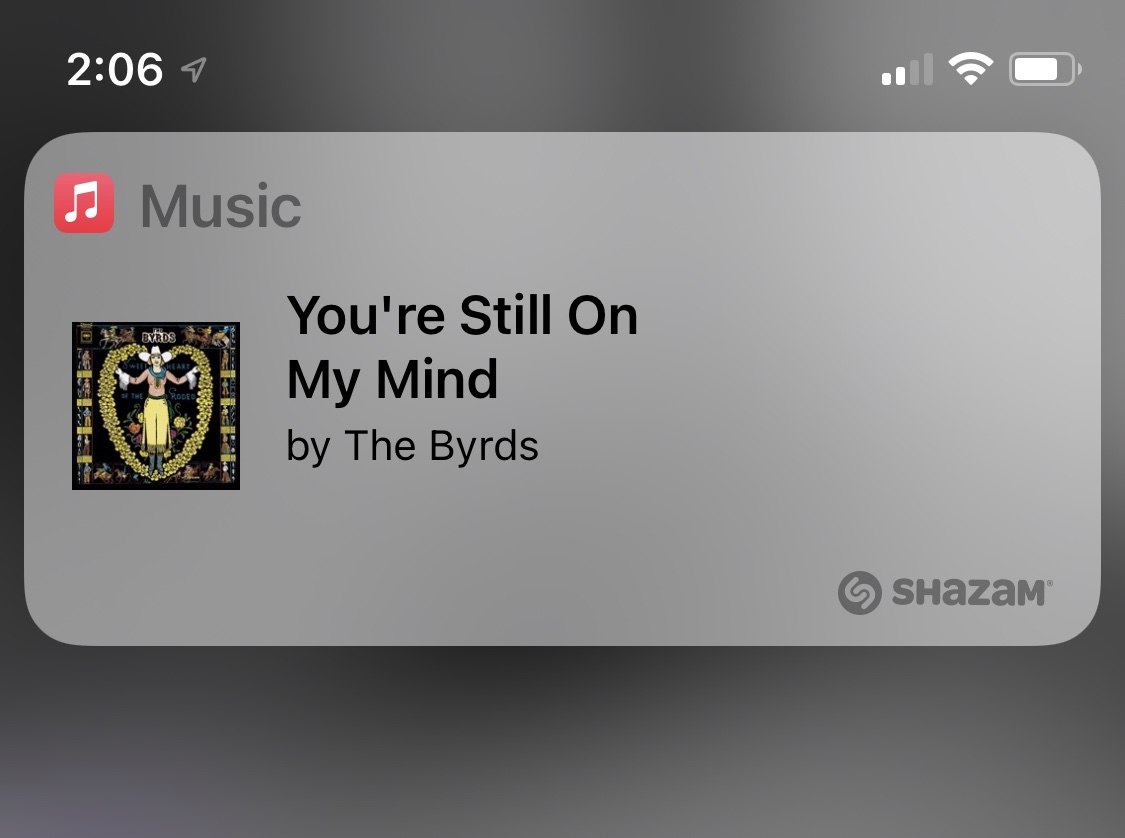
What is that Song?
“Hey, Siri, What Song is Playing?”
Siri can identify a song playing on your device, or a song playing nearby from another source. For music in the room, Siri invokes Shazam. Or, you can Shazam a song from the control center. Or, you can use the dedicated Shazam App.
Shazam Icon in Control CenterSong identified as “You’re Still on My Mind” by The Byrds
What is That Plant or Animal?
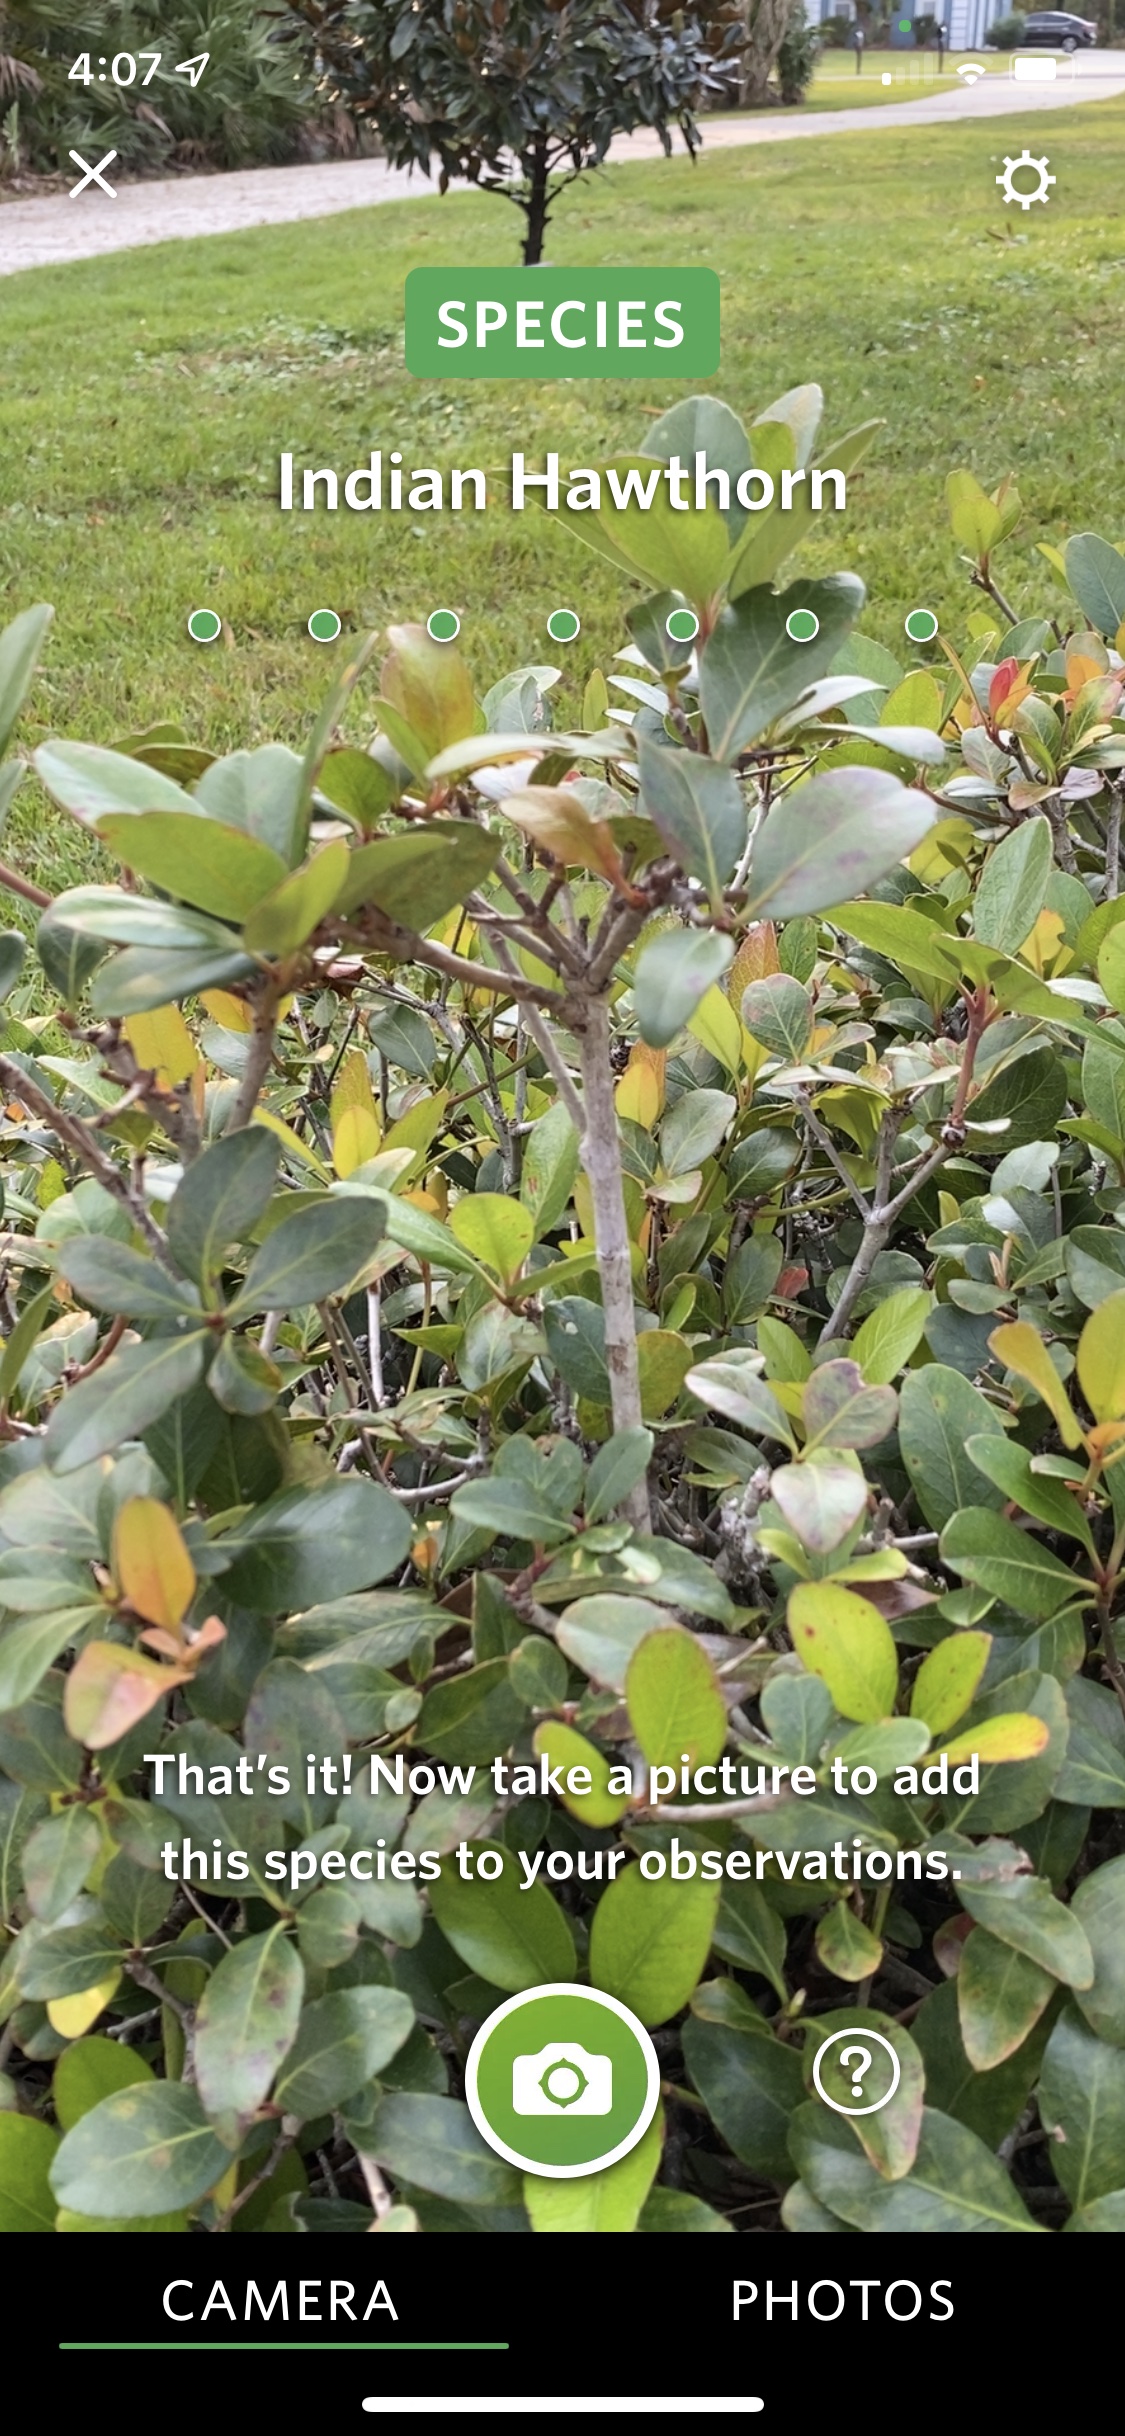
You can identify plants and animals with the free Seek App. Seek is from iNaturalist. There is also an iNaturalist web site and iNaturalist App, where you can submit your observations to a crowd-sourced body of observations, where the species will be confirmed or identified by other human observers.
Seek uses artificial intelligence to quickly identify a plant or animal through your camera. You don’t even need to take a photo to get the ID — just viewing the specimen through Seek will produce a likely identification.
Seek App identifying Indian Hawthorne Shrub
What Bird is Making that Sound?
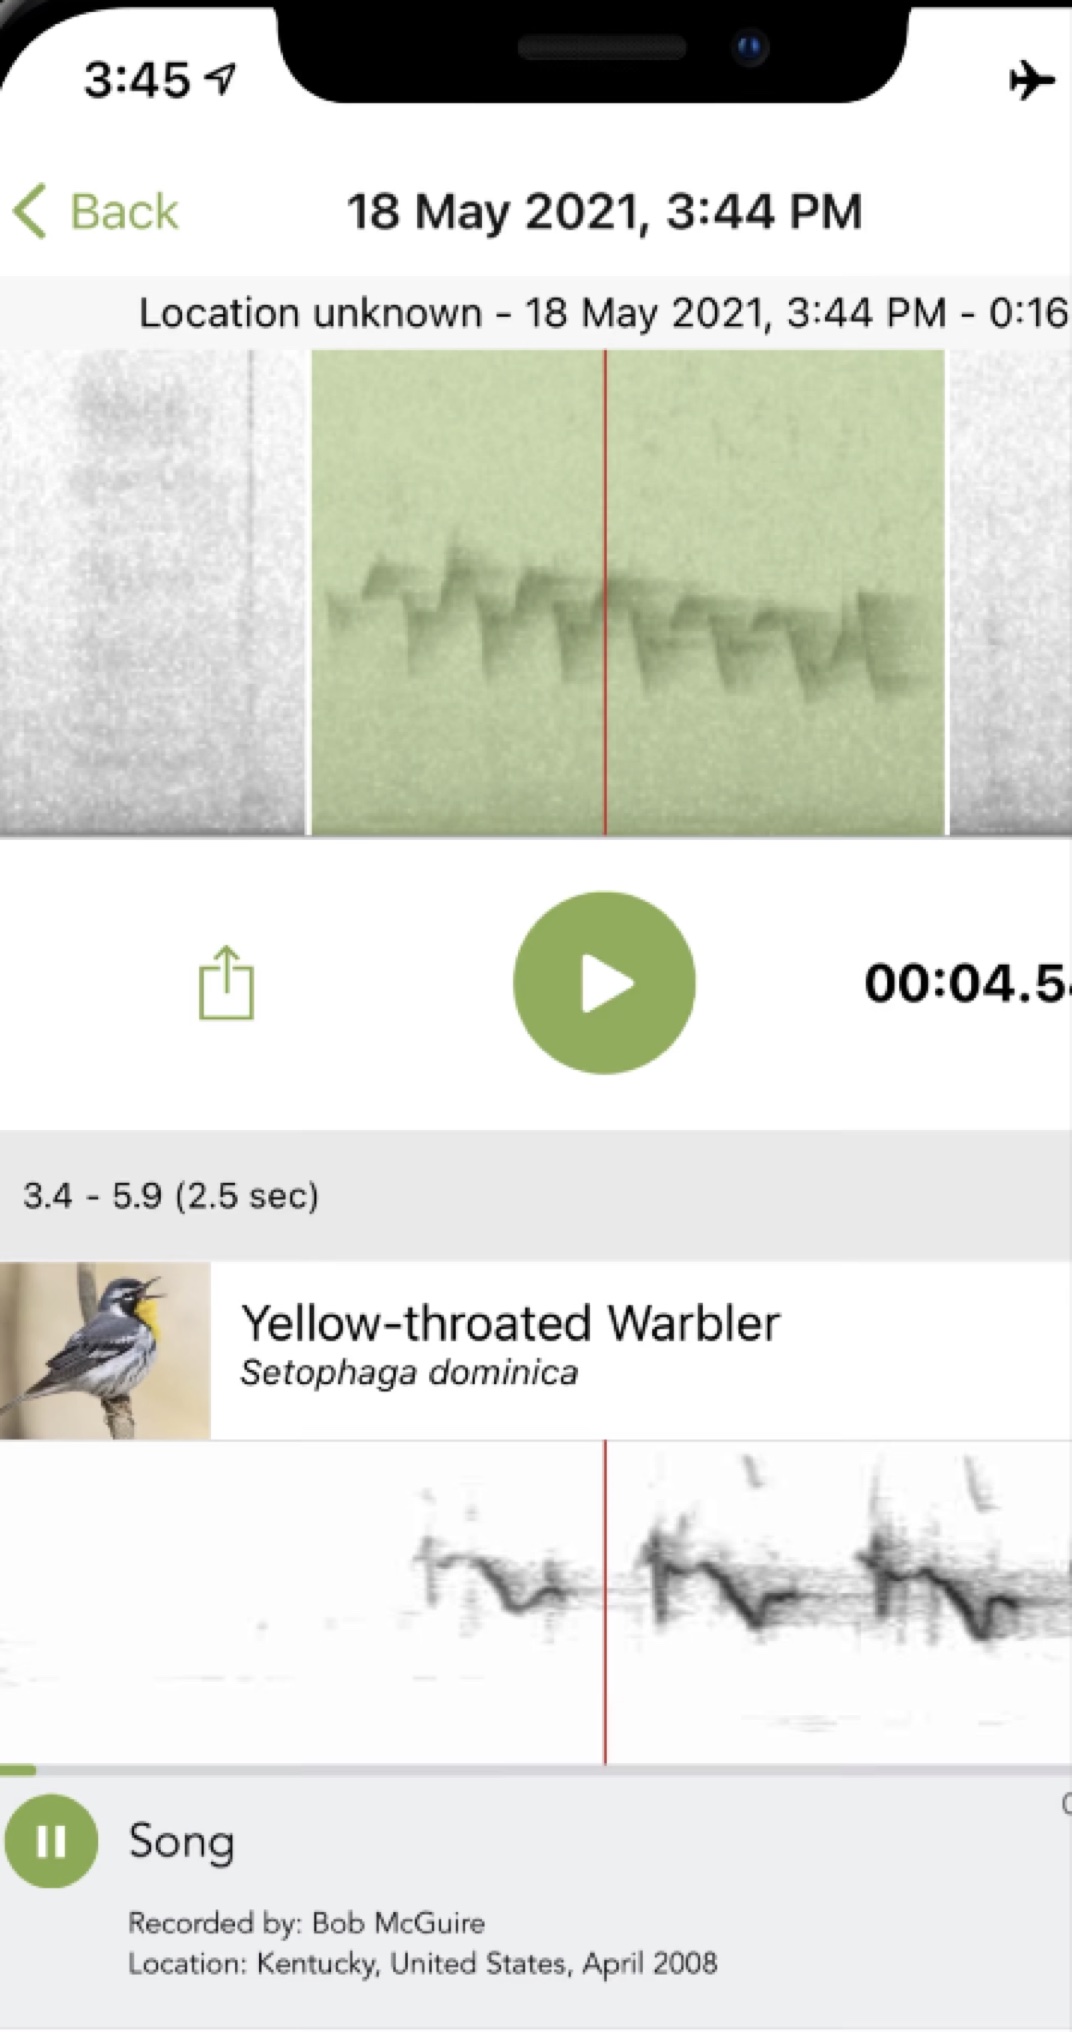
The free Merlin Bird ID app from Cornell Labs can identify many bird species from their songs or calls. You can record the bird call from right within the app. You can then select a part of the recording that is the bird you want, free of background sounds. The App will then suggest a species. This is basically Shazam for birds.
Merlin Bird ID identifying Yellow-Throated Warbler