Variations of this question are some of the most common questions we get here at MacMAD. “What Mac should I buy?”, “Which iPad is the best?”, etc.
There is a great new site for this called Apple Buying Advice. It’s one of those sites that does one thing and does it well. I hope it withstands the test of time and avoids the temptations of click-bait headlines and over-complicated analysis. Right now, it is very simple and straight forward. Try it!
I have a MacMini which has no built-in camera. During the pandemic, I have been doing more on-line teleconferencing (mostly Zoom and Facetime meetings). I have used various cameras and various software to connect them to my computer.
I recently came across Detail, from Detail.co . This application allows you to use your iPhone or iPad as a web camera for your Mac. This is the best solution I have seen yet, and the iPhone has a good-quality camera, so my video looks good.
The Mac application does much more than that, which is both an advantage and disadvantage. It is a disadvantage in that it makes it harder to learn to use. There is a video tutorial on the site. The quick summary is to download the Detail app from the iOS or iPad OS App store on your iPhone or iPad, and also download the app for Macintosh from the web site. The app can work wirelessly, or via a USB cable (recommended).
You may want a tripod adapter for your phone. I bought this one and it seems like a good one. You might want to use that with a small desktop tripod like this, if you don’t have one.
Detail is not free, and they are kind of cagey about the price. I actually don’t know how much or how often they charge. There is a 14 day free trial period. I discovered and got access to Detail through my Setapp subscription, which is excellent for just-in-time discovery of useful, curated apps.
You had an important file, but now you can’t find it anywhere. In this article, we’ll look at tips for finding that lost file. First, for MacOS, and then for iOS/iPadOS.
Finding a file on MacOS
Searching with Spotlight
You might be tempted to search with Spotlight (the magnifying glass icon in your menu bar). Spotlight might find your file, but by default, it returns a lot of results other than files and folders. You might not be able to see the tree for the forest in your Spotlight results. If you visit Spotlight in System Preferences, you will see that Spotlight returns results in up to 20 selectable categories, many of which are not relevant. For instance if you had a file related to a jacket in size 42 long, you might search with Spotlight for 42L. Spotlight will unhelpfully inform you that 42L = 1.48 cubic feet.
Finder Search
You can perform a search in any Finder window by clicking the magnifying glass icon in the upper right of the window, and typing your search term. This is different than Spotlight, and it searches only files.
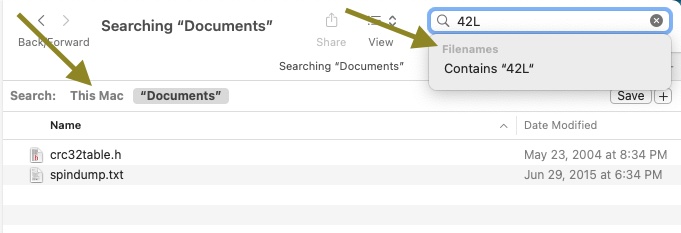
Beginning a Finder Search for 42L
In the example above, you have typed “42L”. You will see that it has found two files, neither of which actually have 42L in the filename. However, there are two clickable options here that you should consider. If you click the dimmed word Filenames, the search is restricted to only filenames. Otherwise it will find any file that contains the search term. To start with, the search only includes the folder you happened to start in. In this case, that is the Documents folder. If you click “This Mac”, then it will expand the search to your entire computer.
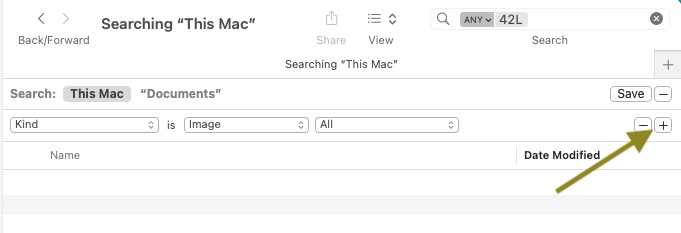
Also, if you click the + to the right side, next to Save, you will get the option to further restrict your search by Kind, Last Opened Date, Last Modified Date, and a great many other attributes. For example, you could select documents whose Kind is Image. That would find only photographs or drawings.
Searching This Mac for all Image files.
By clicking the column headers in the Finder you can sort by Name, Size, Kind, DateLast Opened, etc. This can help bring likely files to the top. Consider searching by Kind, Date, Size, etc., without using a search term. You may have forgotten what the file was named exactly, or it may have been accidentally renamed. By doing this, you may find a file whose name was mangled somehow. If the file is fairly recent, it pays to look at the Recents icon in the Finder sidebar. Maybe you will recognize your file in that list. Again, you might want to sort the list.
Don’t forget to check the Trash. Files in Trash should show up when searching This Mac, but it’s worth a look.
Check the Desktop. Don’t just look at your desktop on the screen. MacOS has a feature called Stacks, which tends to hide things on your desktop. You either need to expand each of those stacks by clicking on them, or else open a Finder window, and visit your Desktop folder directly.
Plan B: Other Places to Search
Maybe the file isn’t actually on your computer, but it exists somewhere else. For example, a lot of Apps like to save files on Cloud Storage of some kind. Here are some ideas of places to look:
iCloud Drive
Microsoft OneDrive
Google Drive
Evernote
Dropbox
Network-Attached-Storage (NAS)
USB Stick/Flash Drive
Your other computer or phone or tablet
Camera Memory Cards
Virtual Machines (files in a Virtual Machine won’t be found when searching outside that machine.)
The cloud storage services are often mirrored to your local system, but not always. So, you may need to sign into their web interface and browse the files there.
Plan C: Files in Transit
Think about where your file originated in the first place. Most of the files on your computer, you didn’t create. They came from somewhere else. If someone sent you that file, it may still be available. If it’s not too embarrassing, you can always ask the sender to send it to you again. Otherwise, check your messaging apps and services:
e-Mail Inbox(es)
Apple Messages App
Facebook Messages
What’s App
Hangouts
We Chat
Signal
The file may still be in the message by which it originally arrived. If you originally downloaded the file from the internet, it’s probably easiest to just find it again with Google and re-download it.
If you created the file locally, did you ever send it to anyone else? If so, a copy of the file may exist in your outbox on one of the above services. Or, you can ask a recipient to send you back a copy.
Searching for a lost email is another topic in itself to be covered in a later post.
Plan D: Recover from Backup
Maybe the lost file used to be on your computer, but it was accidentally deleted. This is the scenario where backups come in handy, especially Time Machine backups. You have been performing regular backups, right?? Well, even if you haven’t, there is a good chance that Time Machine has saved your bacon. By default, Time Machine keeps some backup versions of files on your local computer even if you have never performed a Time Machine backup to an external drive (like you should!).
To recover files from Time Machine, it helps if you have some idea where in your file system the file was located. If you’re not sure, you can start with the usual suspects like the Documents folder, the Desktop or the Downloads folder. Open that folder now, in the Finder. Attach your Time Machine backup drive if you have one. Make sure that your folder of interest is the active Finder Window.
Click the Time Machine icon in the menu bar (it looks like a clock). Select Enter Time Machine. This will open sort of a time-tunnel view of that particular Finder window.
You can navigate back to some older version(s) of that folder and look for your file. If you haven’t backed up to an external drive, there may be very few snapshots available for viewing.
Finding a File on iOS or iPadOS
The key place to look for files on iOS is the Files App. It has a blue folder icon. Like MacOS, it has a Recents view which can be helpful. It can show files stored directly on your device as well as files stored on iCloud Drive. You may also have various other cloud services folders under Files. There are also the Shared, Recently Deleted (Trash), and Downloads folders. These are all worth checking.
In iOS or iPadOS, you can search for a file by swiping down from the center of the home screen. This will bring a search text box onto the screen as well as an on-screen keyboard. You can then search by typing or by voice.
I hope you were able to find your lost file, or at least to find some hints useful for next time.
This article is part of a series on how to solve basic computer issues yourself.
Today’s article will help you with problems you may encounter on the web. A common problem is that some web site is misbehaving. Maybe you can’t logon, or maybe some feature or page of the site isn’t working properly.
In this scenario, you are probably thinking: I can’t believe that those idiots at major-fortune-500-company have a bug like this on their web site! If it’s this bad for everyone, no one can buy or use their product.
You’re probably right that if this problem was affecting everyone, it would already be fixed. So, there is probably something you can change on your computer to fix it.
After each step below, try accessing the problem site again, looking for any change or improvement.
Solution Steps
Keep Calm – computer problems don’t respond well to anger or curse words, but they can seldom resist an icy cool analysis.
Make sure you are visiting the correct site. Are you at goggle.com or giggle.com? Does the correct site name end in .com, .org, or something else?
Make sure your internet is working for other sites. Are you able to browse to other major web sites? Try Apple.com, for example.
Make sure your web browser is updated to the latest version:
Chrome: select Chrome/About Google Chrome
Safari: open the App Store and click Updates
Firefox: select Firefox/About Firefox
Open the affected site in a Private Browsing Window/ Incognito Window. This will disable extensions and ignore web history and fixes many issues:
Chrome: select File/New Incognito Window
Safari: select File/New Private Window
Firefox: select File/New Private Window
Clear your browsing history and cache. Sometimes outdated cache information breaks a site’s functionality. Note: This will log you out of all web sites, and you will have to re-login to all your favorite sites.
Chrome: select Chrome/Clear Browsing Data. Select All Time.
Safari: select Safari/Preferences. Click Privacy. Click Manage Website Data. You can choose to Remove All, or remove just the data for the affected site.
Firefox: select Firefox/Preferences. Click Privacy & Security. Scroll down to Cookies and Site Data. Click Clear Data.
Check your ad blockers and similar browser extensions. For example, if you have Ad Block+ installed, you may want to exempt your problem site to prevent accidental blockage of site features. You can try temporarily turning off extensions to troubleshoot. To see a list of your installed extensions:
Your Apple device didn’t come with a manual in the box, but they are available for free, and they are very nice.
Apple publishes manuals for all their hardware and software and makes them available in the Books App. The Books App is included on every Macintosh, iPad and iPhone.
There are very nice manuals for every model of Macintosh, iPhone and iPad, as well as Apple Watch, Home Pod and Apple TV.
There are users guides for iOS, Pages, Numbers, and Keynote.
Of course, there are many other books in the store about these subjects, by many different publishers, and most of them are not free.
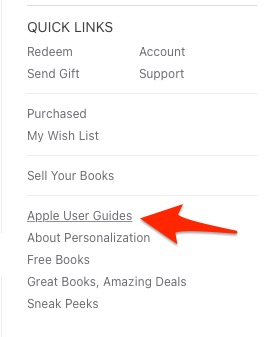
Once you’ve opened the Books App, to find the free, Apple-published items, look for the Apple User Guides link on the right hand side of the Books App, under Quick Links. The guides are usually named either User Guide or Essentials, for example, iMac Essentials, or iPhone User Guide.
In the Quick Links Section of the Books App, Click Apple User Guides
You will definitely learn something from these. Amaze your friends and family with your expertise — Read the Manual!
Here is an overview of iPhone prices. These are the prices from Apple’s on-line store in June, 2021. There are 13 different models available as new and refurbished. Apple’s refurbished products are excellent, and usually can’t be distinguished from new.
All prices are subject to change, and availability of any specific model on the refurb store, especially, can change from day to day.
At this writing, there were 13 different iPhone models ranging from a refurbished $339 iPhone 8, up to a brand new iPhone 12 Pro Max, with 512 GB at $1399.
In the chart, the blue bars indicate the price of the base model and the green bars the price of the same model with the maximum amount of storage. There is often an intermediate model between those two.
Apple has probably never had so many different models of iPhone available simultaneously before. Choice is good.
In our March virtual meeting, we talked about Continuity Camera and on-line user guides for Apple devices.
With Continuity Camera, you can use your iPhone to scan documents directly into apps on your Macintosh. It is particularly useful in Mail, Notes and Preview. If you scan paper documents into Notes in this way, they become searchable in the Notes app.
The answers to many questions about your device are contained in the user guide for your particular device, e.g. iPhone, iMac, or iPad. Apple has the user’s guides online. Apple doesn’t keep the user’s guides for older versions handy, so if you are planning to keep a device into vintage or obsolete status, download the applicable user guide before it goes out of date.
I will give you some links, but they are likely to go out of date. The consistent way to find the user’s guides is:
Here in the 21st century, I thought I was done dealing with analog video, but a relative showed up with a box of video tapes asking if I can get them digitized.
I figured I could, since I had done it before, and still had a VCR and other hardware.
Years ago, I bought an analog to digital video adapter called ezCap Video Grabber*. It was some cheap Chinese thing, about $13, I think. It required its own special software which was crappy, but it worked. However, the software no longer works in MacOS Catalina, and maybe it didn’t work in Mojave, either, and it hasn’t ever been updated.
Shopping for a replacement digital-to-analog A/V converter for Macintosh lead to a wilderness of high prices, bad reviews and Windows-only products.
“Amazon’s Choice” is the Elgato Video Capture, which is way more expensive than what I bought years ago. I had a bad experience with Elgato previously. I had their TV tuner hardware and software. The software was horribly buggy, and they never could fix it. They eventually abandoned the product and their customers. I still have no desire to buy from them again. The Elgato Video Capture has good reviews, works with the Mac, but is expensive.
Other Mac-focused products either had bad reviews or high prices and included hardware or software that I didn’t need.
I finally found something that works for me. I found this LEOP USB 2.0 Audio/Video Converter, which wasn’t advertised for Mac, but it had good reviews for Windows and one of the reviews mentioned it working on a Mac, so I took a chance. It was only $15.99. [Edit: Nov 24, 2020: Unfortunately I can no longer recommend this product. After a few days, it stopped recording S-Video connections in color and dropped back to monochrome. This problem has been reported by other reviewers on Amazon. I returned it using Amazon’s return policy.]
You’ll need an S-Video cable for best results if your video player has S-video. You probably already have the RCA cables for audio. The converter came with a USB A extension cord, which is good because it solves the problem of not having physically enough space to plug in the adapter itself.
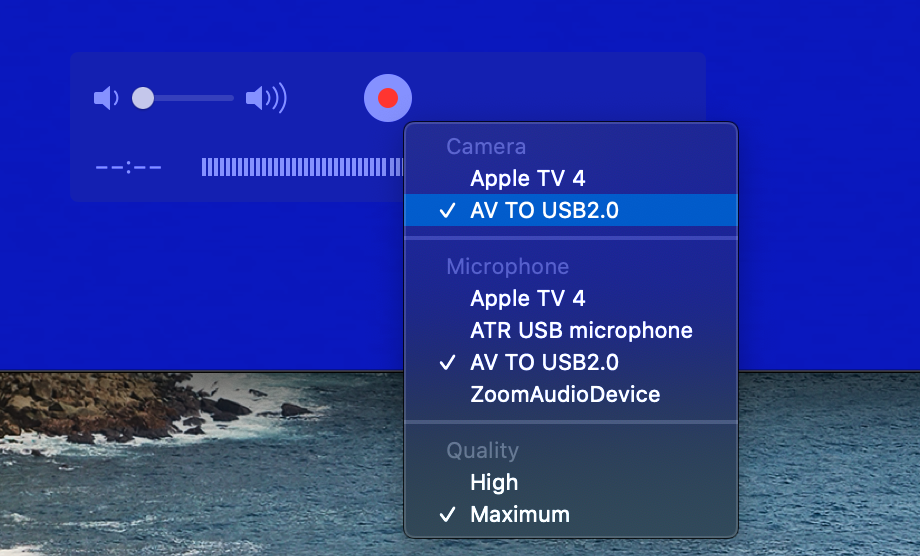
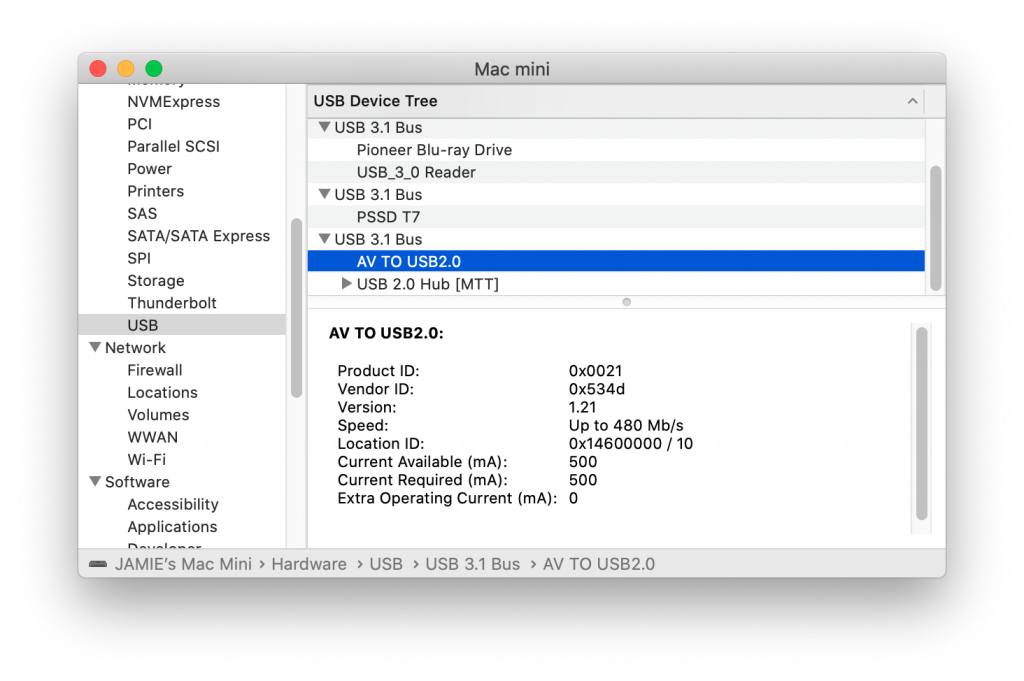
This converter worked right out of the box with the Mac. It shows up as a camera and microphone in Quick Time Player, with no special software required. This is what I expect from a video device in recent decades. I just want to plug it in, and it works. It came with a Mini CD with Windows 10 software, which I did not need. (Who uses CDs anymore, much less Mini CDs?)
Selecting the AV TO USB2.0 device in Quick Time PlayerMacOS System Report showing AV TO USB2.0 attached to USB.
Once you have digitized a tape with QuickTime Player, you can use iMovie, or whatever Mac video software you have to manipulate it. I used HandBrake convert it to MP4 to save space.
I also wanted to burn video to DVDs. (I know, DVDs are rapidly becoming obsolete. They are for my tech-challenged family.) The DVD-burning software I had used in the past has disappeared due to software rot. Apple’s iDVD isn’t a thing anymore, and the version of Toast I had doesn’t work anymore either. I ended up buying Toast DVD on the Mac App store. It was $19.99. There were some “free” or cheaper DVD burners, but I had more confidence in this one from Corel. It is working fine for me. It seems to be adequate for home movie DVDs.
* It turns out that ezCap was kind of a generic brand name used by many different Chinese video converters, some better than others.