I have a MacMini which has no built-in camera. During the pandemic, I have been doing more on-line teleconferencing (mostly Zoom and Facetime meetings). I have used various cameras and various software to connect them to my computer.
I recently came across Detail, from Detail.co . This application allows you to use your iPhone or iPad as a web camera for your Mac. This is the best solution I have seen yet, and the iPhone has a good-quality camera, so my video looks good.
The Mac application does much more than that, which is both an advantage and disadvantage. It is a disadvantage in that it makes it harder to learn to use. There is a video tutorial on the site. The quick summary is to download the Detail app from the iOS or iPad OS App store on your iPhone or iPad, and also download the app for Macintosh from the web site. The app can work wirelessly, or via a USB cable (recommended).
You may want a tripod adapter for your phone. I bought this one and it seems like a good one. You might want to use that with a small desktop tripod like this, if you don’t have one.
Detail is not free, and they are kind of cagey about the price. I actually don’t know how much or how often they charge. There is a 14 day free trial period. I discovered and got access to Detail through my Setapp subscription, which is excellent for just-in-time discovery of useful, curated apps.
Here in the 21st century, I thought I was done dealing with analog video, but a relative showed up with a box of video tapes asking if I can get them digitized.
I figured I could, since I had done it before, and still had a VCR and other hardware.
Years ago, I bought an analog to digital video adapter called ezCap Video Grabber*. It was some cheap Chinese thing, about $13, I think. It required its own special software which was crappy, but it worked. However, the software no longer works in MacOS Catalina, and maybe it didn’t work in Mojave, either, and it hasn’t ever been updated.
Shopping for a replacement digital-to-analog A/V converter for Macintosh lead to a wilderness of high prices, bad reviews and Windows-only products.
“Amazon’s Choice” is the Elgato Video Capture, which is way more expensive than what I bought years ago. I had a bad experience with Elgato previously. I had their TV tuner hardware and software. The software was horribly buggy, and they never could fix it. They eventually abandoned the product and their customers. I still have no desire to buy from them again. The Elgato Video Capture has good reviews, works with the Mac, but is expensive.
Other Mac-focused products either had bad reviews or high prices and included hardware or software that I didn’t need.
I finally found something that works for me. I found this LEOP USB 2.0 Audio/Video Converter, which wasn’t advertised for Mac, but it had good reviews for Windows and one of the reviews mentioned it working on a Mac, so I took a chance. It was only $15.99. [Edit: Nov 24, 2020: Unfortunately I can no longer recommend this product. After a few days, it stopped recording S-Video connections in color and dropped back to monochrome. This problem has been reported by other reviewers on Amazon. I returned it using Amazon’s return policy.]
You’ll need an S-Video cable for best results if your video player has S-video. You probably already have the RCA cables for audio. The converter came with a USB A extension cord, which is good because it solves the problem of not having physically enough space to plug in the adapter itself.
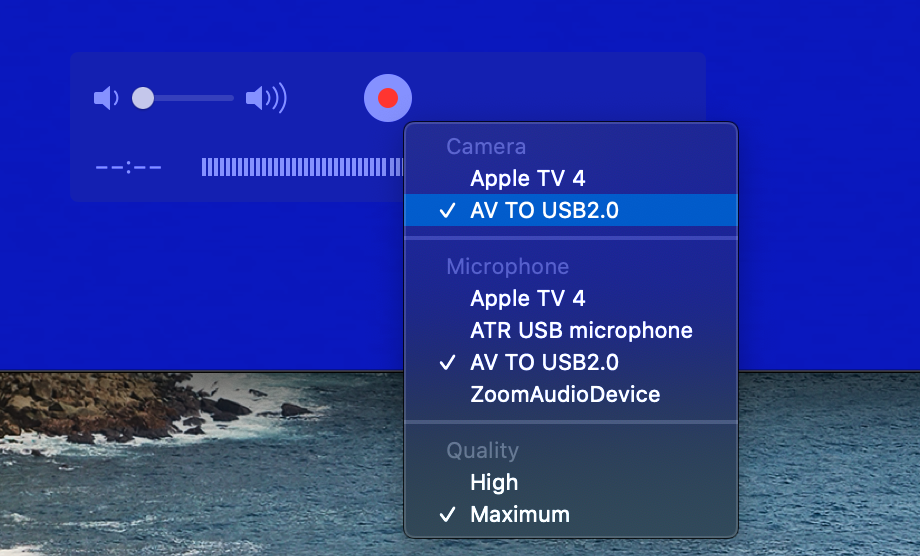
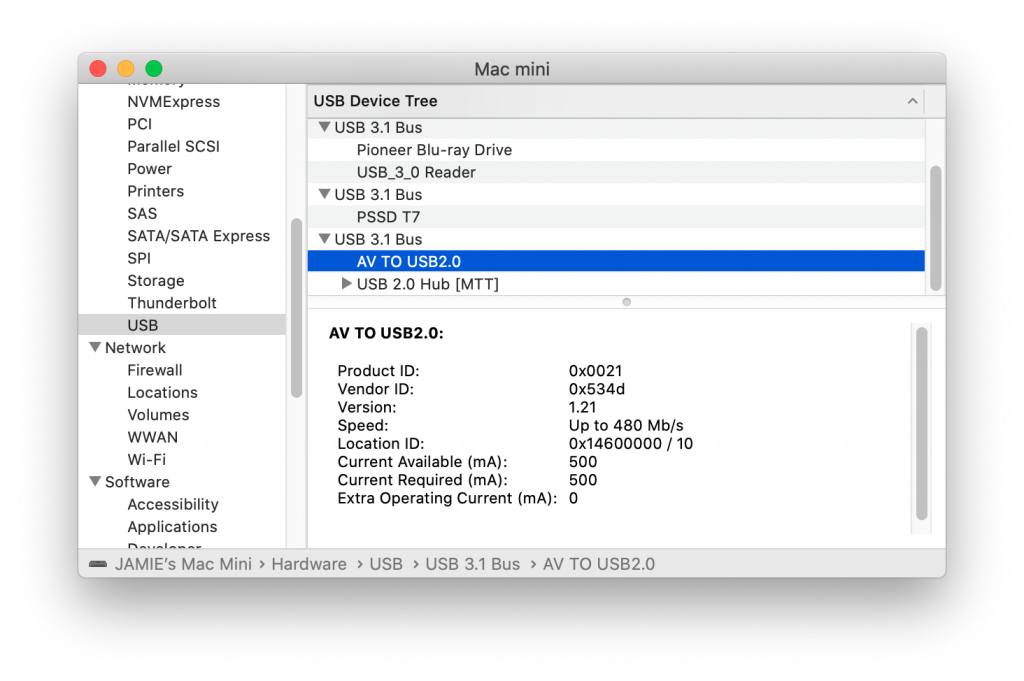
This converter worked right out of the box with the Mac. It shows up as a camera and microphone in Quick Time Player, with no special software required. This is what I expect from a video device in recent decades. I just want to plug it in, and it works. It came with a Mini CD with Windows 10 software, which I did not need. (Who uses CDs anymore, much less Mini CDs?)
Selecting the AV TO USB2.0 device in Quick Time PlayerMacOS System Report showing AV TO USB2.0 attached to USB.
Once you have digitized a tape with QuickTime Player, you can use iMovie, or whatever Mac video software you have to manipulate it. I used HandBrake convert it to MP4 to save space.
I also wanted to burn video to DVDs. (I know, DVDs are rapidly becoming obsolete. They are for my tech-challenged family.) The DVD-burning software I had used in the past has disappeared due to software rot. Apple’s iDVD isn’t a thing anymore, and the version of Toast I had doesn’t work anymore either. I ended up buying Toast DVD on the Mac App store. It was $19.99. There were some “free” or cheaper DVD burners, but I had more confidence in this one from Corel. It is working fine for me. It seems to be adequate for home movie DVDs.
* It turns out that ezCap was kind of a generic brand name used by many different Chinese video converters, some better than others.
I was looking for a straight-forward way to concatenate separate MP4 (MPEG 4) movies into a single movie. I am novice at all things video. I have at my disposal just some basic tools: iMovie, QuickTime Player, QuickTime Player 7 and MPEG Streamclip.
iMovie seemed like overkill. I couldn’t find any hint of a “concatenate” or “append” menu item in QuickTime Player or MPEG Streamclip.
Totally by accident, I found the trick in MPEG Streamclip. If you open multiple files at once, by command-clicking or shift-clicking them in the open dialog, MPEG Streamclip treats the group as one big video — instantly concatenating them together. It does not open multiple windows, but opens them all together in a single window as though they were a single continuous file.
Hopefully, you have named them in such a way that the sort order represents the order you want them to appear in the final video. Now, all you have to do is export that combined video into whatever format� you want. It will take a while, but you didn’t have to fool around with trying to cut and paste video segments, which wasn’t working for me at all, anyway.