You had an important file, but now you can’t find it anywhere. In this article, we’ll look at tips for finding that lost file. First, for MacOS, and then for iOS/iPadOS.
Finding a file on MacOS
Searching with Spotlight
You might be tempted to search with Spotlight (the magnifying glass icon in your menu bar). Spotlight might find your file, but by default, it returns a lot of results other than files and folders. You might not be able to see the tree for the forest in your Spotlight results. If you visit Spotlight in System Preferences, you will see that Spotlight returns results in up to 20 selectable categories, many of which are not relevant. For instance if you had a file related to a jacket in size 42 long, you might search with Spotlight for 42L. Spotlight will unhelpfully inform you that 42L = 1.48 cubic feet.
Finder Search
You can perform a search in any Finder window by clicking the magnifying glass icon in the upper right of the window, and typing your search term. This is different than Spotlight, and it searches only files.
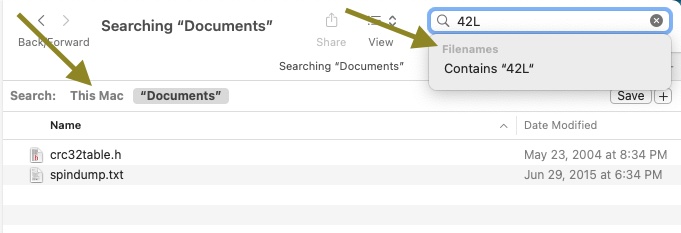
In the example above, you have typed “42L”. You will see that it has found two files, neither of which actually have 42L in the filename. However, there are two clickable options here that you should consider. If you click the dimmed word Filenames, the search is restricted to only filenames. Otherwise it will find any file that contains the search term. To start with, the search only includes the folder you happened to start in. In this case, that is the Documents folder. If you click “This Mac”, then it will expand the search to your entire computer.
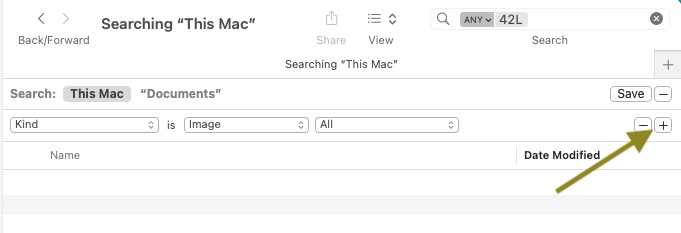
Also, if you click the + to the right side, next to Save, you will get the option to further restrict your search by Kind, Last Opened Date, Last Modified Date, and a great many other attributes. For example, you could select documents whose Kind is Image. That would find only photographs or drawings.
By clicking the column headers in the Finder you can sort by Name, Size, Kind, Date Last Opened, etc. This can help bring likely files to the top. Consider searching by Kind, Date, Size, etc., without using a search term. You may have forgotten what the file was named exactly, or it may have been accidentally renamed. By doing this, you may find a file whose name was mangled somehow. If the file is fairly recent, it pays to look at the Recents icon in the Finder sidebar. Maybe you will recognize your file in that list. Again, you might want to sort the list.
Don’t forget to check the Trash. Files in Trash should show up when searching This Mac, but it’s worth a look.
Check the Desktop. Don’t just look at your desktop on the screen. MacOS has a feature called Stacks, which tends to hide things on your desktop. You either need to expand each of those stacks by clicking on them, or else open a Finder window, and visit your Desktop folder directly.
Plan B: Other Places to Search
Maybe the file isn’t actually on your computer, but it exists somewhere else. For example, a lot of Apps like to save files on Cloud Storage of some kind. Here are some ideas of places to look:
- iCloud Drive
- Microsoft OneDrive
- Google Drive
- Evernote
- Dropbox
- Network-Attached-Storage (NAS)
- USB Stick/Flash Drive
- Your other computer or phone or tablet
- Camera Memory Cards
- Virtual Machines (files in a Virtual Machine won’t be found when searching outside that machine.)
The cloud storage services are often mirrored to your local system, but not always. So, you may need to sign into their web interface and browse the files there.
Plan C: Files in Transit
Think about where your file originated in the first place. Most of the files on your computer, you didn’t create. They came from somewhere else. If someone sent you that file, it may still be available. If it’s not too embarrassing, you can always ask the sender to send it to you again. Otherwise, check your messaging apps and services:
- e-Mail Inbox(es)
- Apple Messages App
- Facebook Messages
- What’s App
- Hangouts
- We Chat
- Signal
The file may still be in the message by which it originally arrived. If you originally downloaded the file from the internet, it’s probably easiest to just find it again with Google and re-download it.
If you created the file locally, did you ever send it to anyone else? If so, a copy of the file may exist in your outbox on one of the above services. Or, you can ask a recipient to send you back a copy.
Searching for a lost email is another topic in itself to be covered in a later post.
Plan D: Recover from Backup
Maybe the lost file used to be on your computer, but it was accidentally deleted. This is the scenario where backups come in handy, especially Time Machine backups. You have been performing regular backups, right?? Well, even if you haven’t, there is a good chance that Time Machine has saved your bacon. By default, Time Machine keeps some backup versions of files on your local computer even if you have never performed a Time Machine backup to an external drive (like you should!).
To recover files from Time Machine, it helps if you have some idea where in your file system the file was located. If you’re not sure, you can start with the usual suspects like the Documents folder, the Desktop or the Downloads folder. Open that folder now, in the Finder. Attach your Time Machine backup drive if you have one. Make sure that your folder of interest is the active Finder Window.
Click the Time Machine icon in the menu bar (it looks like a clock). Select Enter Time Machine. This will open sort of a time-tunnel view of that particular Finder window.
You can navigate back to some older version(s) of that folder and look for your file. If you haven’t backed up to an external drive, there may be very few snapshots available for viewing.
Finding a File on iOS or iPadOS
The key place to look for files on iOS is the Files App. It has a blue folder icon. Like MacOS, it has a Recents view which can be helpful. It can show files stored directly on your device as well as files stored on iCloud Drive. You may also have various other cloud services folders under Files. There are also the Shared, Recently Deleted (Trash), and Downloads folders. These are all worth checking.
In iOS or iPadOS, you can search for a file by swiping down from the center of the home screen. This will bring a search text box onto the screen as well as an on-screen keyboard. You can then search by typing or by voice.
I hope you were able to find your lost file, or at least to find some hints useful for next time.