This month we’re talking about web browsers, probably the most-used app on your device (Mac, iPhone or iPad). Specifically, we’re covering Apple’s Safari web browser.
Interested in having a FaceTime chat on the big screen? It seems like a good idea to sit in your living room and see your contacts big as life on your TV. However, your Apple TV doesn’t have a camera or a microphone, which are necessary for FaceTime.
Apple has addressed that problem with a feature called Continuity Camera, in which your iPhone’s camera and microphone can be used to extend the capability of your Apple TV.
As usual, there are certain provisos. Your devices must be running recent versions of iOS & TV OS. Operating systems must be at least iOS 17 and tvOS 17. Your devices must be connected to the same network and same Apple ID, yada yada. Your mileage may vary.
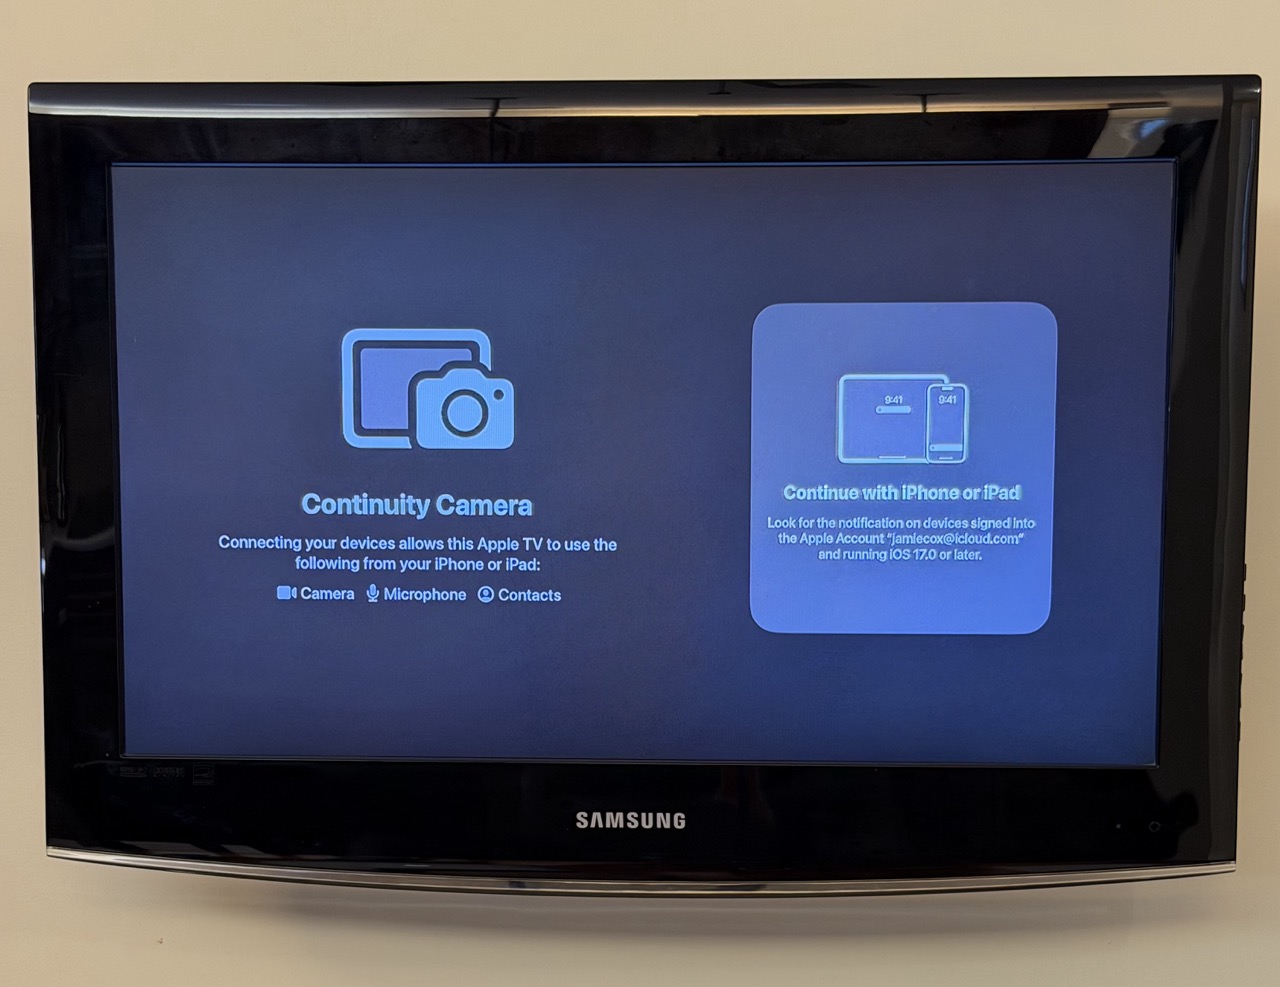
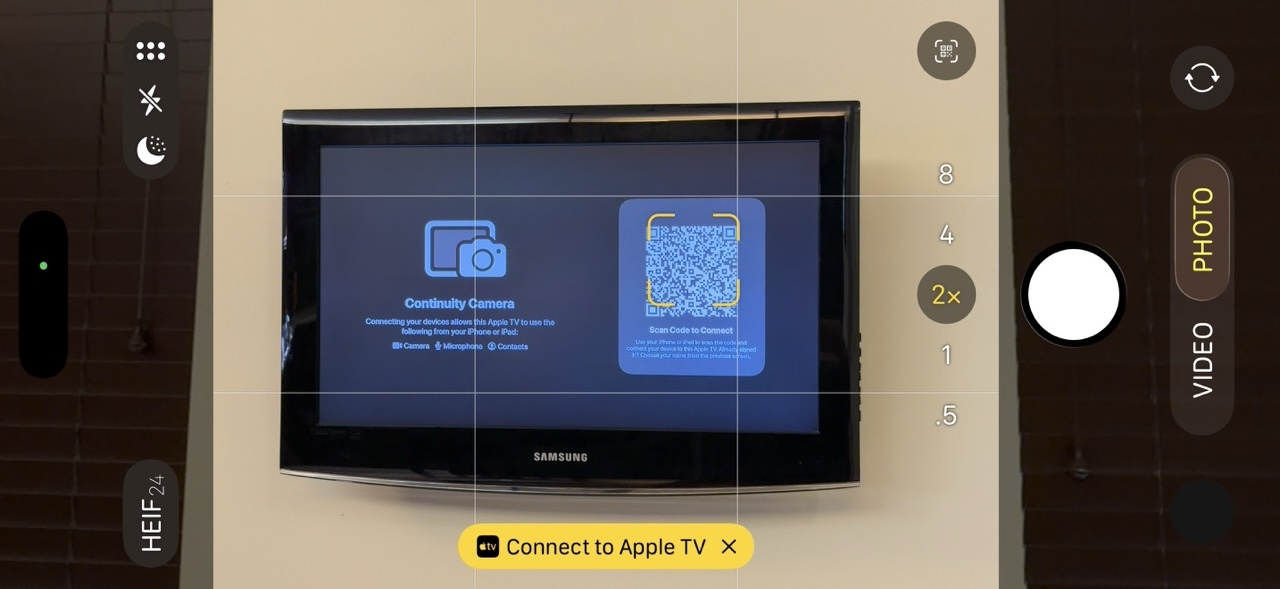
Once you open the FaceTime app on your Apple TV, you’ll see a chance to connect with your iPhone (or iPad).
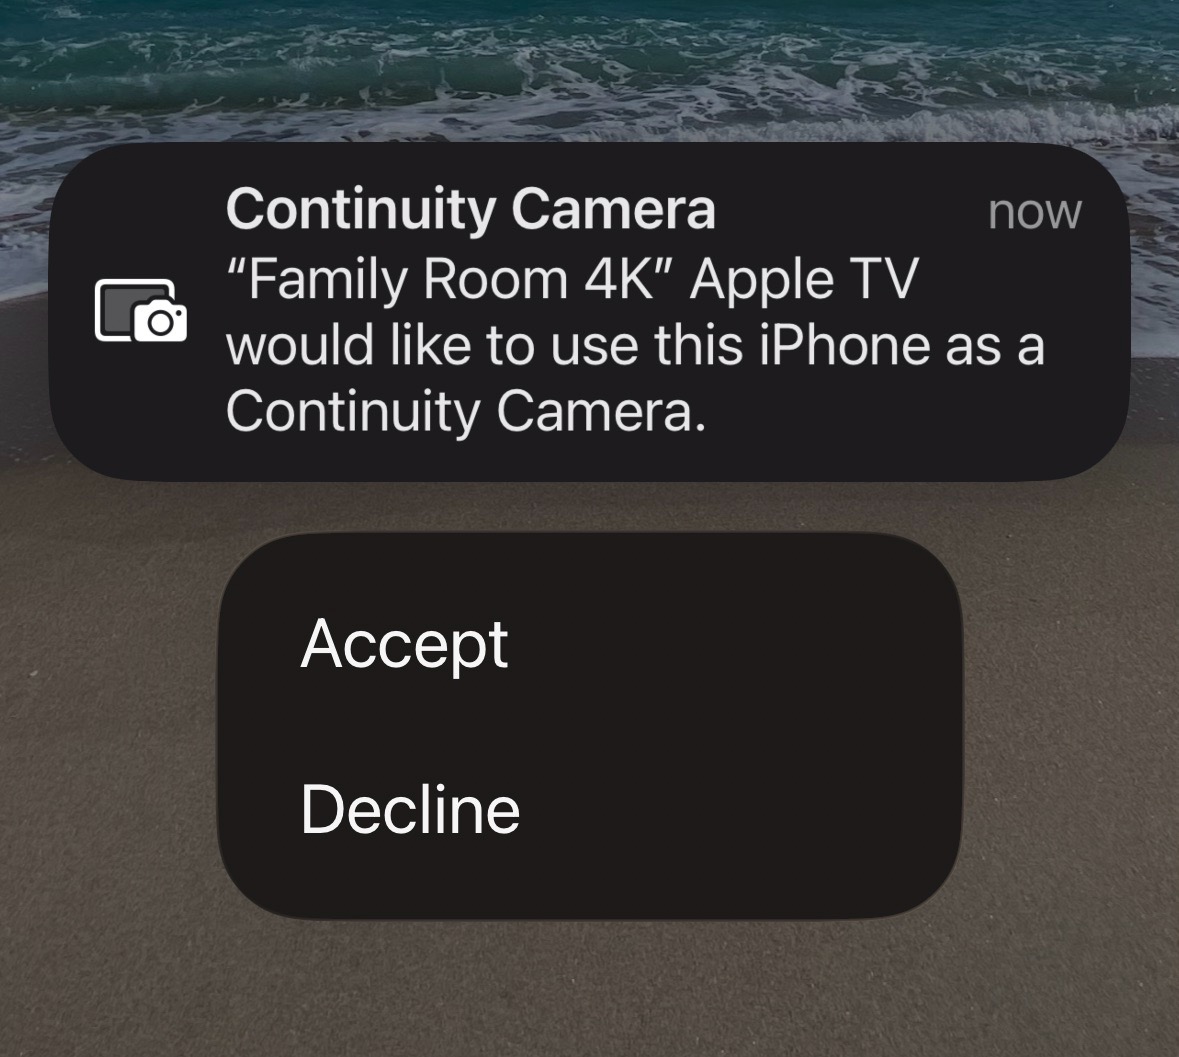
The screen below shows what pops up on your iPhone.
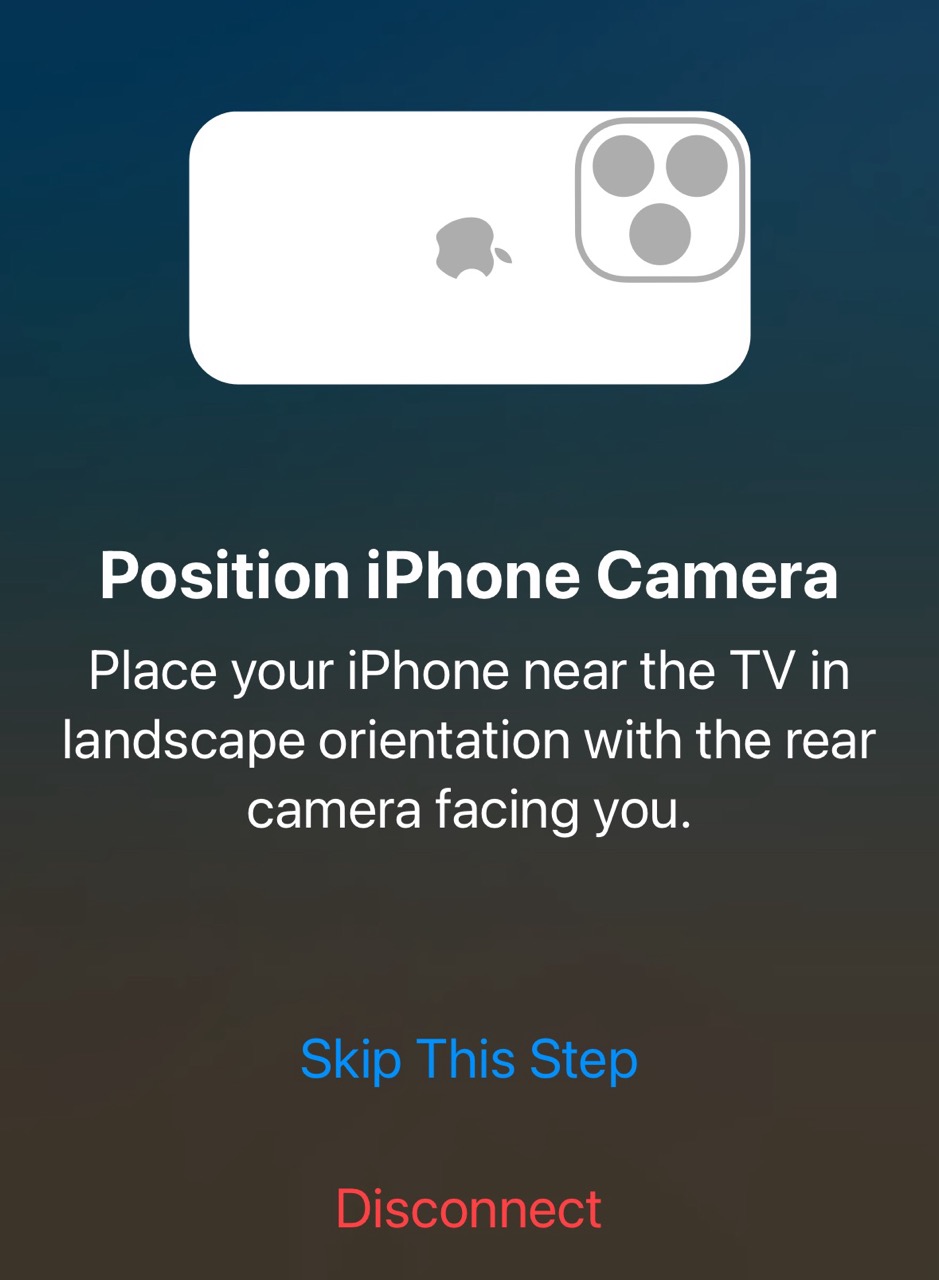
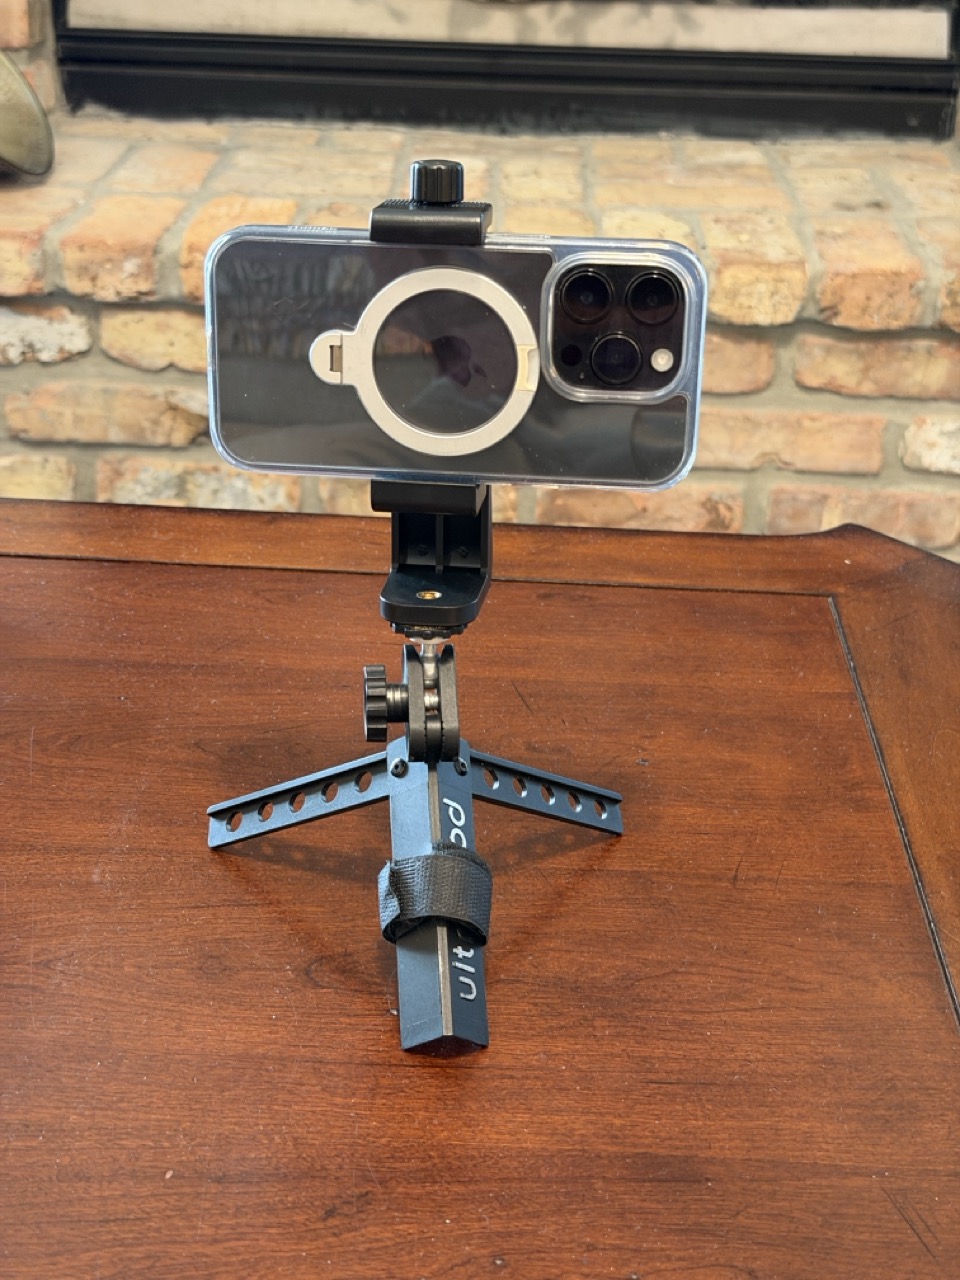
Once you accept, you’ll get the prompt below to position your iPhone camera appropriately for use by FaceTime. This is potentially the hardest part. It’s difficult to get your phone propped up in the right position unless you have some sort of mount or tripod.
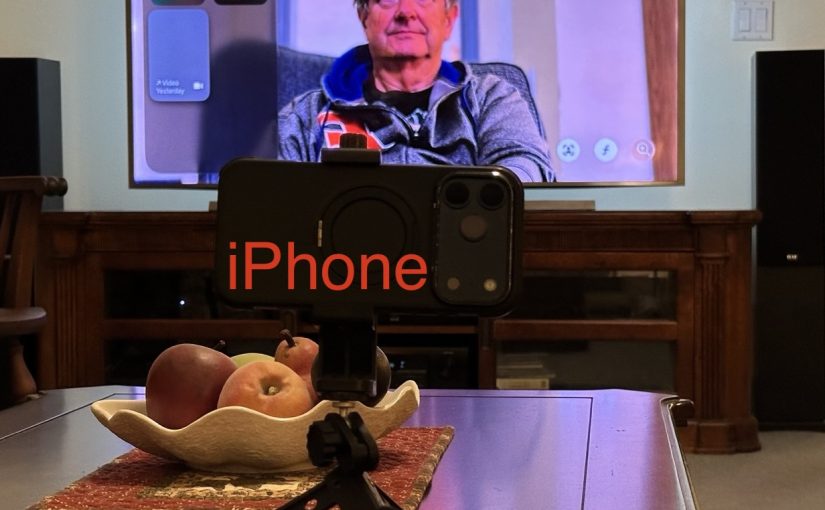
Below is my phone mount on a mini tripod. The tripod had a ball-swivel head, which is what you want to get the camera pointed in the correct direction. This product on Amazon seems to be a very similar setup.
Once you have your phone mounted, you’re ready to FaceTime. Below is what it looks like in a FaceTime call. Since my chair is pretty far from the TV, I placed the iPhone camera on a table closer to me to capture a better image.
Versions of the iPhone from iPhone 11 on, will use a feature called Center Stage, to automatically keep the camera image centered on you, even if you move around a bit.
Problems, etc.
The above is the best-case scenario where everything works as expected.
If your phone isn’t on the same iCloud account as the Apple TV, you are guided to scan a QR code to connect. Frankly, I was never able to get that scenario to work.
Error messages I got:
“There was a problem loading your recent calls. You may need to restart your iOS device or Apple TV.”
“To continue, go to FaceTime Settings on your iOS device, then sign in to your Apple Account.” (I was already signed in and didn’t see any sign-in option in the FaceTime Settings.)
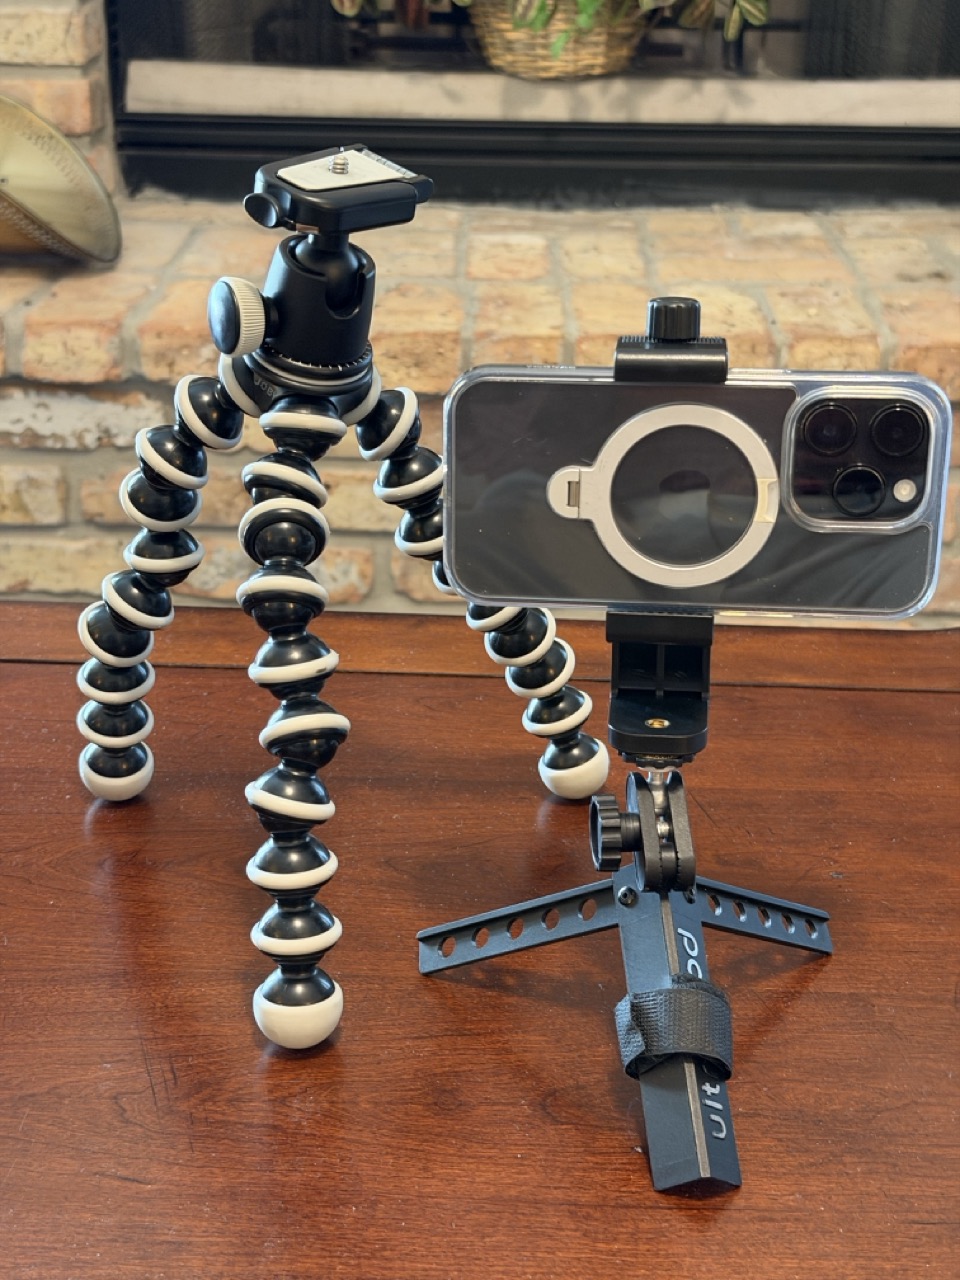
Other Tripods
Your setup might work better with a full-sized camera tripod, or something in between, like this Gorilla Pod.
FaceTime with Apple TV is a cool feature, but it does require some patience to get it set up the first time. Enjoy.
We’ve already gotten an important question on Assistive Access: How do I turn it off, and get out of Assistive Access? You can exit Assistive access by triple-clicking the side button (power button). This brings up the option to exit. You’ll need to enter the 4-digit assistive access code that you originally setup to exit back to your usual user interface.
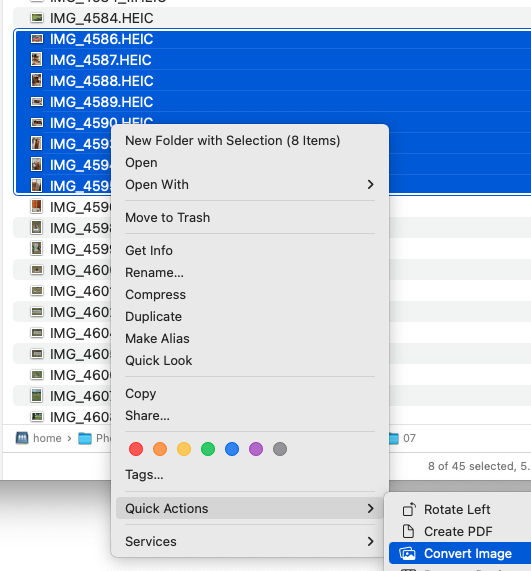
Also, a question came up about converting a lot of photos. Here is the solution we showed in the meeting:
Also, the macOS Finder has a convenient way to convert multiple images at once. Select some files, then right-click, or Ctrl-click to bring up the contextual menu. Then go down to Quick Actions and select Convert Image. You will see options to convert to JPEG, etc.
Several people asked questions about photo albums in Photos on the iPhone. One tip that might help you make albums appear more prominantly for you:
In Photos, scroll all the way to the bottom where you will eventually see Customize & Reorder.
On that screen, you can select which views of your photos you want to appear in Photos, and drag them into the order you prefer. I have put Albums at the top here, and turned off Memories and Featured Photos. It’s entirely personal preference, and you can adjust this as you like.
As always, here’s the complete iPhone User’s Guide from Apple. On that page, either use the search, or click Table of Contents to get started. If you read that, you’ll be ahead of everybody in understanding the iPhone. Note that the User’s Guide is always for the latest version of iOS. If you are using an older version, it won’t be exactly applicable.
This is the MacMAD Meeting topic for March, 2025, as of iOS 18.3.2.
Settings is a big topic. I’m going to mostly talk about iOS (iPhone) settings. There are literally thousands of separate items in the Settings app for iPhone.
Terminology
Settings for iOS are located in the Settings app. Settings for MacOS are in System Settings, formerly known as System Preferences.
Expect it: There’s a Setting for That
Settings affect everything you do with your device. Many behaviors we know and expect from iOS are optional and can be turned on, off, or adjusted.
One of my favorite rules of thumb for working with computers and smart phones is: It probably already does what you want and if not, it can be adjusted to do that. If you are wishing for a feature every time you use your device, you are probably not the first. The designers and developers also have to use these devices and they have included many of the features that they want as users.
Expect a lot, and you’ll get a lot.
How Settings are Organized
Search is at the top. That’s good because Search is often the easiest way to find the setting you want.
Next comes the Apple Account / Apple ID / iCloud settings. I think of this as being first because it’s important to Apple’s bottom line. Encouraging people to use their Apple account ultimately contributes to Apple’s income, so they put that right at the top.
Take a look at the Subscriptions section to find everything you are subscribed to, not only from Apple, but from any Apps in the App Store. You might find you are subscribed to something you no longer need.
After the Apple Account settings come about 27 system settings that seem randomly organized. They are divided into sections which each seem to mostly be in alphabetic order, but not always. This disorder is one of the reason many users throw their hands up and despair of ever finding anything in Settings.
At the end of the list comes the Apps section. Inside the Apps settings, everything is strictly in alphabetic order, which is good, because you may have dozens or hundreds of Apps installed, each with their own settings. The exception is hidden apps, which appear in a special section at the end of the list.
A Few Favorite Settings
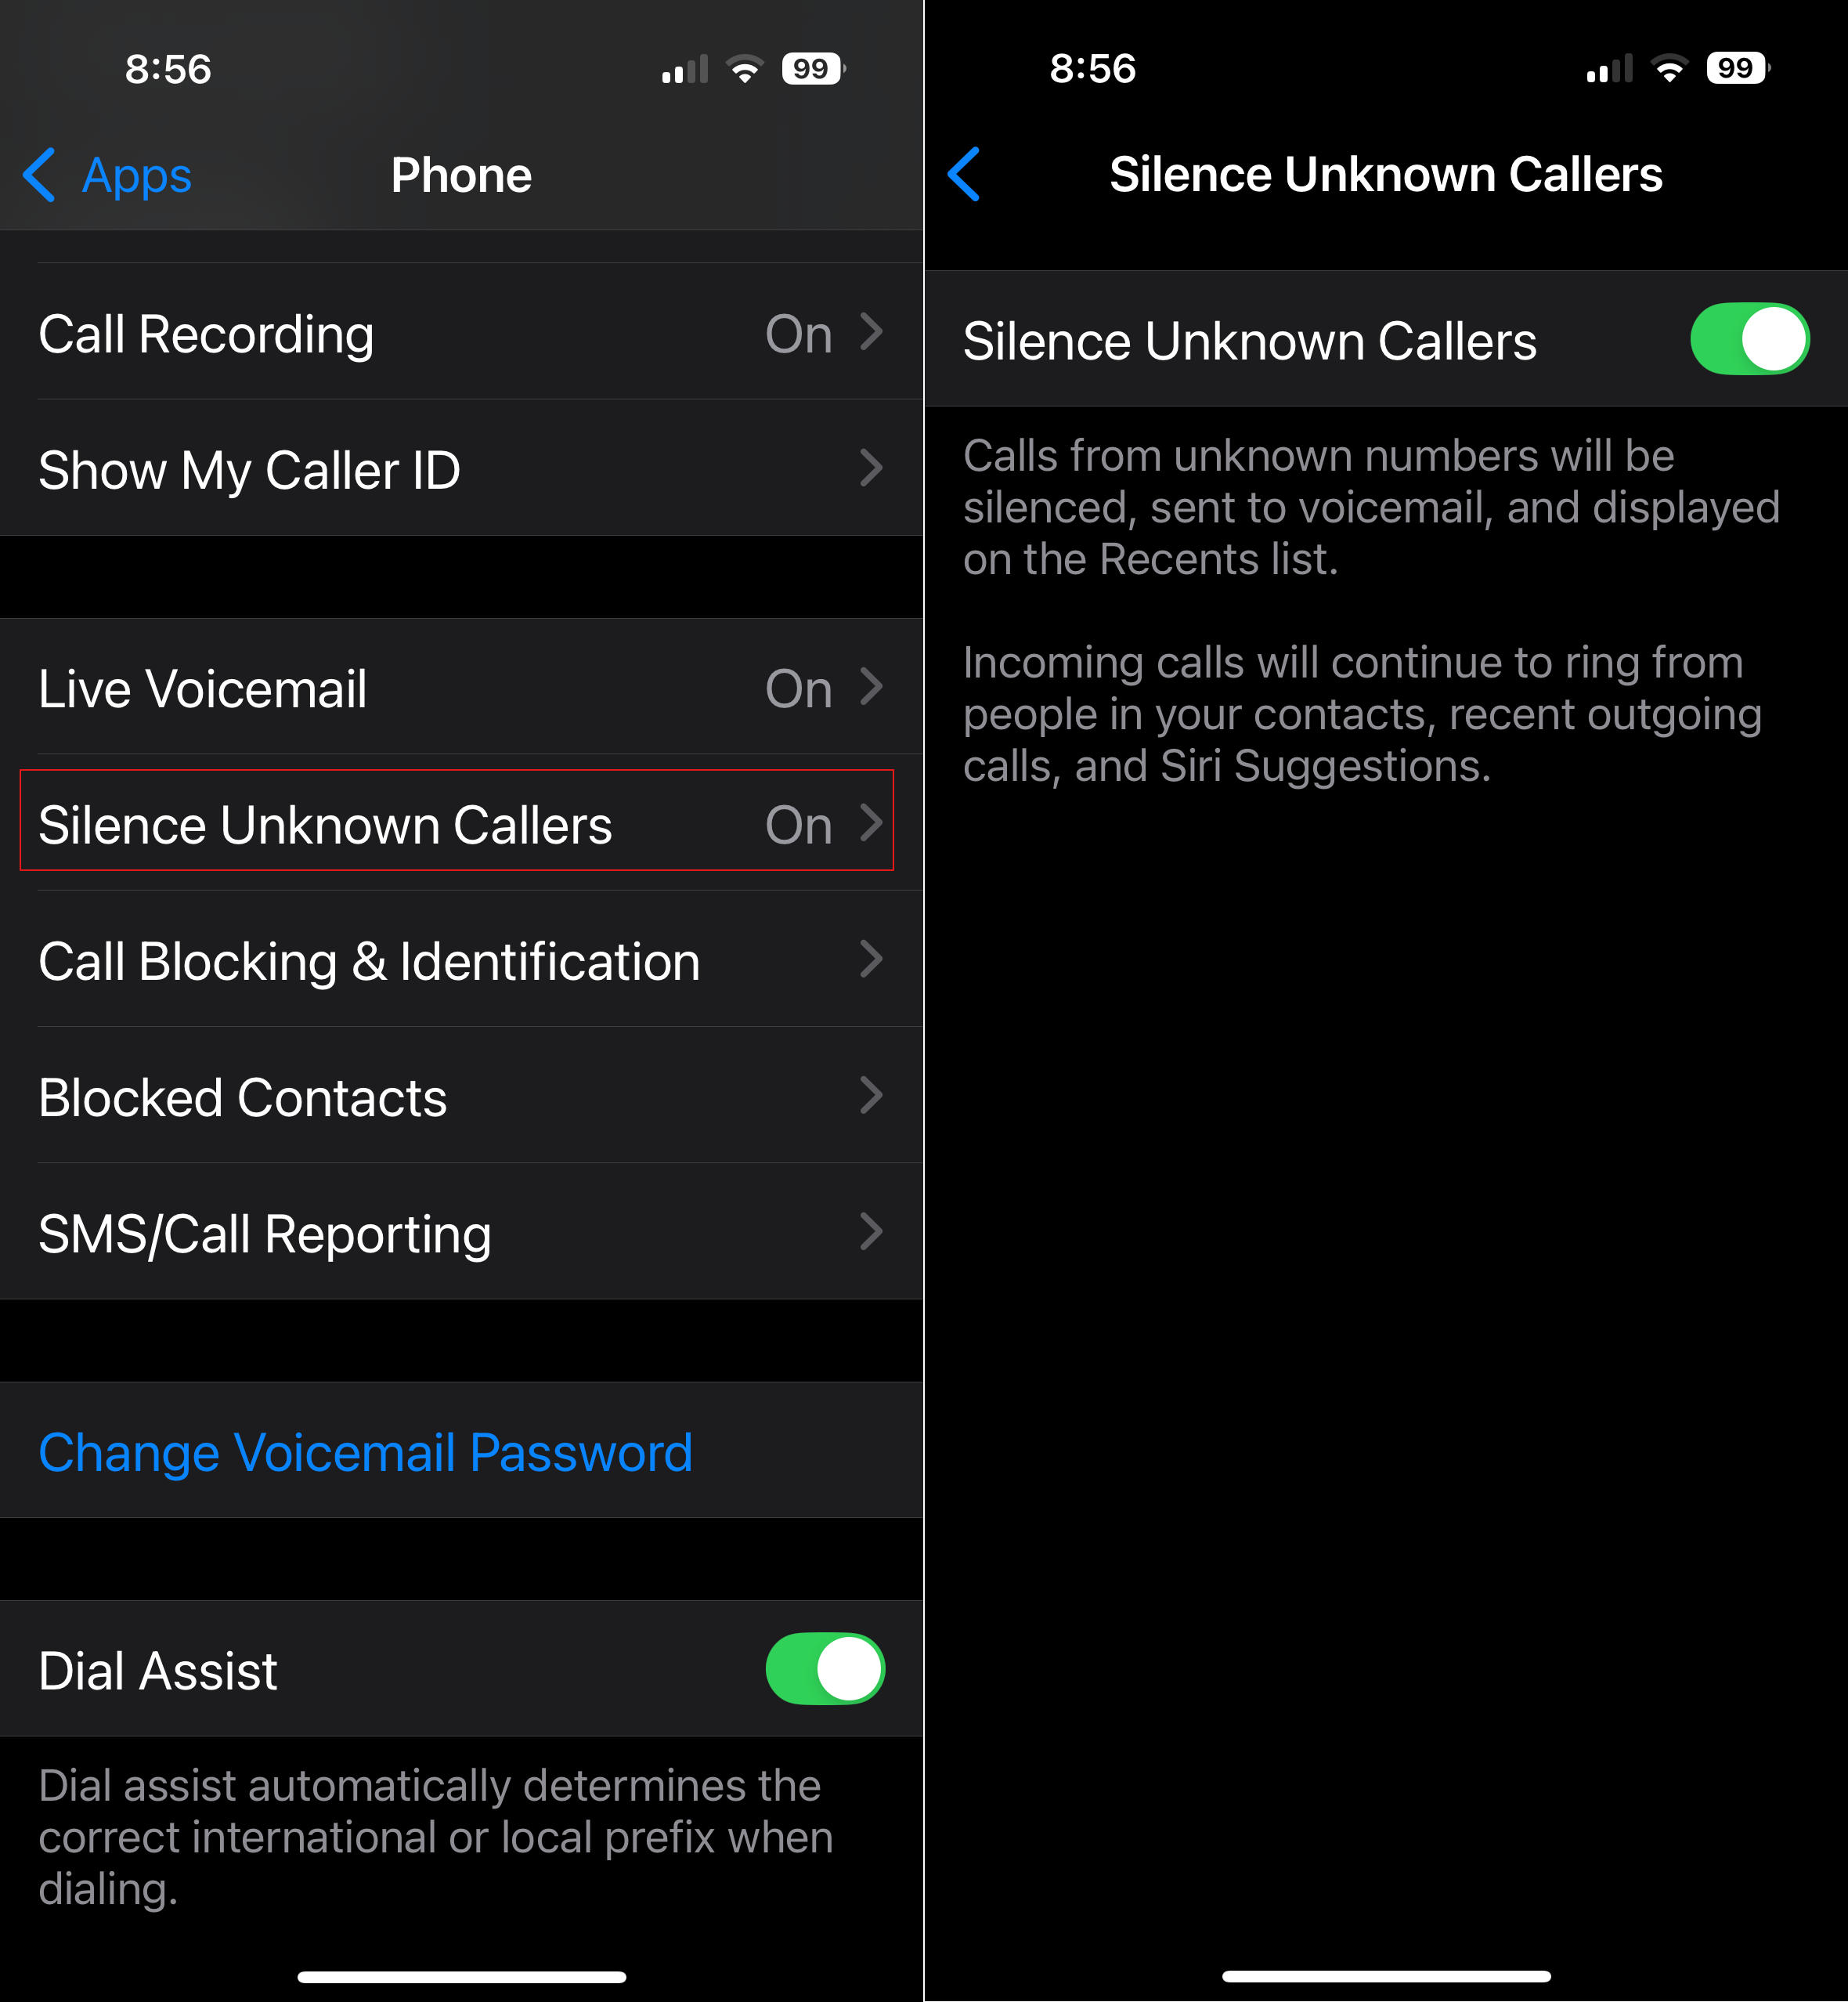
Silence Unknown Callers – This is in Apps ->Phone->Silence Unknown Callers. If you turn this on, it sends calls from numbers which are not in your contacts straight to voicemail. Your phone won’t ring. Also, notice Apps->FaceTime->Silence Unknown Callers. This one is lesser known, and spammers have started using FaceTime lately.
Screenshot
General -> About This often-overlooked section has lots of useful information and controls. What model of phone do I have? It’s in there. When does my Apple warranty expire? It’s in there. How full is my phone’s storage?
Accessibility – This (large) section is mostly for people with some sort of disability of sight, hearing, motor control, etc. But there are some gems in here that might be useful to everyone. Accessibility -> Face ID & Attention -> Require Attention for Face ID. This seems more like a security feature. I have this turned on which makes it less likely my phone will be unlocked without me knowing it.
Accessibility -> Side Button -> PRESS AND HOLD TO SPEAK (Siri). I have Siri selected here. When I hold the side button, the Siri Icon appears, and I’m speaking directly to her without having to say her name first.
Settings -> Notifications – Here’s the answer to those frequent questions like “How do I get rid of those red numbers on my App icons?” and “How can I get rid of all these popups on my screen from Facebook?”
Those numbers on App icons are called badges. They are a form of notification. You can turn those on or off for each App individually in the Notifications section of Settings.
App Icons with Badges
We live in a marketplace of attention. Companies with Apps typically want you to pay attention to their app. Your attention is worth money to them. So they often try to capture your attention with lots of notifications. Of course, this becomes overwhelming when you have dozens or hundreds of Apps clamoring for your attention. iOS allows you to selectively enable or disable notifications from Apps.
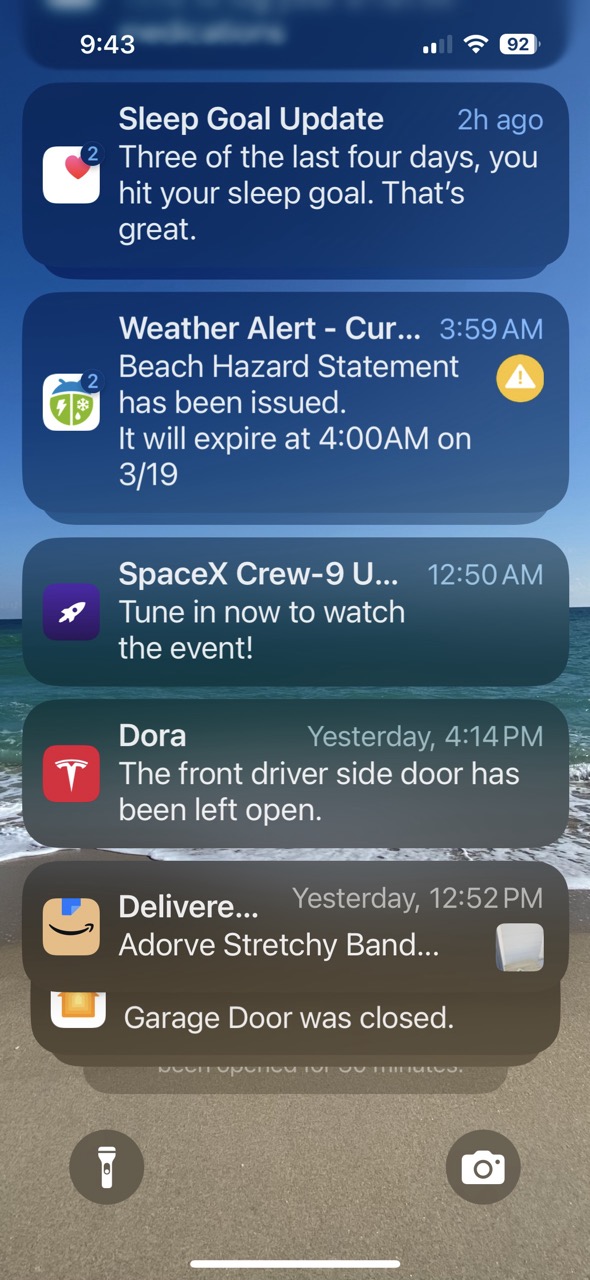
Notifications in Notification Center
For many of the worst offenders, like Facebook or other social media apps, your best option is to turn off notifications for those Apps altogether.
Control Center
Control Center is a quick way to access settings and other features of your phone.
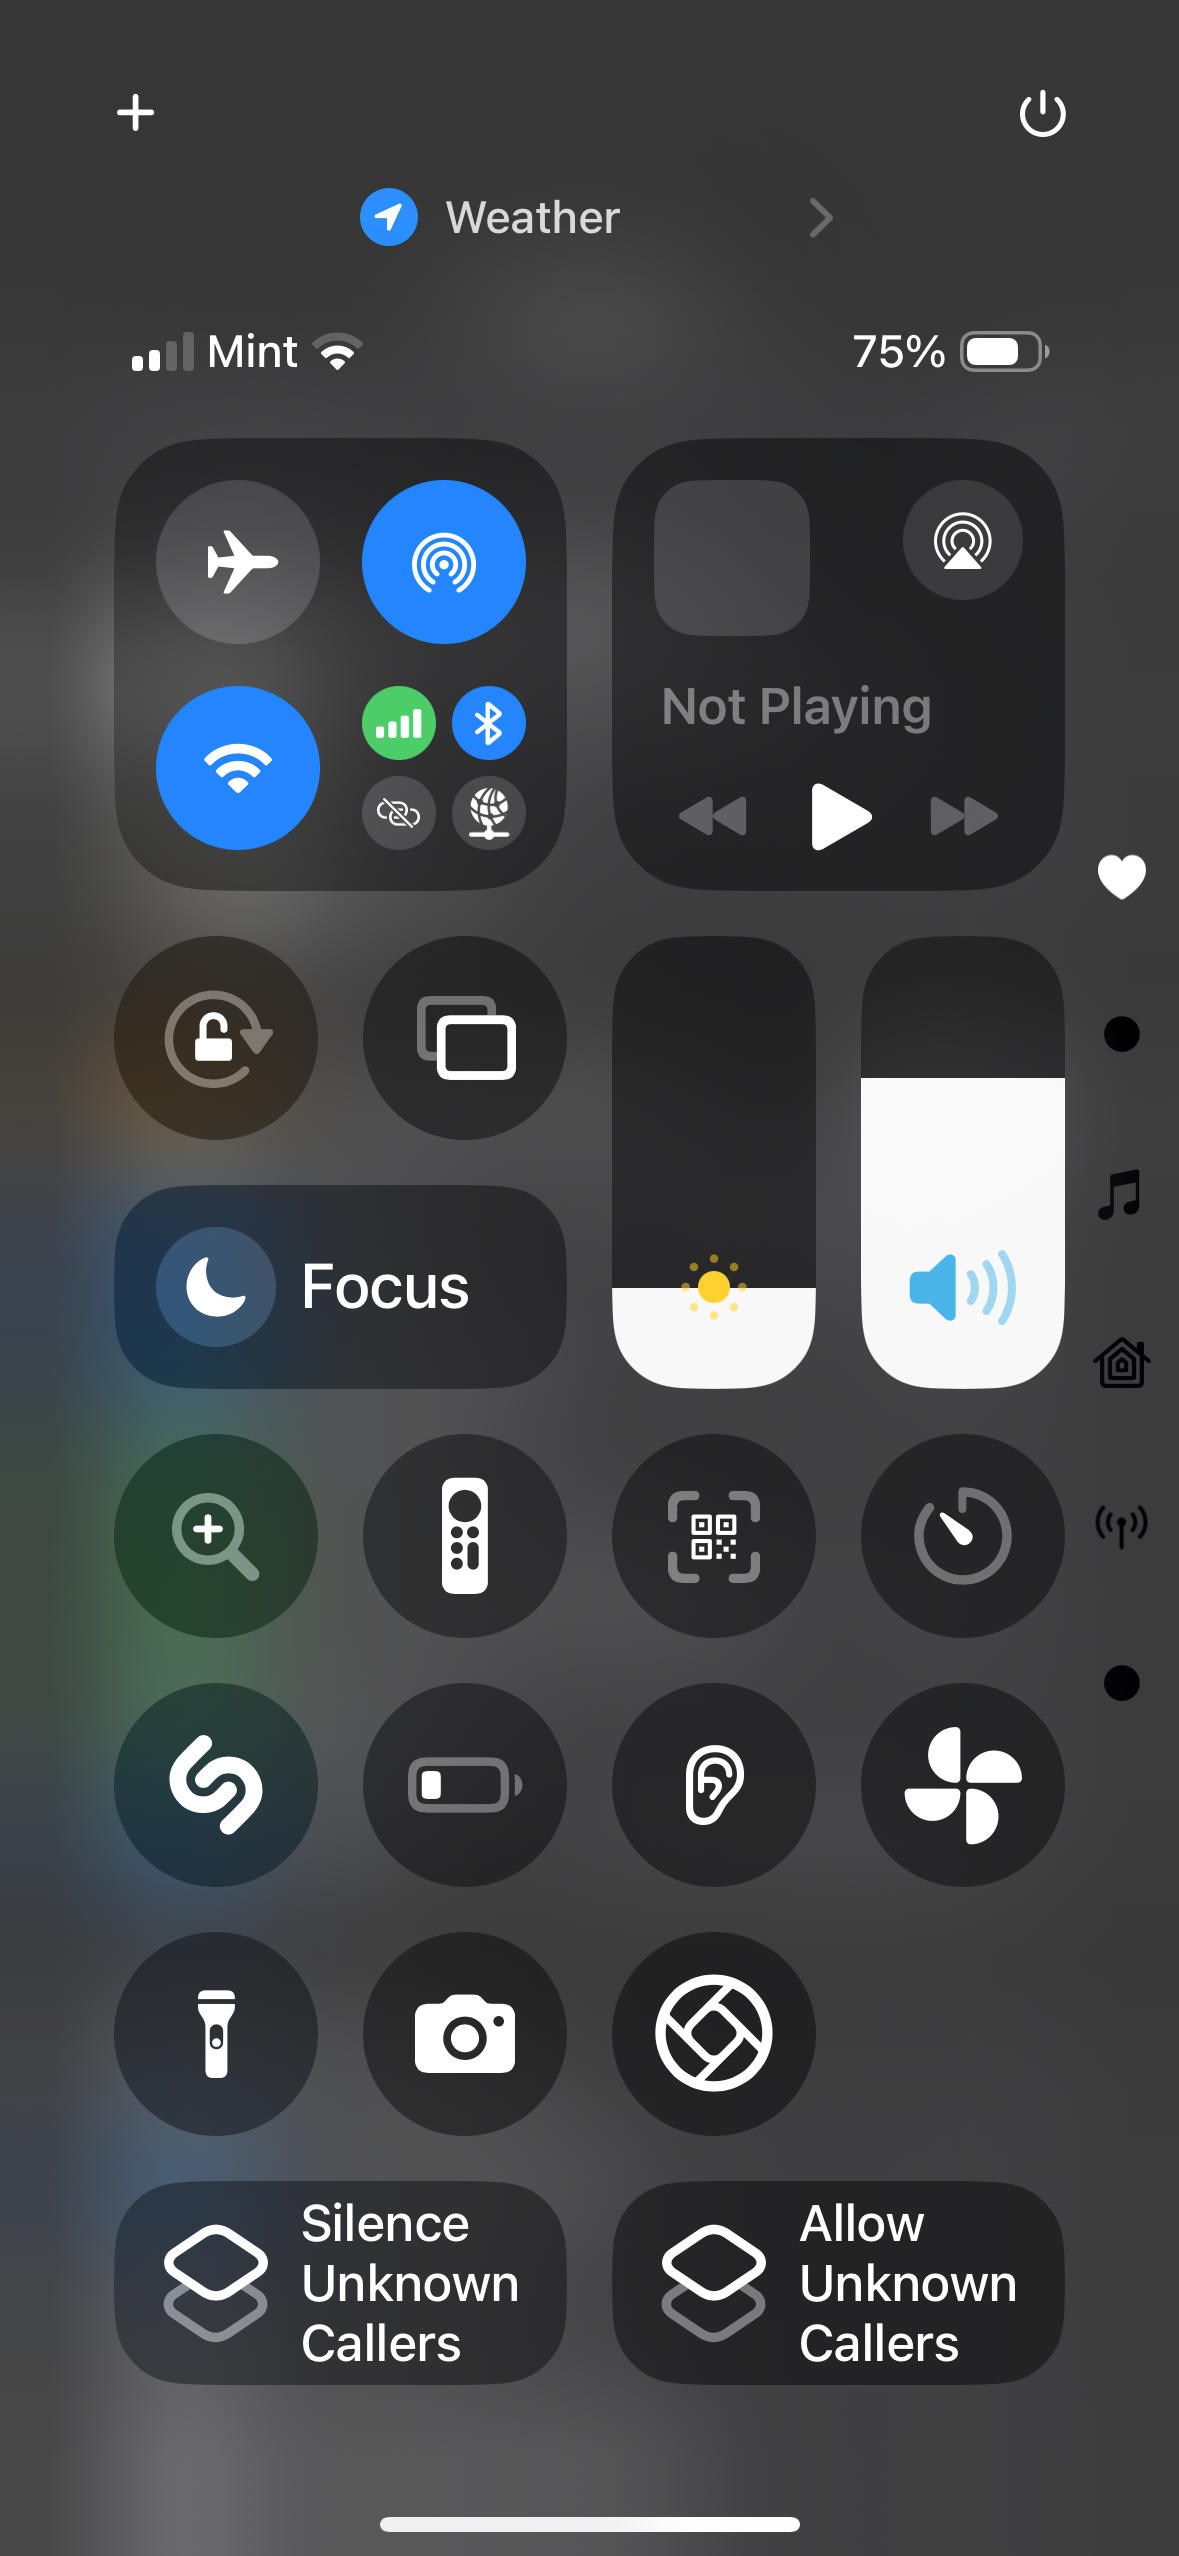
Control Center “Favorites” Screen
Pull down from upper right to open Control Center on iPhones with Face ID. Swipe up from the bottom of the screen on iPhones with a home button.
Some of my favorites here are the Magnifier, Apple TV Remote and QR Code Scanner.
Screenshot
You can customize Control Center with your preferences, including controls to launch your favorite Apps, and controls that use Shortcuts to accomplish other tasks, like the “Silence/Allow Unknown Callers” buttons above.
Why should you get an Apple Watch if you already have an iPhone?
The iPhone did a lot to kill the market for wristwatches. If you already have an iPhone in your pocket that shows the time, among its many other functions, why wear a watch? People were using their iPhone as a glorified pocket watch and leaving their wristwatch at home.
That started to turn around with the introduction of the Apple Watch.
So, why would you want an Apple Watch?
It provides hands-free access to many of the same functions as the iPhone:
Time and Date
Notifications
Texts
Emails
Phone Calls
Weather
Siri and HomeKit
Apple Pay
Unlock your Mac
Many more functions provided by Apps from Apple & 3rd parties
You no longer have to dig your phone out of your pocket or purse to use these functions.
Health and Safety
Fall Detection
Car Crash Detection
Pulse Measurement
Detection of AFIB (atrial fibrilation of the heart)
Emergency Calling*
ECG (EKG)
Blood Oxygen Measurement **
Sleep Tracking
Workout and Fitness Tracking
* On Cellular models, or if in range of the paired iPhone ** Pending resolution of patent lawsuits
Driving and Navigation
Apple Watch (and iPhone) can act as a car key for many car models.
Haptic wrist-taps for turn-by-turn directions
In the car, driver can know when to turn without voice prompts annoying passengers
Especially useful when walking or biking
Works with or without Maps app on iPhone
Compass App
Choosing an Apple Watch
Models:
Series 1 thru 10 (new one every year 2015-2025)
Apple Watch SE & SE2 (lower-cost models)
Apple Watch Ultra 1 & 2 (2022 & 2023)
Options:
With or Without Cellular – Watches without Cellular are called “GPS”
Cellular service plan required to use the phone and data features of Cellular models
Sizes: Small or Large – mostly a fashion choice & screen size
Materials: Aluminum, Titanium or Stainless Steel
All Ultras are Large, Titanium and have Cellular
Charging & Battery
All Apple Watches charge via a Mag Safe charging puck. There is no “charge port” on the watch.
Battery life is about 1 day for most models, and 2-3 days for the Ultras.
Your watch may not ship with a charger. Be sure you have one.
Apple Watch charging speeds vary by model and charger. The latest, the Apple Watch Series 10, charges up to 80% in 30 minutes using a modern charger. The Ultra takes longer to charge its larger battery.
Water & Swimming
The Apple Watch tolerates water. All recent models are safe to get wet or even swim with. There is a setting you should turn on if you expect to take it in the water, but the watch will turn water mode on itself if it detects water.
The Ultra models are rated for scuba diving.
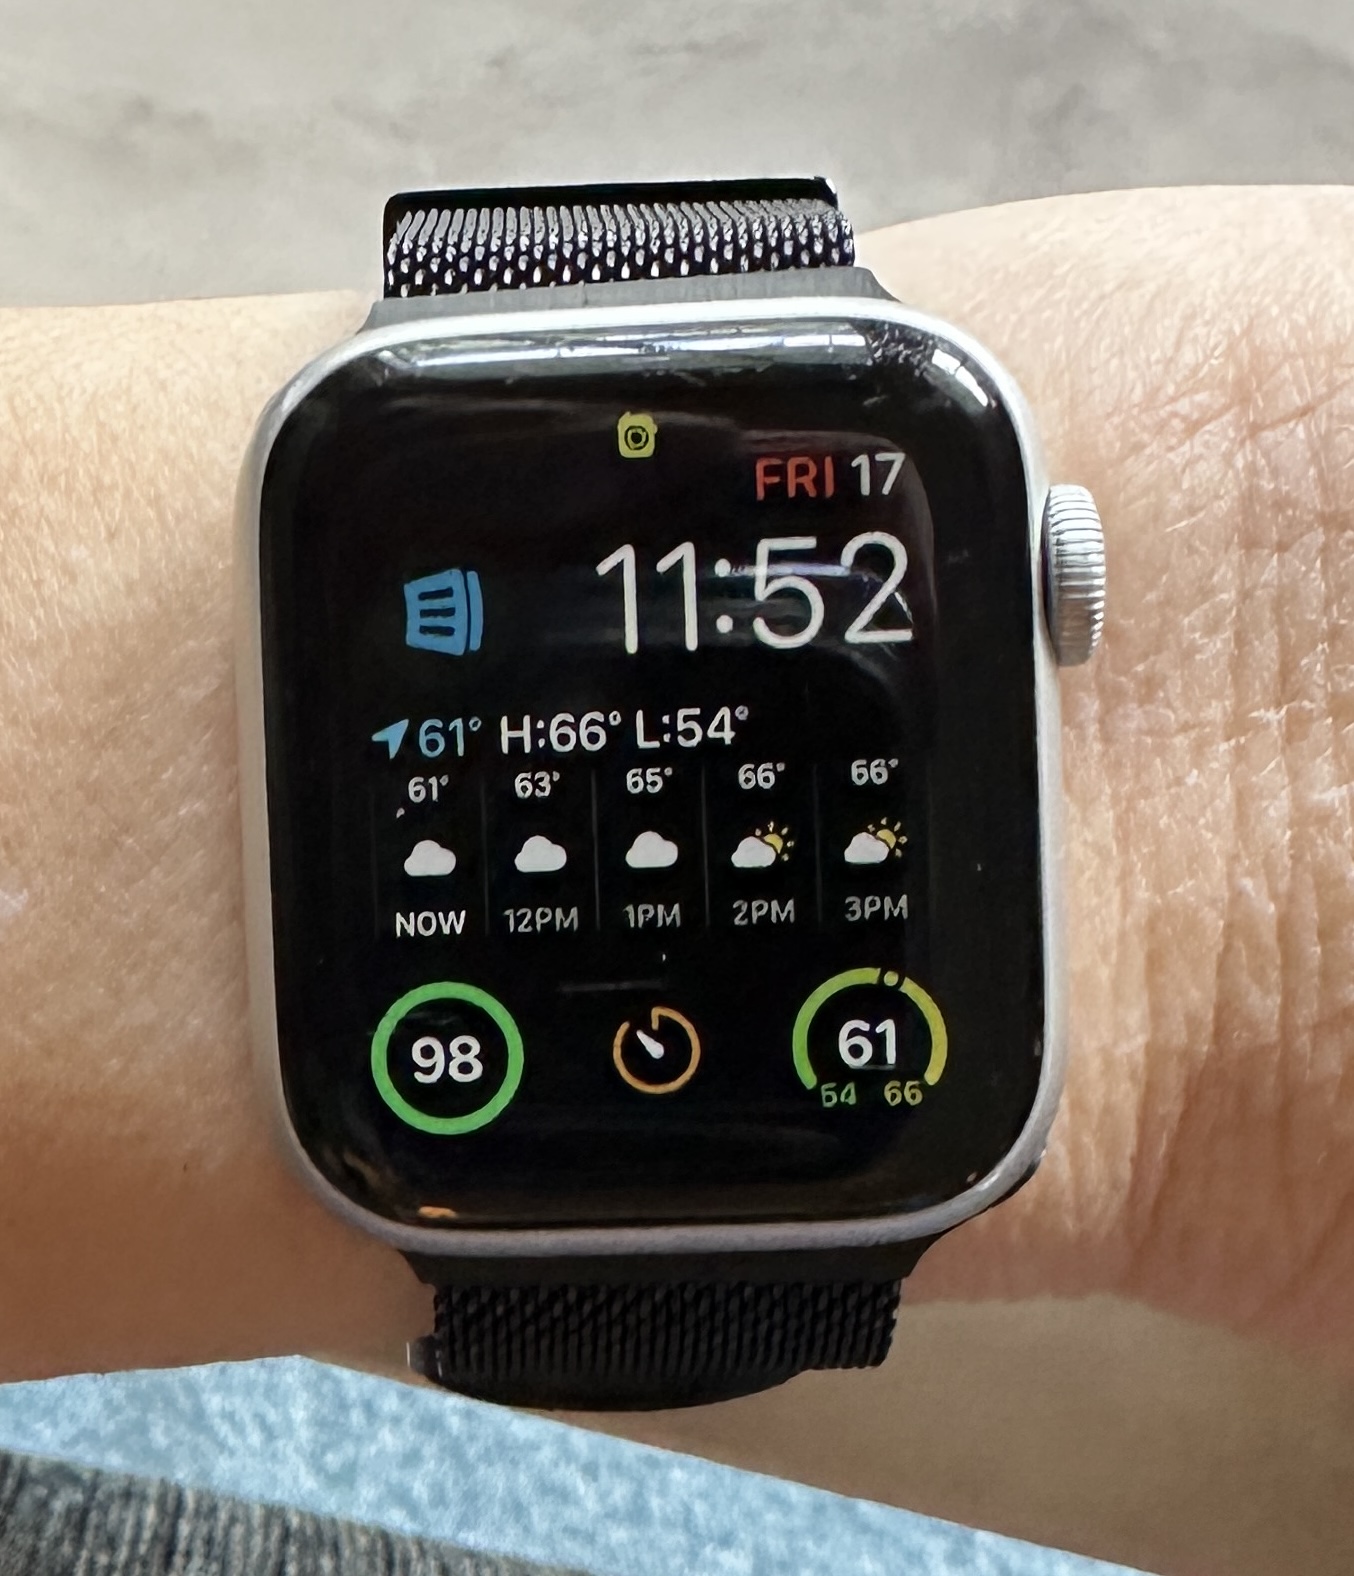
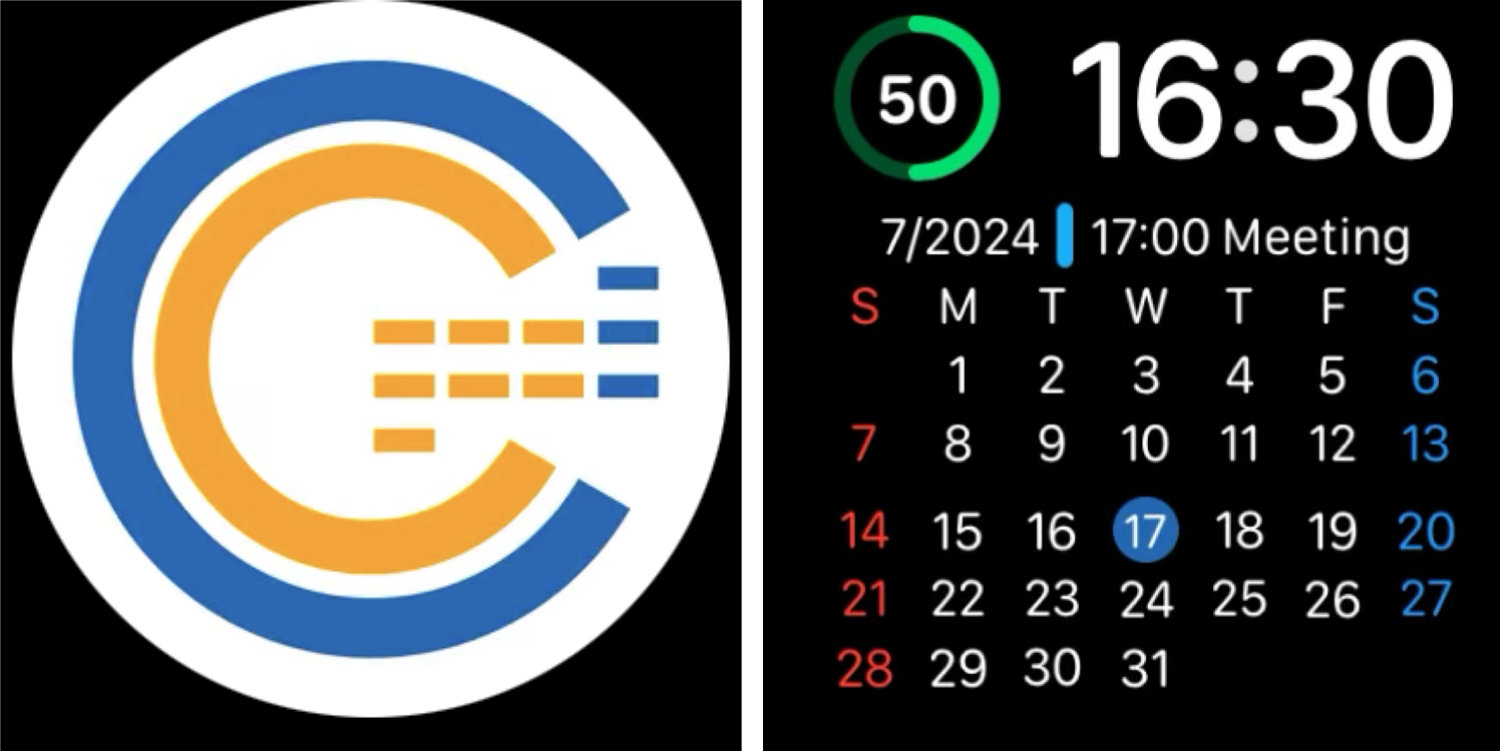
Apps, Faces and Complications
Like the iPhone, the Apple Watch supports Apps. Many iPhone Apps have an Apple Watch counterpart.
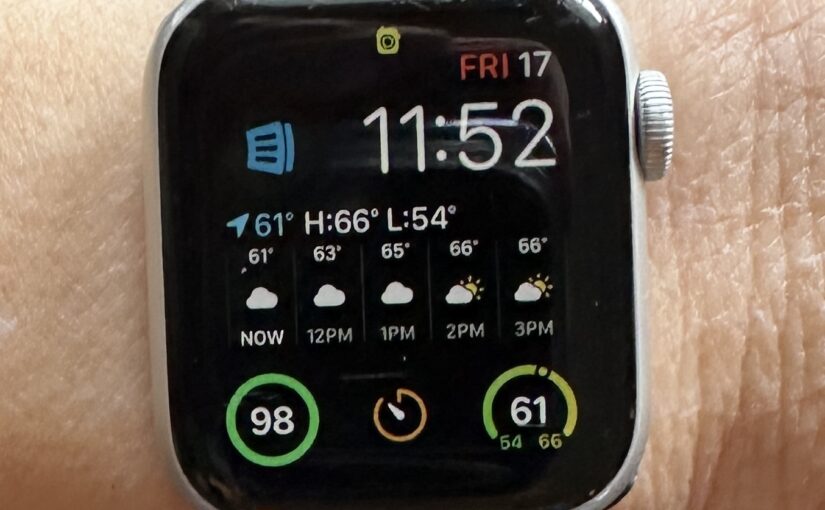
You can customize your watch by selecting among various watch faces. Some are analog, some are digital. Some are utilitarian and some are fashionable.
Any particular watch face can be further customized by selecting complications. These are regions of the watch face that act as buttons, or display information from a particular App. Complications can display items like weather, calendar, battery state, and heart rate. Third-party complications are available and might install as an Apple Watch App, or an iPhone App.
Some watch faces are only available for the Apple Watch Ultra.
iPhone Required
You must have an iPhone to set up and use the Apple Watch. The Watch App on the iPhone is the primary means to control settings on the watch.
Some functions of the watch may be limited unless it is in range of the paired iPhone. The Cellular models have more autonomy because they have their own connection to the Internet.
Watch Bands
When buying an Apple Watch, you will have to select a band. This decision is not critical since bands are removable and replaceable. There is a thriving market of 3rd party Apple Watch bands many of which have good appearance and functionality at a fraction of the price of Apple’s bands.
The band you buy should:
Fit your wrist, and
Fit your watch
Watch case sizes and band sizes are measured in millimeters
Two basic sizes of band attachments, small and large
Small = 38, 40 and 41 mm
Large = 42, 44 and 45 mm
The wrong band size will work, but might look funny. You should choose bands that match the size category (small or large)
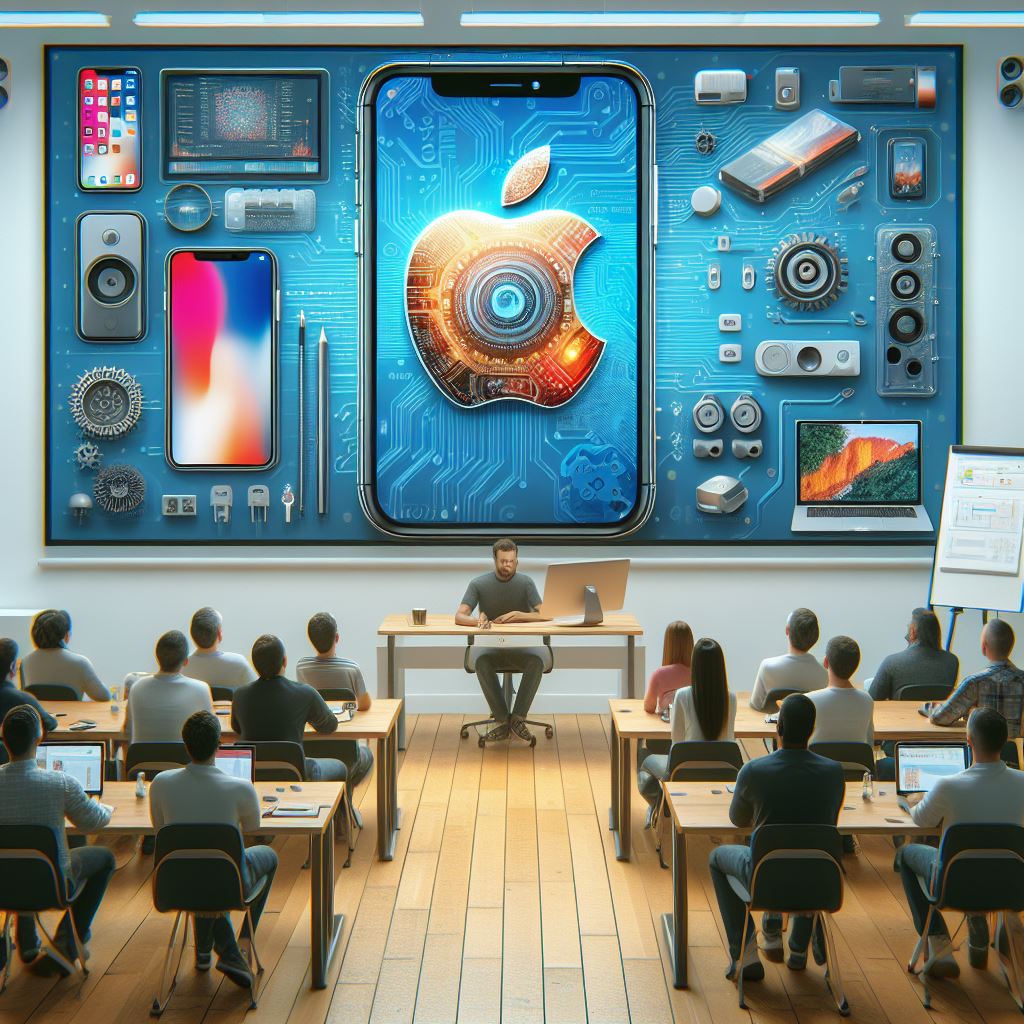
Artificial Intelligence (AI) has meant different things at different times to different people. It is a moving target. In the 1970s, it meant a machine playing chess. Today, no one would call that artificial intelligence. Now it might be a machine generating an essay, drawing or photograph from a short prompt.
This image of an Apple User Group meeting was generated by AI.
Artificial Intelligence has become vastly more powerful, and it will only continue to get better.
Whether you realize it or not, you are already using Artificial Intelligence in several forms:
Facial Recognition – “Face ID”, Photos
Recognition of Objects: cat, dog, building, The Eiffel Tower, vehicles, humans
Voice and Speech Recognition, e.g. Siri commands
Siri Suggestions – AI forecasts what App/Destination/Search you might want now
Sound Recognition, e.g. Siri can recognize smoke detector sounds
Navigation Apps, driver assist, “self-driving”
Language Translation, Apple & Google Translate Apps
Speech Generation – Personal Voice, Live Speech, in Accessibility Settings
Recognition of facial expressions and gestures – Used in Face Time and the Vision Pro
Face ID is an example of very unobtrusive AI, probably the best kind. You are usually unaware of Face ID unlocking your phone except in the rare situation where your face is obstructed for some reason and it doesn’t unlock.
Apple has dedicated about 1/4 of the on-chip real estate in their new processors to the Neural Engine. This shows a commitment to AI going forward at Apple. The Neural Engine does on-device machine learning.
Much of what you see when you browse the internet is determined by AI.
Search Engine Rankings
YouTube Recommendation Engine
Amazon “Inspired by your Shopping Trends”
Video recommendations for Apple TV, Netflix and Amazon Prime
When you do those captchas (“I am not a robot”, “click all images containing a bus”), you are providing training data for AI algorithms.
Generative AI
The new type of AI getting a lot of attention in 2024 is Generative AI, so called because it generates something, whether text or an image.
When you hear about ChatGPT, GPT stands for Generative Pre-trained Transformer. This is a large language model trained on a large amount of text.
This type of AI tool can be used to generate documents like reports, emails, ad copy, blog posts and computer code. The generated text usually looks very good, but you must check it for accuracy.
How Can I Try Out These AI Tools?
It’s early days in this phase of the AI revolution, and things are changing rapidly. Web sites appear and disappear. Companies are bought and sold. Tools change hands and change names. Here is a list of generative AI tools that work as of March 2024.
Claude.ai – Account required. Free and paid tiers.
The Microsoft Copilot App – May require Microsoft 365 subscription? Includes Designer (for images), Vacation Planner, Cooking Assistant and Fitness Trainer.
Sora – from OpenAI, generates videos from prompts – only pre-recorded demos now
Artificial General Intelligence
Artificial General Intelligence (AGI) doesn’t exist yet. Existing AI software is powerful in certain domains, but it is helpless outside those domains. ChatGPT can write a passable paragraph for a PhD thesis, but it’s not as smart about the world as a five year old. True AGI would have intelligence equal to or better than human intelligence in at least all the domains where humans are knowledgeable.
Here’s Copilot Designer’s response to a request for three yellow ducks and a green goose. It totally failed to include a green goose, or any green bird. It’s really not too bright yet. It draws better than a five year old, but lacks understanding.
One theory is that in order to develop AGI, AI will have to be embodied in a robot where it can gain the experience of the world that a child has.
Is AI a Threat to Humanity?
Scary Robot Drawn by Microsoft Designer / DALL-E 3
There have been a number of topical headlines recently suggesting that AI is a serious threat to the human race. Caution is warranted, as with any new technology, but I believe that the threat isn’t Artificial Intelligence itself, but our own lack of wisdom in deploying it.
Most of our fear of alien or artificial intelligences is that they will be too much like us. We know all too well the human capacity for fear, greed and desire for power.
Artificial Intelligence is likely to lack those things unless we are stupid enough to design them in. Without an equivalent to the more primitive parts of the human brain, robots or AI will lack lust, greed and even an instinct for self-preservation.2
We obviously shouldn’t give an AI control of nuclear weapons, but that has more to do with the danger of such weapons than of AI.
A more realistic concern in the near term is that AI may threaten many people’s jobs. If you write ad copy or blog posts for a living, AI is already coming for your job. If you are an illustrator or photographer, AI can already accomplish many of your tasks in a fraction of the time. Lawyers and computer programmers are probably next, and I am sure there are many other job categories at risk.
Like any other tool, AI can be used by bad people to do bad things. Since it is a powerful tool, it can have a big effect. It could be a propaganda tool without precedent, and will no doubt be used to spread misinformation, fear, uncertainty and doubt on a massive scale.
These are serious social problems. We have already experienced social problems from other aspects of technology such as automation and social media. As a society we need to figure out how to fairly distribute the wealth and other benefits derived from AI and similar technologies and how to protect society from misuse of AI.
This is a live demonstration meeting covering Procreate for iPad. There is also a version of Procreate for the iPhone.
Procreate
Our presenter this month is Ann Posner. She says:
The Procreate app is a powerhouse assistant in my career as a professional artist, as well as in my personal life. I recommend the Procreate app for any computer users or artists from beginners to experts!
Ann on the sailboat with some of her art
The video of this meeting is now on-line here. The audio is low, so turn it up. The actual presentation starts about 4 minutes in.
In today’s rapidly advancing digital age, smart home technology has become increasingly popular among homeowners. Users need an overall smart home system to control their many devices. There are several to choose from, and Apple is by no means the leading provider:
Amazon Alexa and Google Home are the most popular, and there are others, such as Samsung SmartThings. Apple’s HomeKit is arguably the most privacy-focused system, and is convenient for users already in the Apple ecosystem.
Apple HomeKit is a framework developed by Apple that allows users to control and automate their smart home devices using their iPhone, iPad, Apple Watch, or even Siri voice commands. It provides a unified platform that simplifies the management of multiple smart devices, ensuring compatibility and ease of use.
Features and Benefits:
Centralized Control: With HomeKit, you can control all your HomeKit-enabled devices from a single app, eliminating the need for separate apps for each device.
Automation and Scenes: HomeKit allows you to create automation routines and scenes, enabling you to customize your smart home experience. For example, you can create a “Good Morning” scene that automatically turns on the lights, opens the blinds, and starts playing your favorite music, all with a single command.
Remote Access: HomeKit enables remote access to your smart home devices, providing convenience and peace of mind. Whether you’re at work or on vacation, you can monitor and control your devices from anywhere using your Apple devices.
Requirements
You need to have a WiFi network (a router) to use HomeKit.
You must have at least one HomeKit hub for HomeKit to work. Hubs keep your home automation working while your personal devices like an iPhone or computer are turned off or away from home. Hubs are presumably plugged into power, and stay on 24 hours a day.
Your hub can be a HomePod, Apple TV or iPad. A HomePod or Apple TV is probably preferable to an iPad. Only the Apple TV 4K Wi-Fi + Ethernet model (128 GB) is compatible with Thread networking. Get that one if you want to future-proof your setup, even if you don’t need Ethernet or the extra memory. The HomePod Mini also has Thread. (See below.)
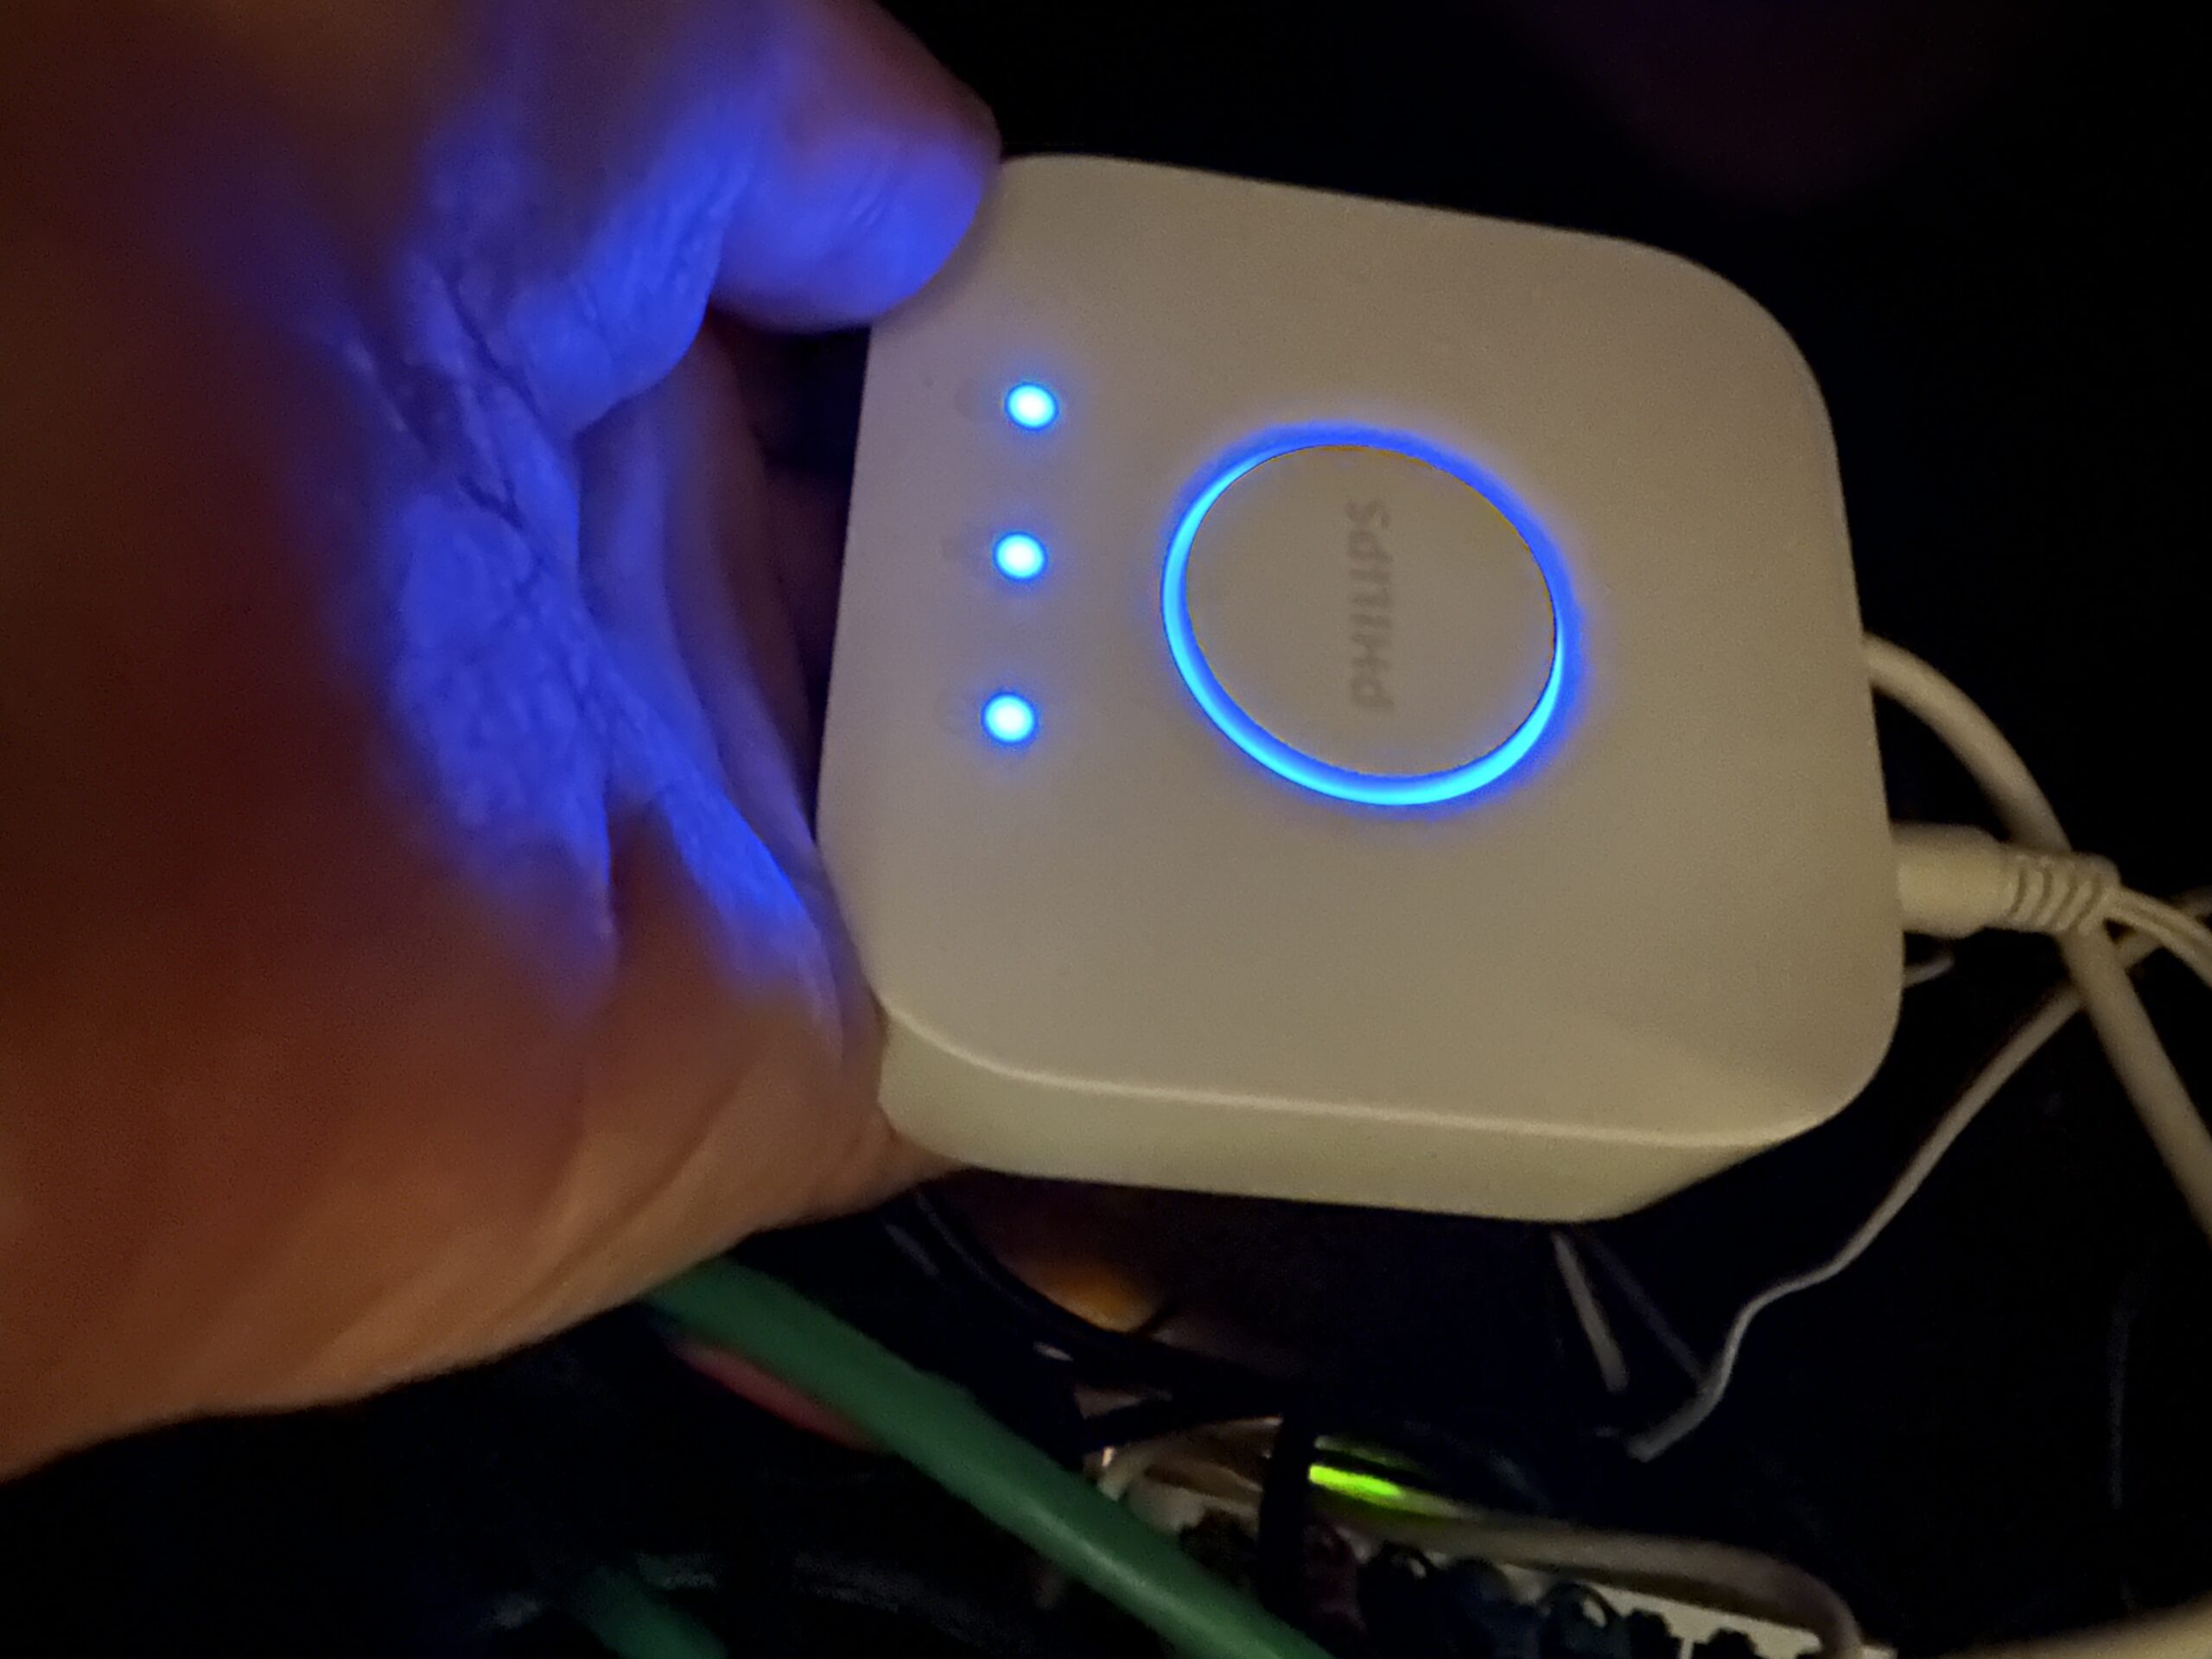
You may also need one or more hubs for specific products. For example, I have a hub for my Phillips Hue light bulbs. You don’t need to interact with these hubs. They just need to be connected to Ethernet, and can live in a closet somewhere.
The Phillips Hue Hub Connected to Power and Ethernet
Competing Standards Replaced by Thread and Matter
When shopping for smart home devices you must navigate a tricky compatibility maze. Many products are compatible with some of the competing smart home frameworks, but not others.
HomeKit users need to shop for devices that specifically state they are compatible with Apple HomeKit. That list is surprisingly short, but growing. Here is Apple’s own list of HomeKit-compatible accessories. There are many others available which are not on that list, but this is a list of solidly-compatible devices.
Hopefully the compatibility situation is improving with the introduction of the smart home interoperability standards called Thread and Matter. Thread and Matter devices interoperate between competing home automation systems like Apple HomeKit, Amazon Alexa, and Google Home. You should soon be able to buy one device and know it will operate with any of the systems.
Thread is a wireless technology. It requires special radio hardware. That’s why you need a special hub, like the HomePod Mini or the latest Apple TV 4K Wi-Fi + Ethernet model (128 GB), to use Thread. Thread is slower, cheaper, and lower-power than WiFi, which makes it appropriate for inexpensive devices which don’t need to send much data.
Getting Started with HomeKit
The foundation of your Home Automation system is your WiFi network. You want to start out on a firm basis. It will become increasingly difficult to change your Network name (SSID) or password as you add more devices. You want to think ahead and establish a Network name that is not unique to you, is not embarrassing, and that could be transferred to another person if you sold the house. You also want to have a really long, secure password which is also something not embarrassing to tell the buyer of your house, or the installer of equipment that uses WiFi.
Once you have dozens of Home Automation devices using your Network and password, you really won’t want to have to change them all.
Home Automation will soon be a consideration for home sales contracts. Contracts will likely specify what devices will stay with the house, and which will not, and may require the owner to transfer the WiFI credentials. Since many devices are attached to the house, like switches, cameras and doorbells, they will probably stay with the house. I know if I was a buyer, that’s what I would want.
You might want to have a separate WiFi network for your home automation, or IoT “Internet of Things” devices. You don’t have to do that right away. If you create a second network later, you can leave the home automation devices on the existing network and put your computers on the new one. It is much easier to change the WiFi connection on a few computers and phones than on numerous light bulbs, etc. Having a separate network reduces the risk of rogue or poorly secured devices by isolating them from your more important personal devices.
Your First HomeKit Device
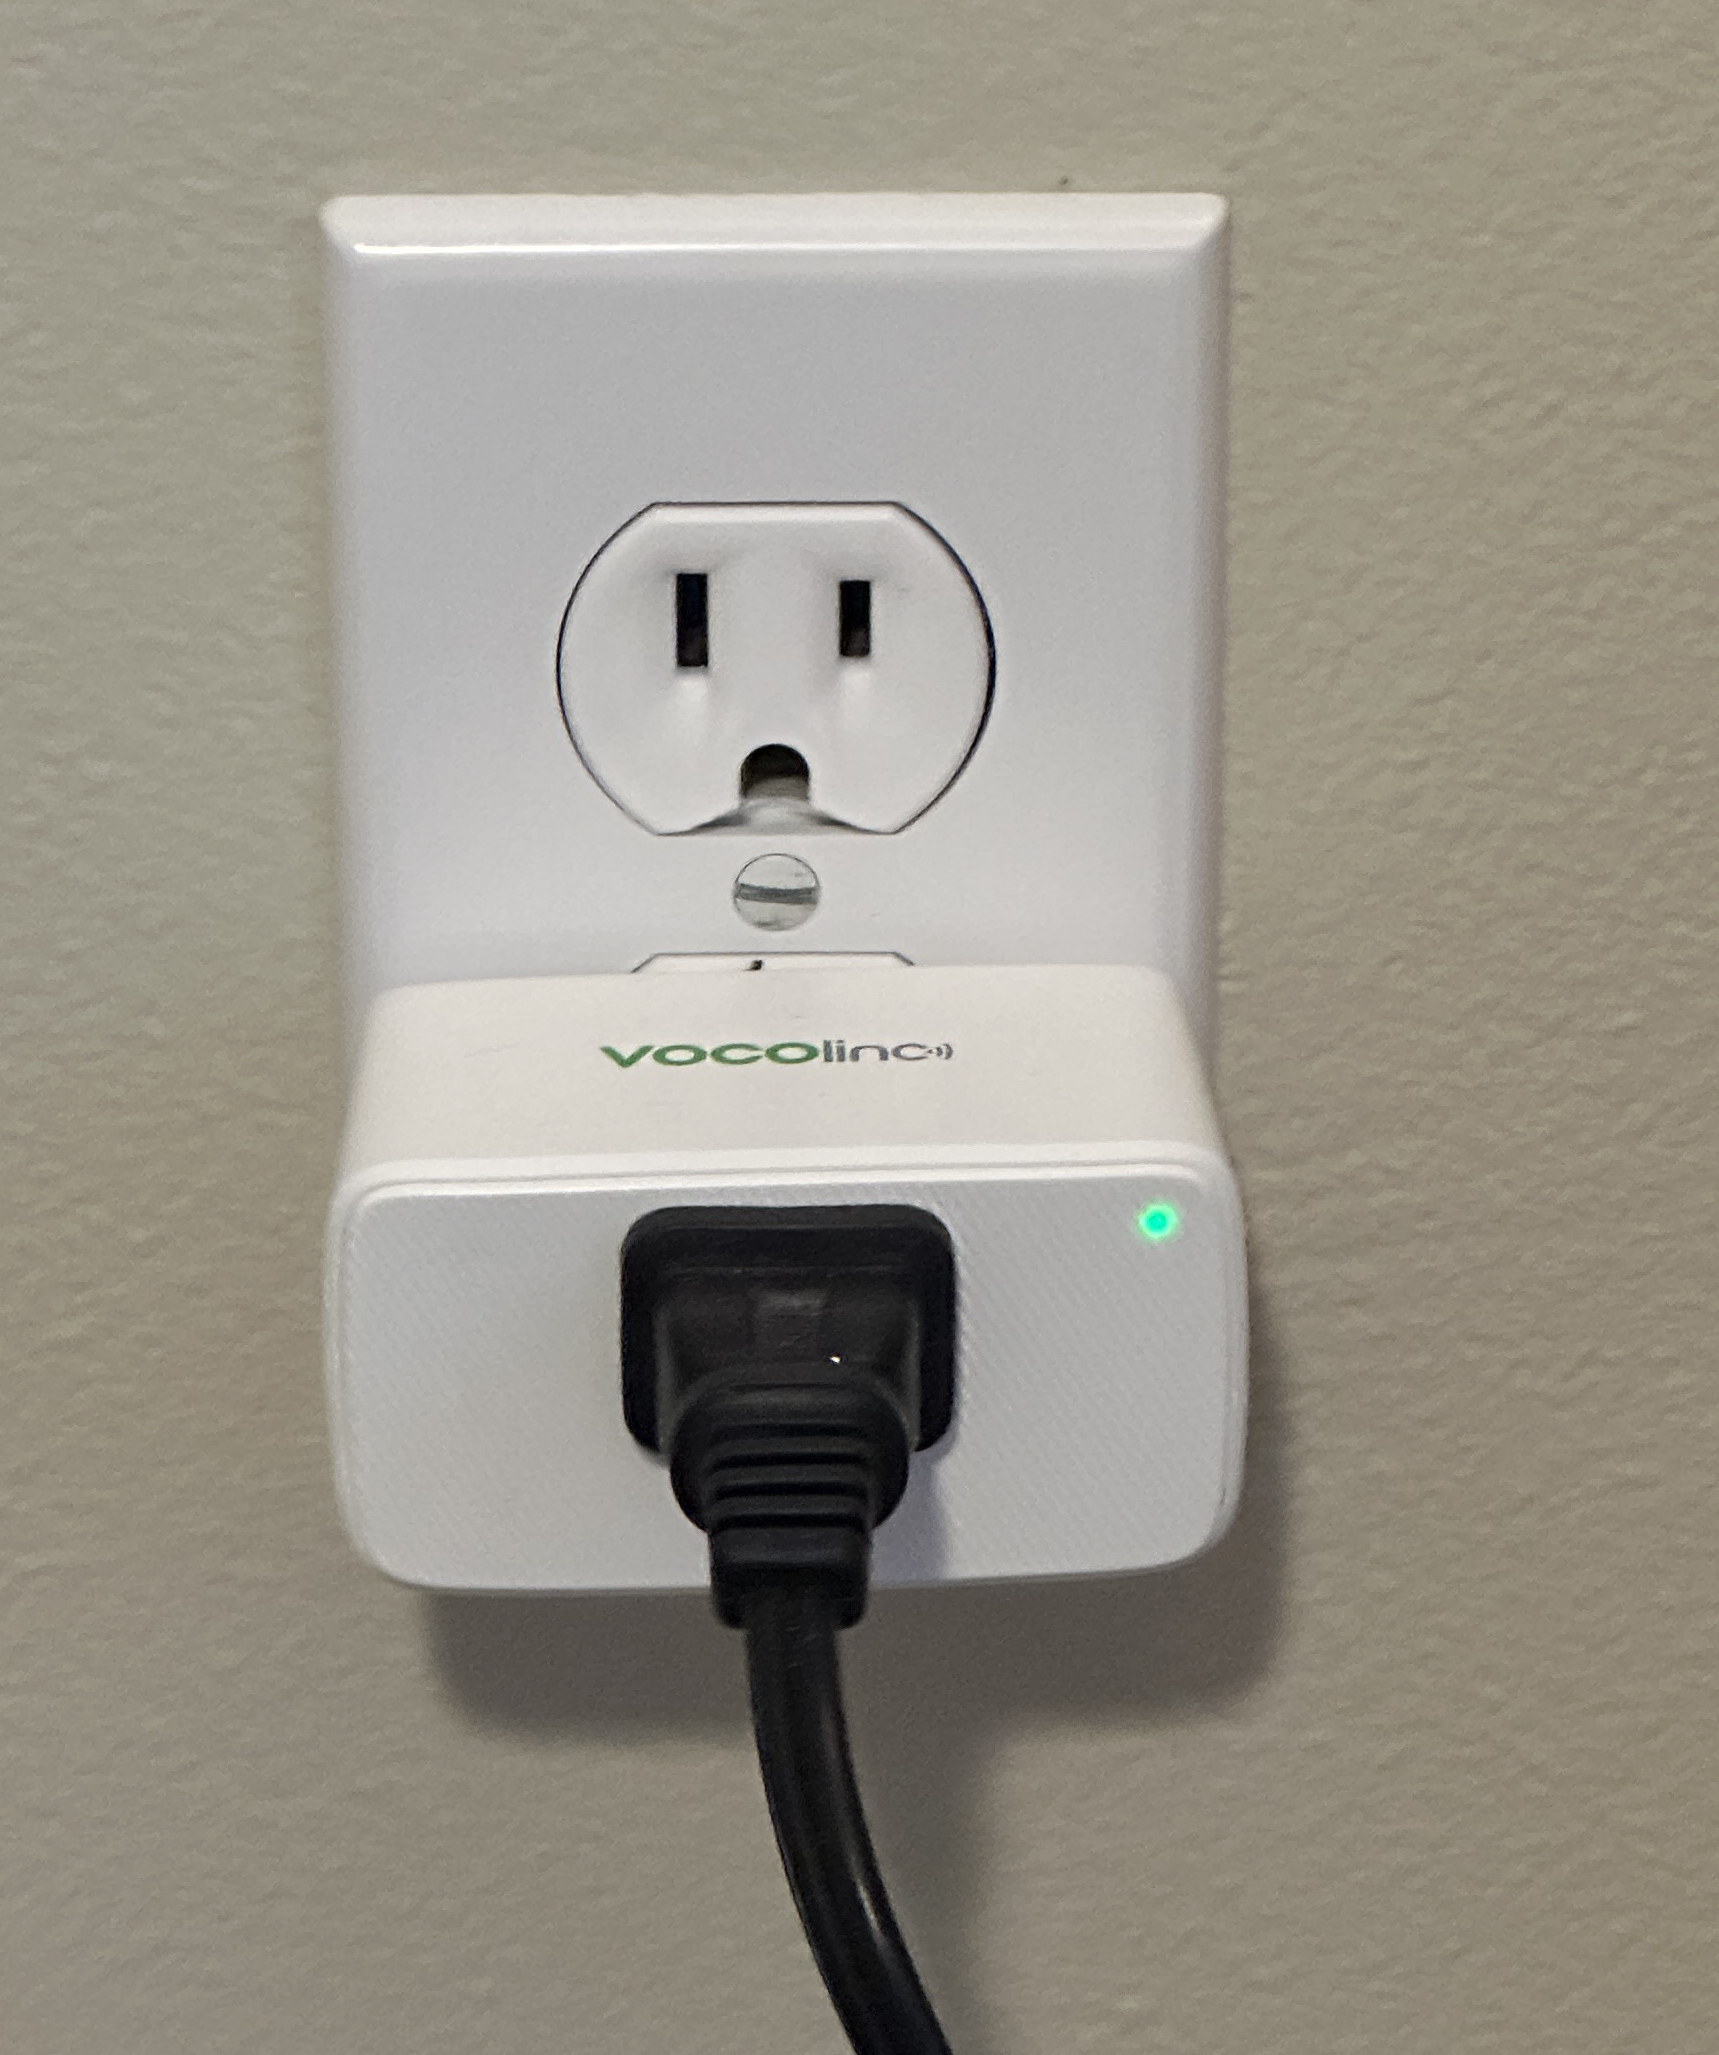
If you are just starting out with HomeKit, I suggest you start with some smart plugs like these from VOCOlinc.
These are not expensive. I found them easy to set up. You don’t need any electrician skills. You just plug them into an outlet, and plug your device into them. These have their own App, but you don’t need to use it. They will work directly with HomeKit.
In-Wall Light Switches
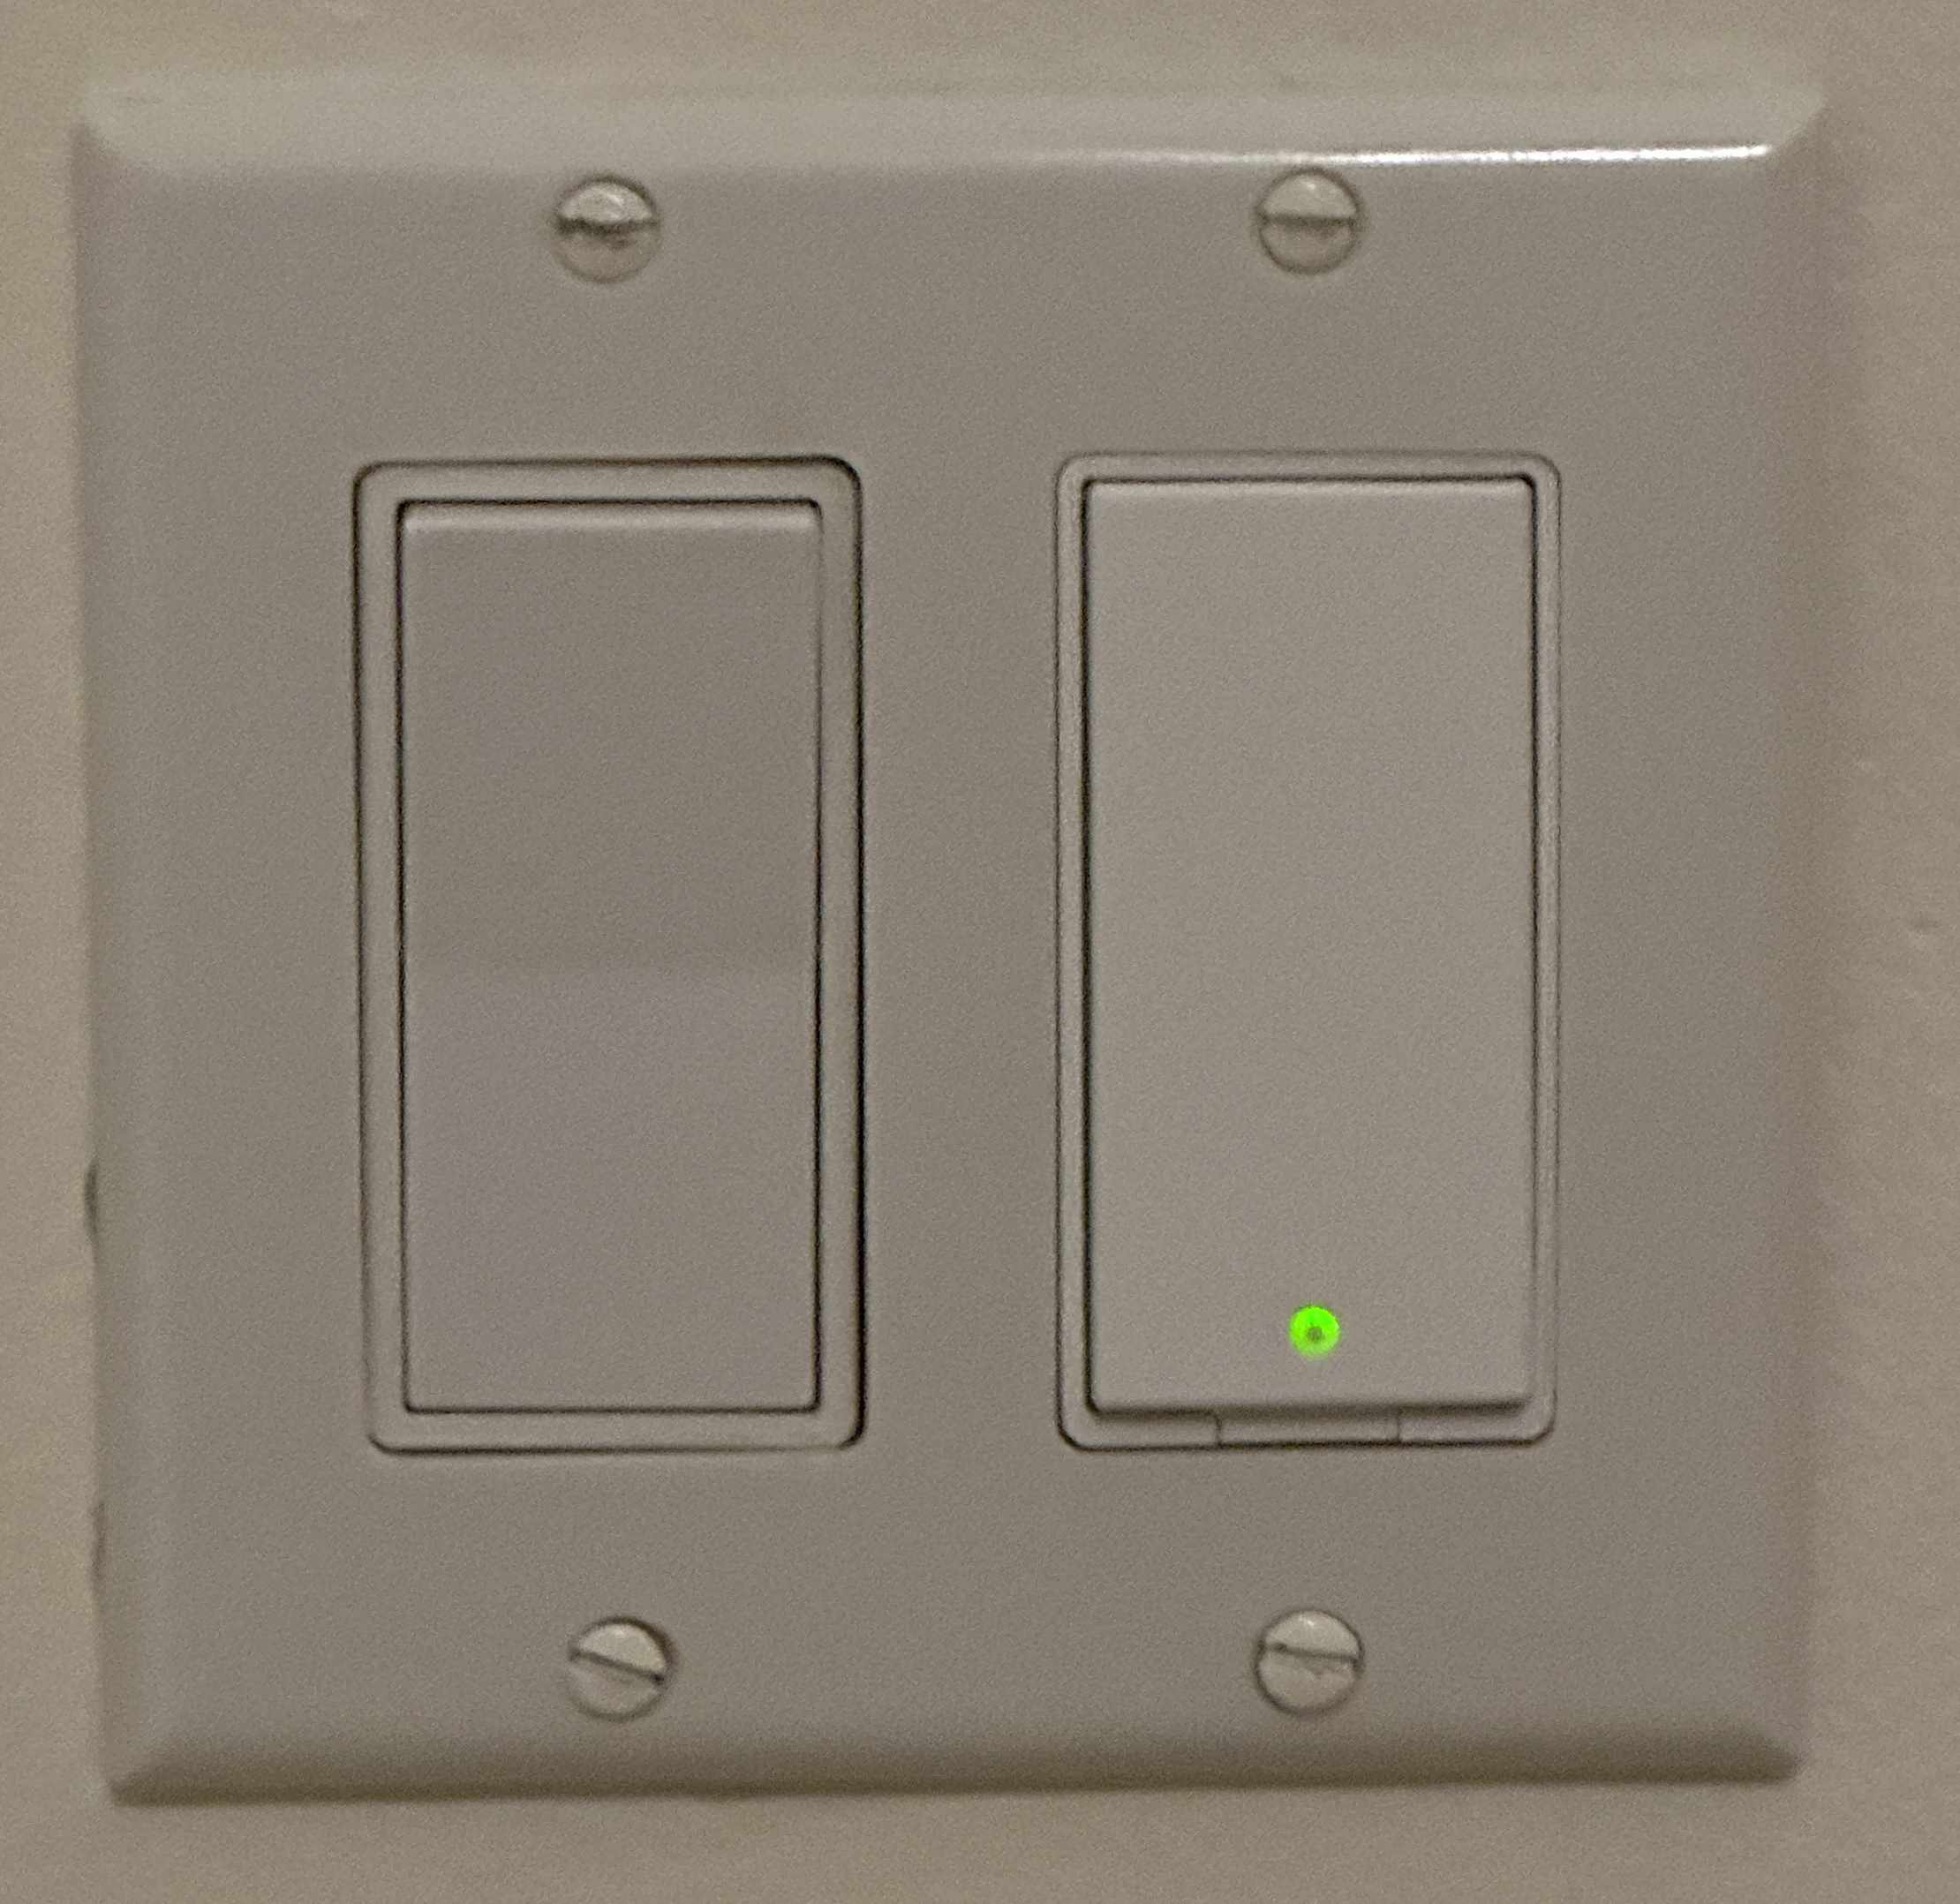
The switch on the left is manual, the switch on the right is a smart switch.
Since many of your lights and fans are built-in, you may want to replace manual wall switches with smart switches. This is about the same difficulty as replacing the switch with a dumb switch. Smart switches are bigger, so the space for wiring can be very tight in the outlet box. If in doubt, consult an electrician.
I have been using Meross brand switches, both simple on-off switches and dimmer switches. I have found these reliable and usually easy to set up, but I had one or two that were very reluctant to join my HomeKit home successfully.
Again, Meross has an App, but you don’t need to use it except during setup.
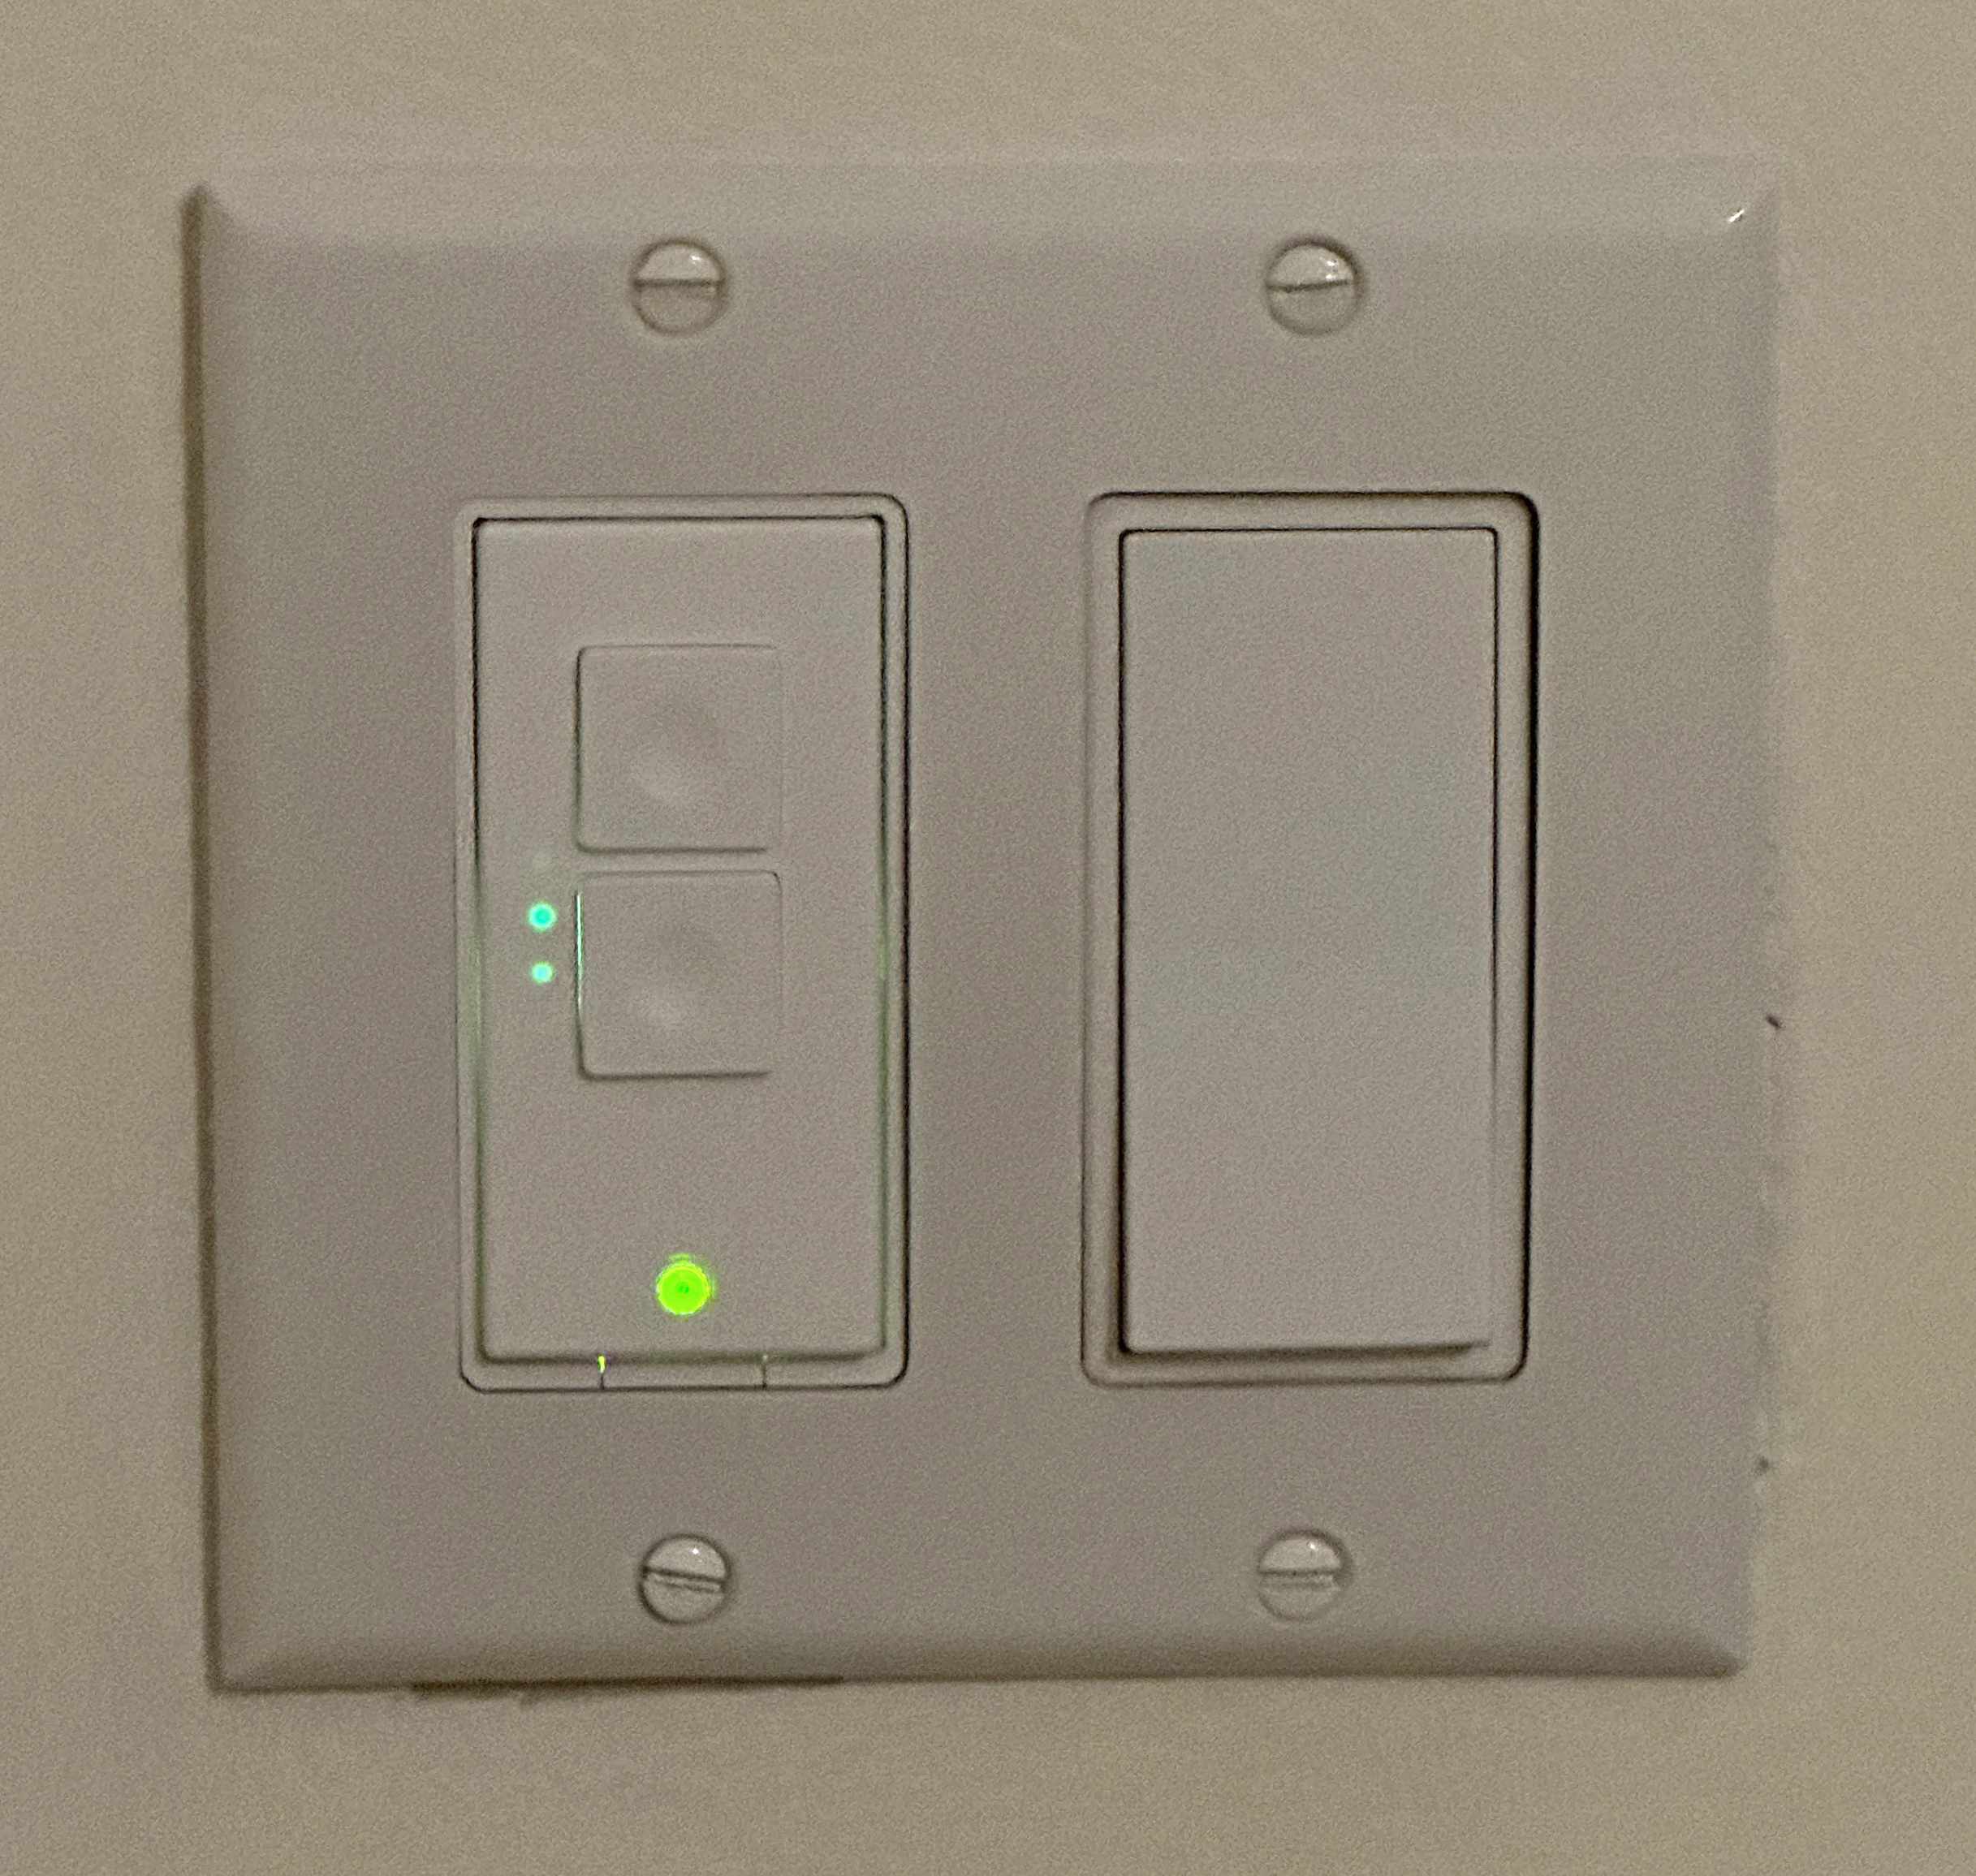
The switch on the left is a Meross dimmer switch
If installing a dimmer switch, make sure that your light bulbs, especially LED bulbs are dimmable. Some LED bulbs are not designed for dimmers and will flicker wildly on a dimmer switch.
Hot tip: when setting up your devices make sure your phone is connected only to the WiFi network you want your devices to adopt. (Your Internet-of-Things network if you have one.) The devices will learn the WiFi network and credentials from your phone.
It’s Not for Everything
Not all your devices need to be smart devices, need to be connected to HomeKit, or even connected to WiFi.
Some things are probably better off as dumb devices.
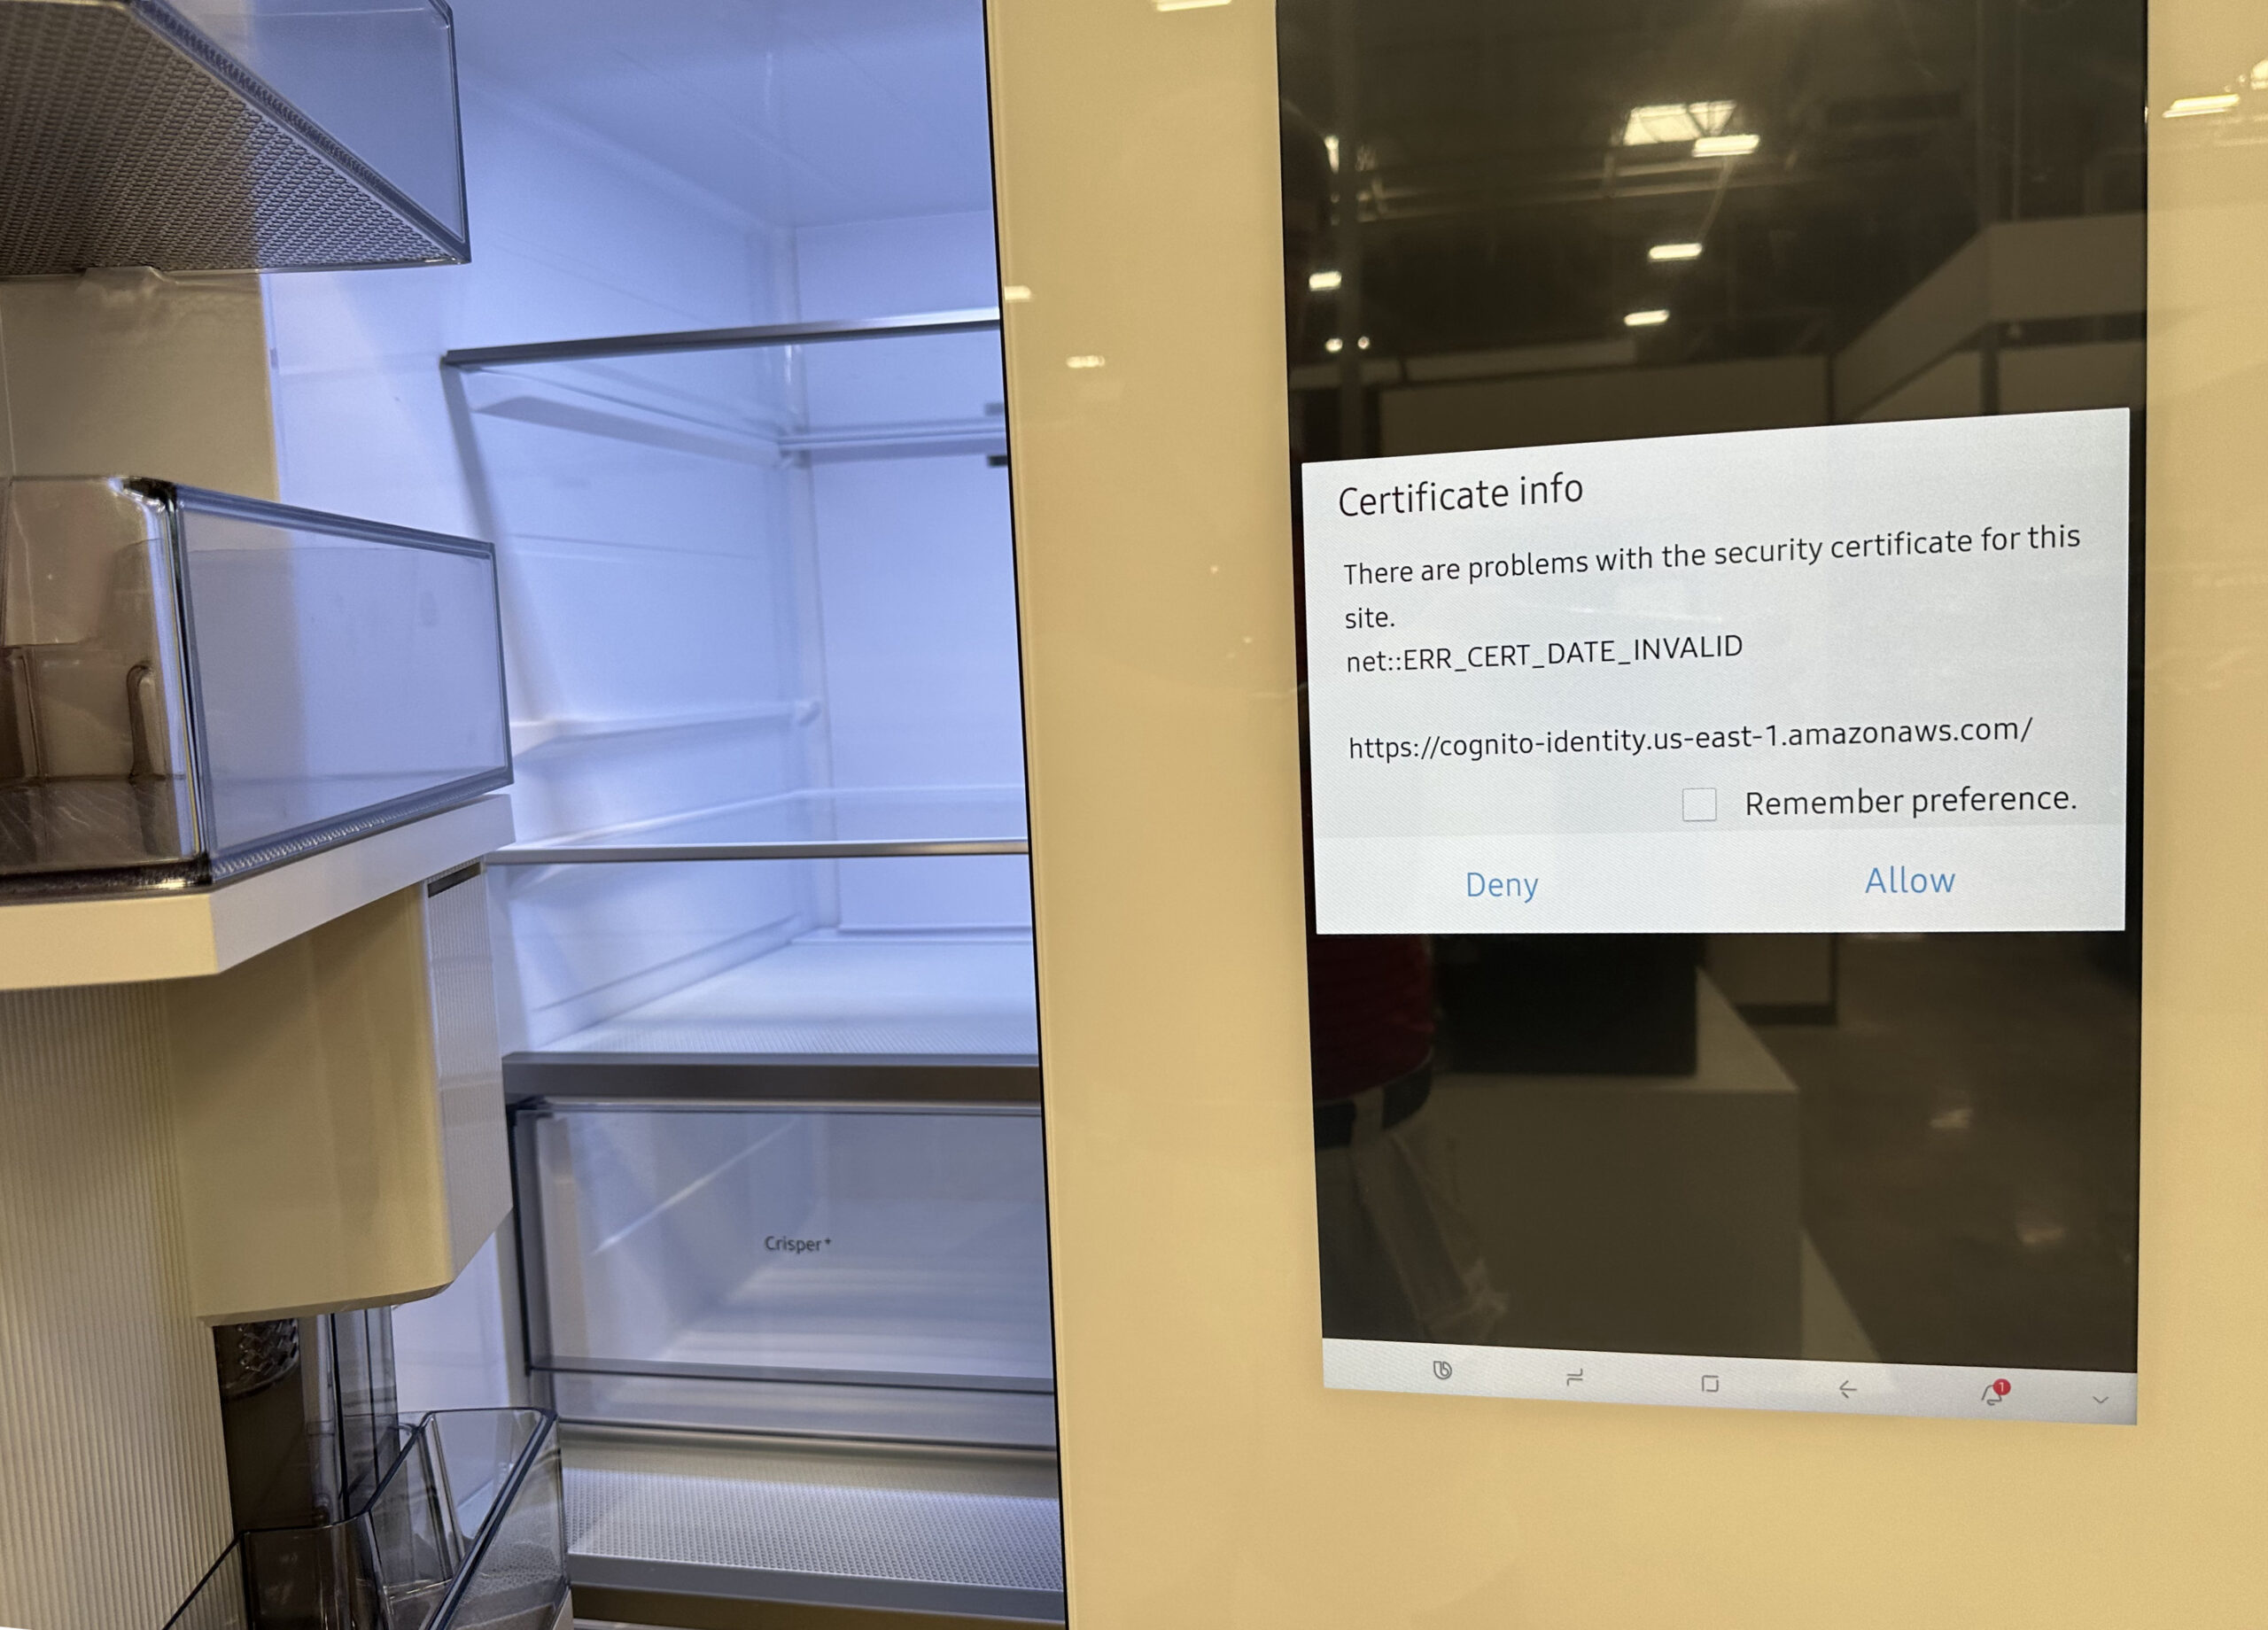
Certificate Error on Refrigerator in Appliance Store
I took this photo in an appliance store of a new “smart” refrigerator displaying an error about an out-of-date security certificate. No matter how nerdy you are, you probably don’t want to be debugging certificate errors on your fridge.
I have several smart home devices that are not on HomeKit, and probably shouldn’t be: Robot Vacuum cleaner, Solar Power System and Clothes Dryer, for example. Those things have their own apps and that’s probably how it should be.
It’s Not Forever
The lifetime of smart devices is unpredictable and is probably shorter than their dumb counterparts.
Reasons that smart devices can stop working:
Device Needs a software update, but manufacturer doesn’t provide one
App Needs a software update, but manufacturer doesn’t provide one
The Cloud is down (e.g. mfg. bankrupt, doesn’t pay their hosting bill)
Deliberate abandonment/sabotage by manufacturer
Virtual Supply Chain problem (some cloud or network provider goes away)
I am now wary of devices that require an account to operate. Obviously, if that account stops working, so does the device. Unfortunately that describes most devices sold recently.
Advanced HomeKit Compatibility with Homebridge
Homebridge is a software package that supports plug-ins that extend HomeKit in various ways. As its name suggests, Homebridge acts as a bridge between HomeKit and devices that would not otherwise be compatible with HomeKit. There are many such plugins for both real and virtual devices.
Homebridge can run on various devices and operating systems, including MacOS, Windows, Linux and Synology. Like other “bridges”, Homebridge is probably something you want plugged in and running all the time as part of your home automation setup.
I am currently using Homebridge for three things:
My Eufy Doorbell / Camera
My Garage Door (via ratgdo hardware)
A virtual device to schedule triggering of other devices
A few months ago, my Garage Door, which had been working in HomeKit via Homebridge stopped working via HomeKit because the manufacturer, Liftmaster/Chamberlin (may the fleas of 1,000 camels infest their armpits), deliberately revoked their API which many of their customers had been using for that purpose.
It’s not clear why they did that. Possibly for marketing reasons. Possibly they wanted customers to be forced to use their own app (which shows advertising) to control the garage door. It’s weird because they also discontinued their own HomeKit interface box.
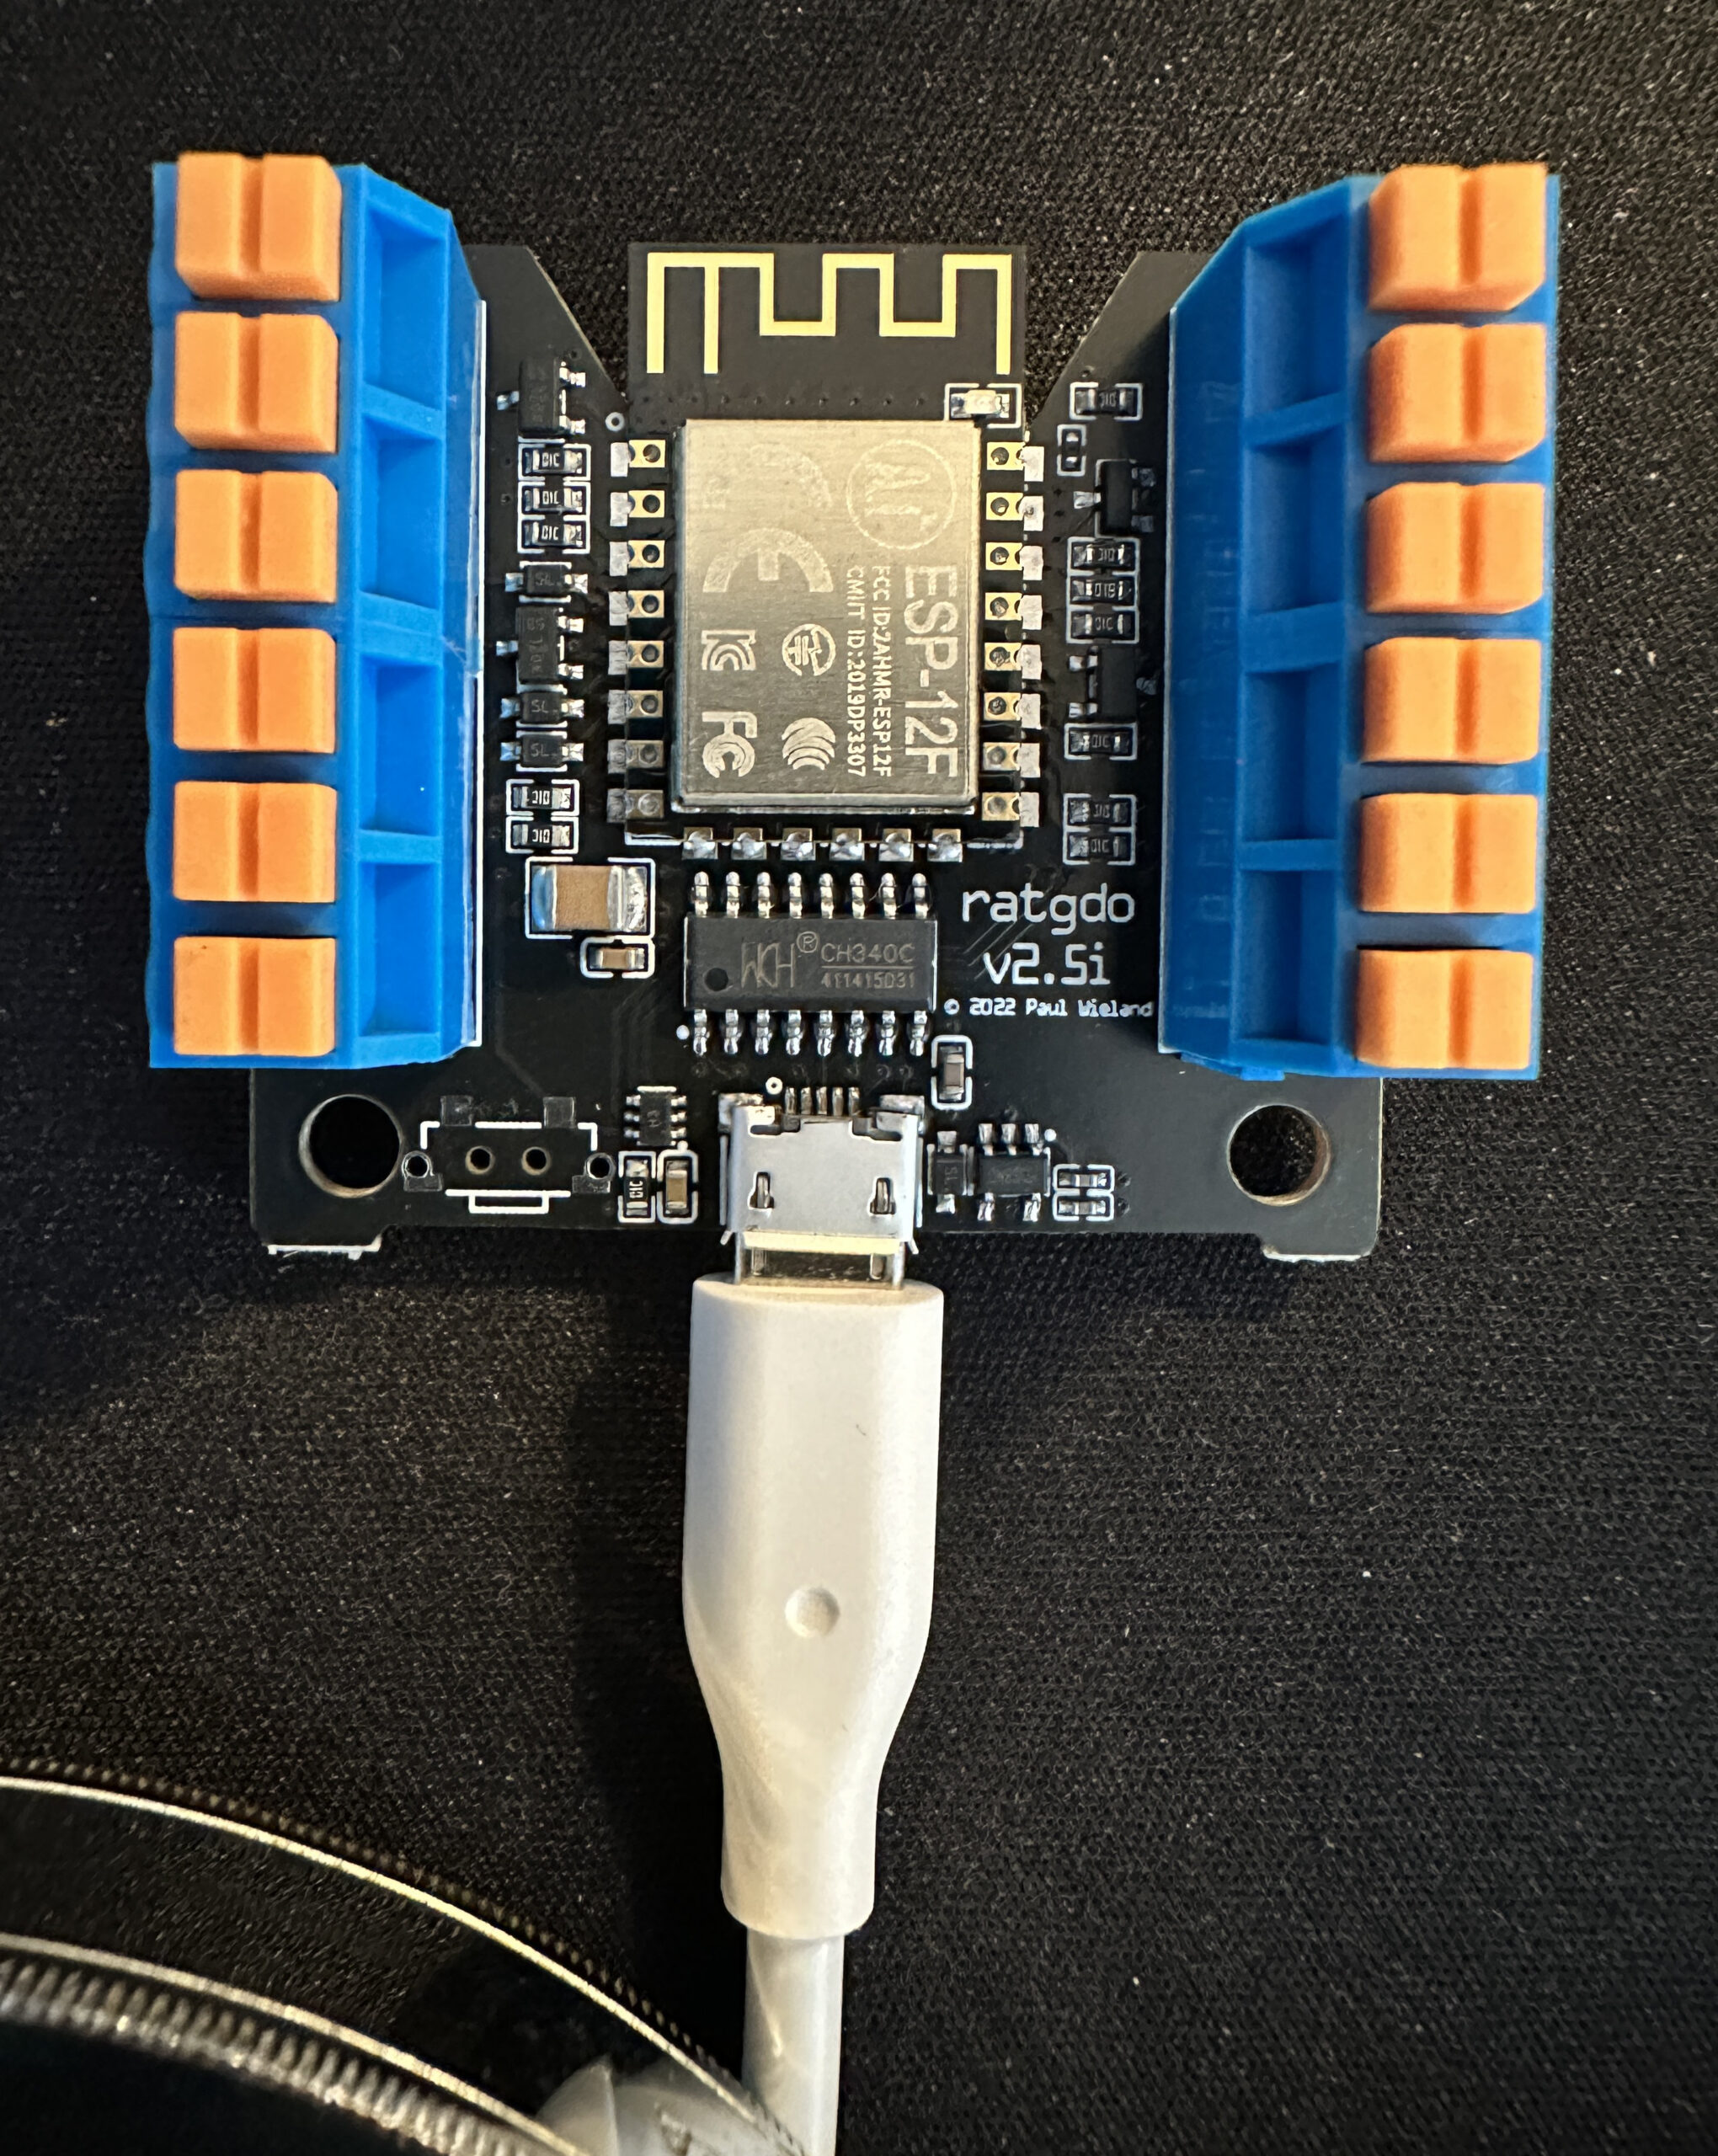
To restore HomeKit functionality, I bought and installed a hardware device called ratgdo. (GDO=Garage Door Opener). It was specially made for just this purpose; allowing Liftmaster garage doors to again be used with smart home setups.
The ratgdo Garage Door Opener Interface
Ratgdo is a bare circuit board powered via a USB cable. It connects to the garage door opener by three wires. It is an entirely local device which requires no connection to the cloud, and no App or account. It does connect to your WiFi network. (Notice the gold antenna trace at the top of the photo.)
With this hardware and the Homebridge Ratgdo plugin, my garage door is again fully HomeKit compatible.
Such are the adventures of HomeKit early adopters.
What happens to your digital possessions after your death? How can you make sure that they are available (or not available) to your heirs as you wish?
The same preparations that will help your heirs after your death can help you while you are alive. They can help with disaster recovery after a fire, flood, etc. They can help in the event you have to go to the hospital or are temporarily incapacitated. They can help if your phone or computer is lost, destroyed or just quits working.
Apple ID and iCloud
For Apple users, the obvious place to start is your Apple ID. This single ID controls your Apple email account, your iCloud on-line storage and many other things you may or may not be using.
If your heirs know your Apple ID credentials, they can access your stored photos and documents, read your email, unlock your locked devices and prepare computers and devices for sale. Without your Apple ID, they may be completely locked out of doing any of those things.
Apple has a Legacy Contact Provision that you can use to designate a person to have access to your Apple ID after your death.
Make a list of your on-line accounts and keep it in a safe place for your heirs. Note that probably every company you do business with has an on-line account. The list can be on paper, or in digital form. Just make sure that your heirs will be able to access the list.
You should make some notes as to the purpose and significance of each account. If you have an account at foobar.biz, will your heirs have any idea if that’s important, or why you had it? In a year or two, will you yourself remember why you created that account?
Notes, e.g. A social media site primarily for dogs
Note that your Username on a site might be an email address or not. Note that the site probably doesn’t have anything to do with the email domain (me.com, in the example), unless the site is an email provider.
Passwords are case sensitive. For handwritten lists, make sure your writing is clear, and that upper and lower case letters are clearly distinguished. One convention is to underline capital letters. eMail addresses are never case sensitive, and are usually written in all lower case.
Password Managers
A password manager is essentially a place to keep a list of all your accounts, while keeping the passwords safely encrypted. This is ideal information for your heirs, if they can get access.
Legacy access is just another reason to use a password manager.
You may be able to establish an emergency or legacy contact for your password manager. You may be able to have shared password vaults with your family members, so that they always have access to those accounts.
Things You Should Keep On Paper
You should keep a paper copy of at least your most important accounts and passwords. This would likely include your password manager and passcodes to your devices. You should include backup 2FA (2nd factor Authentication) codes, if you use 2FA for those accounts. Don’t forget to mark on the 2FA codes exactly which service and account they are for. Put all these papers somewhere like a safe or safety deposit box.
eMail Accounts Are Important
You might think that your email is unimportant — just a pile of silly memes and spam. But your email is often the key to accessing your other, more important, accounts. Most accounts require an email address to sign up. If you forget your password (or your heirs don’t know it), the forgot password password recovery process uses your email to reset your password.
This is why you should use strong passwords and good security on your email accounts, and also why you should make sure your heirs can get access.
Keep accounts separate from your spouse
Death is another good reason not to use shared email and other accounts. You don’t want your account to be closed because your spouse has died.
Your Phone is Important
Your phone is another way to access your accounts. The account sign-on or recovery process often includes a text message or phone call with a sign-in code. If you or your heirs lose access to your phone, that process will be stymied.
Apps on your phone are often the easiest way to access your accounts. If you have authenticator app(s) (for 2FA codes) on your phone that you use to sign in, how will your heirs sign in without access to your phone?
Google, LastPass, Microsoft and others have stand-alone authenticator apps.
The Apple Wallet App is probably only accessible on your iPhone or Apple Watch. Your heirs might need that to pay the credit card bills.
Precautions
Back up your iPhone periodically, either to your computer, or to iCloud.
Make sure your heirs can find your iPhone passcode.
Consider adding your spouse’s fingerprint or face ID to your device
If you need to restore a phone because of a forgotten passcode, almost everything will be restored, exceptAuthenticator App data, and the Apple Wallet.
Other Accounts
Every web site and company will have its own methods for account security and recovery. There are a few things you can do to make account recovery easier for you and for your heirs.
Establish backup email addresses, and backup telephone numbers if the site supports them. Add your trusted spouse’s phone, for example as a secondary method of receiving login codes.
Similar to your Apple ID, your Google account is multifaceted. It governs Gmail, Google Photos, Google Pay and Google Drive (and more). Many people have important documents and precious photos in Google Drive and Google Photos.
If you can’t or don’t want to provide credentials to your account to your estate, you can set up a policy with the Inactive Account Manager. You can specify what happens to your Google account when it becomes inactive for a specified time — presumably when you have died. You can give access to specified people, and/or specify that your account is to be deleted.
Many accounts have no legacy or inheritance feature. The survivors have to go through a process with a death certificate or letters of administration to gain control of the deceased account.
What’s Most Important to Your Heirs
Where’s the money?
How can I get access?
Where’s the tax information for final IRS return?
Where are the family photos?
How can I delete or close the account?
How can I sell the device?
How can I cancel the subscriptions?
Other Things to Consider
Financial Accounts
Banking
PIN
Investment
Insurance
Cryptocurrency wallets and exchanges
PayPal
What will your heirs need in order to pay all the bills?
Retirement accounts
IRS.gov, ID.me accounts. Heirs need to file your final tax return.
Home
Alarm Codes
Keypad codes (door locks)
Safe combinations
Websites for alarm systems
Solar generating systems
Home Monitoring services
Cars
Pin and Keypad codes (yes, some cars have these)
On-line account credentials (yes, some cars have these)
SiriusXM subscription
Dashcam account
SunPass account (toll transponders)
2FA Keys
Physical Keys, (Yubikey)
2FA Apps
BACKUP CODES – make sure you have printed out backup 2FA codes for your accounts and stored them safely
Other Companies & Web Sites in General
Frequent Flyer Miles, Travel Points (can be valuable) Airline miles – often not “officially” transferable, but can be if you have the credentials
do you have an email account at your ISP that you use?
Genealogy – you did it for your heirs, right?
Access to family tree
Access to DNA test results
Amazon
music, photos, videos, books
What would your heirs need in order to sell your computer?
Digital Media (usually can’t be officially transferred)
Purchased Music
Purchased Movies & TV Shows
Purchased Software (Software Licenses)
Purchased eBooks
Social Media Accounts
How your heirs might notify folks of your passing
Heirs might want to close the account(s)
Access to photos stored on-line
If you didn’t use your real name/birthday on FB or others, your heirs might not be able to delete or memorialize the account because the details on the death certificate don’t match.
For our April meeting, we’re covering sites and apps that might be especially useful to those living in Brevard County, Florida.
Printing at the Library
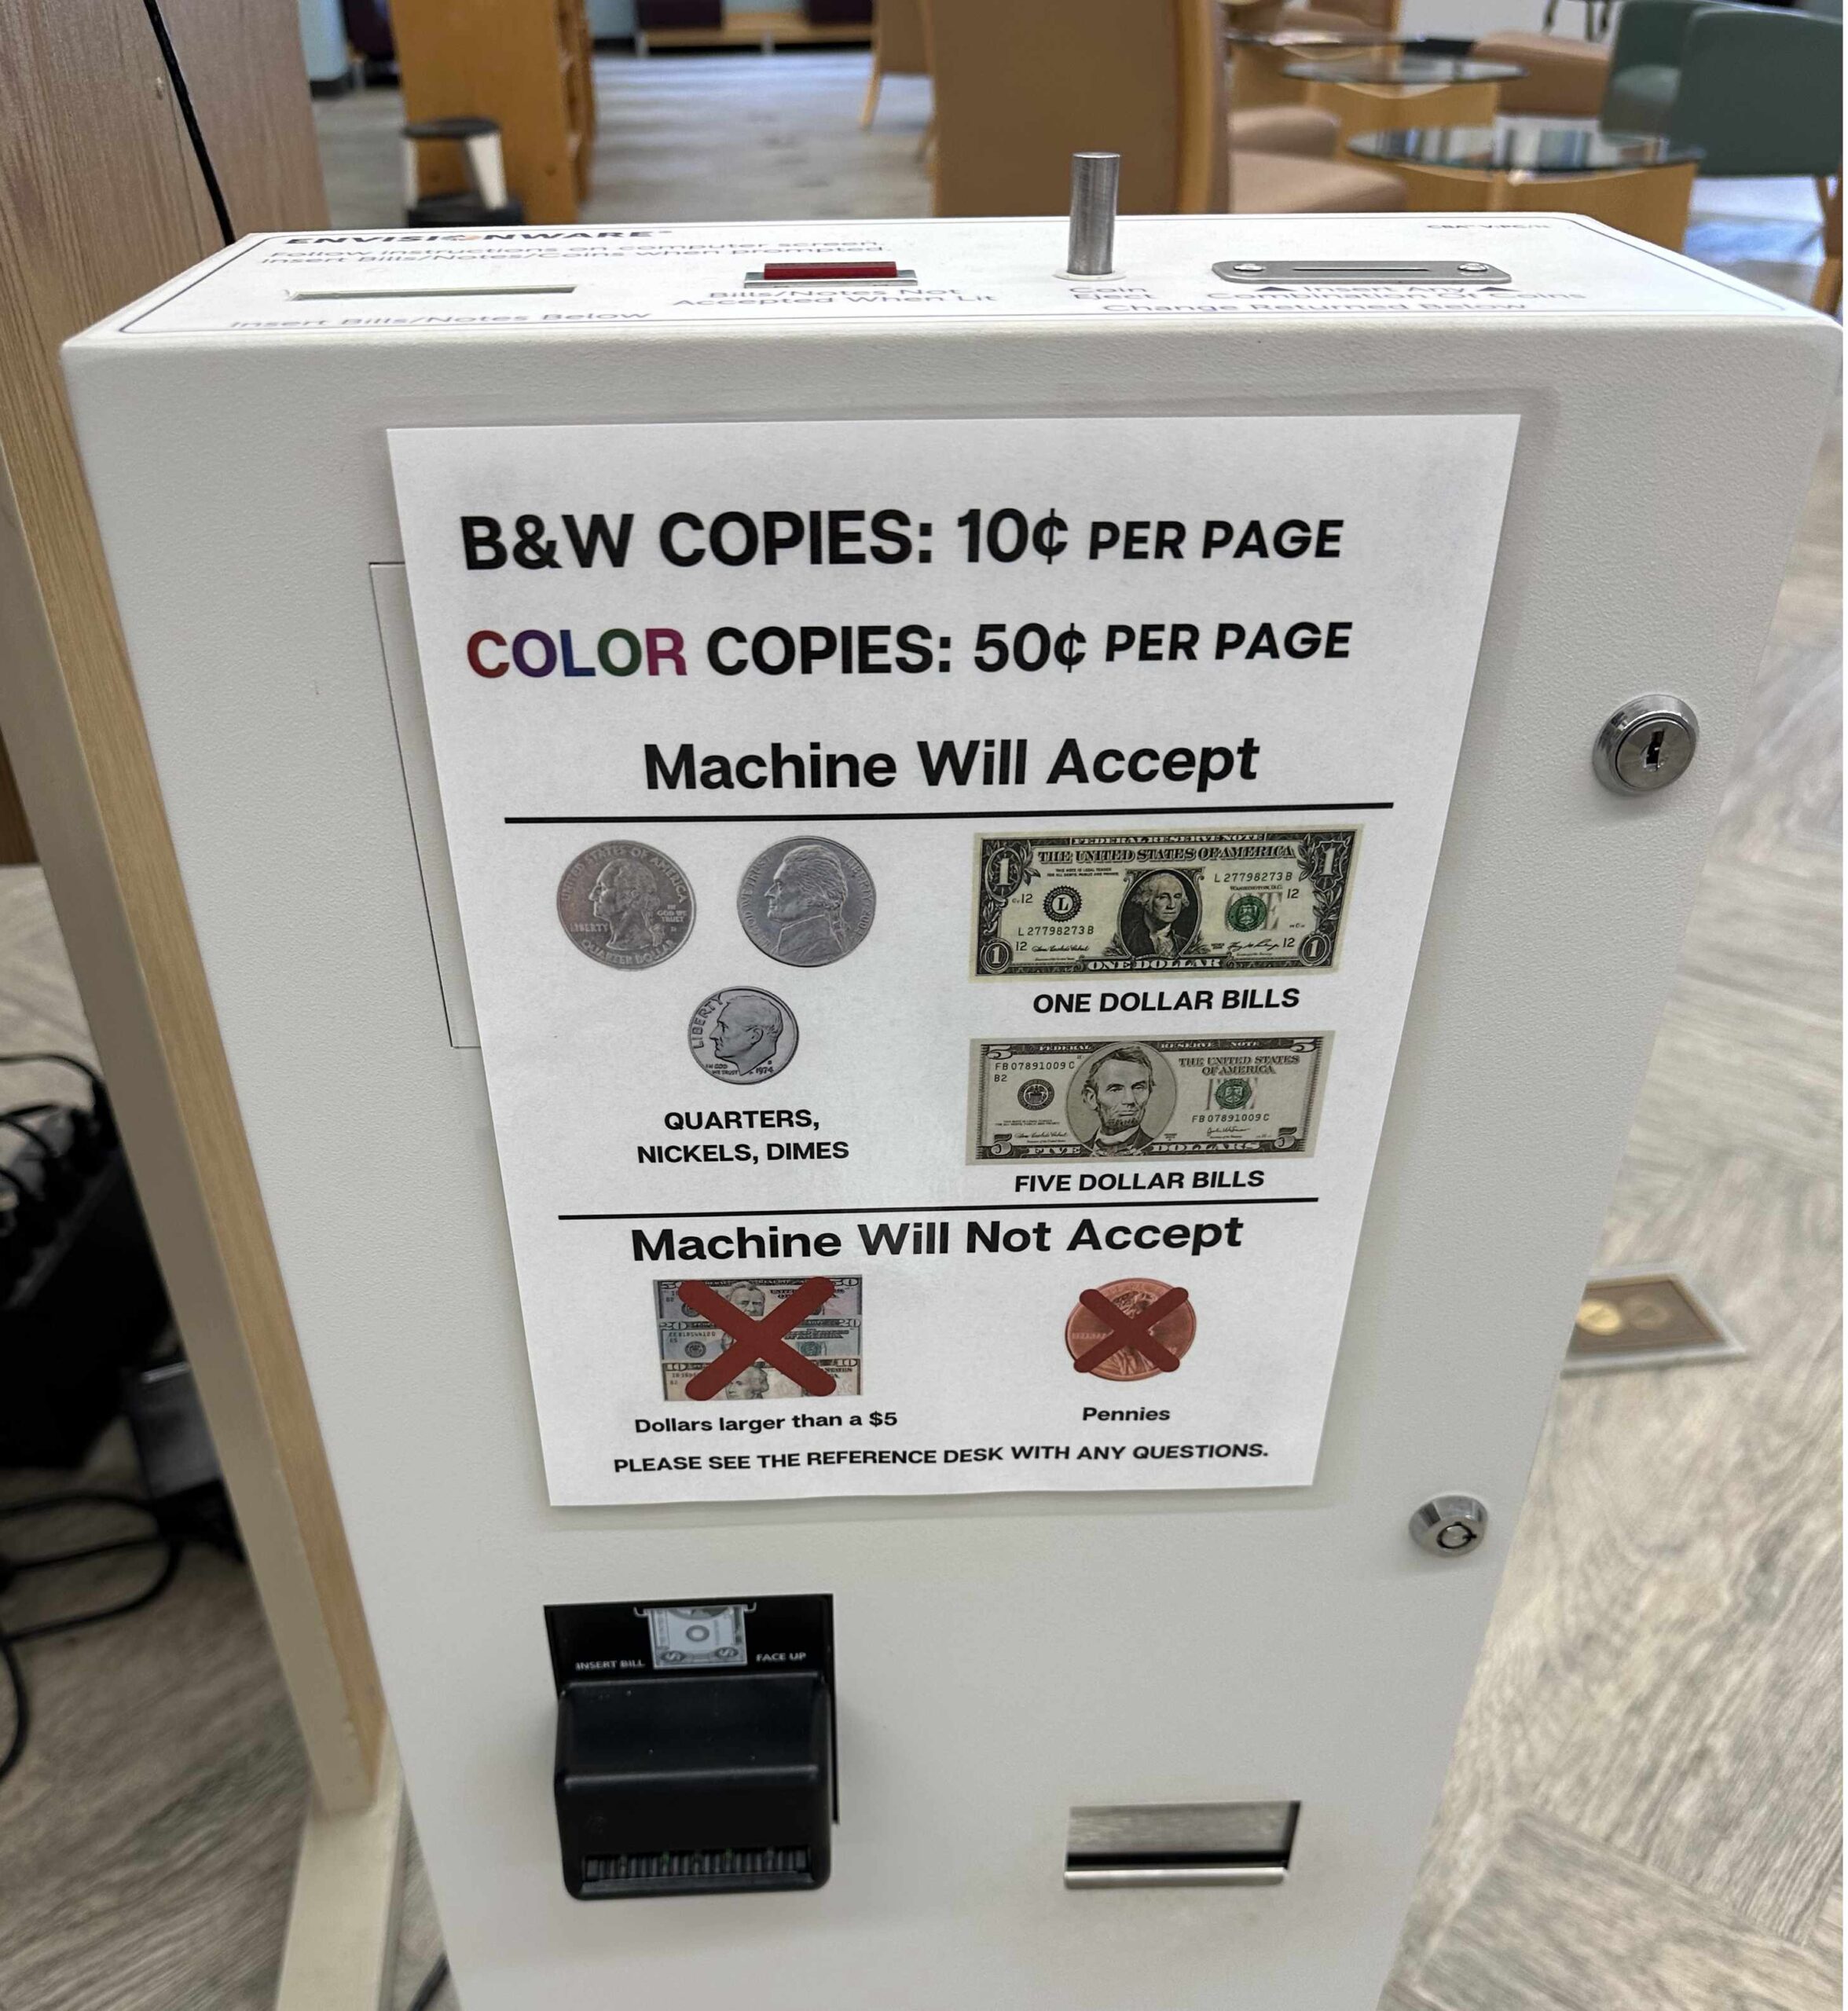
The Brevard County Libraries allow you to print on their printers for a small fee. (10 cents per page for black and white, 50 cents for color). If you have a printer at home, you might not need this. But, if, like me, you have a monochrome printer, and only occasionally need a color print, this is a great option. Also, if you are away from home when you realize you need to print something, you can pick it up at the nearest library, which may be much closer than your house.
Printing at your library is accomplished through services known as printeron.net and printspots.com. You must know the unique web address or email address for your desired library branch. They are different for each of 17 branch libraries. If in doubt, contact your local library. Here are a few sample links.
If you print via email, give your email a descriptive subject line so that you can recognize which print job(s) you want to pay for and print. When you go to pick up your print job, look for the coin operated machine like this.
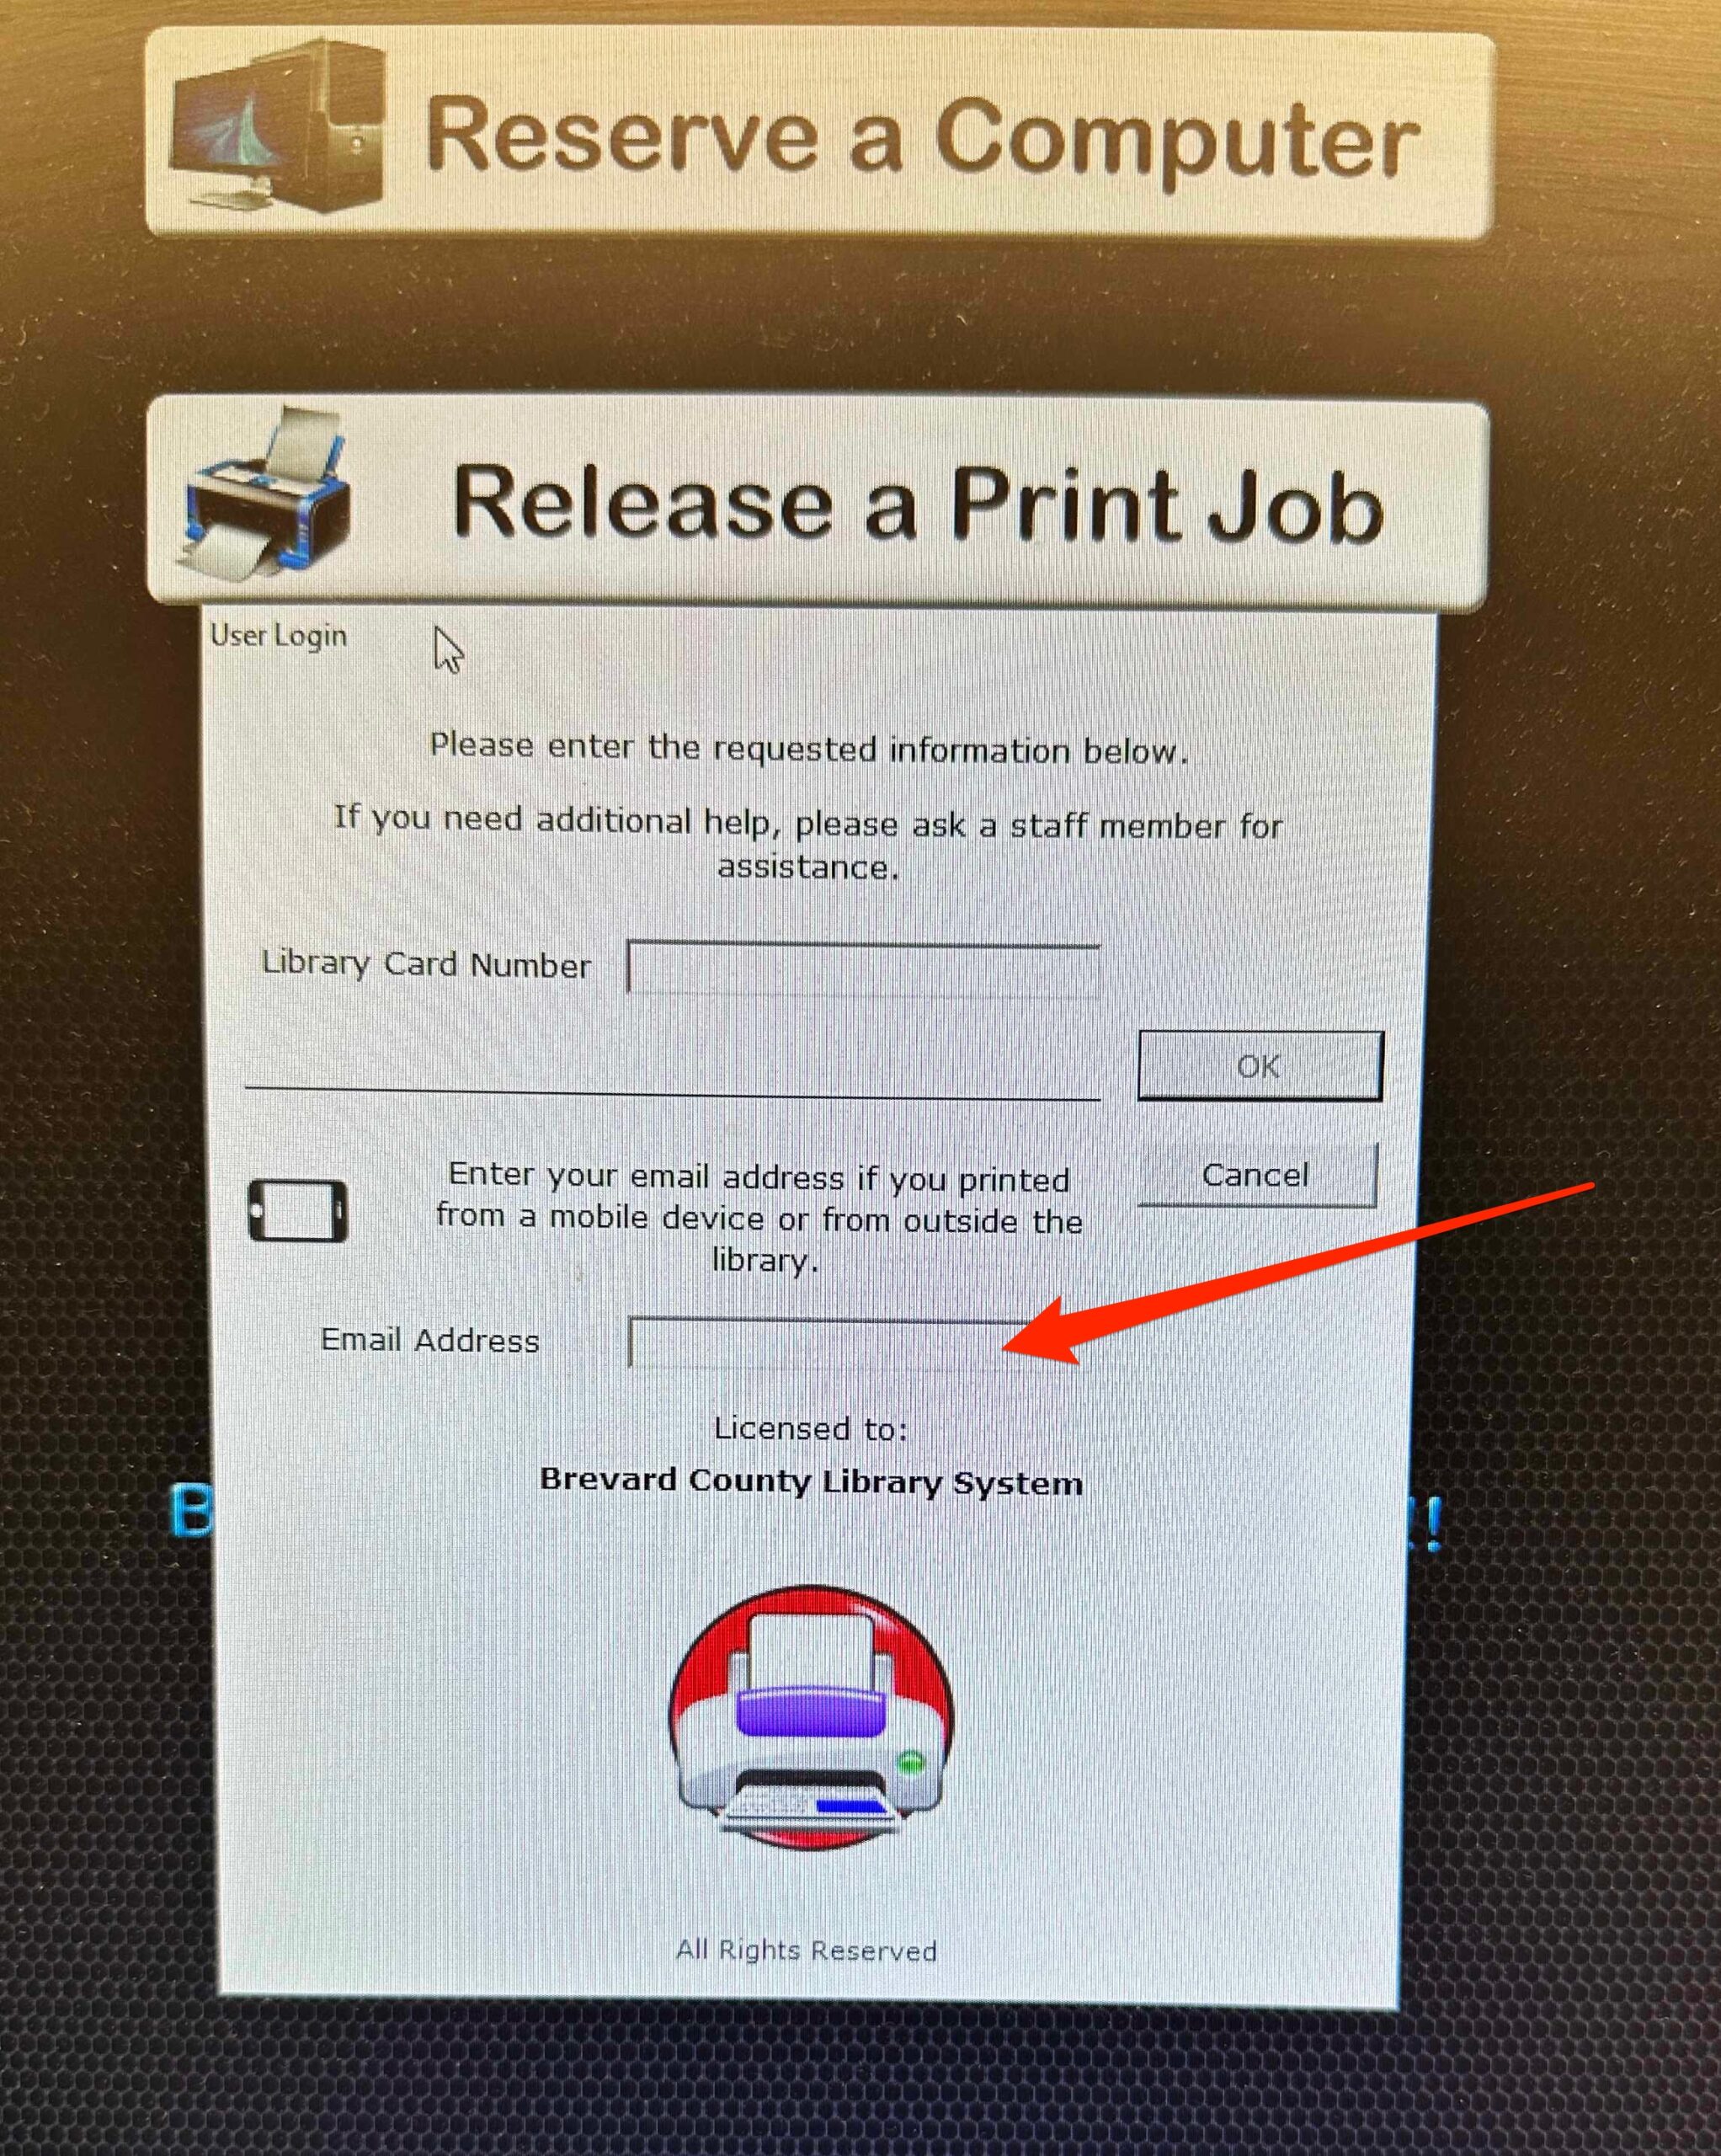
This should be next to a computer that you can use to select the job to be printed.
To begin, enter your email address. I did not have to enter a library card number to print. You can pay for your print either using coins and bills in the machine, or you can pay the reference librarian. If you are already at the library when you send the print job, just be aware that it does take a few minutes for the print job to be ready.
Libby and Hoopla Media Apps
Our libraries also offer two nice services that allow you free access to ebooks, audiobooks, movies and TV shows for free on your device. You can use these from your computer, iPad, iPhone or Apple TV. Hoopla is better for TV, Libby is for books. These are connected to your Brevard County Library account, so you need a (free) library card.
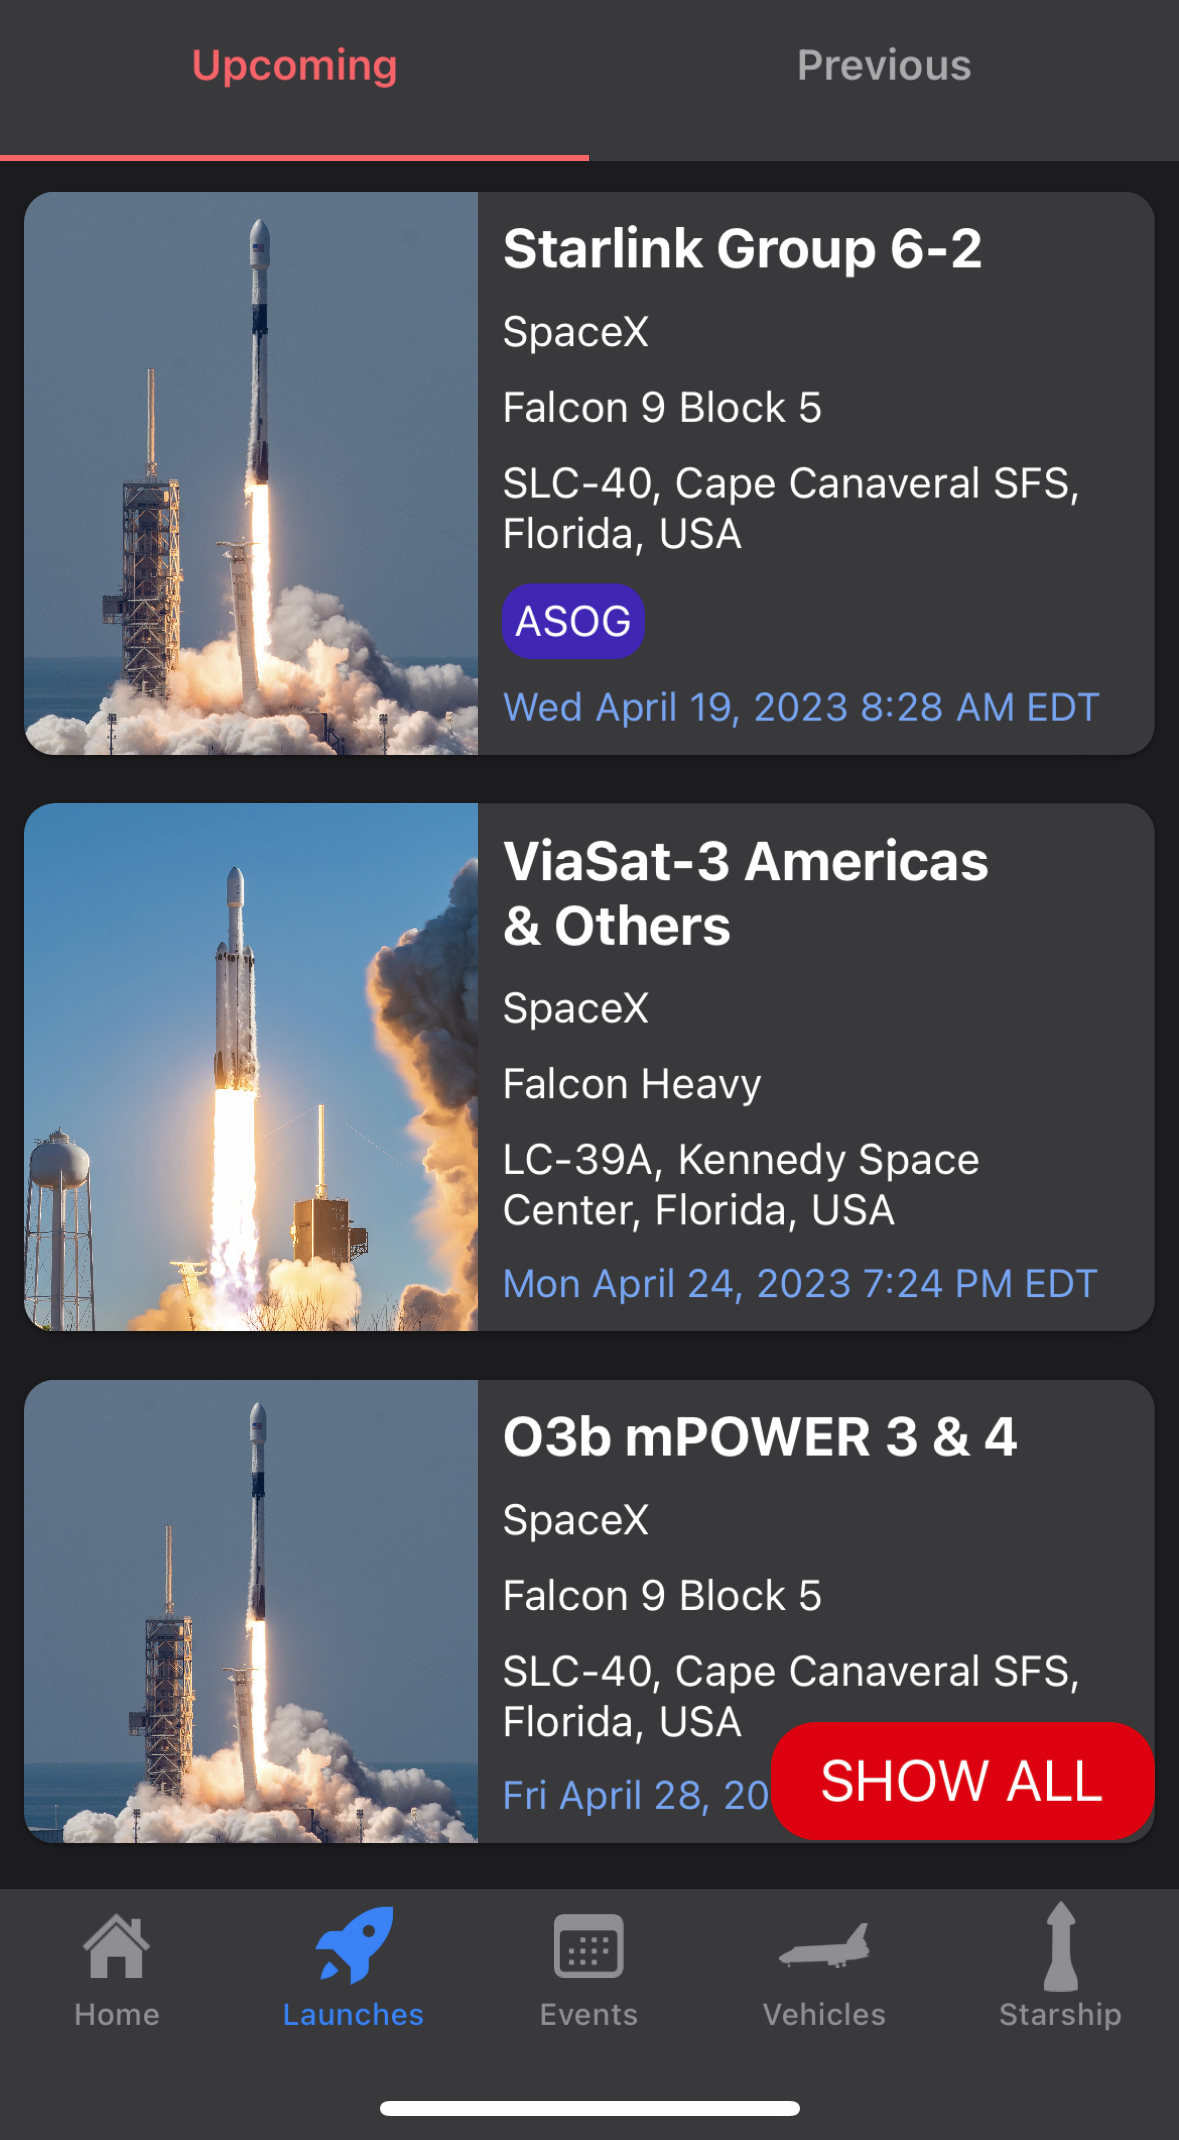
I highly recommend the Next Spaceflight app. Because it lists upcoming launches from all over the world, you should probably set your favorite launch location(s) to Florida, and whatever else interests you in order not to be overwhelmed by distant launches.
Spectrum News 13 has a Brevard County page. That’s useful to everyone. If you are a Spectrum TV subscriber, you may find the Spectrum News App useful. There are iPhone, iPad and Apple TV versions.
The Brevard edition of Hometown News is a small, but nice local paper. Their “E-Editions” show an image of the print version of the paper. From their homepage you can sign up for daily news emails.
Text Alerts from the Brevard County Emergency Operations Center – You can sign up for alerts which you can opt to receive by email, text or phone. These alerts include severe weather, fires, rocket launches, boil water notices, law enforcement alerts, etc.
The Florida 511 page might be useful to people who drive a lot. This site has more to it than you might expect from a state agency. You can create a free account, and set up alerts for various specific traffic situations. For instance, you can ask for notifications when traffic is unusually slow on particular routes, on particular days of the week and at specific times. If there is an incident, construction zone, road closure or unusual congestion affecting your route you will be notified by text or email. The site only handles routes involving Interstates or major highways.
Nixle Public Safety Alerts – Nixle.com handles public safety alerts for many cities and counties in the US. You don’t need to create an account. To sign up for alerts, text your zip code to 888777.
Maps and Photographic Views
The Brevard County Property Appraiser’s Office has a lot of information which might be interesting to homeowners, home buyers and sellers. I was very impressed with their Map View page, especially Eagle View. You can take a look at any property in Brevard County from various angles, and going back in time as far as 2007. The image resolution is much better than you would get from satellite coverage from Google Maps, for instance.
The Hotel Melby in 2023.The same location in 2018 was a parking lot.
WiFi Hotspots
Publix, Home Depot, McDonalds, Brevard Public Libraries and many other businesses have free WiFi hotspots. Quality and convenience varies. Publix and Home Depot are public guest networks, with no password required. Once you have connected your phone to one of these, it will automatically be used next time you are in range. The Brevard Libraries use a captive portal design, where you must visit a sign-in page each time you connect. Even though no password is required, this creates a lot of friction and makes the network less useful.
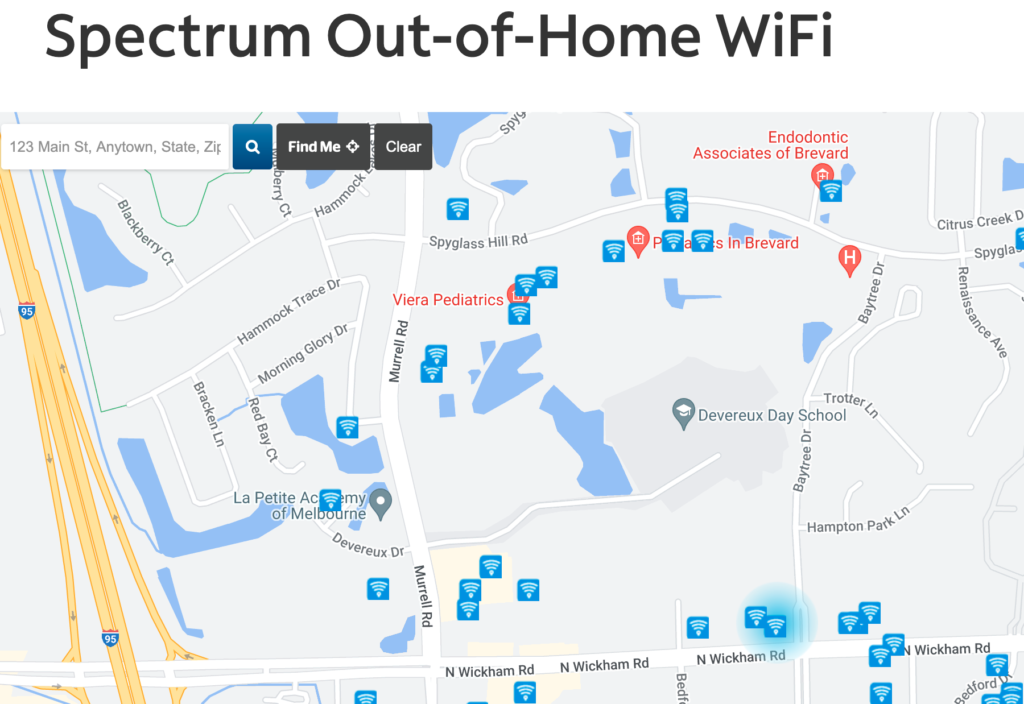
If you are a Spectrum Internet or Mobile customer, you can use their network of thousands of WiFi hotspots around the country. They have plenty in popular locations here in Brevard. You can check Spectrum’s WiFi map here.
Spectrum’s network includes WiFi networks named Spectrum, Spectrum Free Trial and Spectrum Mobile.
You can connect automatically to Spectrum hotspots if you use the My Spectrum App to install the Spectrum Config Profile. The profile gives your phone a list of WiFi networks to connect to automatically, and provides your credentials automatically, so you don’t need to log in each time.
You can also log in to the WiFi access points each time, which is obviously less convenient. The trick to logging into the App, or logging into the Spectrum access points is to use the correct username and password. You may have more than one. You want to use your account password — the one you use for billing purposes. This might be identified as a Spectrum or Brighthouse “My Services” account, or “Account Partner”. Your Spectrum email account and password is probably not the right one. Once logged into the App, you can turn on Face ID or Touch ID, so you can easily log in again.
The profile that the App installs contains certificate information which expires every six months or so. You will need to occasionally delete the old profile and install a new one from the App. They are not automatically updated.


