This month we’re talking about web browsers, probably the most-used app on your device (Mac, iPhone or iPad). Specifically, we’re covering Apple’s Safari web browser.
Apple’s Photos App is deeply integrated into our daily use of our iPhones. At MacMAD, we get a lot of questions about photo storage, sync and general usage of the Photos App. So, this month we’re going to go over some of the common ones.
Artificial Intelligence (AI) has meant different things at different times to different people. It is a moving target. In the 1970s, it meant a machine playing chess. Today, no one would call that artificial intelligence. Now it might be a machine generating an essay, drawing or photograph from a short prompt.
This image of an Apple User Group meeting was generated by AI.
Artificial Intelligence has become vastly more powerful, and it will only continue to get better.
Whether you realize it or not, you are already using Artificial Intelligence in several forms:
Facial Recognition – “Face ID”, Photos
Recognition of Objects: cat, dog, building, The Eiffel Tower, vehicles, humans
Voice and Speech Recognition, e.g. Siri commands
Siri Suggestions – AI forecasts what App/Destination/Search you might want now
Sound Recognition, e.g. Siri can recognize smoke detector sounds
Navigation Apps, driver assist, “self-driving”
Language Translation, Apple & Google Translate Apps
Speech Generation – Personal Voice, Live Speech, in Accessibility Settings
Recognition of facial expressions and gestures – Used in Face Time and the Vision Pro
Face ID is an example of very unobtrusive AI, probably the best kind. You are usually unaware of Face ID unlocking your phone except in the rare situation where your face is obstructed for some reason and it doesn’t unlock.
Apple has dedicated about 1/4 of the on-chip real estate in their new processors to the Neural Engine. This shows a commitment to AI going forward at Apple. The Neural Engine does on-device machine learning.
Much of what you see when you browse the internet is determined by AI.
Search Engine Rankings
YouTube Recommendation Engine
Amazon “Inspired by your Shopping Trends”
Video recommendations for Apple TV, Netflix and Amazon Prime
When you do those captchas (“I am not a robot”, “click all images containing a bus”), you are providing training data for AI algorithms.
Generative AI
The new type of AI getting a lot of attention in 2024 is Generative AI, so called because it generates something, whether text or an image.
When you hear about ChatGPT, GPT stands for Generative Pre-trained Transformer. This is a large language model trained on a large amount of text.
This type of AI tool can be used to generate documents like reports, emails, ad copy, blog posts and computer code. The generated text usually looks very good, but you must check it for accuracy.
How Can I Try Out These AI Tools?
It’s early days in this phase of the AI revolution, and things are changing rapidly. Web sites appear and disappear. Companies are bought and sold. Tools change hands and change names. Here is a list of generative AI tools that work as of March 2024.
Claude.ai – Account required. Free and paid tiers.
The Microsoft Copilot App – May require Microsoft 365 subscription? Includes Designer (for images), Vacation Planner, Cooking Assistant and Fitness Trainer.
Sora – from OpenAI, generates videos from prompts – only pre-recorded demos now
Artificial General Intelligence
Artificial General Intelligence (AGI) doesn’t exist yet. Existing AI software is powerful in certain domains, but it is helpless outside those domains. ChatGPT can write a passable paragraph for a PhD thesis, but it’s not as smart about the world as a five year old. True AGI would have intelligence equal to or better than human intelligence in at least all the domains where humans are knowledgeable.
Here’s Copilot Designer’s response to a request for three yellow ducks and a green goose. It totally failed to include a green goose, or any green bird. It’s really not too bright yet. It draws better than a five year old, but lacks understanding.
One theory is that in order to develop AGI, AI will have to be embodied in a robot where it can gain the experience of the world that a child has.
Is AI a Threat to Humanity?
Scary Robot Drawn by Microsoft Designer / DALL-E 3
There have been a number of topical headlines recently suggesting that AI is a serious threat to the human race. Caution is warranted, as with any new technology, but I believe that the threat isn’t Artificial Intelligence itself, but our own lack of wisdom in deploying it.
Most of our fear of alien or artificial intelligences is that they will be too much like us. We know all too well the human capacity for fear, greed and desire for power.
Artificial Intelligence is likely to lack those things unless we are stupid enough to design them in. Without an equivalent to the more primitive parts of the human brain, robots or AI will lack lust, greed and even an instinct for self-preservation.2
We obviously shouldn’t give an AI control of nuclear weapons, but that has more to do with the danger of such weapons than of AI.
A more realistic concern in the near term is that AI may threaten many people’s jobs. If you write ad copy or blog posts for a living, AI is already coming for your job. If you are an illustrator or photographer, AI can already accomplish many of your tasks in a fraction of the time. Lawyers and computer programmers are probably next, and I am sure there are many other job categories at risk.
Like any other tool, AI can be used by bad people to do bad things. Since it is a powerful tool, it can have a big effect. It could be a propaganda tool without precedent, and will no doubt be used to spread misinformation, fear, uncertainty and doubt on a massive scale.
These are serious social problems. We have already experienced social problems from other aspects of technology such as automation and social media. As a society we need to figure out how to fairly distribute the wealth and other benefits derived from AI and similar technologies and how to protect society from misuse of AI.
This is a live demonstration meeting covering Procreate for iPad. There is also a version of Procreate for the iPhone.
Procreate
Our presenter this month is Ann Posner. She says:
The Procreate app is a powerhouse assistant in my career as a professional artist, as well as in my personal life. I recommend the Procreate app for any computer users or artists from beginners to experts!
Ann on the sailboat with some of her art
The video of this meeting is now on-line here. The audio is low, so turn it up. The actual presentation starts about 4 minutes in.
Text messaging of various types has become very popular since the beginning of mobile phones. The popularity of chat apps has really taken off with additional features such as group chat, photos, and audio and video chat.
The line between Chat Apps and social media such as Twitter (X), has become blurred as more features are added.
Popular Chat Apps
Messages/FaceTime (Apple)
Signal
WeChat
WhatsApp Messenger
Telegram
Messenger (Meta/Facebook)
Google Chat
Why Choose A Particular App?
Convenience: Messages is built into your Apple products. It’s easy to use. There may be no reason to change, especially if your friends use Apple devices also.
Security and Privacy: Signal is your best choice for absolute security, with end-to-end encryption, a security-focused company, and publicly reviewed code. Apple’s Messages is also very secure, but perhaps less so against governments. The Signal protocol has also been adopted by WhatsApp and Google Messages (on Android).
International Travel: WhatsApp is popular overseas and with travelers. You can use WhatsApp with an international data plan. Since it does not use conventional SMS text messaging, you won’t get charged for the texts. WeChat is nearly universal in China and the far east. It is widely used for checkout and payments as well as messaging. Telegram is popular in India, Asia, Africa and parts of Europe.
Features
Group Chat
Audio/Video Chat
Broadcast to large group
Stickers, emojis, reactions
File Transfer
Document Sharing/Team Collaboration
Send money
Under the Hood
The original text messaging protocol was SMS (Simple Messaging System). You’re probably still using SMS if you exchange messages with non-iPhone users (probably Android). SMS has a 160 character limit for each message. MMS (Multimedia Messaging Service) is an extension of SMS which allows “texting” of photos and videos (Low-resolution). SMS and MMS messages count as “text messaging” on your cellular plan, and do not use your data plan.
RCS (Rich Communication Services) is a more modern protocol widely used on Android phones. Apple has announced that its Messages App will be compatible with RCS beginning sometime in 2024. RCS messages use cellular data (or WiFi) (not “texts”). However, none of the chat App protocols will probably make a significant dent in your cellular data usage. When RCS is available in Messages, Apple users and their Android friends will see an improvement in the quality of photos and videos sent and received.
The other Chat Apps are each using their own protocols to exchange messages using Internet data over cellular or WiFi. The quantity of data used is probably insignificant.
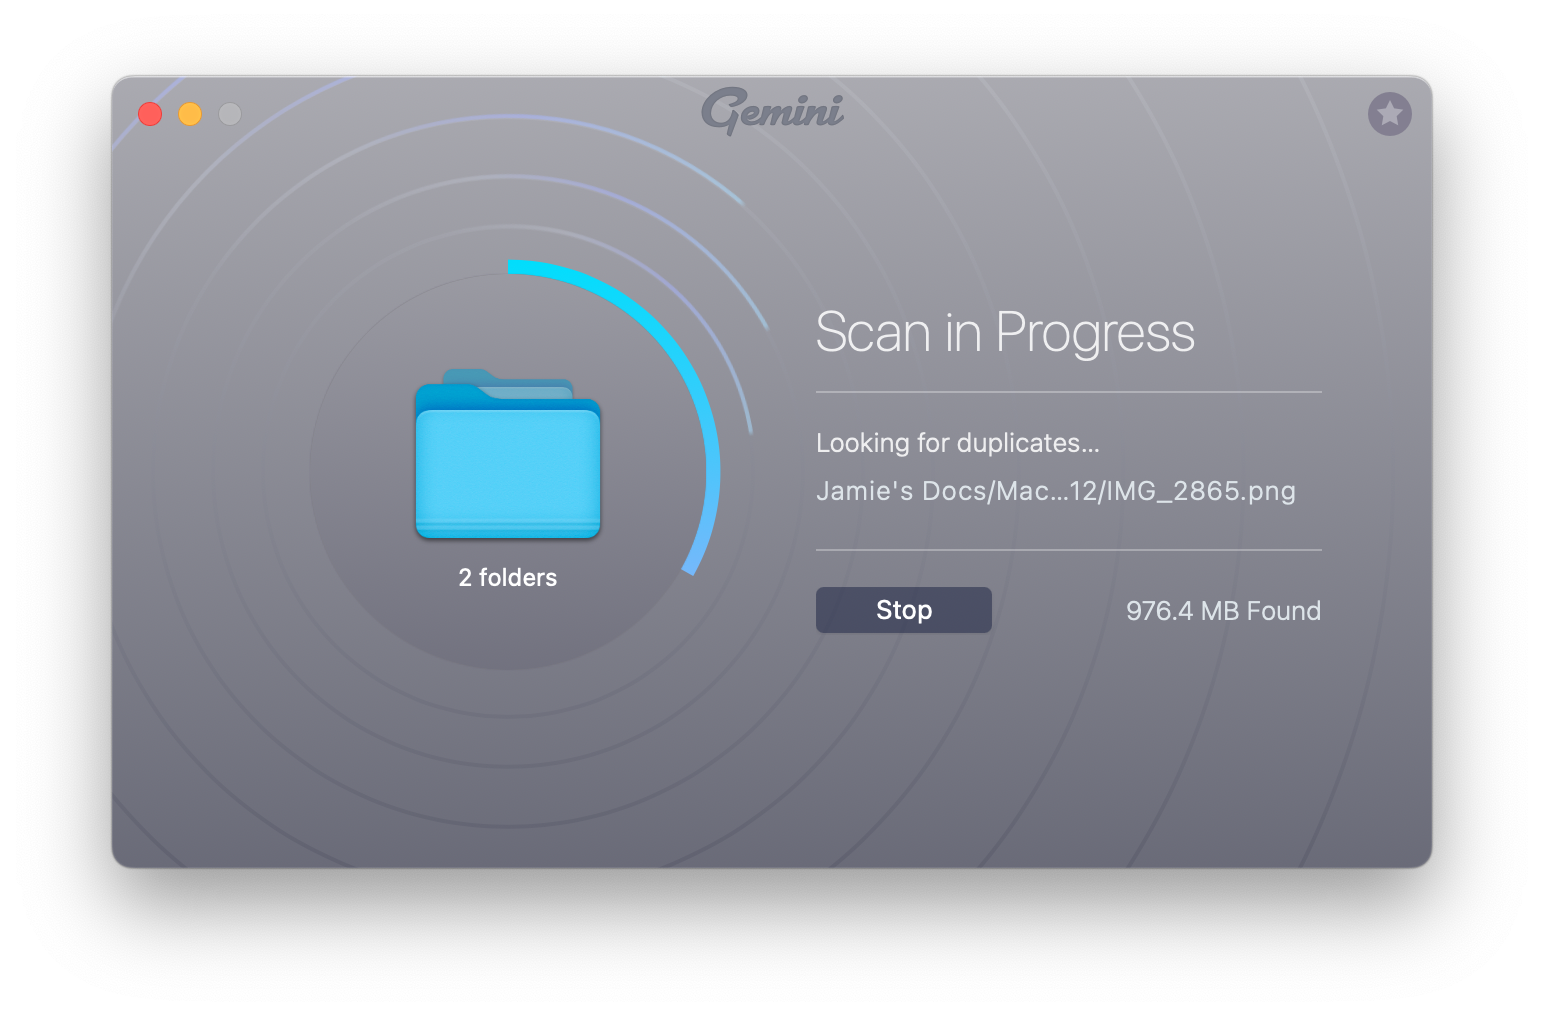
You tell Gemini which folder or folders you want it to scan, including your Photo library. It scans them pretty darn fast.
Scanning Your Files
It finds duplicate files of all kinds, not just photos.
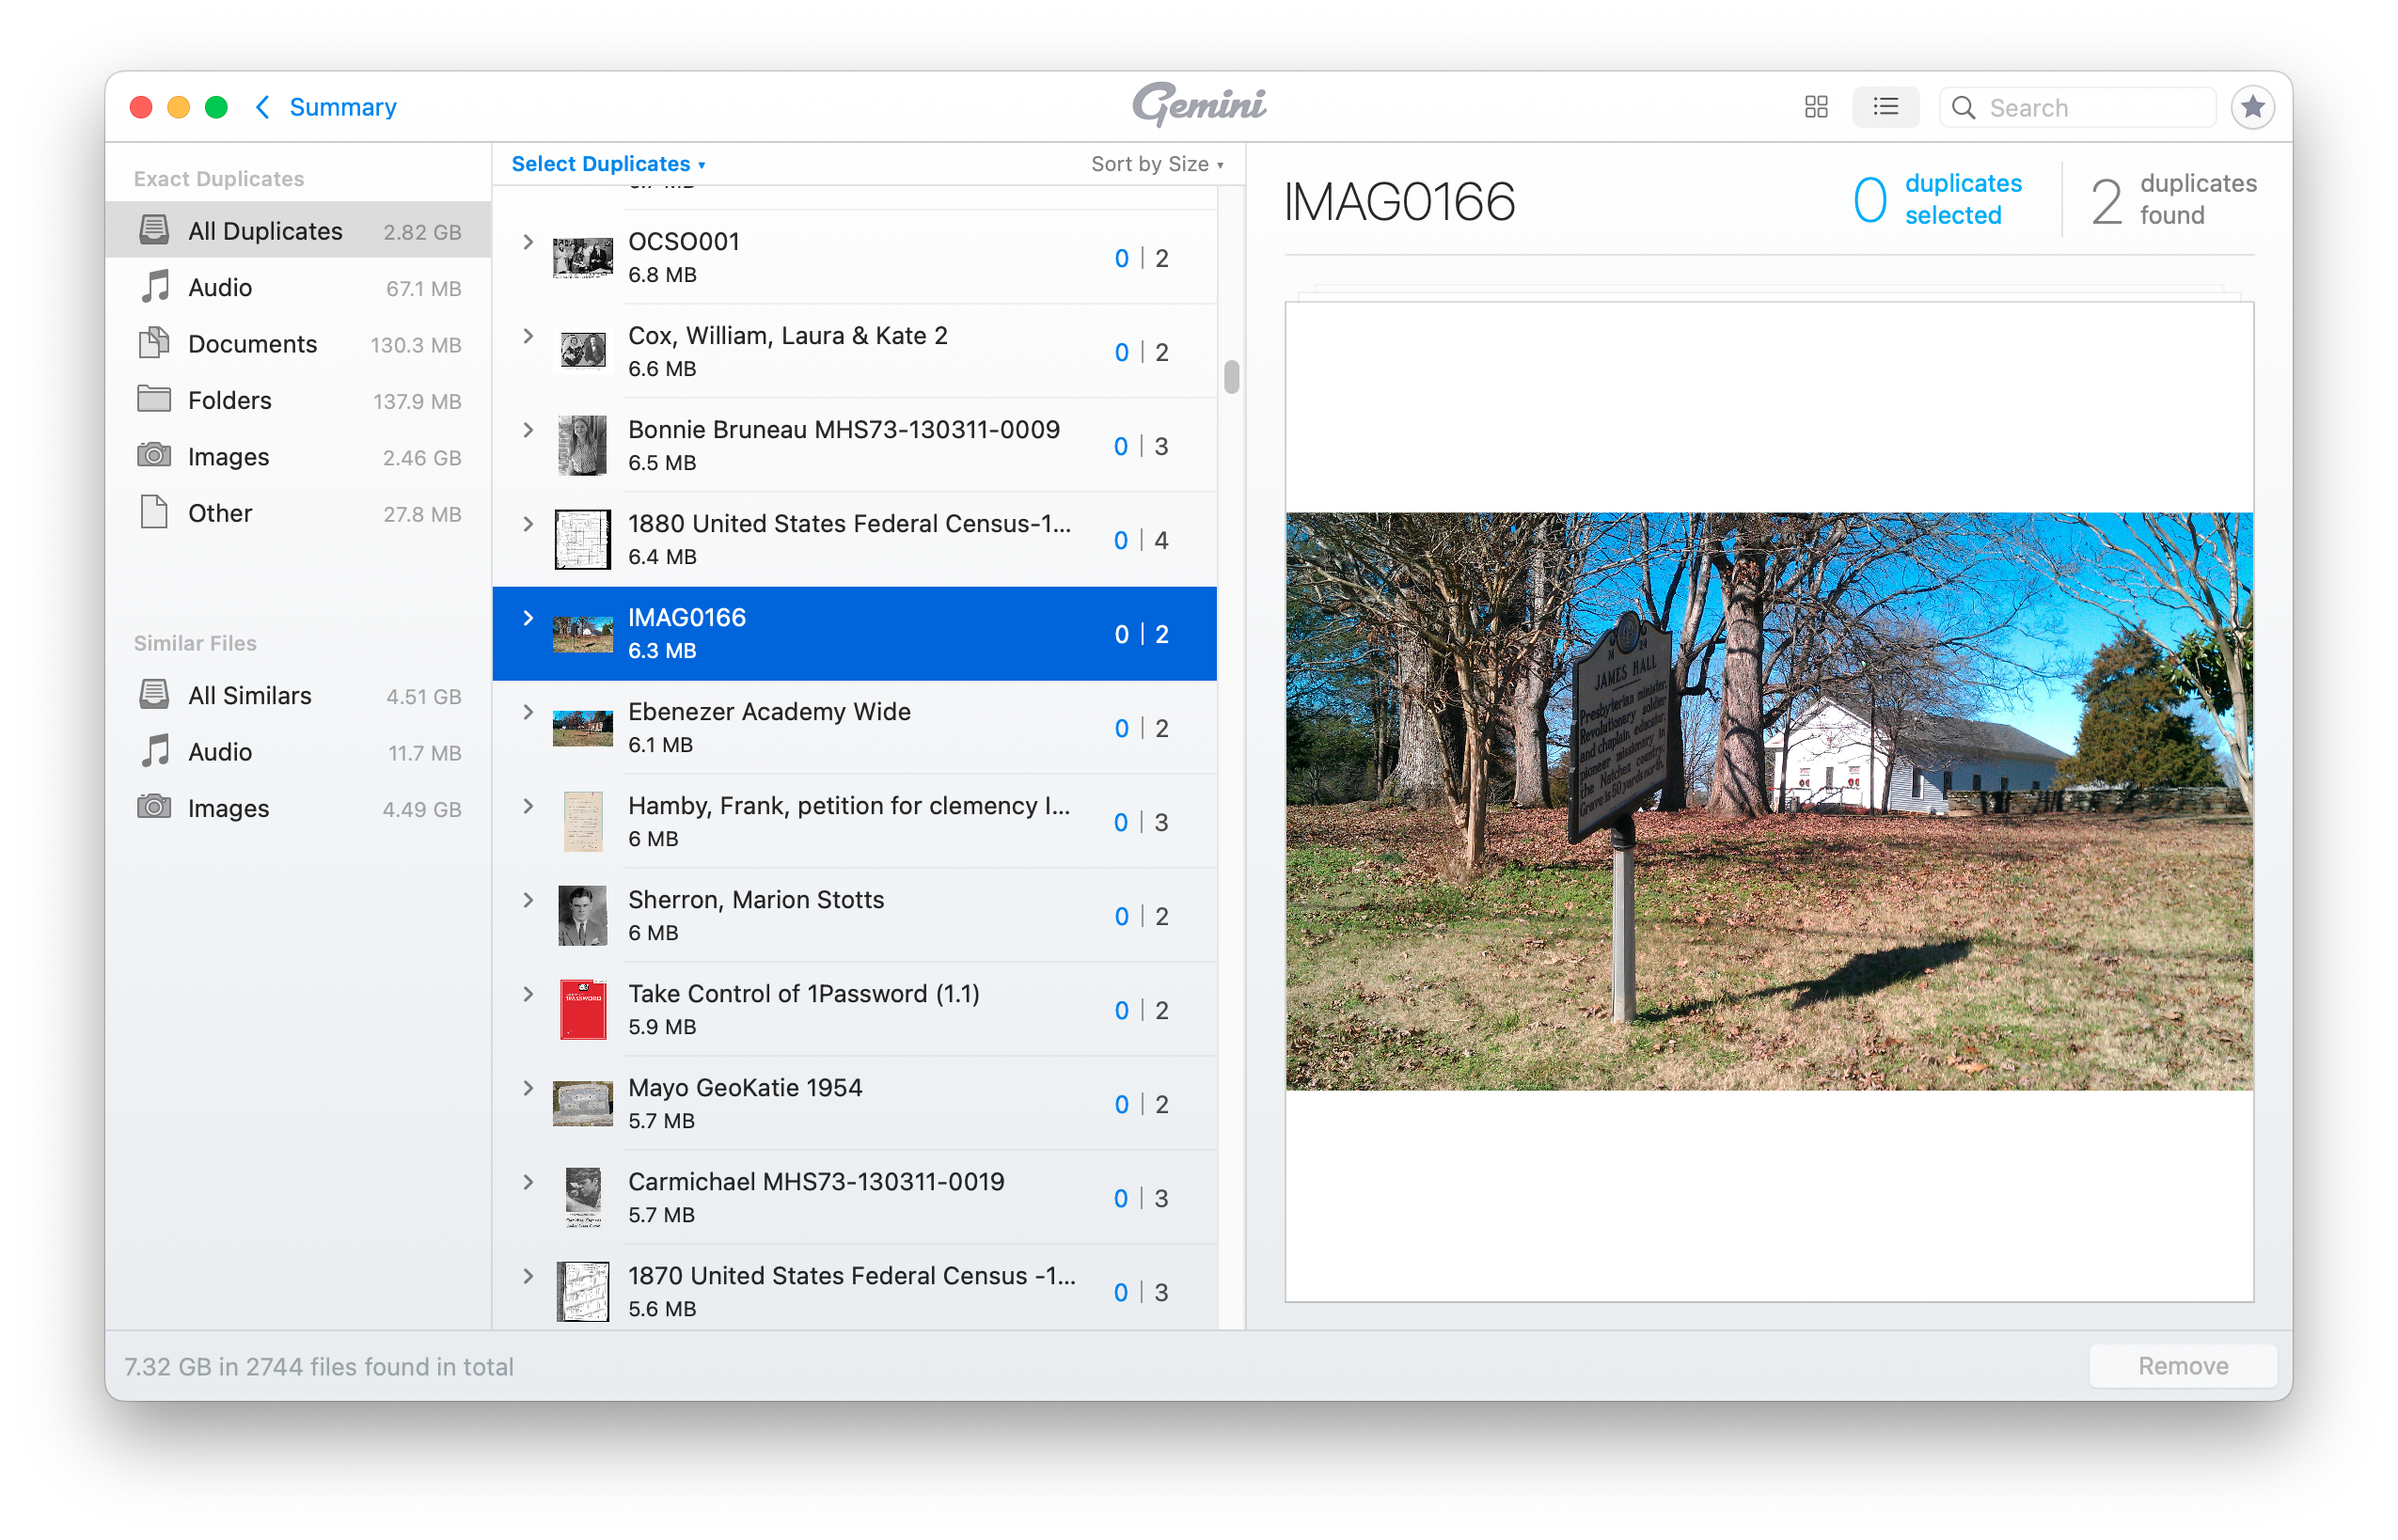
Gemini’s Main Screen with List of Duplicates
You can sort and search these in various ways. You can then select groups of the duplicates for deletion.
Details of a Duplicated Photo
You should be very cautious about deleting duplicates en masse. The duplicates may be in folders belonging to specific applications which expect to find them in those locations. Or, you may want to have duplicates in specific locations for your own organizational purposes.
It probably isn’t worthwhile trying to remove all duplicates. If you can find a few large files that can be deleted, or find entire folders that you no longer need, you may recover a lot of space with a minimum of effort and risk.
Gemini 2 is available on a subscription basis starting at $19.95 per year, or an outright purchase starting at $44.95. It is also available through a subscription to SetApp (also from MacPaw).
How can you help another computer user from a distance? I am going to show you a super easy way to help another Mac user using software that came with your computer.
Sometimes we get questions about computer problems from friends and family. It would be so easy if we were in the same room and could see and interact with their screen. But if they are far away, or in 2020, staying isolated because of Coronavirus, how do you help them?
If you and the other person both have Macs, and you can send and receive messages using the Messages app, then the answer is just a click away.
The Messages App
To connect to your friend’s computer, we are going to use the Messages App (formerly known as iMessage). This application comes with every Macintosh. It isn’t obvious, but the humble Messages app has a superpower. It can remote control a computer screen.
It might be good to first verify that you can send and receive messages to and from the remote computer. You must be connecting to your friend via their email address, which should be associated with their Apple ID.
If you see the blue text bubble(s) when messaging your friend, the next steps should go smoothly. If you see green text bubbles, or can’t send and receive messages at all, see the Difficulties section below.
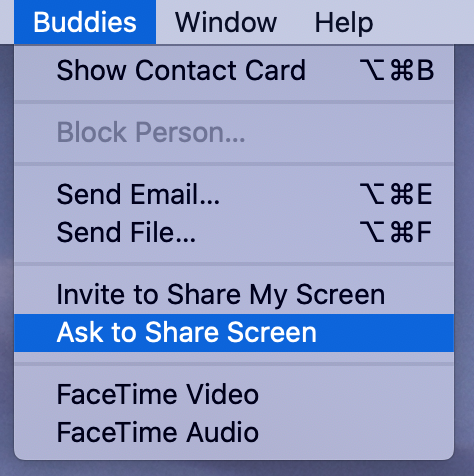
To begin screen sharing, make sure that the correct friend’s conversation is highlighted in the Messages window. Then, select Ask to Share Screen from Messages’ Buddies menu.
Ask to Share Screen menu item
This will cause a message to appear in the upper right of your friend’s screen asking them to allow screen sharing:
Accept Screen Sharing
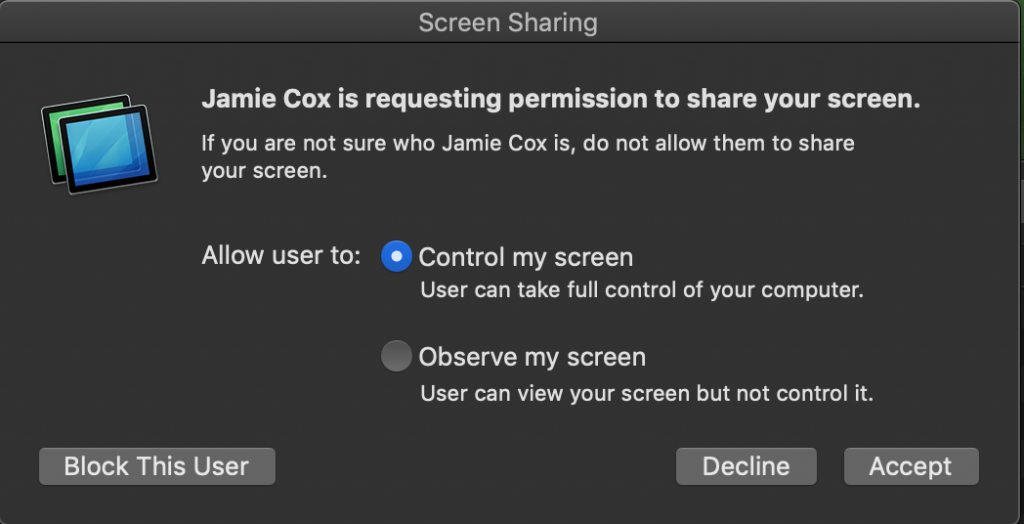
When they click Accept, they will get one more message:
Click Accept to allow remote control
For troubleshooting with a trusted friend, it is usually easier if the recipient allows you to control their screen as well as observe it. Control is the default.
Once they click Accept, screen sharing will begin.
Either party can end screen sharing. Remember that if the computer restarts, or if you quit the Messages app, screen sharing will end and need to be restarted.
I have successfully talked some very inexperienced computer users through this process on the phone. They only have to be able to see when they receive a text message, and then click Accept twice. After that, you will be able to help them.
You’ll probably be talking to your friend on the phone to get this started. When screen sharing starts, it also starts an on-line voice conversation. You should be prepared to end the phone call when this happens to prevent echo, feedback and confusion. You will still be able to speak to each other via the computer (if both computers have microphones and speakers — most do).
Difficulties
If this is not working as expected, check the following:
Both computers must be running MacOS
Both computers must be connected to the Internet
Both parties must have an Apple ID
Check that the email addresses being used for communication are listed in System Preferences/Apple ID under Name, Phone, Email in the Reachable at section. If not, they can be added there.
If you are reading this, you probably know why you want to run SpinRite. SpinRite is a hard drive recovery utility intended to run stand-alone on Windows machines. There is really nothing comparable to it for the Macintosh, especially in its ability to recover data from corrupted hard drives.
The other instructions I found on the web for SpinRite on the Mac were variously outdated, contained bad links or were overly complicated. I had to hunt around multiple web sites to find bits and pieces of the instructions. Here is my attempt to write a coherent single set of instructions for SpinRite on the Mac.
I don’t want you to go through this process with false expectations. There are some limitations to SpinRite and to running it on the Mac.
SpinRite 6.0 is glacially slow on today’s large hard drives. A full scan on level 2 of a 1 TB drive with no bad sectors took 35 hours and 46 minutes. If the drive has bad sectors, or you use level 4, it will take much longer.
SpinRite 6.0 can’t handle drives larger than 2 TB at all.
SpinRite hasn’t been updated by its author since 2004. Steve Gibson says he plans to release updated versions 6.1 (much faster and supports larger drives) and 7 (with support for the Mac), but it could be a while.
SpinRite can operate on internal and external drives, including USB drives. The S.M.A.R.T. aware features of SpinRite will not work in the virtual machine environment we will use on the Mac. However, this does not prevent SpinRite from recovering bad sectors, or refreshing marginal ones.
The good news is that you can continue to use your Mac while SpinRite, in a virtual machine, works on a hard drive. This is better than the usual situation where a physical Windows machine is dedicated to running SpinRite for the duration. However, you must not try to use SpinRite on your system boot drive (or any mounted drive). If you need to use it on your internal boot drive, you will either have to boot from another drive or connect your Mac to another Mac in target disk mode and run SpinRite from the other Mac.
Overview
[Edit May, 2022]: These instructions were written for Intel-based Macs. I haven’t tried to do this on a Mac with Apple Silicon, e.g. M1. If you try it, leave a comment on how it worked or not.
This is an advanced topic. I assume if you are planning to run SpinRite that you are somewhat familiar with running DOS-based programs, such as SpinRite, and that you are willing to use the Mac’s Terminal command line.
You must perform these steps from an administrator account, or one with sudo access (usually only admin accounts). (At least from step 4 on.)
Use caution with connecting physical and virtual drives! Make sure that you are connecting the correct drives to your virtual machine, and that you are running SpinRite on the drive you intend. If you connect a RAW drive to a virtual machine while it is mounted by MacOS, you risk utter destruction of data on that drive. (Although VirtualBox seemingly tries to prevent you from doing this.)
Here is the executive summary of what you are going to do:
Get SpinRite
Get VirtualBox
Get FreeDOS (sort of a MS-DOS replacement)
Install FreeDOS into VirtualBox
Install SpinRite into VirtualBox
Connect your problem drive to Virtual Box, so SpinRite can work on it
Instructions
0. Get SpinRite – Buy and download SpinRite from grc.com if you don’t already have it.
Download the latest version for OS X (currently 5.2.22)
Install it.
Open VirtualBox
Create a new machine for DOS
Accept the defaults (32 MB RAM, 500 MB expandable virtual hard disk)
In Settings/System/Processor for the new machine, set the Execution Cap slider to about 45%. This keeps the virtual machine from spinning up your fans and running down your battery.
2. Get FreeDOS – Download and install FreeDOS from freedos.org. (It’s free)
Select the CDROM “standard” installer distribution. You’ll get a file something like FD12CD.iso.
The current version 1.2 is acceptable. You are going to install FreeDOS into the VirtualBox virtual machine you created above.
3. Install FreeDOS into Virtual Box
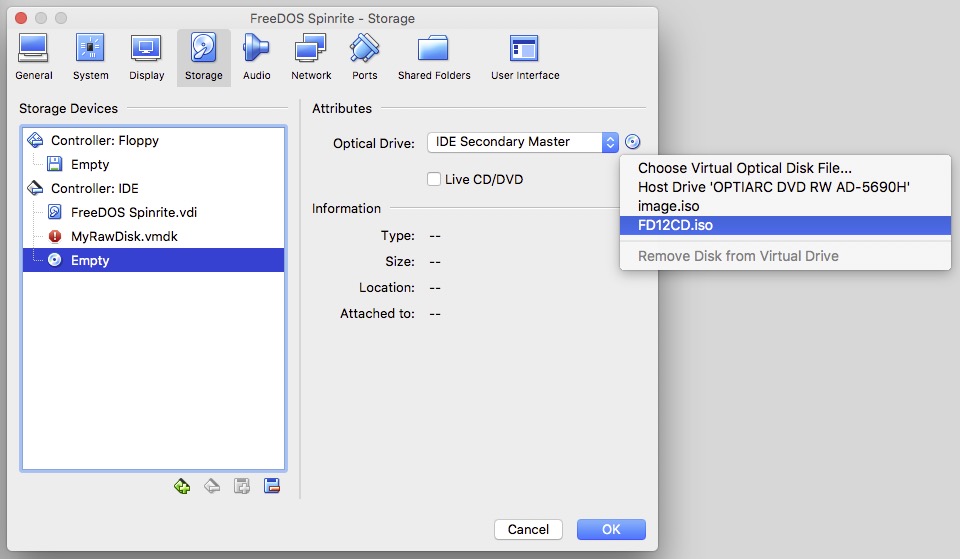
In Virtual Box, Click on your FreeDOS machine. Select Settings/Storage. Click on the empty optical drive icon. To mount your FreeDOS image click on the CD icon on the far right, and choose it using Choose Virtual Optical Disk File
Select the FreeDOS ISO image (FD12CD.iso).
You are now going to boot your virtual machine for the first time to install FreeDOS onto your virtual hard drive. It will help to understand some features of the Virtual Box user interface. You will need to click in the virtual machine window to allow you to type into it. When you do that, the virtual machine will “capture” your mouse and keyboard. To release the mouse and keyboard, to do anything else on your Mac, you can press the left ⌘ (command) key.
There is a bug between VirtualBox and FreeDOS that will cause the virtual machine to crash with a messy string of Invalid Opcode messages if you simply follow the prompts. There is a workaround, and here it is.
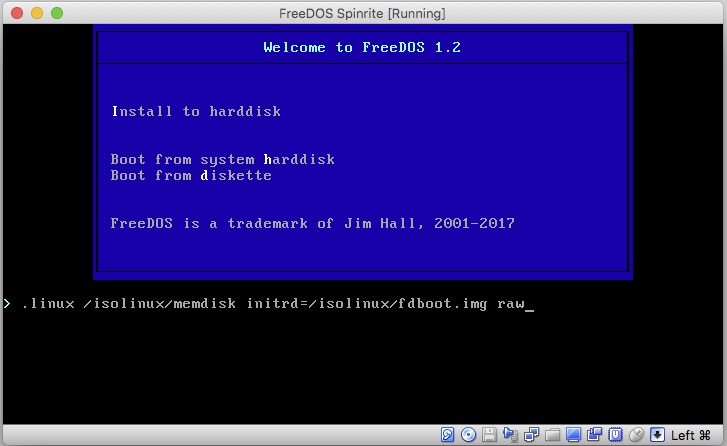
Select your virtual DOS machine in Virtual Box. Press Start. The virtual machine window will appear, and it should boot into the FreeDOS installer screen. There is a countdown running (50 seconds) which you need to stop. Click in the virtual machine window and press the TAB key. That will stop the timer. You are now editing the Install to harddisk menu option. Add the word raw (lower case) after the command line. Press return.
You should now be in the installer at the preferred language prompt. Proceed.
When asked if you want to partition Drive C:, select Yes. And also select Yes – Please reboot now. Once again, intercept the countdown with a tab and add raw to the command line.
You will be back to the installer preferred language prompt. Proceed. This time you will be asked if you want to format C:. Say Yes. Then choose your keyboard format (perhaps different from your preferred language).
At the prompt What FreeDOS packages do you want to install?, Choose Base packages only. This is sufficient for SpinRite.
Naturally, you will choose Yes – Please install FreeDOS 1.2.
When the install is complete, you will be asked if you want to reboot. Don’t do it yet. Wait until step 4b, below.
4. Install SpinRite Into VirtualBox
4a. You will Create a CD image with spinrite.exe on it. This will be used to get SpinRite.exe into the Virtual machine. When SpinRite runs, it can create an ISO containing itself. If you already have a SpinRite ISO created by SpinRite on a Windows machine you may use that and skip the rest of this step (skip to 4b).
Create a folder named “spinrite” in your Mac Downloads folder. Put spinrite.exe (from step 0) into that folder.
Open a Terminal window. Enter this command into the terminal:
(Enter the command all on one line.) This will create a file on your desktop named image.iso containing spinrite.exe . This image is of a type acceptable to Virtual Box. If you create an image with Disk Utility instead, it will not work.
4b. In VirtualBox Manager, select your DOS machine, and pick Settings/Storage. Again, using the optical disk icon on the far right, choose the image.iso file we created on your desktop in step 4a, above. Click OK to save settings.
Now, back in the virtual machine, select Yes-Please reboot now and press enter. You don’t need to intercept the boot process anymore. Wait for the machine to boot into FreeDOS and the C:\> prompt.
The SpinRite “CD” should now be mounted as drive D:. Type the DOS command:
copy d:\spinrite.exe c:\spinrite.exe
This will copy Spinrite to your virtual C: drive. At this point, you now have a virtual machine with a virtual hard drive containing SpinRite, and you no longer need the image.iso image. You may remove that from the virtual drive if you like.
5. Connect the Problem Drive to VirtualBox and SpinRite
[Edit: May, 2022]: With newer versions of MacOS, Catalina (10.15) Big Sur(11), Monterey (12) and newer, you will run into problems with SIP (System Integrity Protection) in the following steps, because it will prevent you from modifying the permissions on files in /dev . You can turn off SIP via the recovery partition. There are instructions here.
In the terminal, create a shell script as follows:
cat > srscript.sh
Then, copy the script below, and paste it into the terminal.
#!/bin/bash
# This script creates a virtual disk image connected to a physical disk for connection to VirtualBox
read -p "Enter Disk name, e.g. disk8: " SpinRiteDisk
# make sure disk is unmounted
/usr/sbin/diskutil unmountDisk /dev/$SpinRiteDisk
sudo vboxmanage internalcommands createrawvmdk -filename "$HOME/Desktop/VirtualRaw$SpinRiteDisk.vmdk" -rawdisk /dev/$SpinRiteDisk
sudo chmod 777 "$HOME/Desktop/VirtualRaw$SpinRiteDisk.vmdk"
sudo chmod 777 /dev/$SpinRiteDisk
/usr/sbin/diskutil unmountDisk /dev/$SpinRiteDisk
echo "Look on Desktop for raw disk file"
Then type
ctrl-D (End-of-file)
Now make your script executable with:
chmod +x srscript.sh
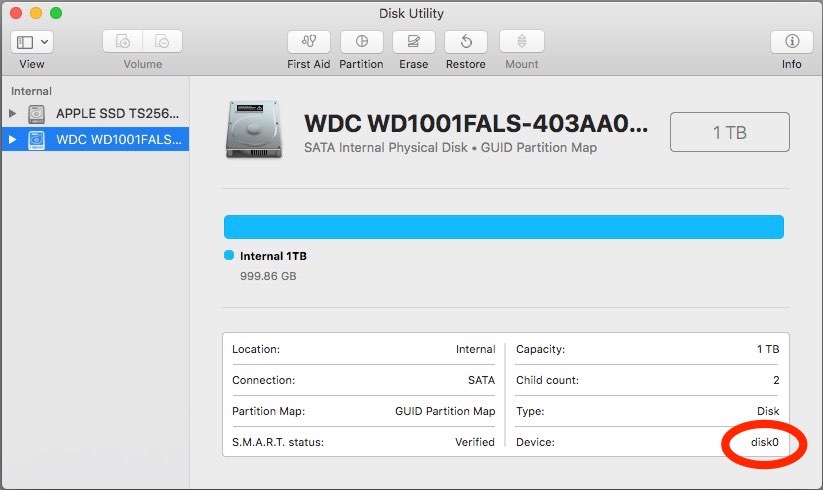
Make sure the drive to be tested is connected and powered on. You need to figure out what the device ID associated with the drive under test is. It will be of the form “diskX”, for example, it might be “disk5”. You can find this in Disk Utility, in the lower right corner.
Disk Utility Window showing disk number
If you see a suffix, e.g., disk5s1, ignore the suffix. This is the disk name you will need in the next step.
While you are in Disk Utility, go ahead and unmount all partitions on the drive to be tested, if any are mounted.
In the terminal, run the script:
./srscript.sh
Because the script contains sudo commands, you will be prompted for a password. Enter your Mac signon password. As mentioned above, this will only work for admin accounts, or accounts for which the user has been added to the file /etc/sudoers . When prompted, enter the device ID (disk name), e.g. disk5 . A vmdk file icon will appear on your desktop named appropriately.
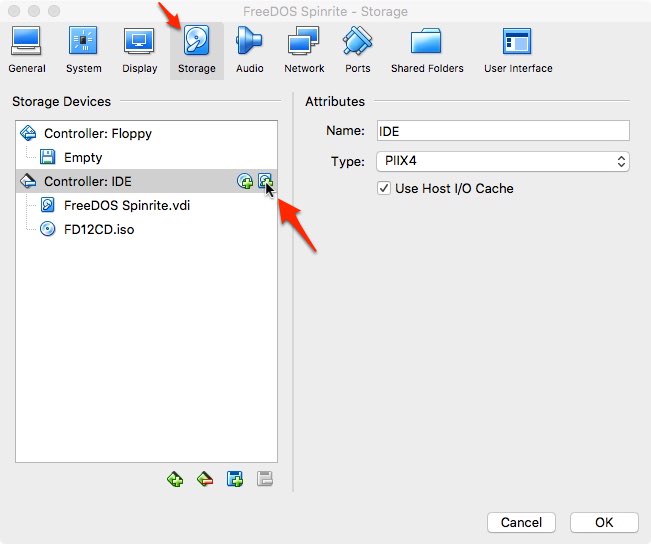
In VirtualBox, go to the storage settings for your virtual machine.
Click the hard-drive-plus icon to add a new hard drive to the virtual IDE controller. At the prompt, select Choose Existing Disk, and then select the VirtualRawdiskx file you created on your desktop earlier.
If the FreeDOS CD is still mounted in your virtual machine, as shown above, remove it from the virtual drive so that your machine boots from your virtual hard drive. If you click on the .iso, the remove option then appears if you click the optical disk icon in the far right of the dialog box.
Very likely, at this point, your target disk may have remounted itself. Eject/Unmount it before proceeding. VirtualBox will complain about being unable to access the VirtualDrive if partitions on the physical drive are still in use. Eject it using DiskUtility or the Finder.
In VirtualBox, start your virtual machine. It should boot up to the FreeDOS command prompt.
Issue the DOS command:
spinrite
You are now running SpinRite on a Mac! As promised earlier, SpinRite will have no access to S.M.A.R.T. data in this scenario.
When SpinRite is done (much, much later), you should restore the correct disk permissions. Leaving the raw disk permissions with world access is a security risk.
In the terminal you can restore them with, for example:
sudo chmod 640 /dev/disk5
If disk5 was your target disk. Check that the permissions are correct with
ls -l /dev/disk*
The raw disk files should all have the same permissions:
brw-r-----
I hope these instructions were helpful for you. Thanks for reading.
Error Situations
1.) If, on powering up your virtual machine, if it fails with VERR_ACCESS_DENIED opening your vmdk file, it is probably because the permissions for your raw disk file are not set properly. They may get reset if you reboot, for example. So go back and do something like:
sudo chmod 777 /dev/diskx
2.) If, on powering up your virtual machine, it fails with VERR_RESOURCE_BUSY, it probably means that the hard drive under test is mounted on your Mac. Unmount it and try again.
3.) If, when starting Spinrite, you get the message from Spinrite:
This PC is using a protected mode memory manager that is
incompatible with SpinRite 6.1's built-in memory manager.
Please edit this system's CONFIG.SYS file to disable any
protected mode memory manager, reboot the system & rerun.
You should restart the virtual machine, and make sure to select option:
3 - Load FreeDOS low with some drivers (Safe Mode).
FreeDos will default to an incompatible protected memory mode.
Reference Material:
Extended installation Instructions for FreeDOS are here:
How can you safely shut down your Mac if your mouse stops working?
On most Macs, you can press and hold the power key to power down immediately. I’m assuming you want to do something more graceful.
If needed, press ⌘+tab to visit each open application, and use ⌘S to save your work.
If you are not signed into an administrator’s account, you will need to sign into such an account. To do that, type ^⌘Q (Control-Command-Q). That will put you on the lock screen. To get the list of accounts, press esc. Then use the up and down arrow keys to select an administrator’s account. Press return. Enter the administrator’s password. Now you are ready to proceed with the rest of the instructions.
Press ⌘+spacebar to open spotlight search.
Type
terminal
Press return to open the terminal.
In the terminal window type:
sudo shutdown -h now
Press return.
Enter your account password. Your Mac will shut down.
Can you think of an easier way?
This tip was created and tested on MacOS 10.6.5. It should work on any version of MacOS X since spotlight was introduced.


 Messages/FaceTime (Apple)