If you are reading this, you probably know why you want to run SpinRite. SpinRite is a hard drive recovery utility intended to run stand-alone on Windows machines. There is really nothing comparable to it for the Macintosh, especially in its ability to recover data from corrupted hard drives.
The other instructions I found on the web for SpinRite on the Mac were variously outdated, contained bad links or were overly complicated. I had to hunt around multiple web sites to find bits and pieces of the instructions. Here is my attempt to write a coherent single set of instructions for SpinRite on the Mac.
I don’t want you to go through this process with false expectations. There are some limitations to SpinRite and to running it on the Mac.
SpinRite 6.0 is glacially slow on today’s large hard drives. A full scan on level 2 of a 1 TB drive with no bad sectors took 35 hours and 46 minutes. If the drive has bad sectors, or you use level 4, it will take much longer.
SpinRite 6.0 can’t handle drives larger than 2 TB at all.
SpinRite hasn’t been updated by its author since 2004. Steve Gibson says he plans to release updated versions 6.1 (much faster and supports larger drives) and 7 (with support for the Mac), but it could be a while.
SpinRite can operate on internal and external drives, including USB drives. The S.M.A.R.T. aware features of SpinRite will not work in the virtual machine environment we will use on the Mac. However, this does not prevent SpinRite from recovering bad sectors, or refreshing marginal ones.
The good news is that you can continue to use your Mac while SpinRite, in a virtual machine, works on a hard drive. This is better than the usual situation where a physical Windows machine is dedicated to running SpinRite for the duration. However, you must not try to use SpinRite on your system boot drive (or any mounted drive). If you need to use it on your internal boot drive, you will either have to boot from another drive or connect your Mac to another Mac in target disk mode and run SpinRite from the other Mac.
Overview
[Edit May, 2022]: These instructions were written for Intel-based Macs. I haven’t tried to do this on a Mac with Apple Silicon, e.g. M1. If you try it, leave a comment on how it worked or not.
This is an advanced topic. I assume if you are planning to run SpinRite that you are somewhat familiar with running DOS-based programs, such as SpinRite, and that you are willing to use the Mac’s Terminal command line.
You must perform these steps from an administrator account, or one with sudo access (usually only admin accounts). (At least from step 4 on.)
Use caution with connecting physical and virtual drives! Make sure that you are connecting the correct drives to your virtual machine, and that you are running SpinRite on the drive you intend. If you connect a RAW drive to a virtual machine while it is mounted by MacOS, you risk utter destruction of data on that drive. (Although VirtualBox seemingly tries to prevent you from doing this.)
Here is the executive summary of what you are going to do:
-
- Get SpinRite
- Get VirtualBox
- Get FreeDOS (sort of a MS-DOS replacement)
- Install FreeDOS into VirtualBox
- Install SpinRite into VirtualBox
- Connect your problem drive to Virtual Box, so SpinRite can work on it
Instructions
0. Get SpinRite – Buy and download SpinRite from grc.com if you don’t already have it.
1. Download and Install VirtualBox
https://www.virtualbox.org/ (It’s free)
- Download the latest version for OS X (currently 5.2.22)
- Install it.
- Open VirtualBox
- Create a new machine for DOS
- Accept the defaults (32 MB RAM, 500 MB expandable virtual hard disk)
- In Settings/System/Processor for the new machine, set the Execution Cap slider to about 45%. This keeps the virtual machine from spinning up your fans and running down your battery.
2. Get FreeDOS – Download and install FreeDOS from freedos.org. (It’s free)
Select the CDROM “standard” installer distribution. You’ll get a file something like FD12CD.iso.
The current version 1.2 is acceptable. You are going to install FreeDOS into the VirtualBox virtual machine you created above.
3. Install FreeDOS into Virtual Box
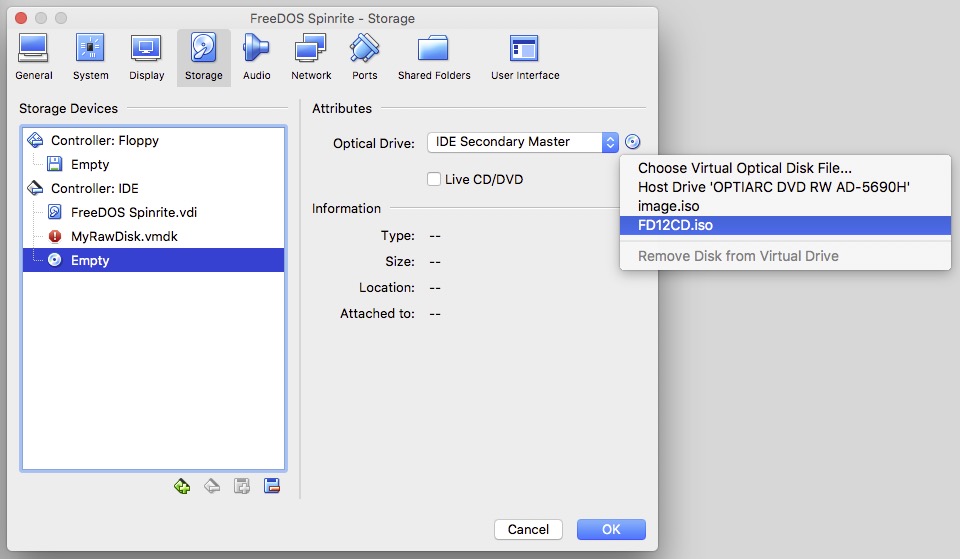
In Virtual Box, Click on your FreeDOS machine. Select Settings/Storage. Click on the empty optical drive icon. To mount your FreeDOS image click on the CD icon on the far right, and choose it using Choose Virtual Optical Disk File
Select the FreeDOS ISO image (FD12CD.iso).
 You are now going to boot your virtual machine for the first time to install FreeDOS onto your virtual hard drive. It will help to understand some features of the Virtual Box user interface. You will need to click in the virtual machine window to allow you to type into it. When you do that, the virtual machine will “capture” your mouse and keyboard. To release the mouse and keyboard, to do anything else on your Mac, you can press the left ⌘ (command) key.
There is a bug between VirtualBox and FreeDOS that will cause the virtual machine to crash with a messy string of Invalid Opcode messages if you simply follow the prompts. There is a workaround, and here it is.
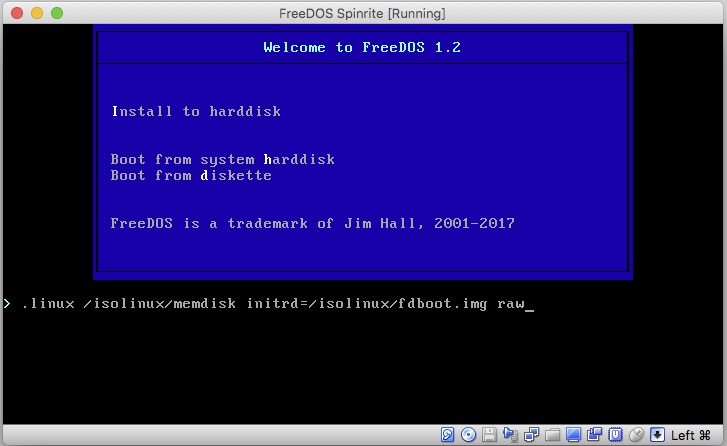
Select your virtual DOS machine in Virtual Box. Press Start. The virtual machine window will appear, and it should boot into the FreeDOS installer screen. There is a countdown running (50 seconds) which you need to stop. Click in the virtual machine window and press the TAB key. That will stop the timer. You are now editing the Install to harddisk menu option. Add the word raw (lower case) after the command line. Press return.
 You should now be in the installer at the preferred language prompt. Proceed.
When asked if you want to partition Drive C:, select Yes. And also select Yes – Please reboot now. Once again, intercept the countdown with a tab and add raw to the command line.
You will be back to the installer preferred language prompt. Proceed. This time you will be asked if you want to format C:. Say Yes. Then choose your keyboard format (perhaps different from your preferred language).
At the prompt What FreeDOS packages do you want to install?, Choose Base packages only. This is sufficient for SpinRite.
Naturally, you will choose Yes – Please install FreeDOS 1.2.
When the install is complete, you will be asked if you want to reboot. Don’t do it yet. Wait until step 4b, below.
4. Install SpinRite Into VirtualBox
4a. You will Create a CD image with spinrite.exe on it. This will be used to get SpinRite.exe into the Virtual machine. When SpinRite runs, it can create an ISO containing itself. If you already have a SpinRite ISO created by SpinRite on a Windows machine you may use that and skip the rest of this step (skip to 4b).
Create a folder named “spinrite” in your Mac Downloads folder. Put spinrite.exe (from step 0) into that folder.
Open a Terminal window. Enter this command into the terminal:
hdiutil makehybrid -o ~/Desktop/image.iso ~/Downloads/spinrite/ -iso -joliet
(Enter the command all on one line.) This will create a file on your desktop named image.iso containing spinrite.exe . This image is of a type acceptable to Virtual Box. If you create an image with Disk Utility instead, it will not work.
4b. In VirtualBox Manager, select your DOS machine, and pick Settings/Storage. Again, using the optical disk icon on the far right, choose the image.iso file we created on your desktop in step 4a, above. Click OK to save settings.
Now, back in the virtual machine, select Yes-Please reboot now and press enter. You don’t need to intercept the boot process anymore. Wait for the machine to boot into FreeDOS and the C:\> prompt.
The SpinRite “CD” should now be mounted as drive D:. Type the DOS command:
copy d:\spinrite.exe c:\spinrite.exe
This will copy Spinrite to your virtual C: drive. At this point, you now have a virtual machine with a virtual hard drive containing SpinRite, and you no longer need the image.iso image. You may remove that from the virtual drive if you like.
5. Connect the Problem Drive to VirtualBox and SpinRite
[Edit: May, 2022]: With newer versions of MacOS, Catalina (10.15) Big Sur(11), Monterey (12) and newer, you will run into problems with SIP (System Integrity Protection) in the following steps, because it will prevent you from modifying the permissions on files in /dev . You can turn off SIP via the recovery partition. There are instructions here.
In the terminal, create a shell script as follows:
cat > srscript.sh
Then, copy the script below, and paste it into the terminal.
#!/bin/bash
# This script creates a virtual disk image connected to a physical disk for connection to VirtualBox
read -p "Enter Disk name, e.g. disk8: " SpinRiteDisk
# make sure disk is unmounted
/usr/sbin/diskutil unmountDisk /dev/$SpinRiteDisk
sudo vboxmanage internalcommands createrawvmdk -filename "$HOME/Desktop/VirtualRaw$SpinRiteDisk.vmdk" -rawdisk /dev/$SpinRiteDisk
sudo chmod 777 "$HOME/Desktop/VirtualRaw$SpinRiteDisk.vmdk"
sudo chmod 777 /dev/$SpinRiteDisk
/usr/sbin/diskutil unmountDisk /dev/$SpinRiteDisk
echo "Look on Desktop for raw disk file"
Then type
ctrl-D (End-of-file)
Now make your script executable with:
chmod +x srscript.sh
Make sure the drive to be tested is connected and powered on. You need to figure out what the device ID associated with the drive under test is. It will be of the form “diskX”, for example, it might be “disk5”. You can find this in Disk Utility, in the lower right corner.
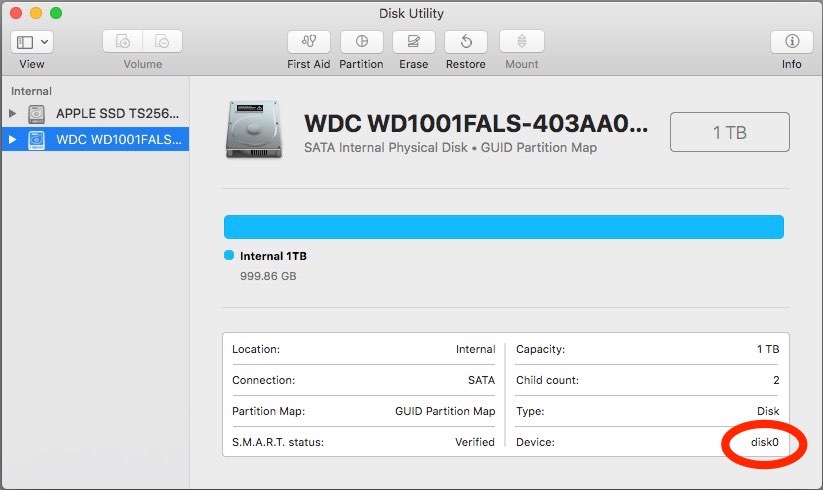
If you see a suffix, e.g., disk5s1, ignore the suffix. This is the disk name you will need in the next step.
While you are in Disk Utility, go ahead and unmount all partitions on the drive to be tested, if any are mounted.
In the terminal, run the script:
./srscript.sh
Because the script contains sudo commands, you will be prompted for a password. Enter your Mac signon password. As mentioned above, this will only work for admin accounts, or accounts for which the user has been added to the file /etc/sudoers . When prompted, enter the device ID (disk name), e.g. disk5 . A vmdk file icon will appear on your desktop named appropriately.
In VirtualBox, go to the storage settings for your virtual machine.
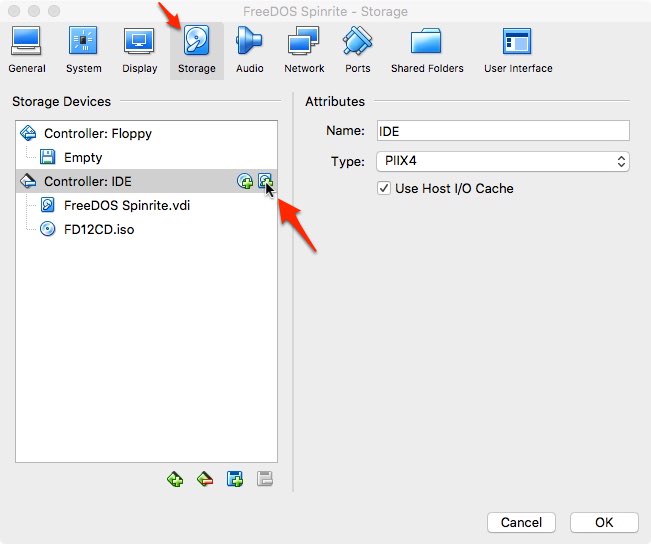
Click the hard-drive-plus icon to add a new hard drive to the virtual IDE controller. At the prompt, select Choose Existing Disk, and then select the VirtualRawdiskx file you created on your desktop earlier.
If the FreeDOS CD is still mounted in your virtual machine, as shown above, remove it from the virtual drive so that your machine boots from your virtual hard drive. If you click on the .iso, the remove option then appears if you click the optical disk icon in the far right of the dialog box.
Very likely, at this point, your target disk may have remounted itself. Eject/Unmount it before proceeding. VirtualBox will complain about being unable to access the VirtualDrive if partitions on the physical drive are still in use. Eject it using DiskUtility or the Finder.
In VirtualBox, start your virtual machine. It should boot up to the FreeDOS command prompt.
Issue the DOS command:
spinrite
You are now running SpinRite on a Mac! As promised earlier, SpinRite will have no access to S.M.A.R.T. data in this scenario.

When SpinRite is done (much, much later), you should restore the correct disk permissions. Leaving the raw disk permissions with world access is a security risk.
In the terminal you can restore them with, for example:
sudo chmod 640 /dev/disk5
If disk5 was your target disk. Check that the permissions are correct with
ls -l /dev/disk*
The raw disk files should all have the same permissions:
brw-r-----
I hope these instructions were helpful for you. Thanks for reading.
Error Situations
1.) If, on powering up your virtual machine, if it fails with VERR_ACCESS_DENIED opening your vmdk file, it is probably because the permissions for your raw disk file are not set properly. They may get reset if you reboot, for example. So go back and do something like:
sudo chmod 777 /dev/diskx
2.) If, on powering up your virtual machine, it fails with VERR_RESOURCE_BUSY, it probably means that the hard drive under test is mounted on your Mac. Unmount it and try again.
3.) If, when starting Spinrite, you get the message from Spinrite:
This PC is using a protected mode memory manager that is
incompatible with SpinRite 6.1's built-in memory manager.
Please edit this system's CONFIG.SYS file to disable any
protected mode memory manager, reboot the system & rerun.
You should restart the virtual machine, and make sure to select option:
3 - Load FreeDOS low with some drivers (Safe Mode).
FreeDos will default to an incompatible protected memory mode.
Reference Material:
Extended installation Instructions for FreeDOS are here:
Thank you so much for putting this together! It saved me a lot of headache and maybe even a drive!
Quick heads up that after “Now make your script executable with” the command is currently “chomd” instead of “chmod”.
Thanks again!
The typo has been fixed. Thanks for the correction.
Hi Jamie ! Thanks for the nice guide !
I’m however currently stuck in trying to get the SpinRite.exe file on my DOS Virtual Machine. I just don’t seem to know the command to be ran on DOS to download the file from the URL as I doubt drag and drop would work.
Wget and cURL don’t work. Any advice on how to get the file in the directory ? Thanks in advance for your feedback 🙂
The strategy to get SpinRite.exe on the DOS virtual machine is:
0) Download SpinRite to MacOS.
1) Mount a CD image containing it to the virtual machine
2) Use the DOS “copy” command to copy the file to the virtual C: drive.
This is in the tutorial. See steps 4a and 4b.
This “How to Run SpinRite on a Mac” is great! Thank you. Can I do this on an early 2009 iMac running 10.11.6?
My internal HDD is not happy; I no longer have Apples Hardware Test and cannot install using several workflows; internal drive is SMART verified, both after FirstAid and erasing. Nor can I reinstall 10.11.6 using several different workflows. I have lost original Apple optical media, which may have been Lion. I’m guessing system integrity that came with 10.11.6 is not letting me maintain my box.
My plan is to boot off internal HDD and run apps and storage off my 2TB RAID running as 1TB logical volume. I’m both CCC cloned and backed up with TimeMachine, separately, and externally.
I think that (MacOS 10.11.6 on a 2009 iMac) should work. That’s pretty close to the configuration in use when the original article was written.
This was a fantastic guide to a very complex process. I could not have made use of SpinRite without it — Steve G. owes you a sales commission ;-). Thank you.
Has anyone successfully run this on a M1/M2 mac using Sonoma? When I try it using the latest developer preview test build for 7.0.15, i can get the cd to boot and then I do the tab thing to stop, add raw to the command line and press return. It says it has successfully booted and then as soon as words start appearing, there is a fatal error and i get a window full of error messages. I can’t get beyond that.
I haven’t tried this yet on Apple Silicon. You might expect it to work, because it is under emulation, but I just don’t know. What error message(s) are you getting? Invalid Opcodes?
FYI, SpinRite 6.1 is now available, and it is capable of booting directly on an Intel Mac from a USB drive. I have now tested that successfully, but it is restricted to certain models even within the Intel Macs. See detailed instructions here. Since SpinRite is written in Intel assembly language, it won’t boot directly on an M1/M2 Mac, and these instructions may continue to be helpful.
Yes, invalid opcodes. I’m thinking that maybe its because i’m using the test builds. I might try using the last 7.0.8 developer preview image. See if that makes any difference.
SpinRite runs on Mac? Weird.