Settings for Seniors

MacMAD Meeting Topic September, 2026

Our Apple devices have literally hundreds of settings, most of which you have likely never changed or maybe even seen. We’re going to explore a few of those that might be helpful as we get older. Maybe your eyesight isn’t what it used to be, or maybe you find these devices to be just too darn complicated.

You may find some of these hints useful. These are mostly for iPhone, with a few for Mac and iPad.

Screenshots in this article are from iOS 26 and iOS27 beta. Some features may move or change in future releases.

Navigating Settings

The hard part might be finding the setting you want to change. Settings are arranged into groups of related settings, so it’s not just one big list.

If, in the settings app, you see a little arrow to the right like >

That means that there is a settings sub-section there. Some sub-sections have additional nested sections below them. Think of it like nested folders.
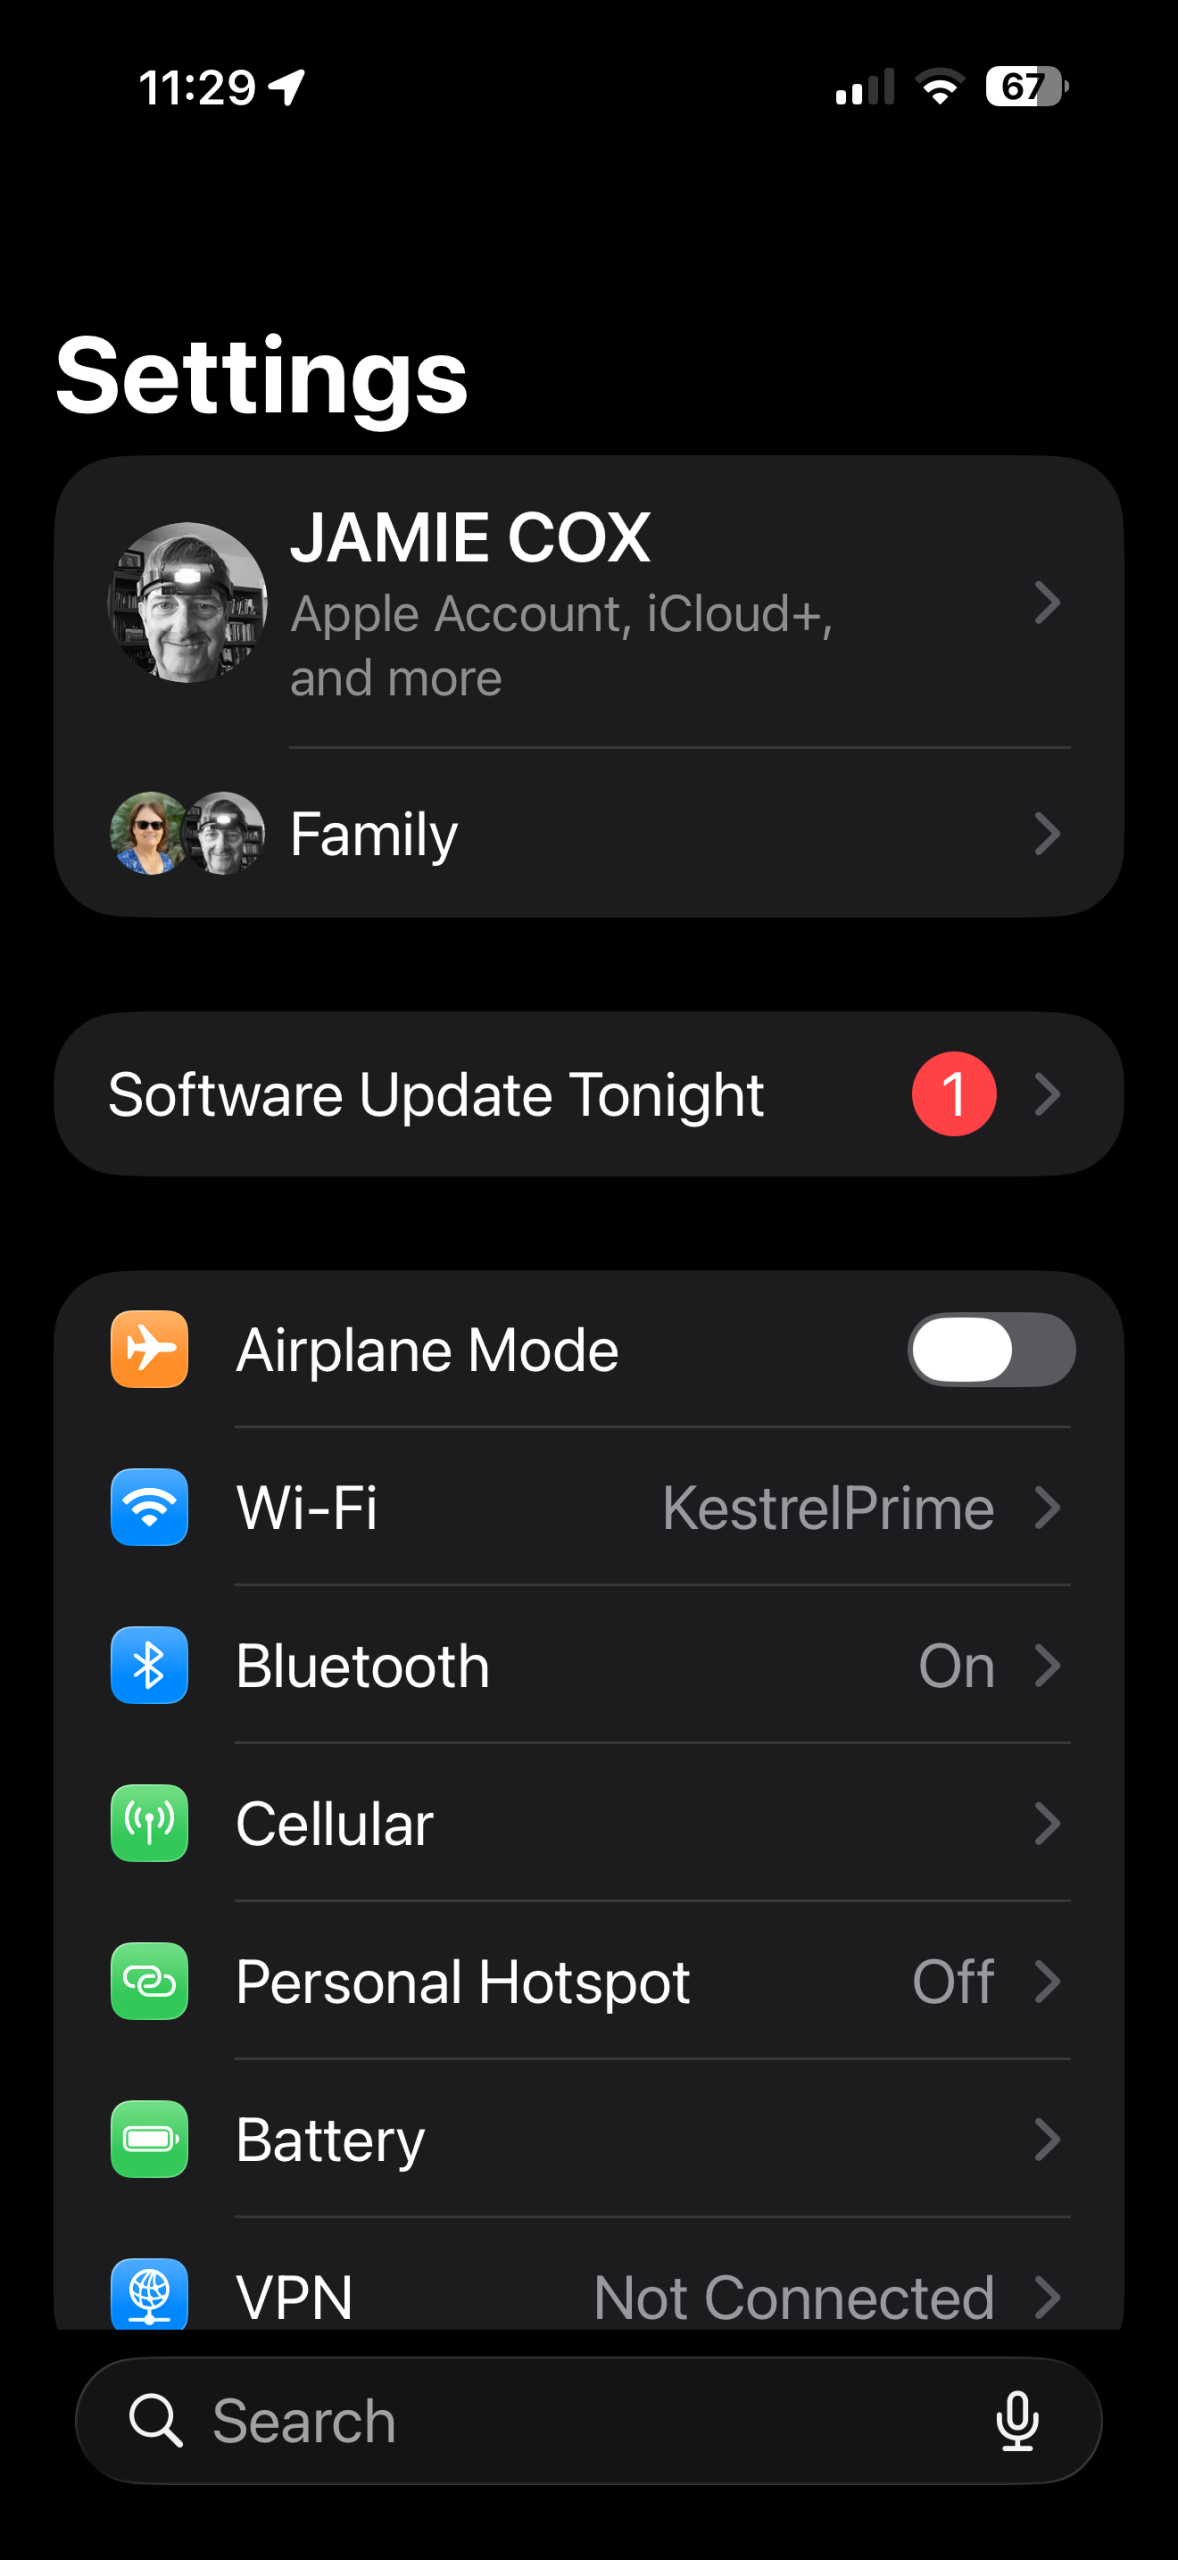
iPhone Settings Screen

Fortunately, Apple has provided a search function to help navigate all these settings. The search field is at the bottom of the screen in recent versions.
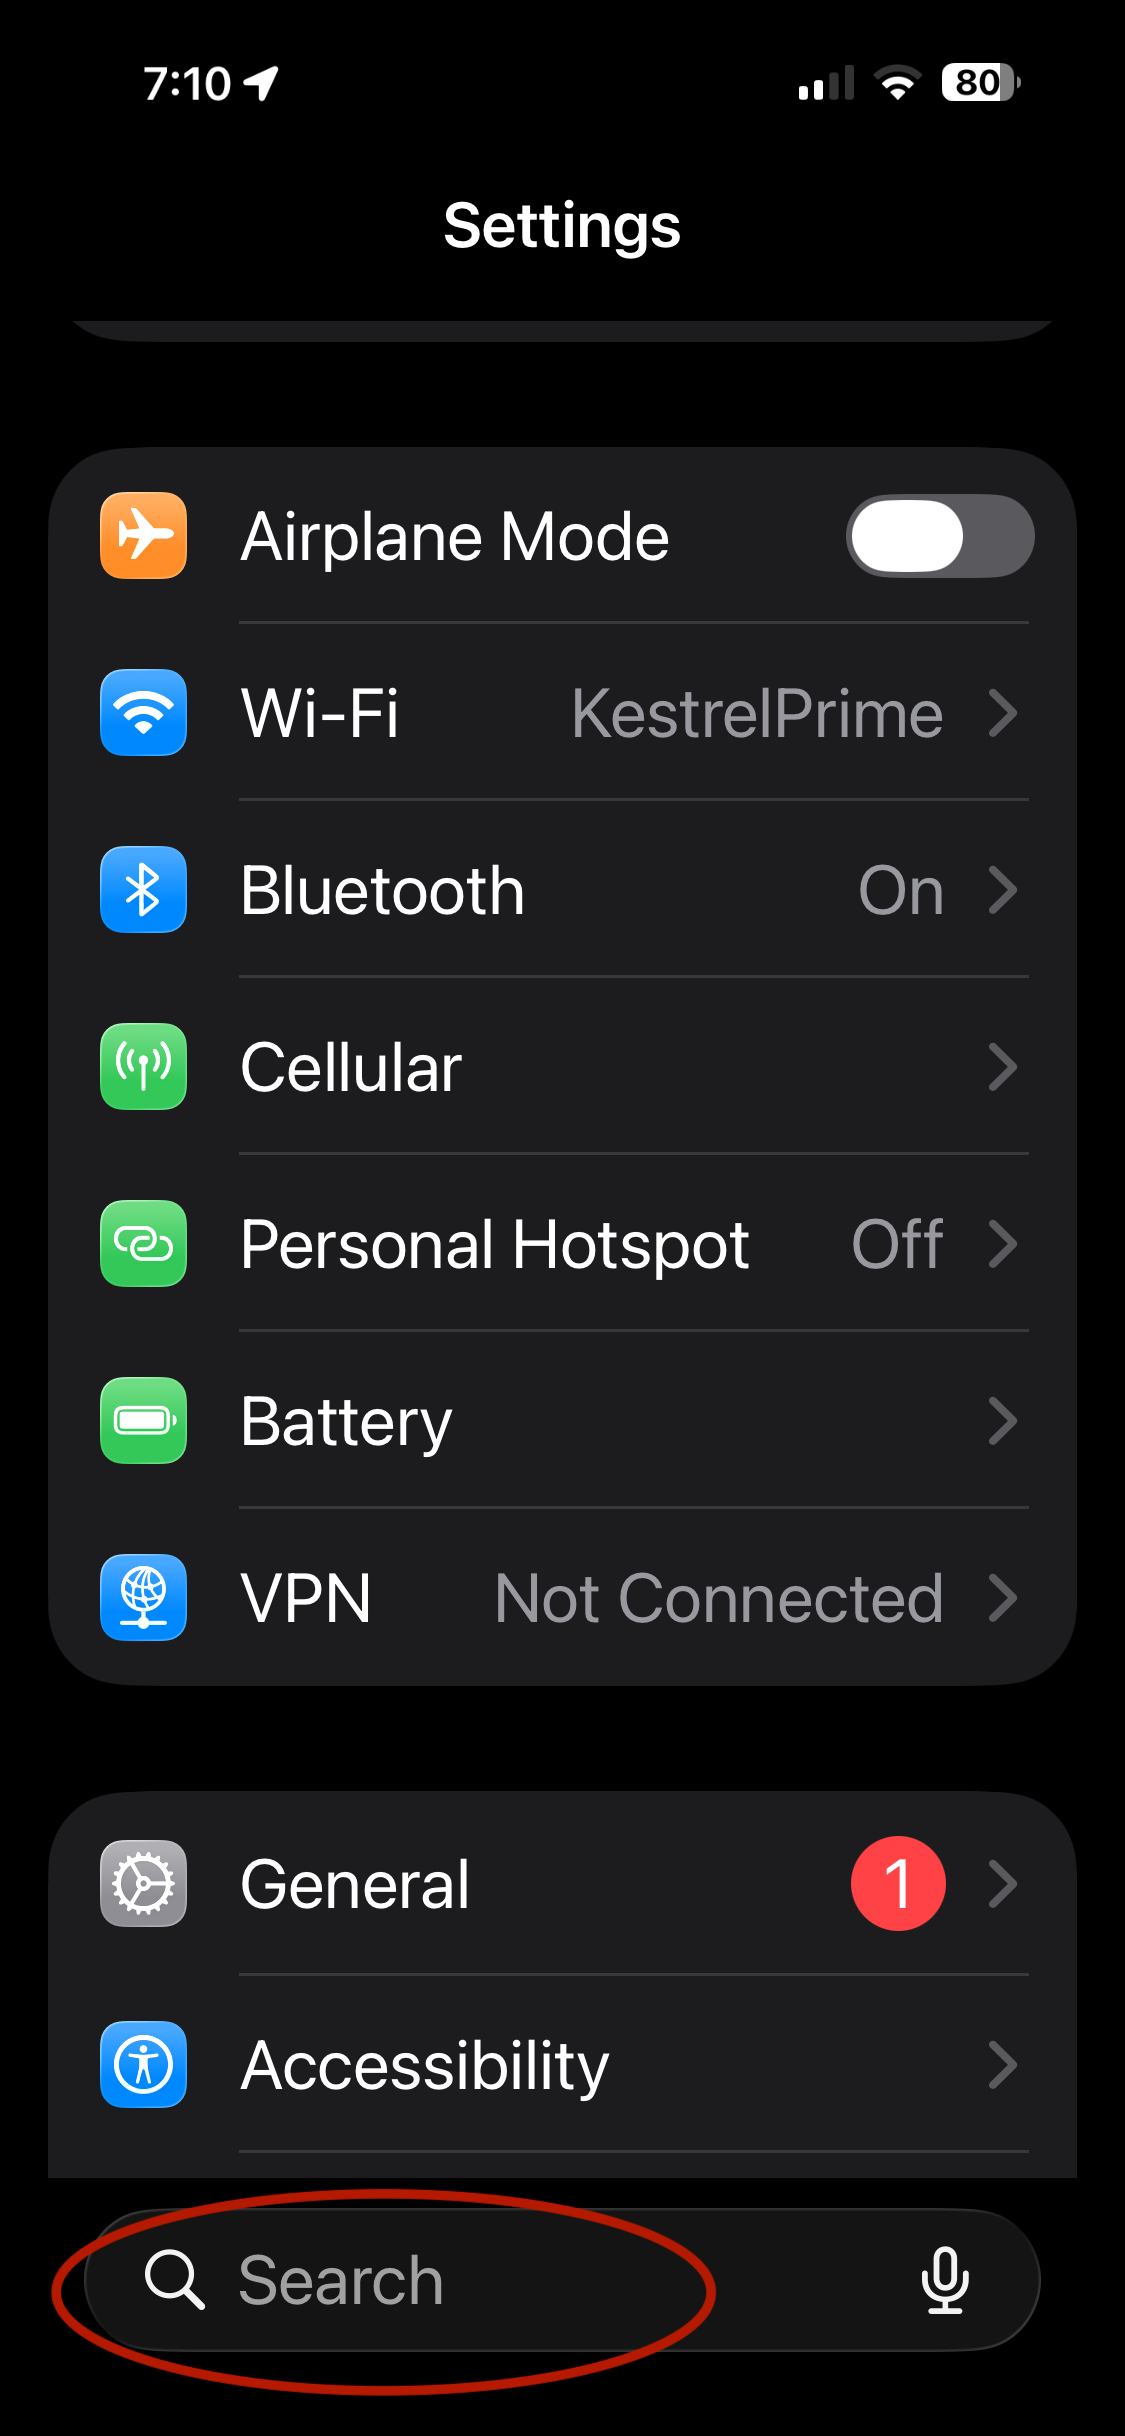
Here’s an example of searching the settings for “Assistive”.
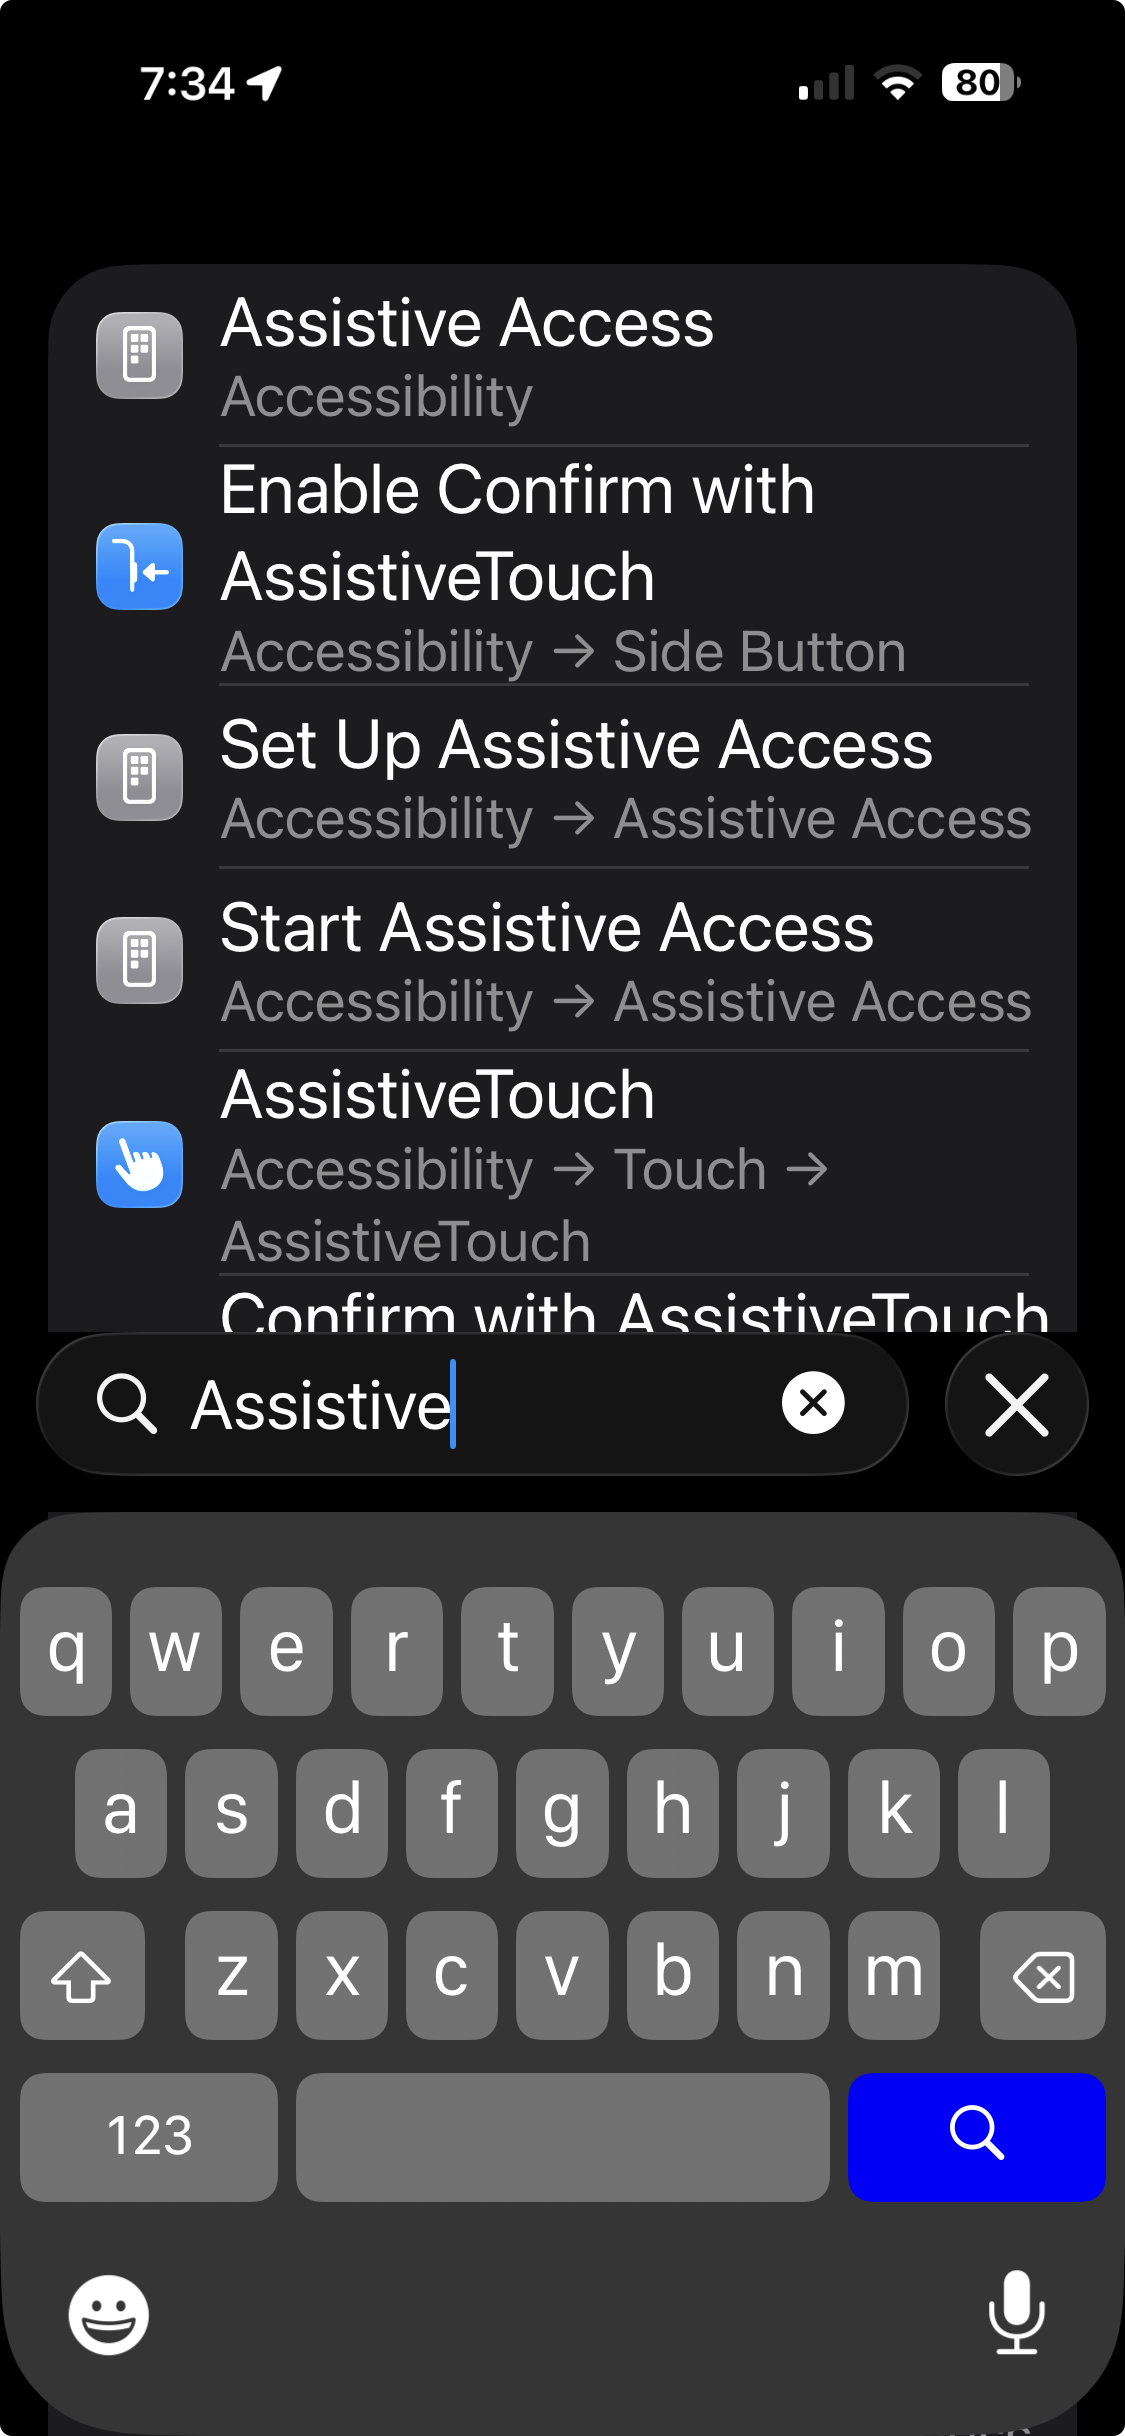
Admittedly, the hard part is knowing the exact name of the feature you are searching for.

Assistive Access

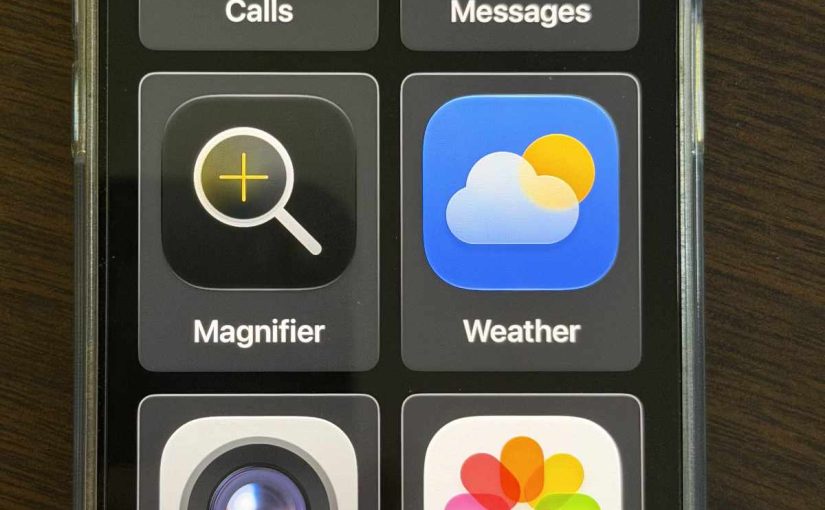
Assistive Access is for someone who needs or wants a phone but doesn’t have the desire or ability to deal with all the complexity of iOS. It reduces the user experience down to a few apps with big buttons.

Assistive Access makes iPhone or iPad extremely simple! It’s the best option for someone with cognitive impairment or someone who just doesn’t need 90% of the features. Also good for parental control scenarios. Assistive Access is intended for scenarios where there is a caregiver and a user. But, You could set it up for yourself.

It’s not real simple to set up. You need to create a new 4-digit Assistive Access passcode for entering and exiting Assistive Access. You also need to choose the Apps and features that will be available from a long list.

In my testing, I had trouble waking the iPhone in Assistive Access mode, and always had to sign in using the passcode although the phone was set up with Face ID. Your results may vary.
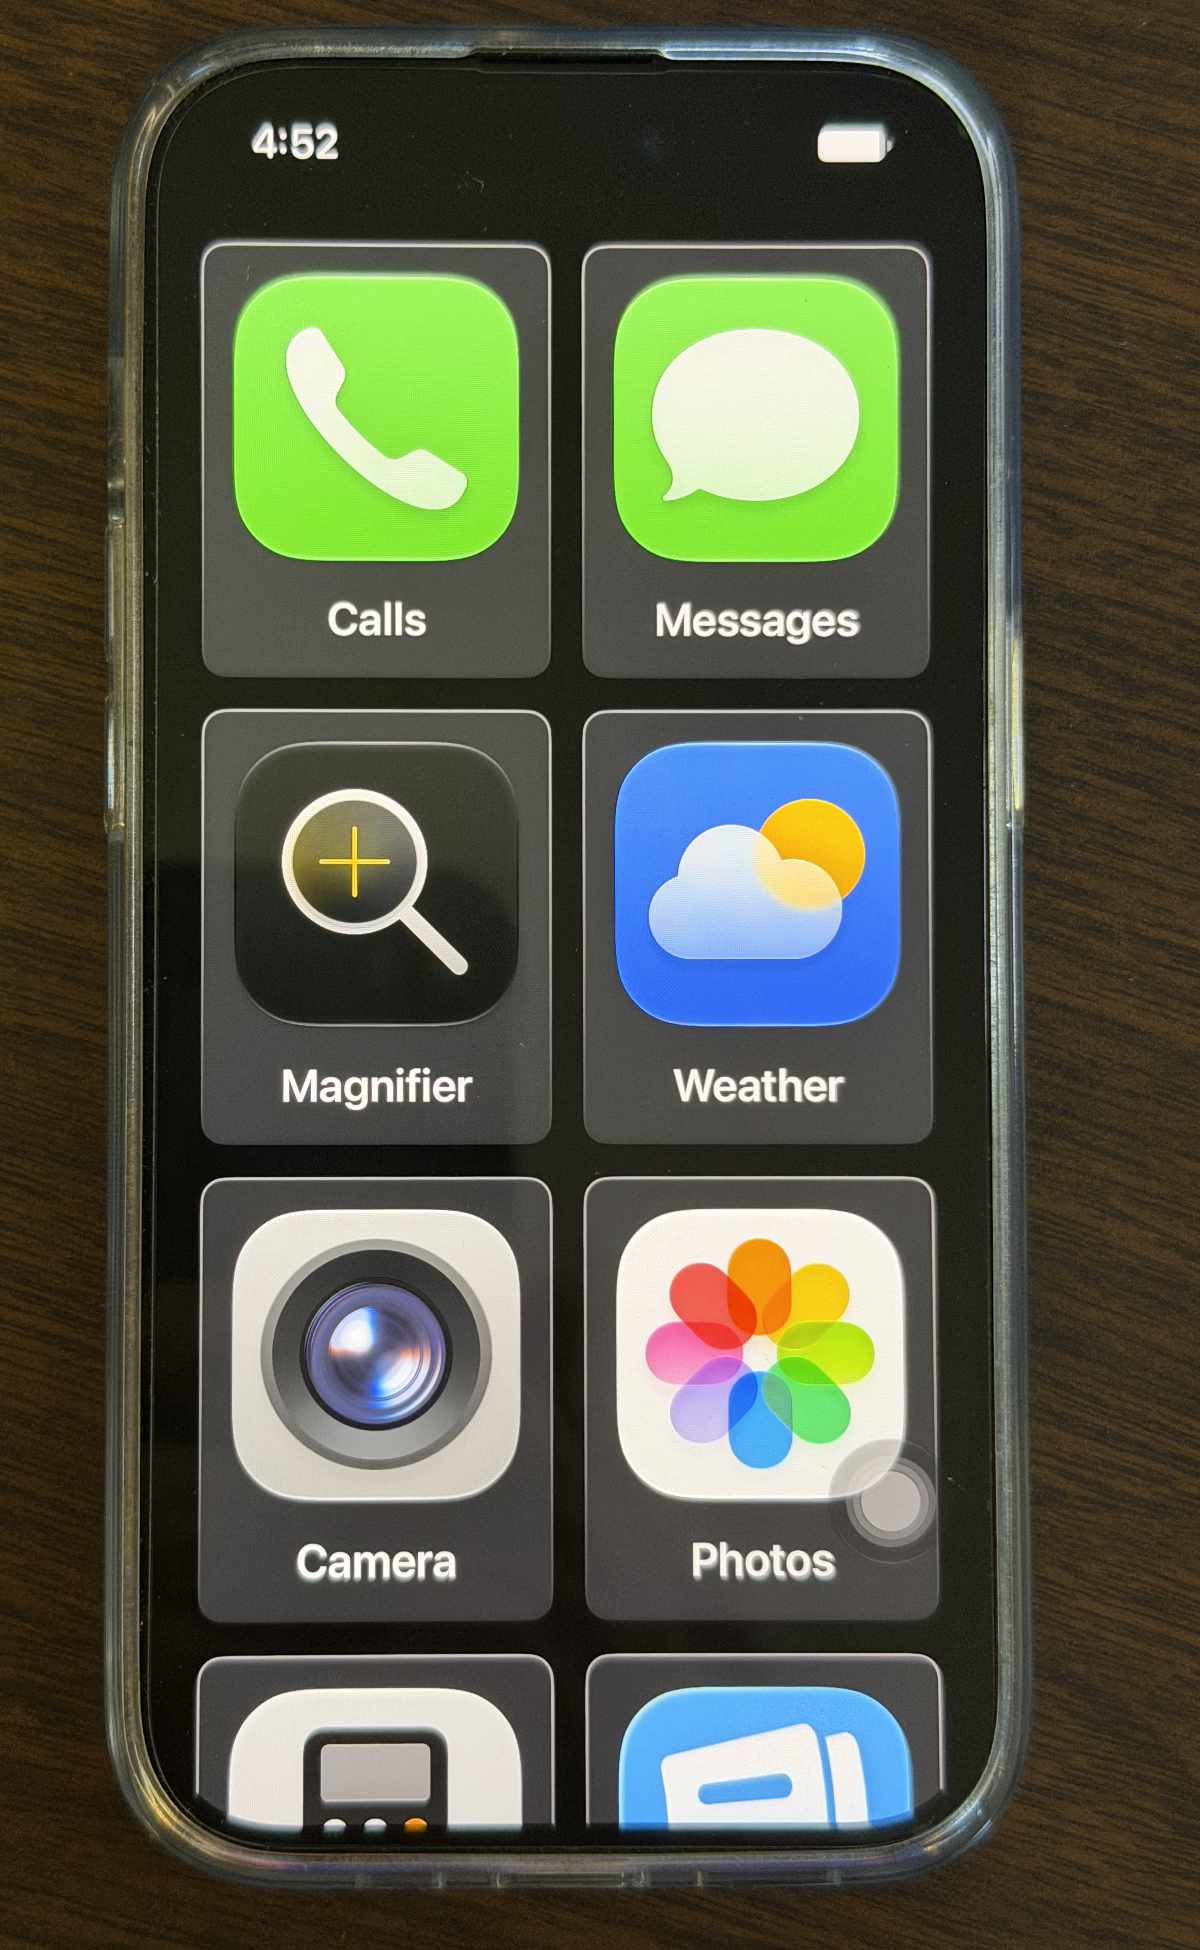
Assistive Access Screen showing 8 large App Icons.

In general, the Assistive Access user can only use the Apps present on the home screen, and cannot install new apps or change the settings. Only by entering the 4-digit Assistive Access passcode can a user escape the protective environment of Assistive Access.

Assistive Touch

Assistive Touch helps iPhone and iPad users who have trouble remembering or executing the gestures defined by iOS and iPadOS. Many older users cannot reliably do the special swipes and other gestures to access the Control Center, Notifications, Siri, the App Switcher, etc.

When Assistive Touch is turned on, a gray dot appears on the edge of the screen. (The Assistive Touch control can be seen towards the lower right of the previous image of Assistive Access.) Tapping that dot reveals the special Assistive Touch menu. The Assistive Touch dot can be dragged to any edge of the screen by the user in case it is interfering with something else on screen.
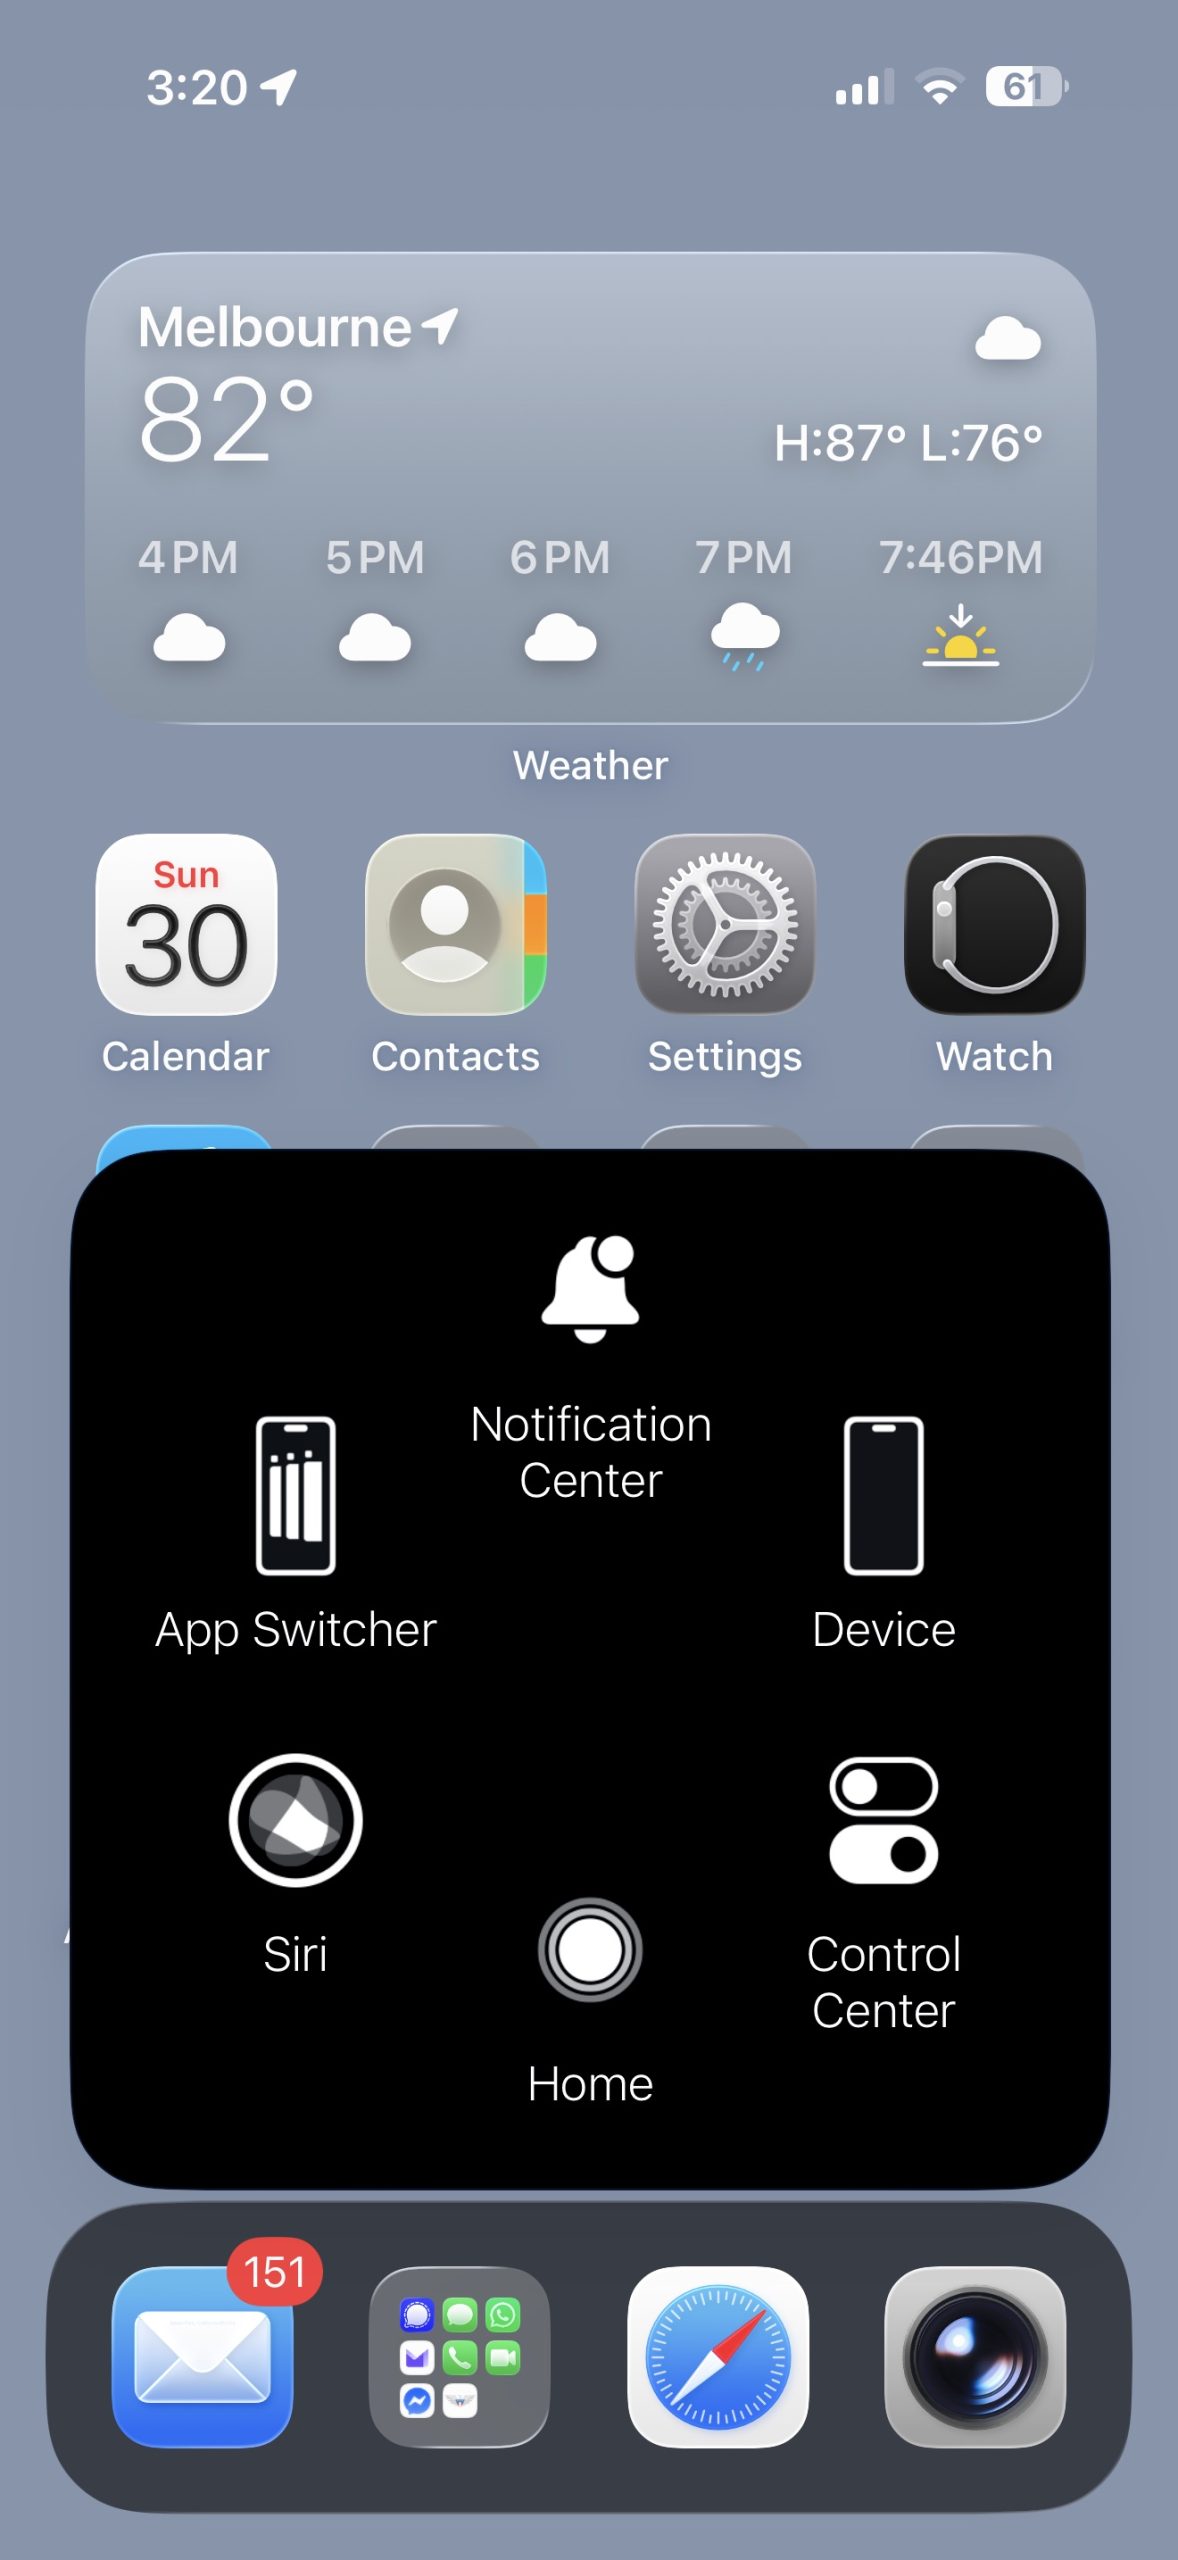
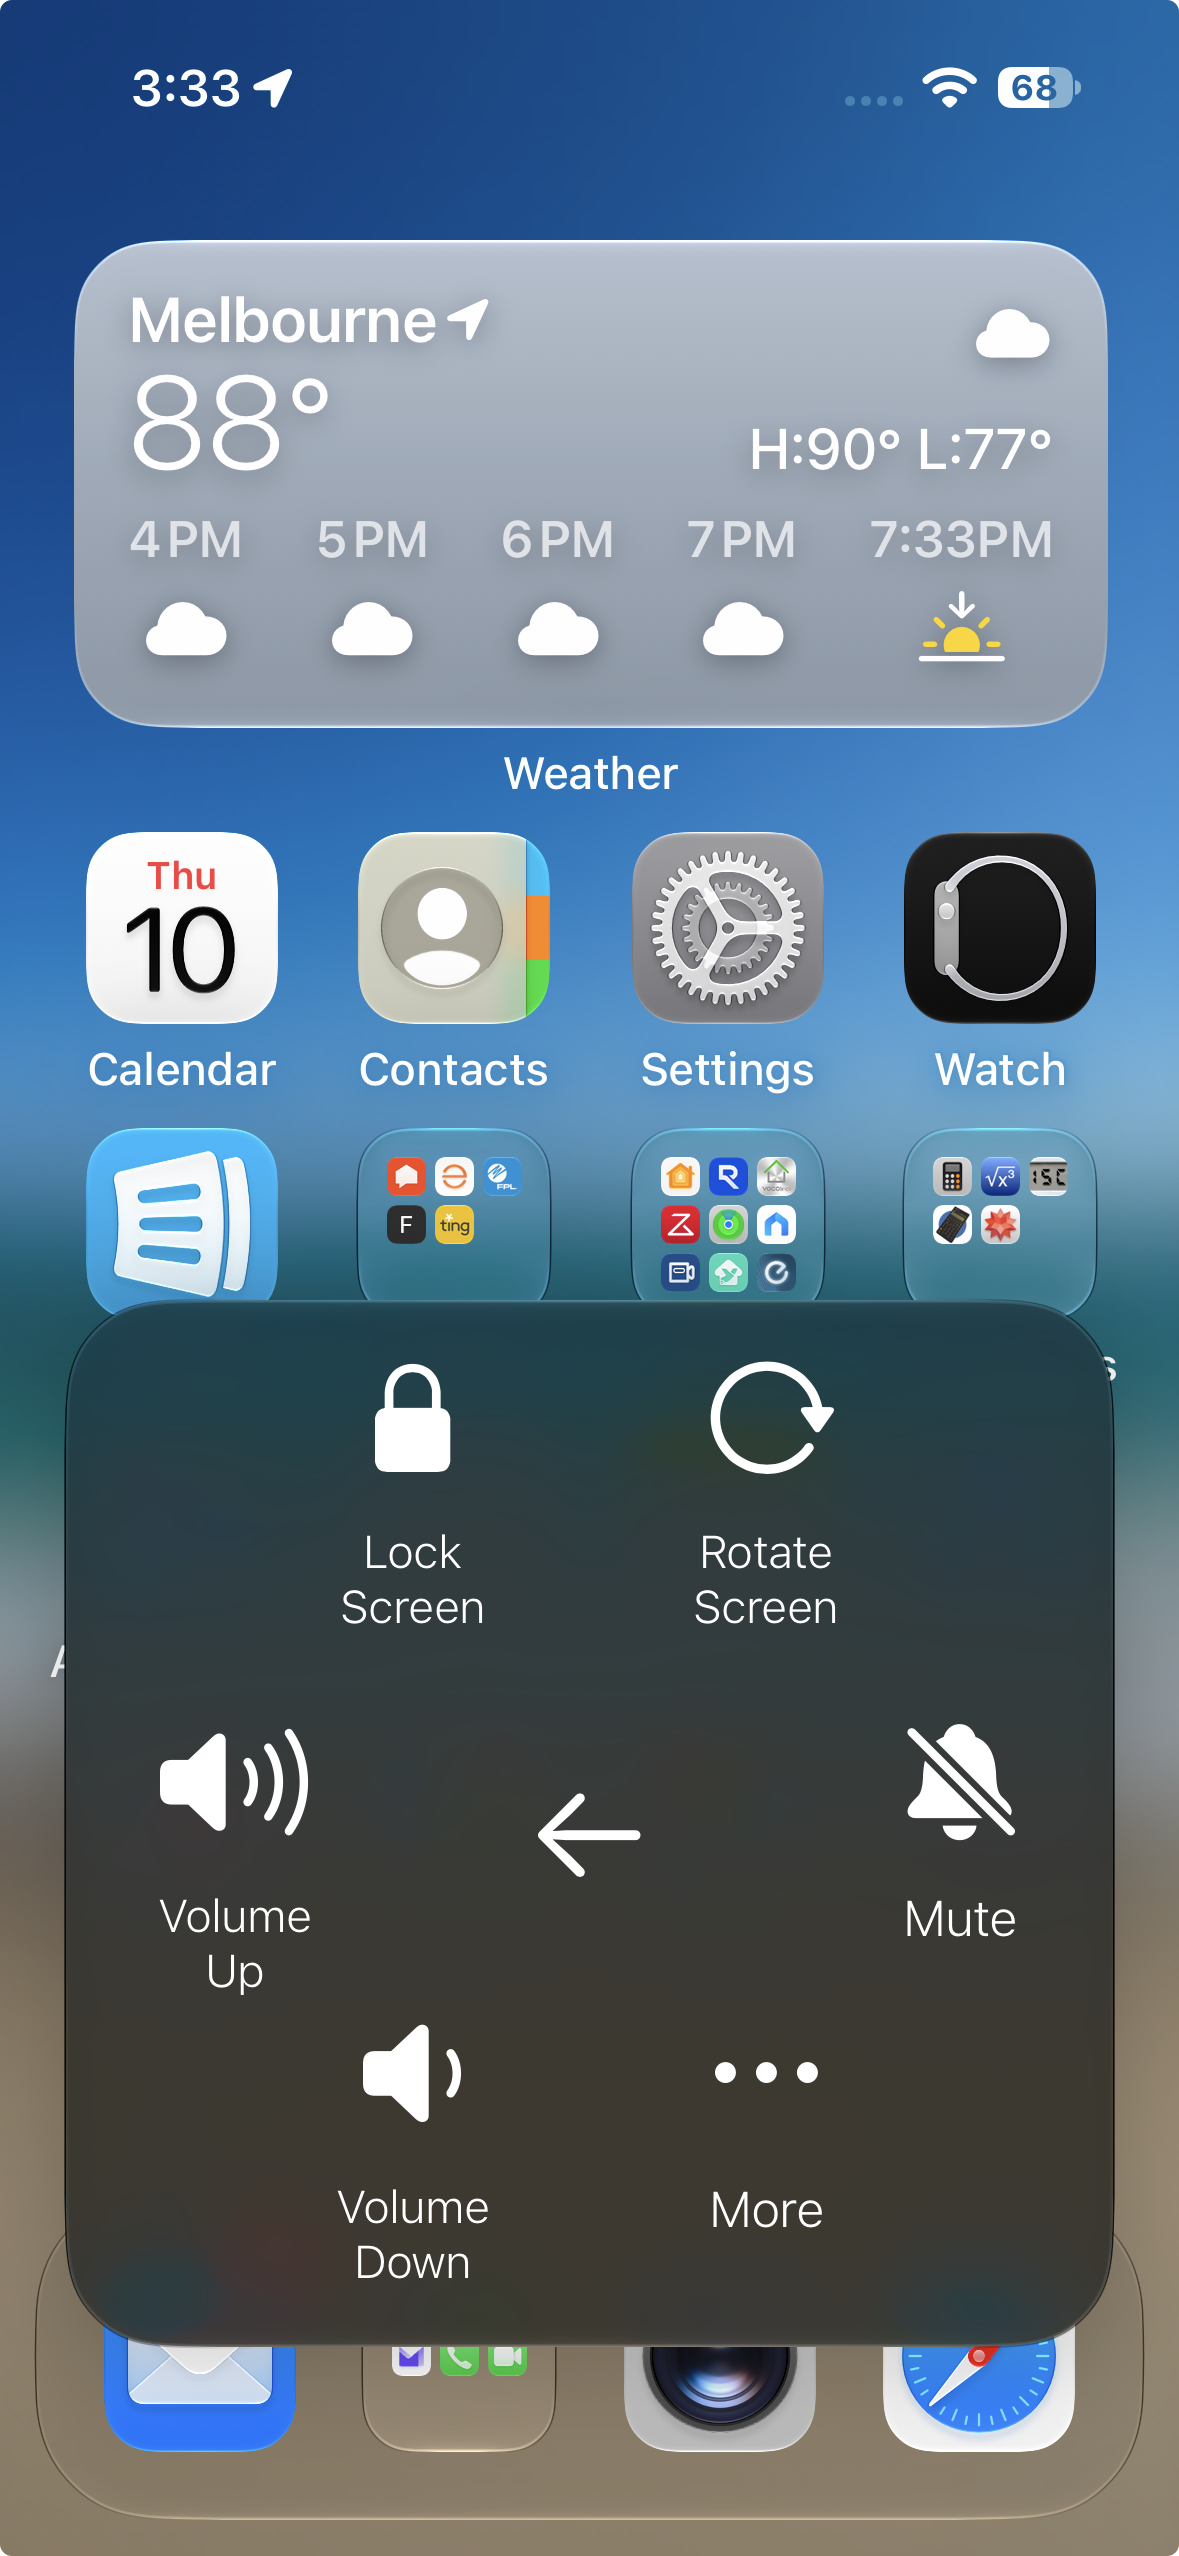
Tapping the “Device” button leads to more options shown below:
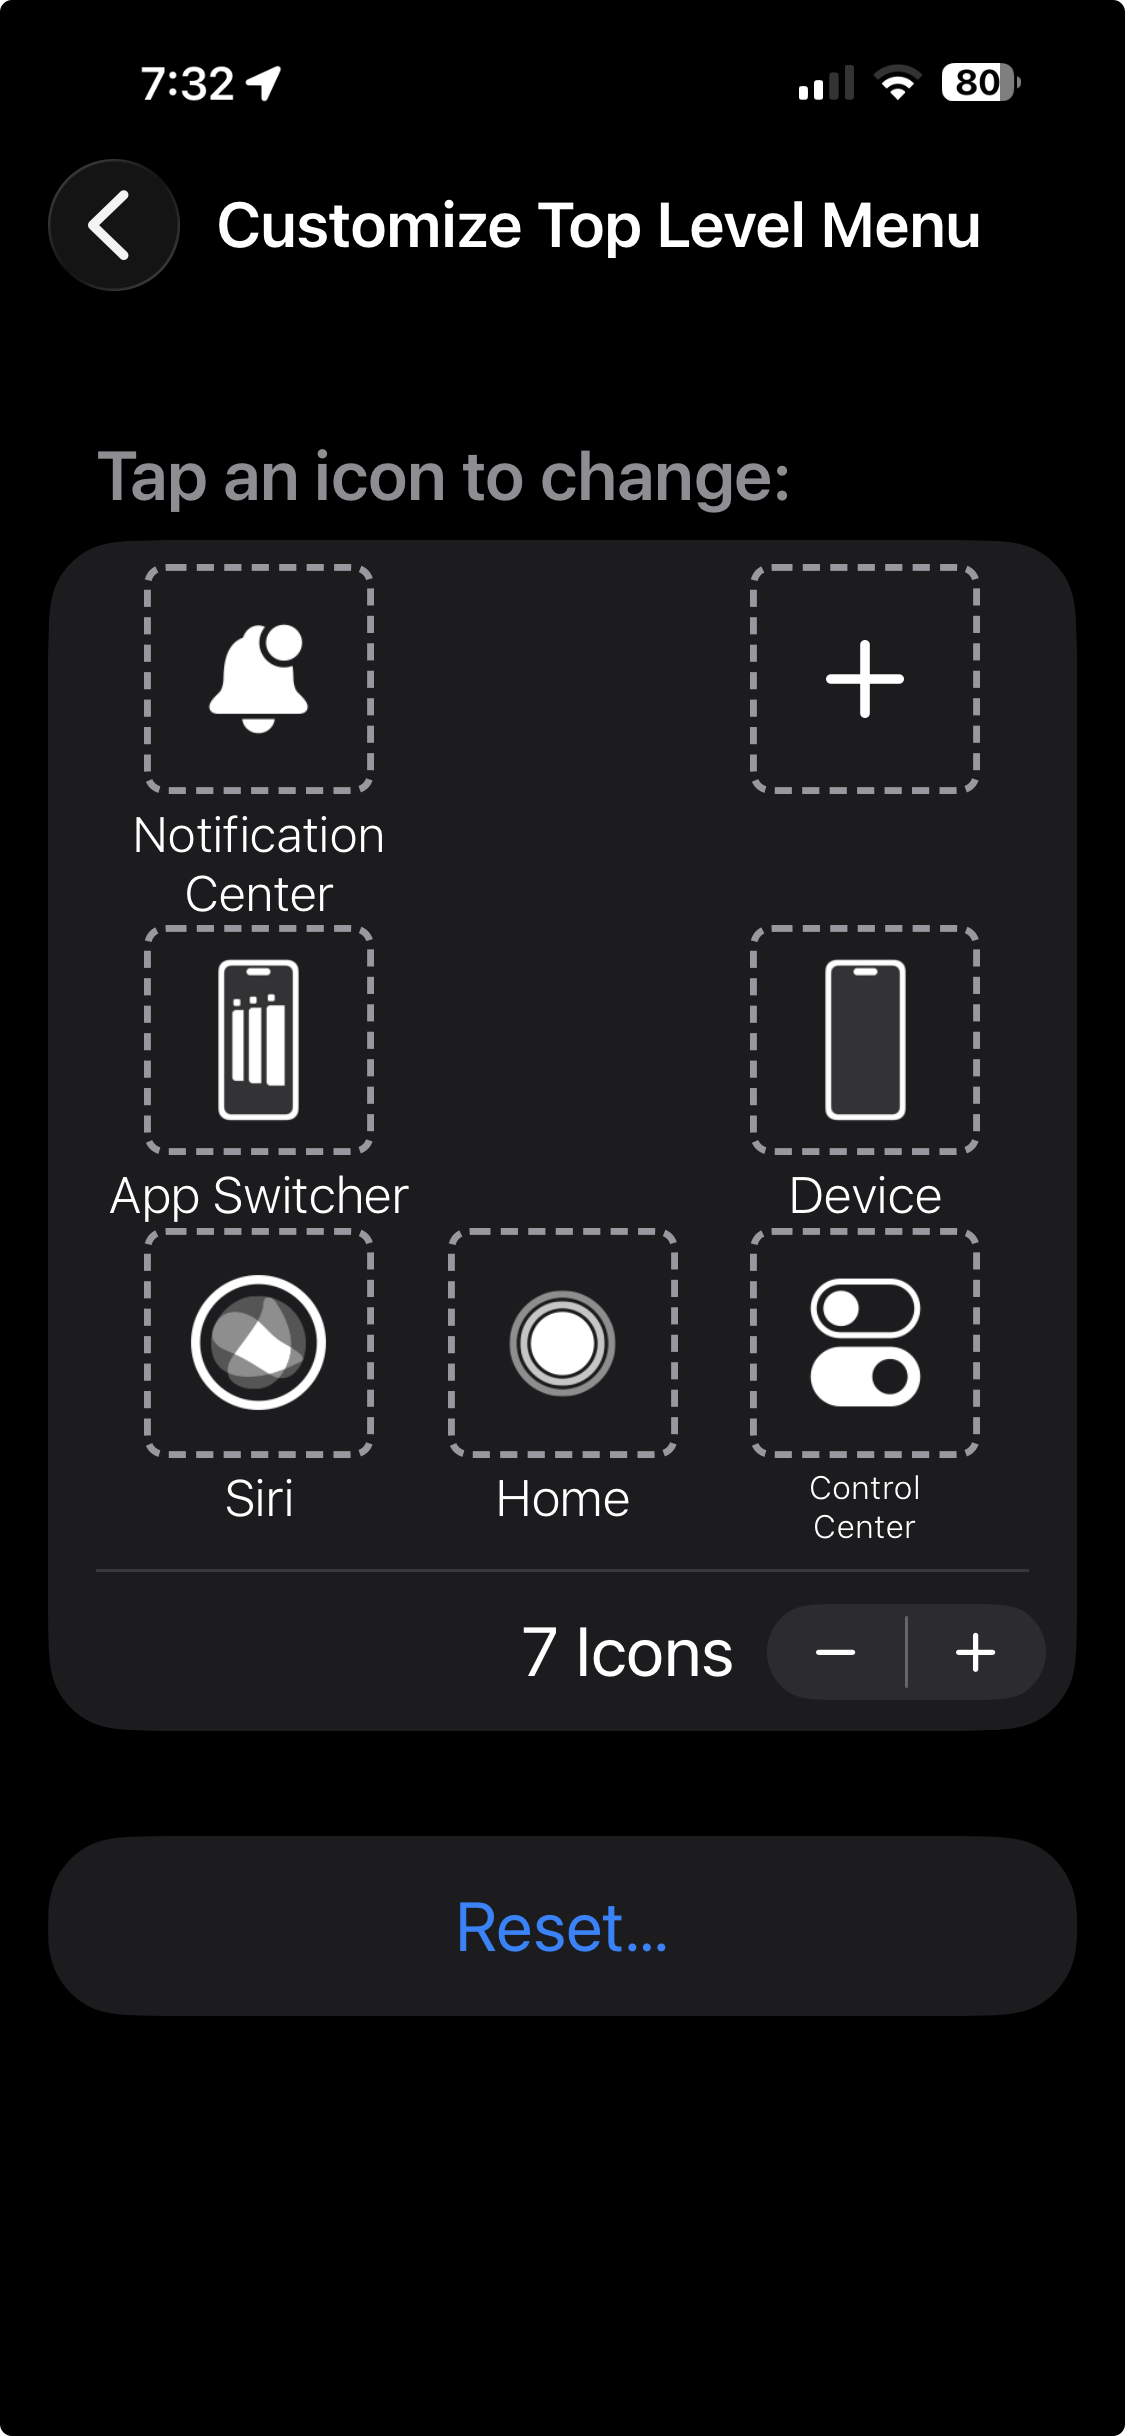
The features of Assistive Touch are customizable:
Assistive touch is a simple feature that can make your device easier to use with very little penalty. There’s no reason not to give it a try. Assistive Touch can be turned on in Settings->Accessibility->Touch->Assistive Touch.

The Magnifier

The Magnifier is not really a setting, but an App that exists in the Control Center.

The Magnifier uses your camera to magnify nearby objects. It’s great for reading the small menu print in a dark restaurant. Besides enlarging the image, it also makes it brighter, thus easier to see.

The Control Center is Customizable so the Magnifier may not appear in your Control Center unless you add it, or it may appear in a different location than shown here.
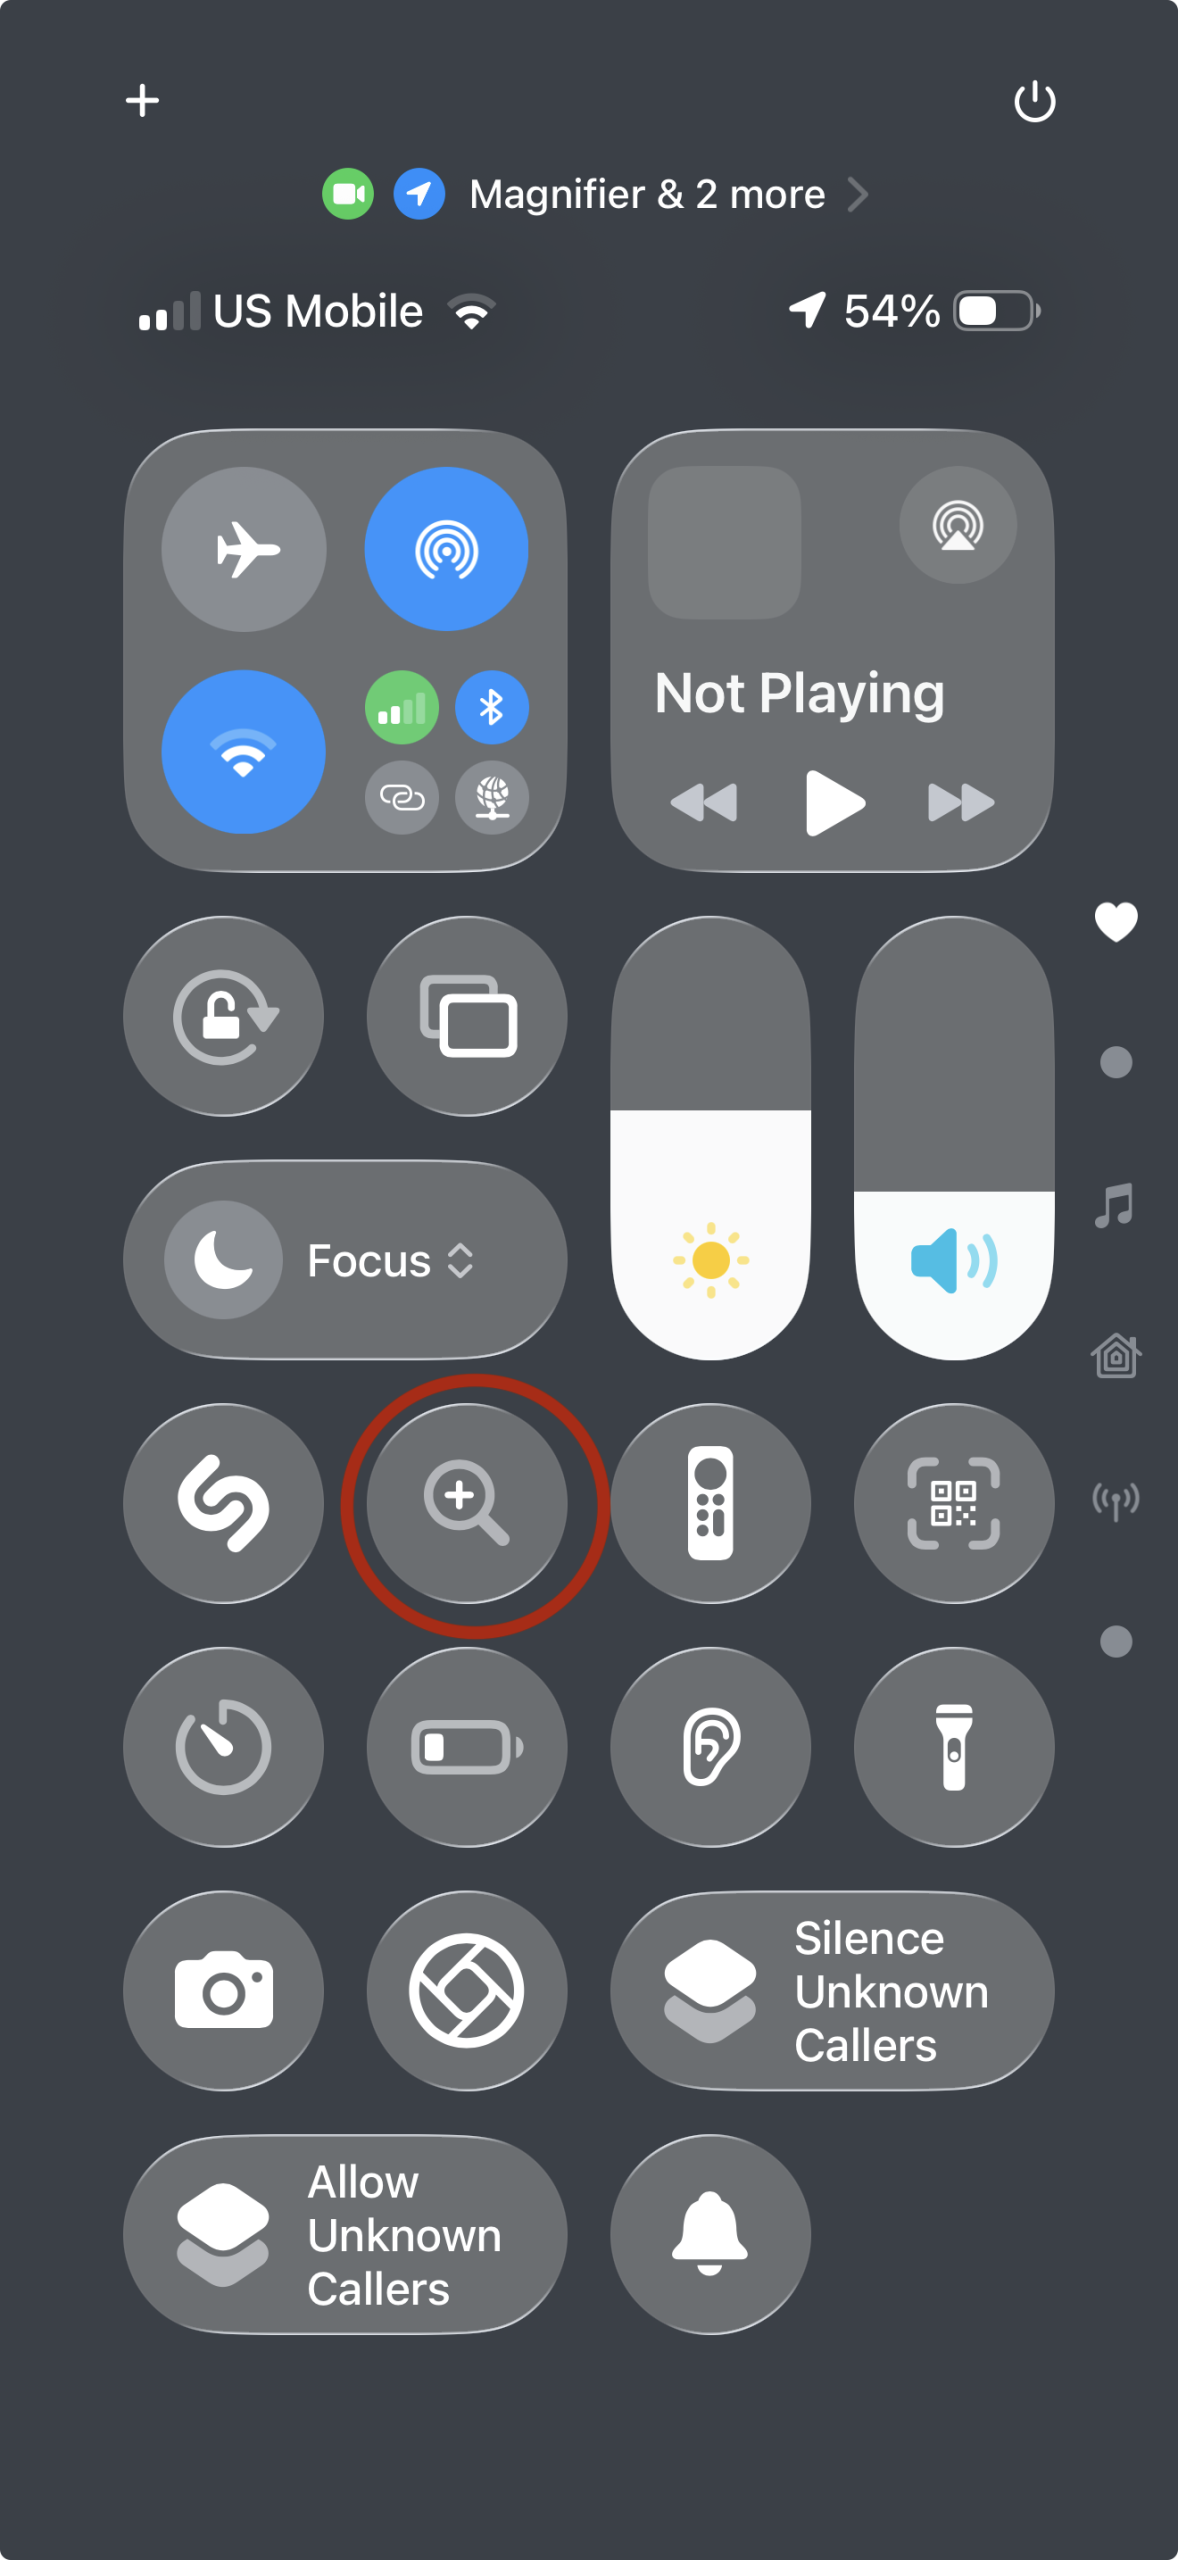
iPhone Control Center – Magnifier Icon in Red

The Control Center can be accessed by swiping down from the extreme upper right of your screen (for devices with Face ID). For devices with a home button, Control Center appears when you swipe up from the very bottom of the screen.

Below is the magnifier in use shown examining some obsolete coins.

Magnifier View of Pennies

Zoom

The Zoom feature magnifies items on screen. Settings->Accessibility->Zoom, then Double Tap with three fingers to invoke or dismiss.

Wikipedia page on Steve Jobs with region of magnified text.

Text Size

You can adjust the size of text in most Apps with Settings->Display & Brightness->Text Size. This size control is further extended to even larger text in Settings->Accessibility->Display & Text Size->Larger Text.
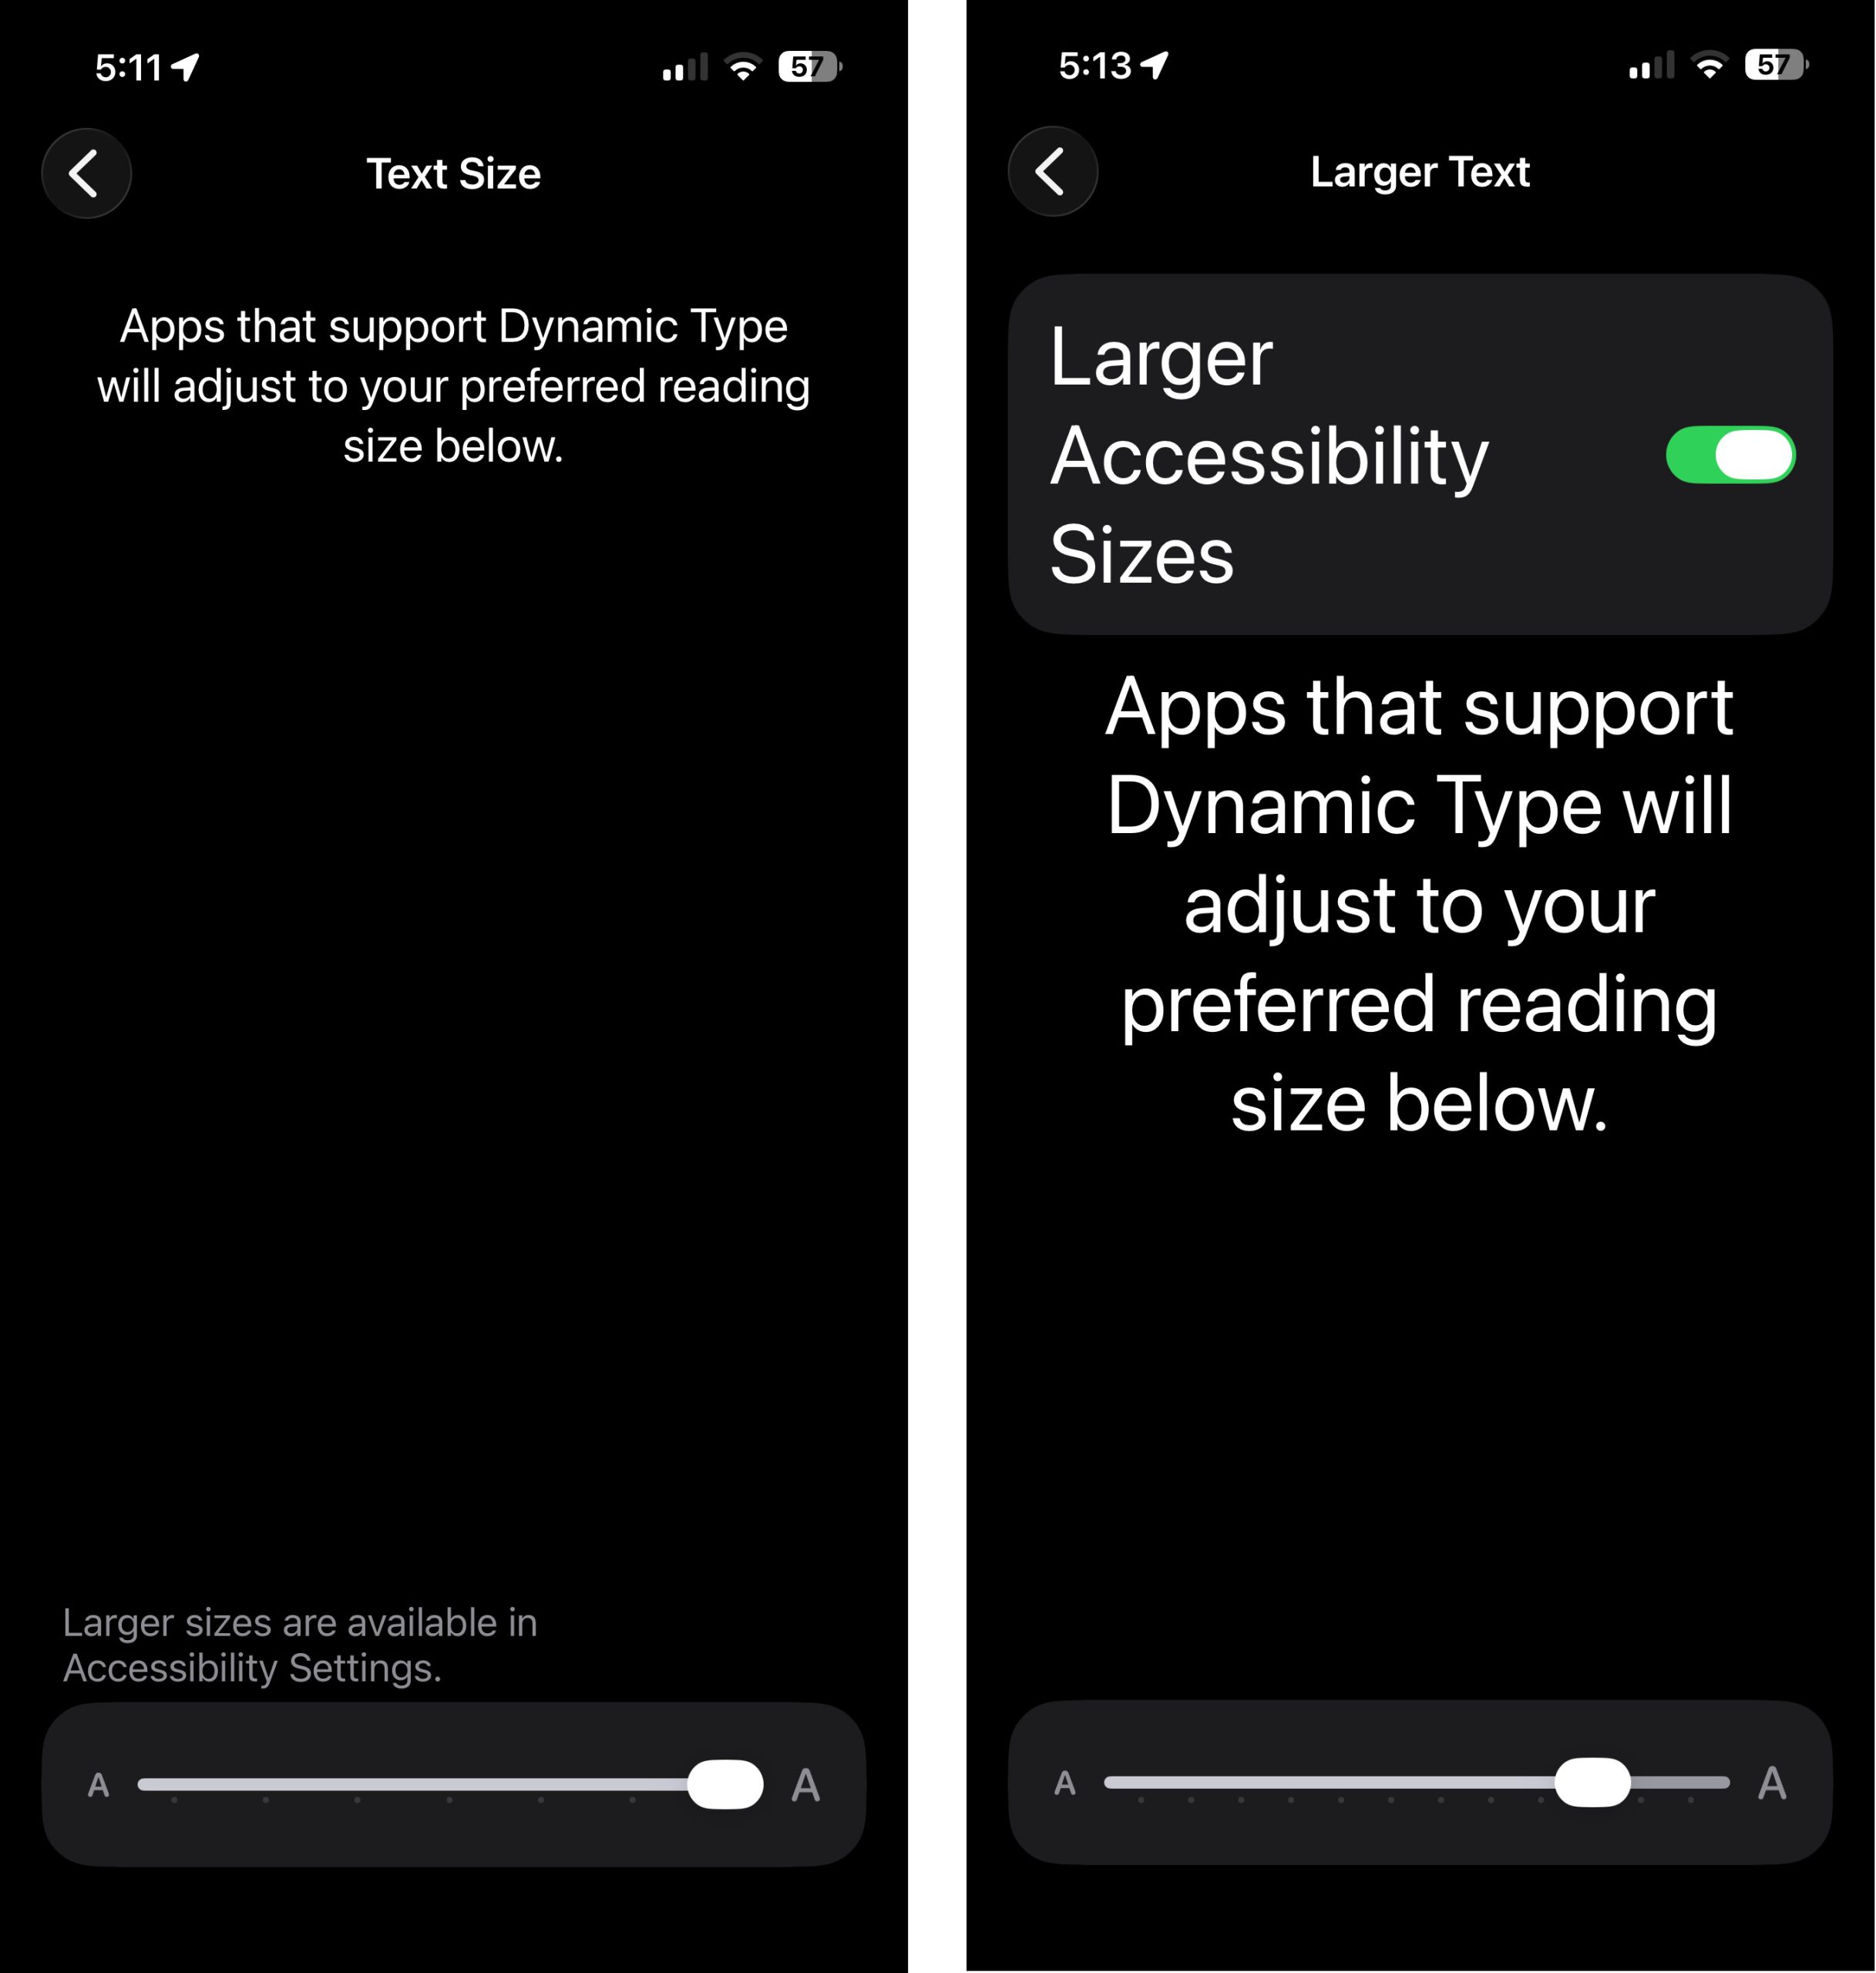
Text Size and Larger Text Settings

Display Zoom

Hey Siri, make everything bigger than everything else.

On iPhone or iPad Display Zoom has two options, Default or Larger Text. This is misleading, because it doesn’t only affect text. What Larger Text does is resize the entire screen, making most everything look bigger.

I liked the Larger Text option right away. Everything is just a bit bigger and clearer, with very little penalty. On the iPhone 17 Pro Max, the screen resolution changes from 2868 x 1125 to 2436 x 1125. That makes everything 17% larger in each dimension, while showing you 85% of the pixel count in each dimension.

This seems like a quite reasonable tradeoff and it just makes everything a little easier to see, at the expense of super fine detail, which older eyes probably can’t see anyway.

Your results will vary with the model of iPhone or iPad. The system claims that your iPhone will need to restart for this change, but in practice I didn’t see a restart — the screen just went blank for a few seconds.

Unless you have great eyesight, or great reading glasses, this will make a nice improvement for you, and you won’t notice those slightly larger pixels.
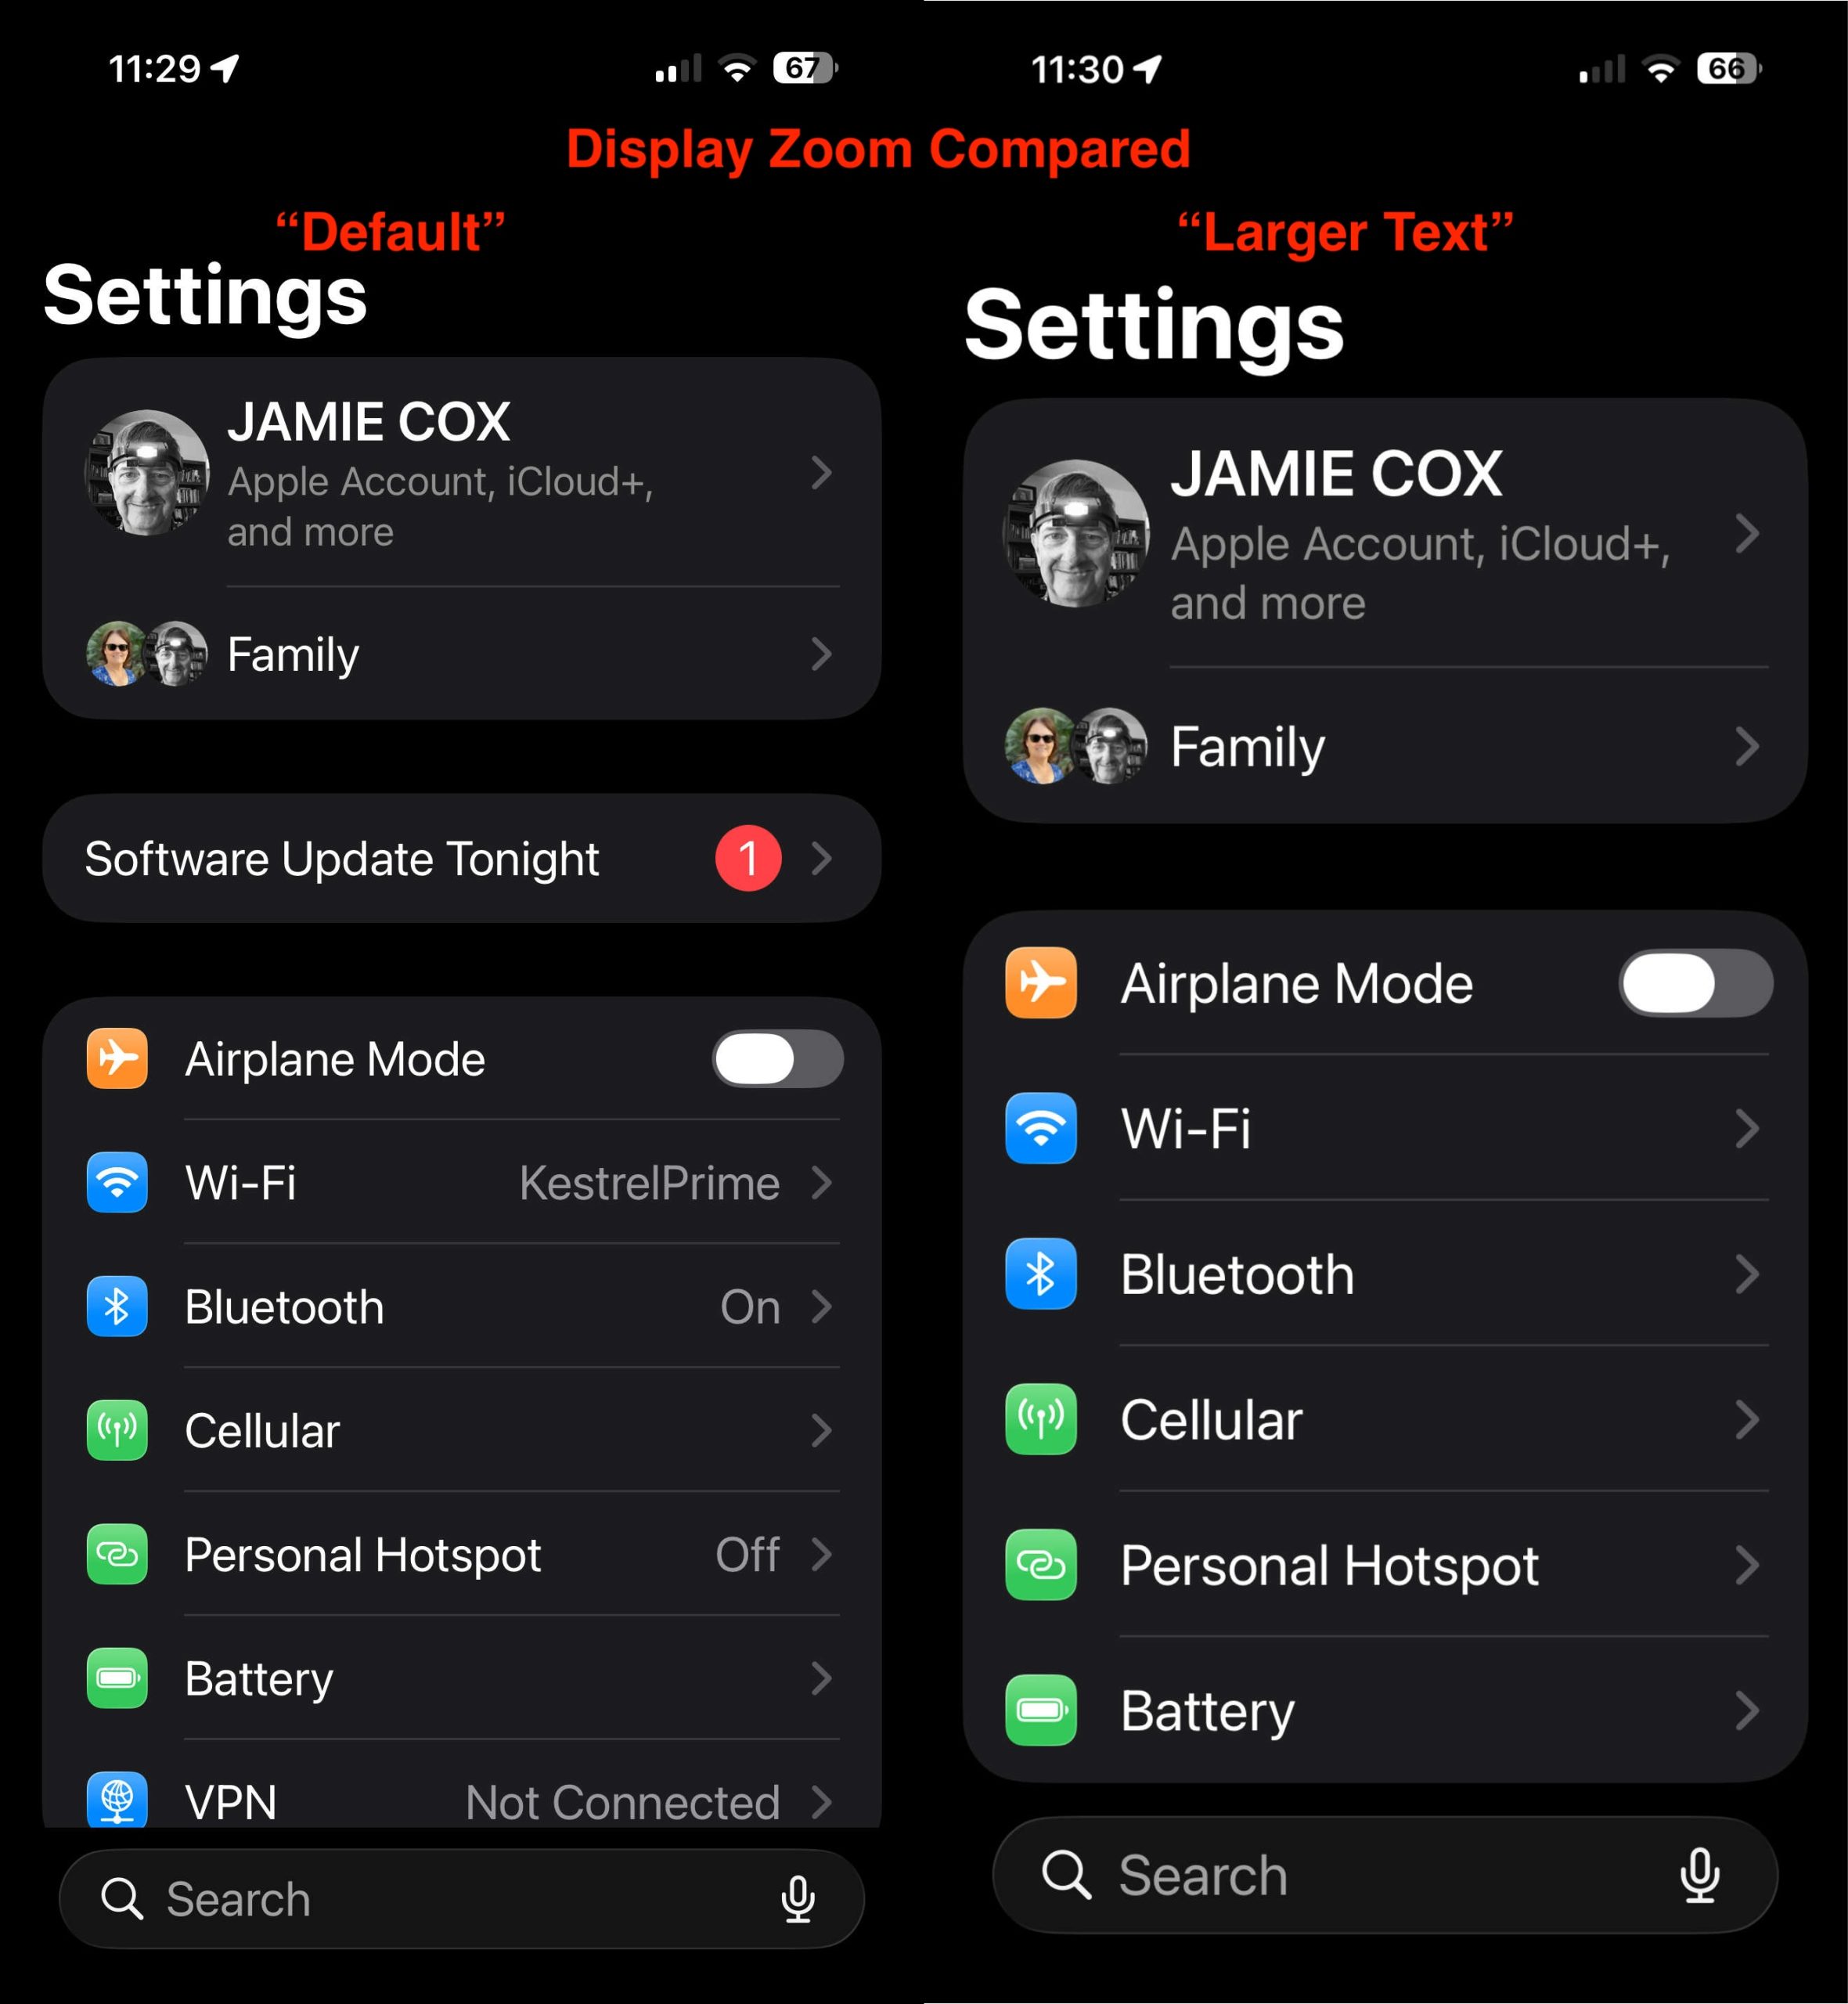
Above is a side-by-side comparison of the settings screen with Display Zoom set to “Default” text (Left), and “Larger Text” setting on the right.

MacOS Display Resolution

Display Zoom on iOS is similar to the long-standing Display Resolution setting on MacOS. Found under Settings->Displays, this option makes everything on your Mac screen larger or smaller. If you have more than one monitor, you will have to make separate adjustments for each.
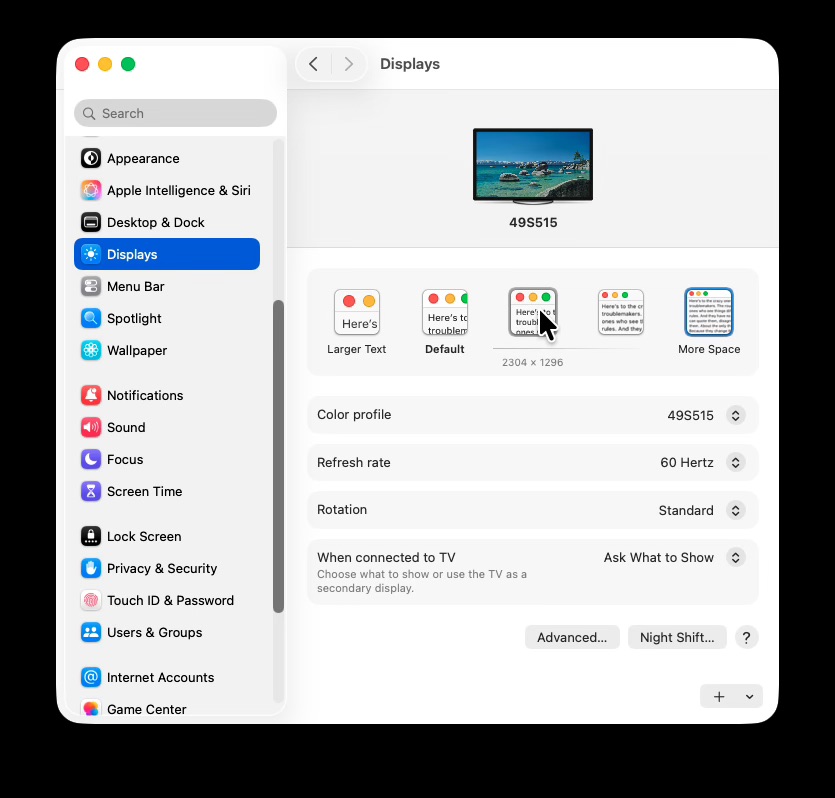
When you hover your mouse over the display size options, you will see the pixel dimensions displayed for that choice. Depending on your monitor setup, you may find some of those scaling options don’t look so great.

Again, one of the options is labelled “Larger Text”, but it make everything larger — not just text.

Bonus Tip – Use Keyboard with iPhone or iPad

Many people may have never thought of using a keyboard with their iPhone. You can connect a USB or Bluetooth keyboard to your iPhone or iPad.
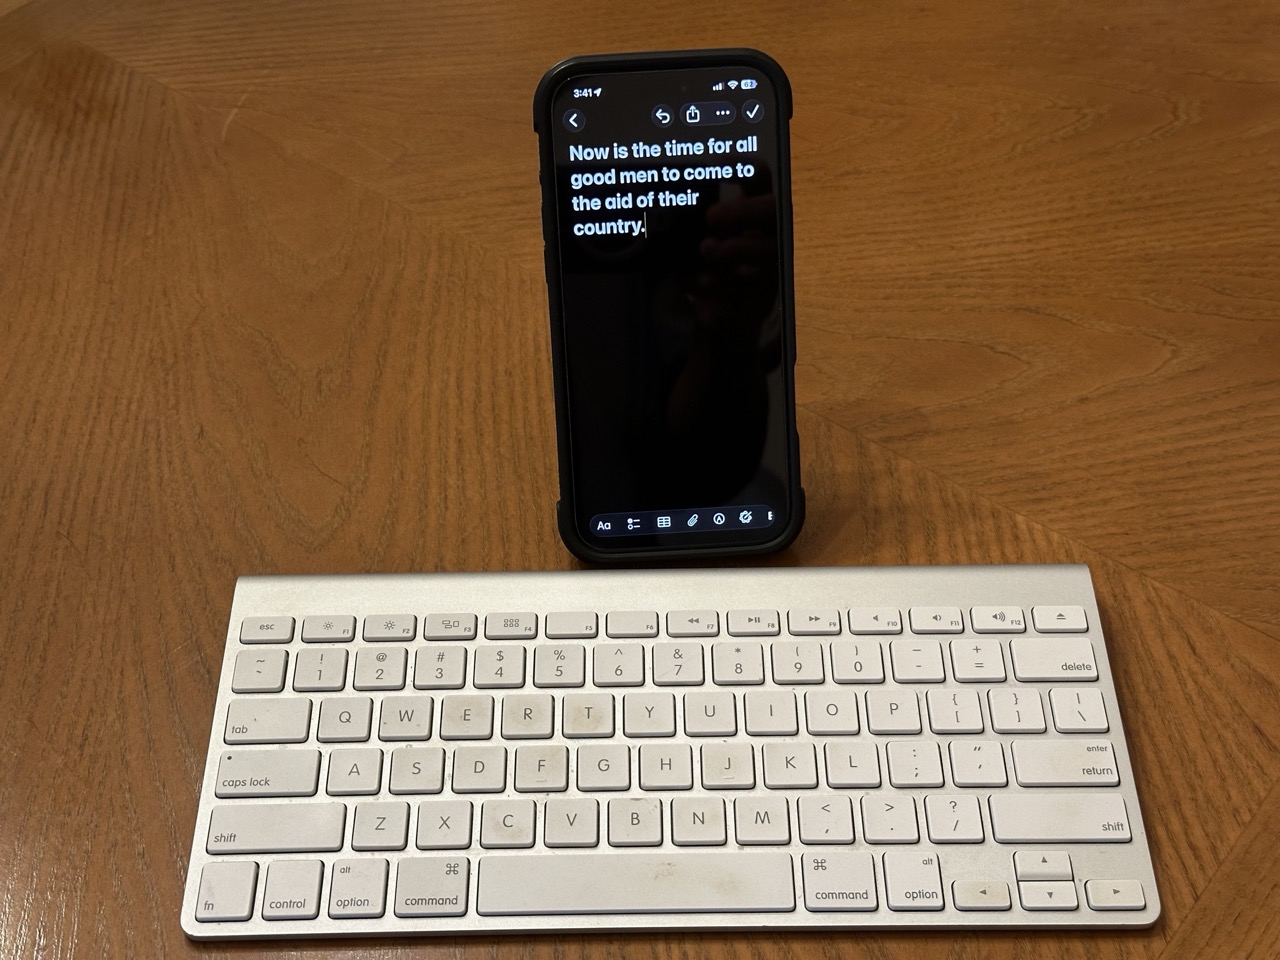
If you have a spare keyboard around, you may be able to save a lot of frustration typing on the tiny iPhone on-screen keyboard. Besides typing text, the keyboard can operate many of the functions of your iPhone. I was able to change brightness & sound volume, switch between Apps, navigate the home screen, take a screenshot and similar actions using only the keyboard.

Like many features on iPhone, you can dig deeper into Accessibility settings to find even more functionality. This article goes into extreme detail of all the buttons and functions that can be performed using a keyboard with iPhone.
Apple: The First 50 Years by David Pogue

This is a big colorful book by long-time tech and Apple author and commentator David Pogue. It covers, in mostly chronological order, the history of Apple as a company, and the evolution of Apple products.

Apple has had an outsized influence on the design of computers, cell phones and other electronic devices, and this book really makes you understand and remember that.

There was one page early on in the book, talking about the Apple I, where a lot of things went wrong. The text confused kilobytes with kilobits (KB vs Kb, the case matters!), RAM with ROM and bytes with kilobytes. The result was a page that made no sense to someone who was knowledgeable about computers.

Fortunately, I didn’t see any glaring errors on the other 600 pages, which I enjoyed tremendously.

There are a number of interesting and funny stories in the book, many that I hadn’t heard before.

Of course, there is the big story arc of Steve Jobs founding Apple, leaving, and eventually coming back to save the company from near disaster. I really hadn’t appreciated how dire the situation was at Apple in the 1990s until reading this book.

I was especially interested in a lot of the history of how our devices came to be the way they are. All laptop computers used to have the keyboard at the very front edge. Now, none of them do. How did that happen?

Computers didn’t have USB ports until Apple introduced them. Computers had floppy drives and CD drives until Apple removed them.

This is overall a great book for Apple fans.

Full disclosure: MacMAD received a review copy of this book.

Referral Codes

Some Handy Referral Codes

US Mobile ($25 off)

If you are shopping for phone plans, here’s my referral code for US Mobile. I like their service. They are much cheaper than the big boys, but use the same networks, and they do have a plan that supports a cellular Apple Watch.


Mint Mobile

I also like Mint Mobile cell service. They have different plans, and are usually the cheapest.

For a limited time use my wife’s referral link to get $15 off any 3-month plan with code 15NOW at checkout, plus $15 in renewal credit to use later. Terms apply.

Tesla

Tesla is arguably the Apple of automobiles. When buying your first Tesla, my referral link can get you $500 to $1000 off. Terms apply.

Proton Mail

Proton mail is the most privacy-focused email provider I know. They also feature a password manager and a VPN service. Get a two-week free trial with my referral link.

Using FaceTime on Apple TV

January 2026

Interested in having a FaceTime chat on the big screen? It seems like a good idea to sit in your living room and see your contacts big as life on your TV. However, your Apple TV doesn’t have a camera or a microphone, which are necessary for FaceTime.

Apple has addressed that problem with a feature called Continuity Camera, in which your iPhone’s camera and microphone can be used to extend the capability of your Apple TV.

As usual, there are certain provisos. Your devices must be running recent versions of iOS & TV OS. Operating systems must be at least iOS 17 and tvOS 17. Your devices must be connected to the same network and same Apple ID, yada yada. Your mileage may vary.

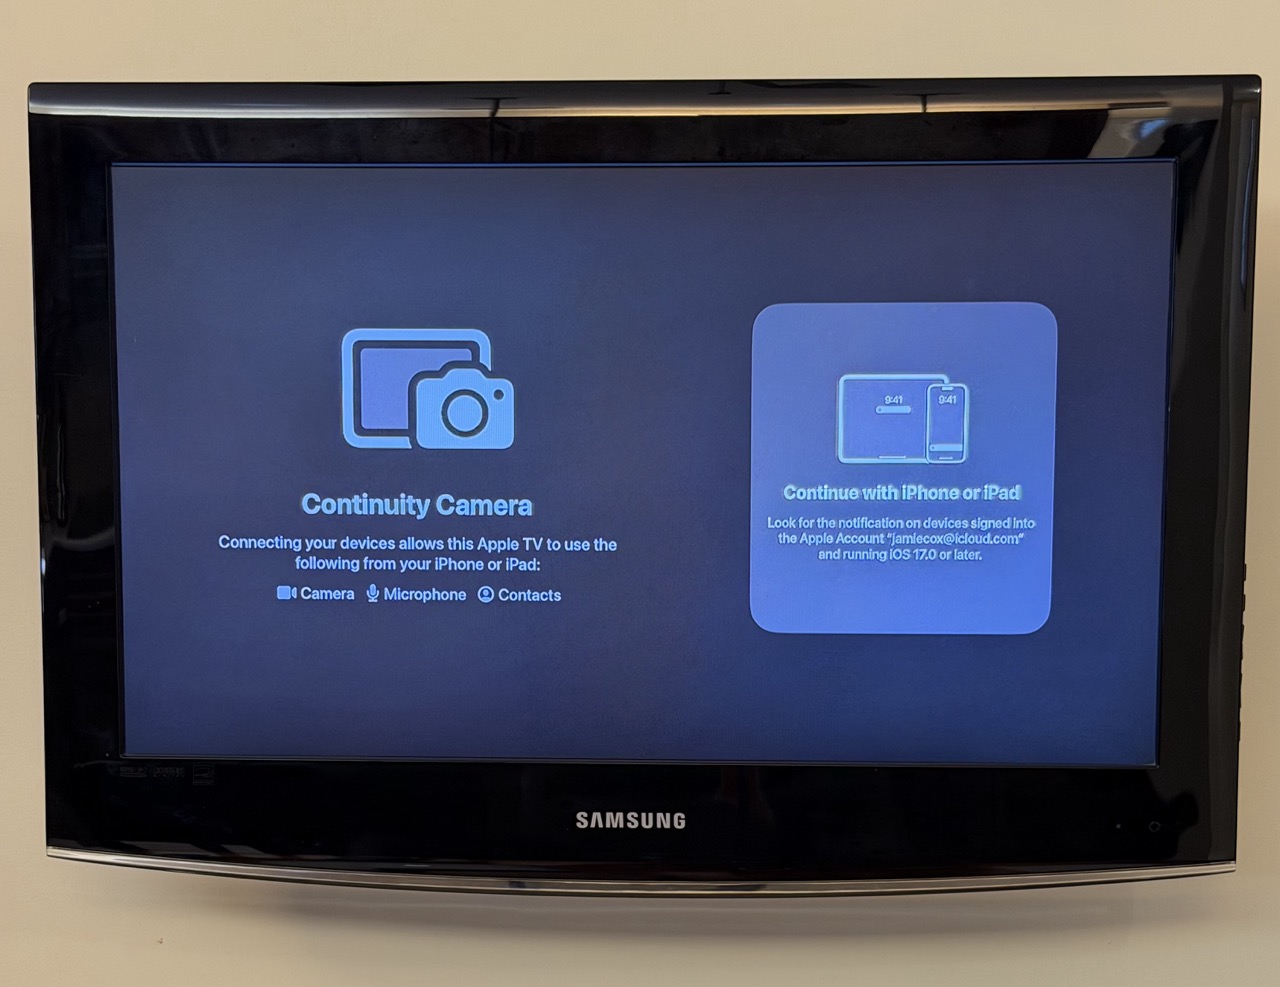
Once you open the FaceTime app on your Apple TV, you’ll see a chance to connect with your iPhone (or iPad).

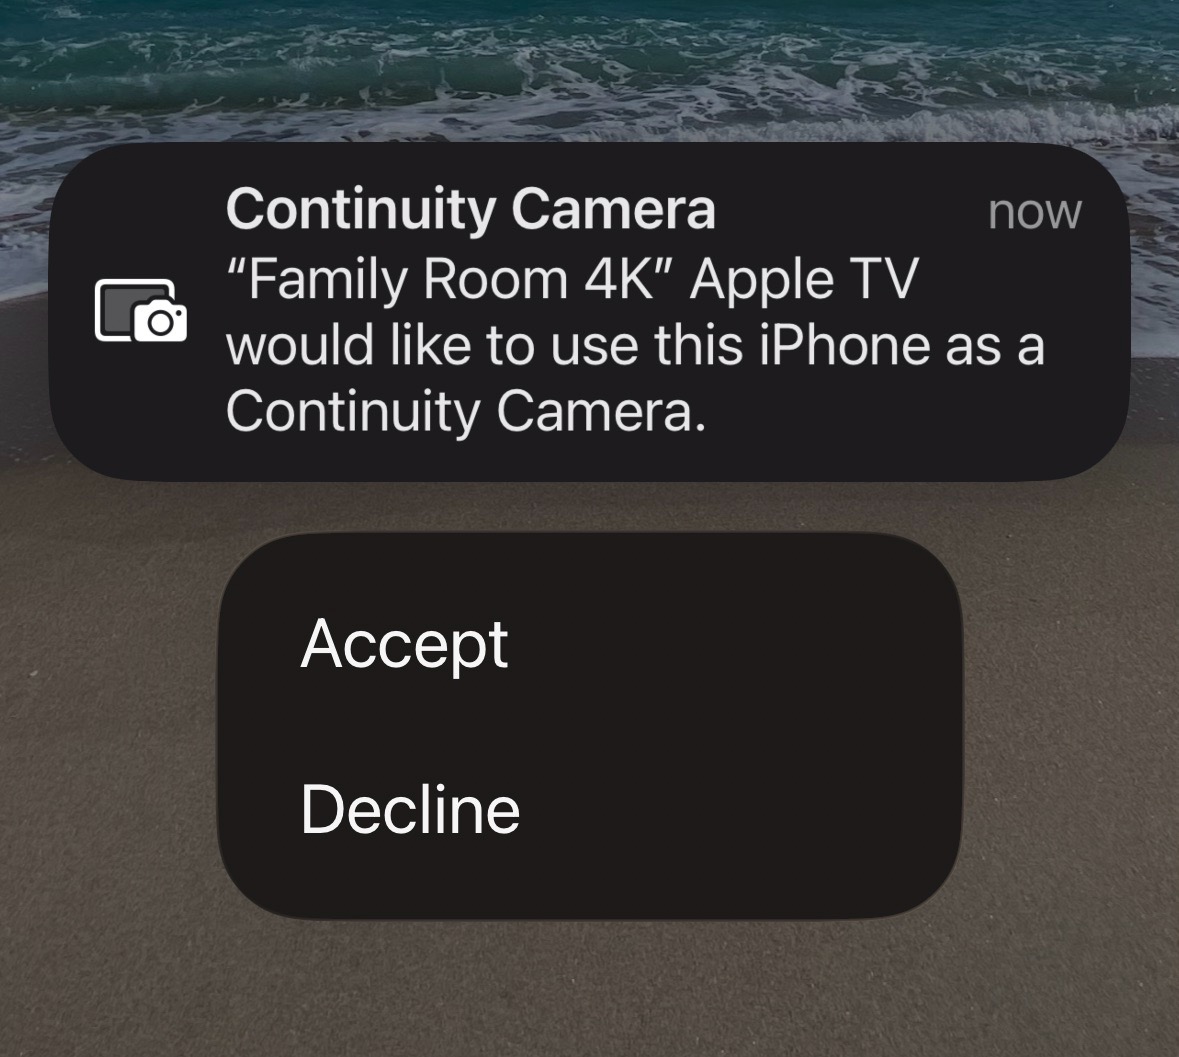
The screen below shows what pops up on your iPhone.

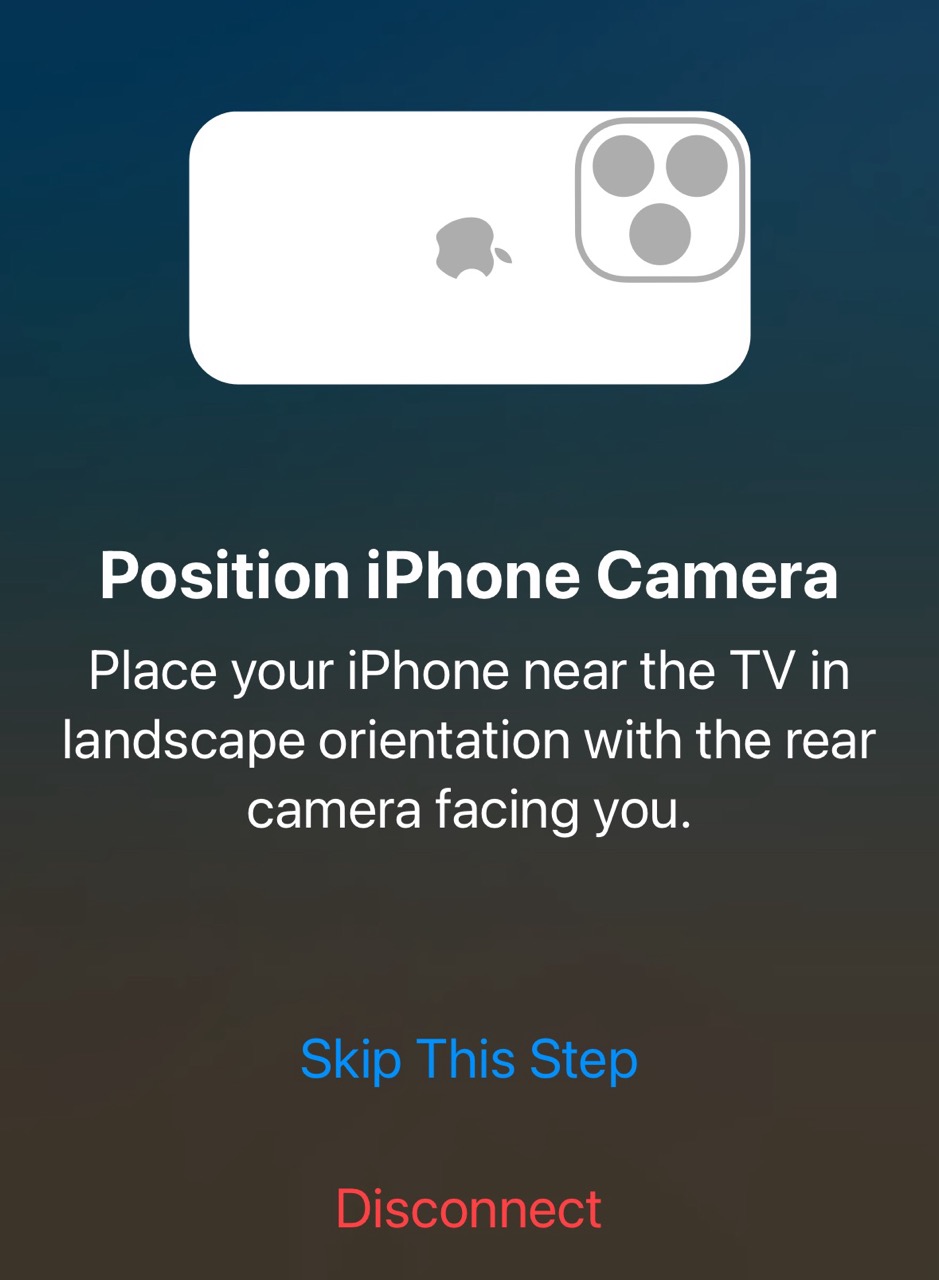
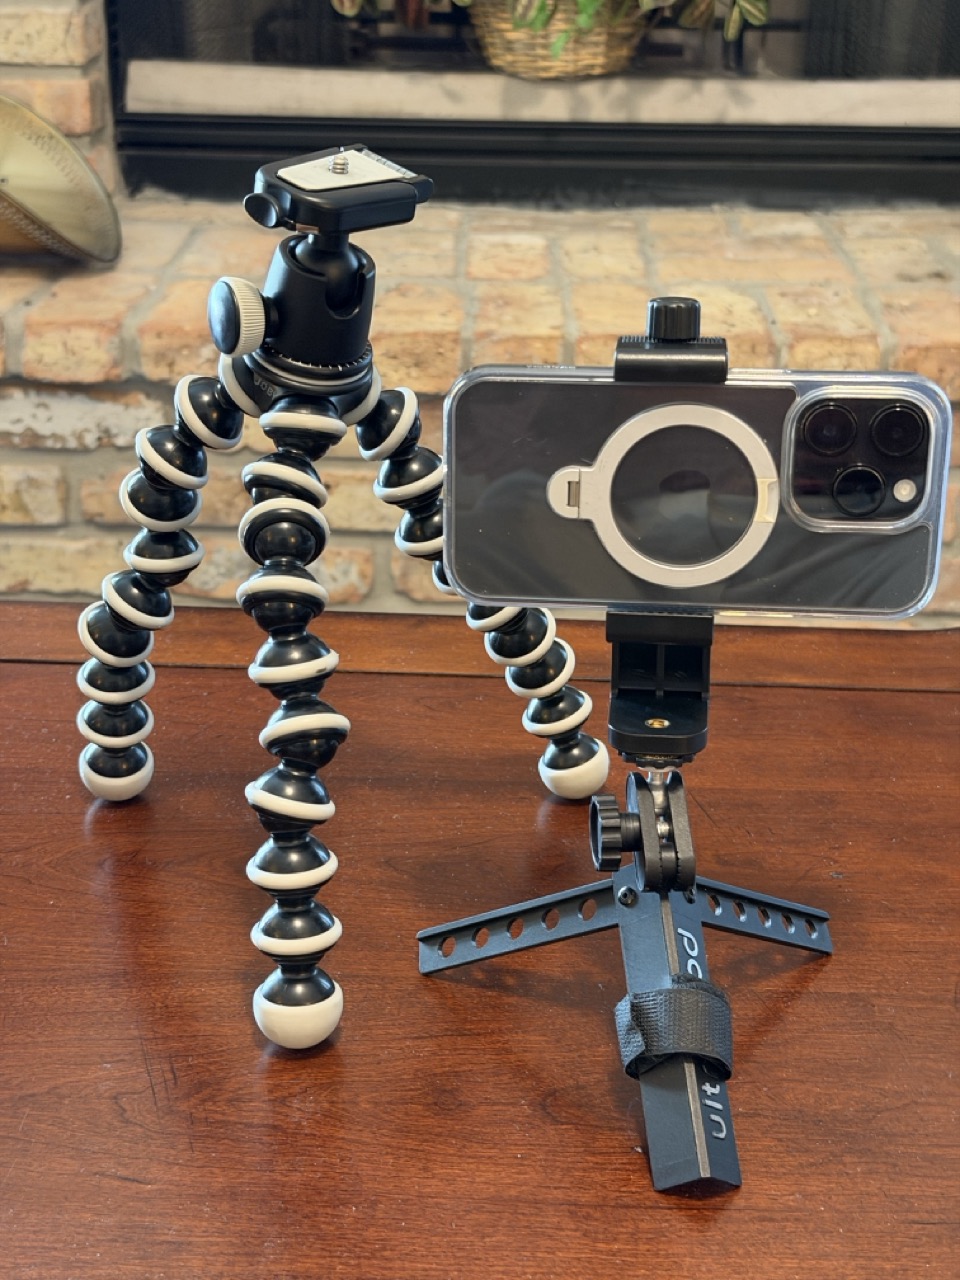
Once you accept, you’ll get the prompt below to position your iPhone camera appropriately for use by FaceTime. This is potentially the hardest part. It’s difficult to get your phone propped up in the right position unless you have some sort of mount or tripod.

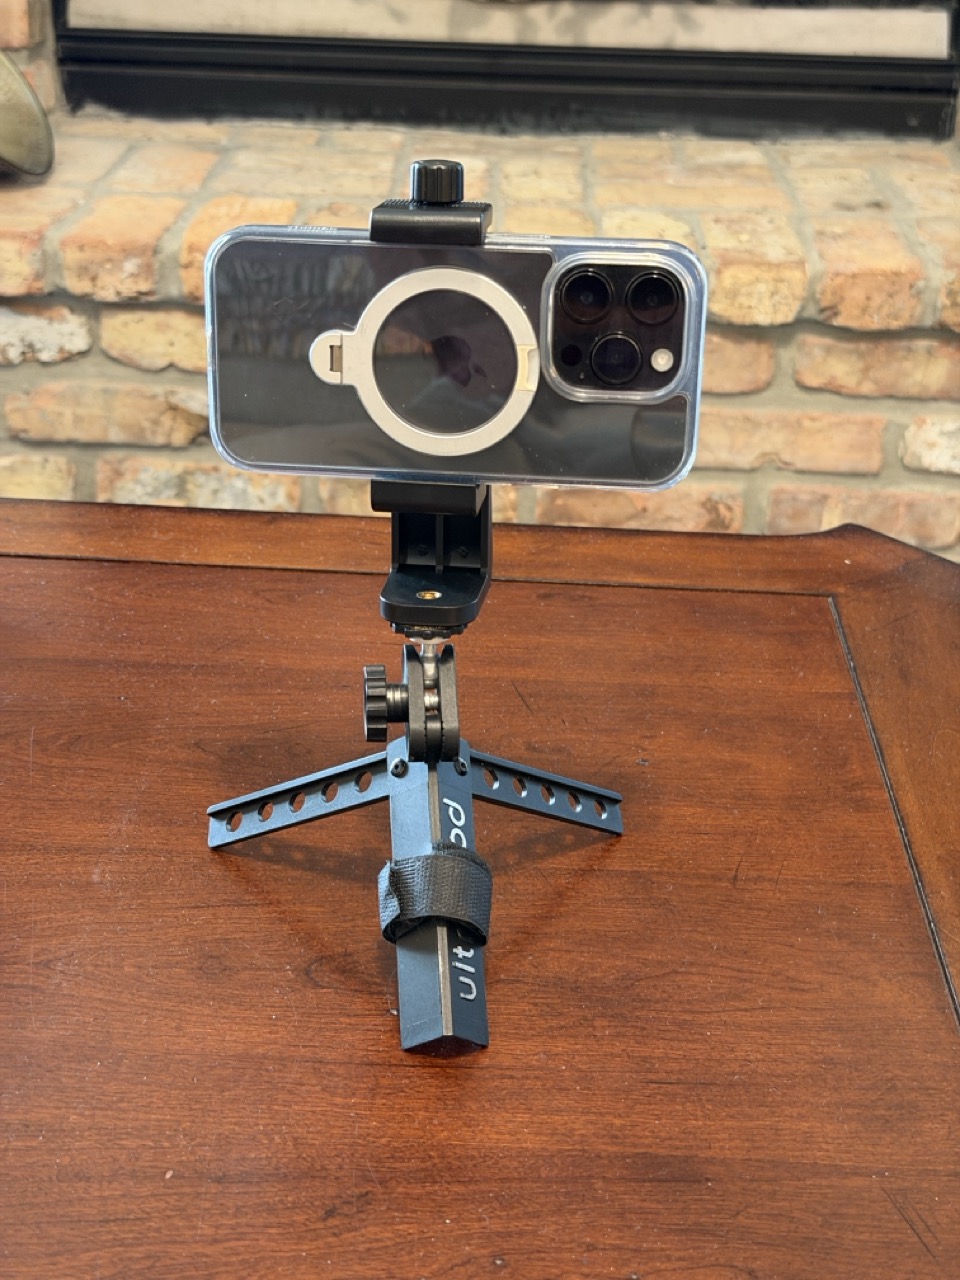
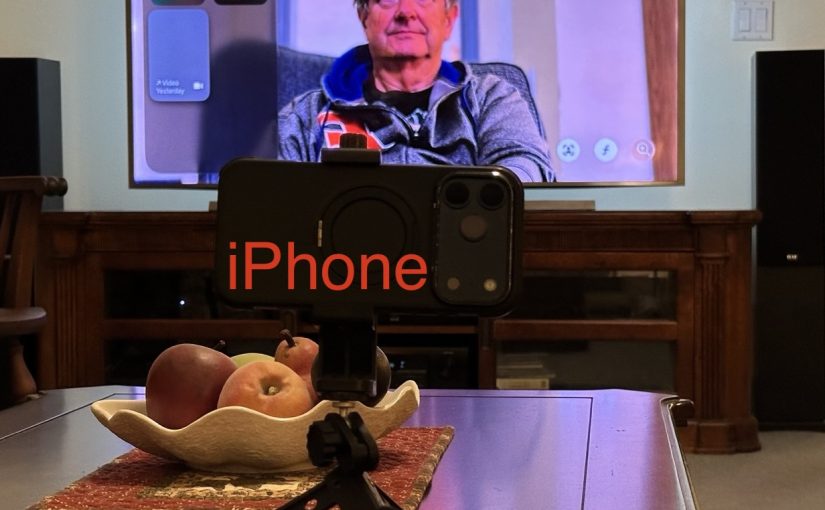
Below is my phone mount on a mini tripod. The tripod had a ball-swivel head, which is what you want to get the camera pointed in the correct direction. This product on Amazon seems to be a very similar setup.

Once you have your phone mounted, you’re ready to FaceTime. Below is what it looks like in a FaceTime call. Since my chair is pretty far from the TV, I placed the iPhone camera on a table closer to me to capture a better image.

Versions of the iPhone from iPhone 11 on, will use a feature called Center Stage, to automatically keep the camera image centered on you, even if you move around a bit.

Problems, etc.

The above is the best-case scenario where everything works as expected.

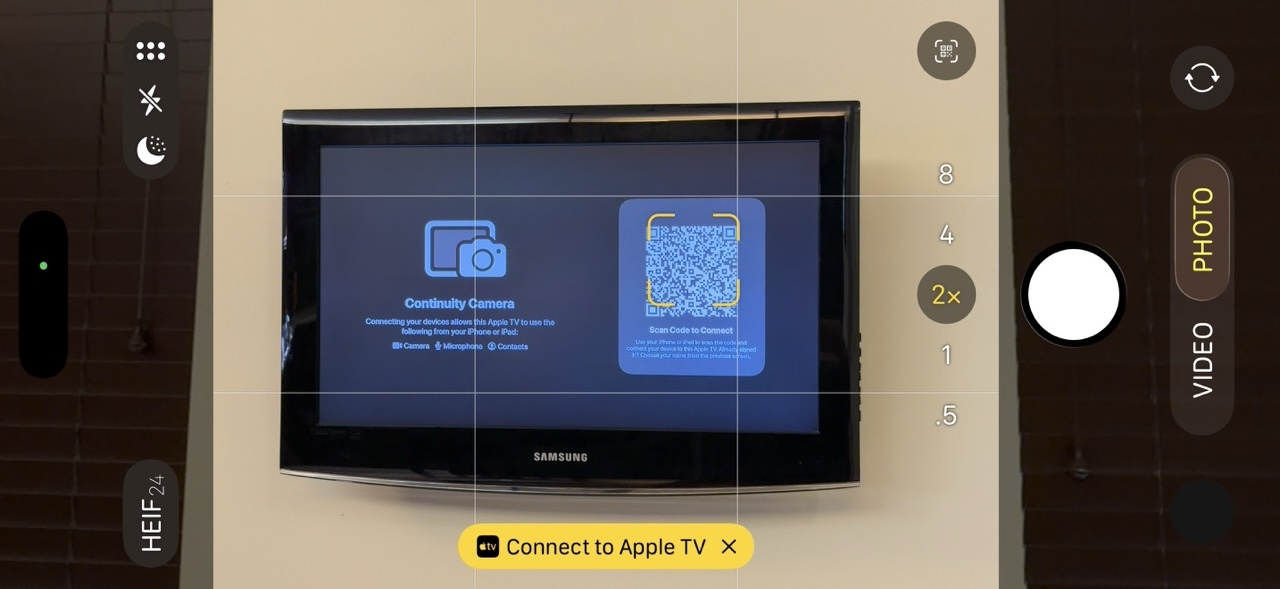
If your phone isn’t on the same iCloud account as the Apple TV, you are guided to scan a QR code to connect. Frankly, I was never able to get that scenario to work.

Error messages I got:

“There was a problem loading your recent calls. You may need to restart your iOS device or Apple TV.”

“To continue, go to FaceTime Settings on your iOS device, then sign in to your Apple Account.” (I was already signed in and didn’t see any sign-in option in the FaceTime Settings.)

Other Tripods

Your setup might work better with a full-sized camera tripod, or something in between, like this Gorilla Pod.

FaceTime with Apple TV is a cool feature, but it does require some patience to get it set up the first time. Enjoy.

Scan with Continuity Camera

January 2026 Meeting Topic

You can use your iPhone to scan paper documents into the Preview App on your Mac. This is a really convenient way to get documents into a PDF file so that you can email them, etc.

You can scan either into a new, blank document, or an existing PDF document, in which case your scans become new pages in that document.

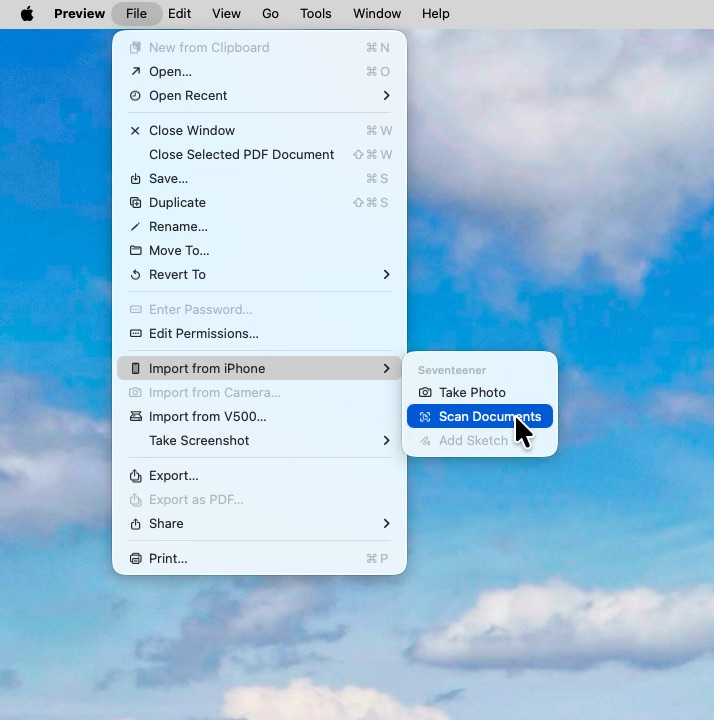
In the Preview App, select File->Import from Phone->Scan Documents.

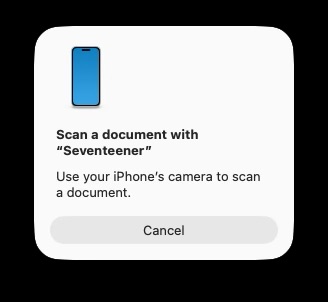
You’ll then see this prompt on the Mac.

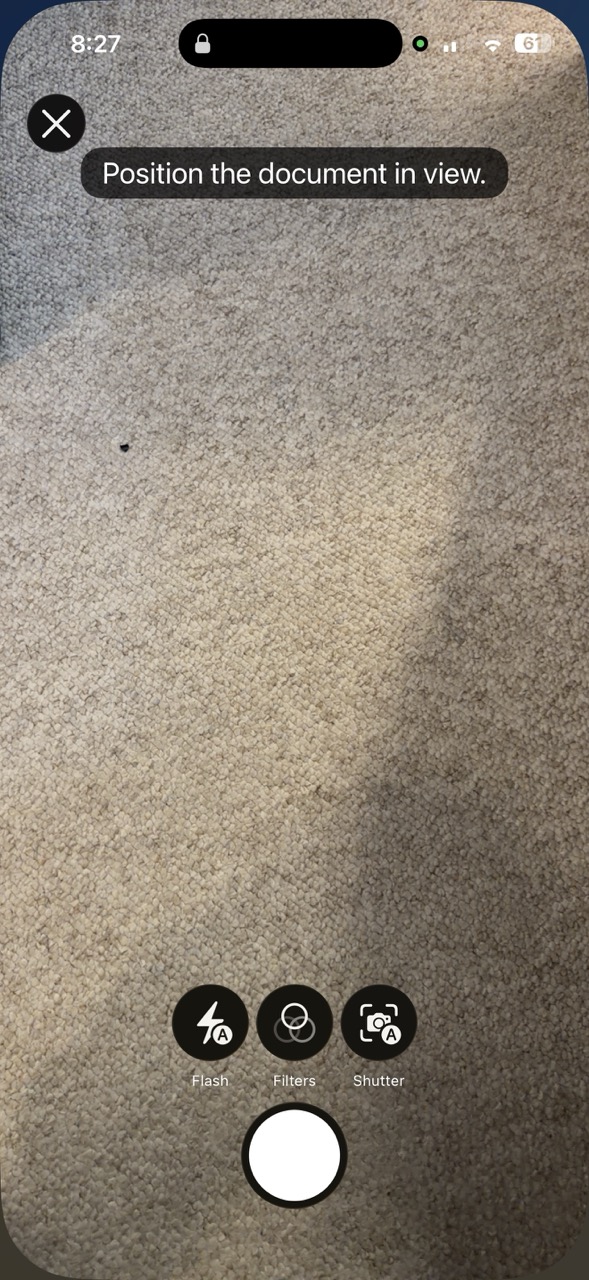
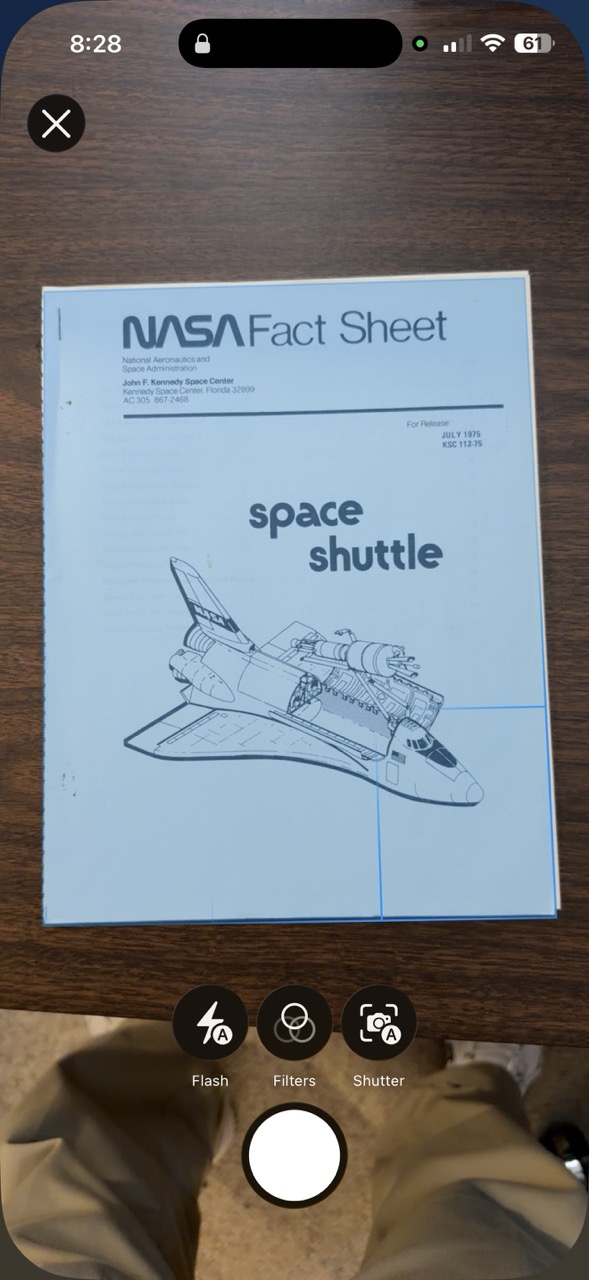
Your iPhone will automatically open the camera app as show below.

The iPhone automatically finds the document in the camera view and captures the scan when the image is in view and stable. You don’t need to press the shutter button. The automatic shutter can be a bit disconcerting if you are not used to it. If you want to turn it off, the button marked “shutter” will disable the auto-shutter, and you can then take each scan manually.

You will have the option to scan multiple pages. There will be a check mark at the upper right. Tap that when you have scanned the last page.

The pages will then automatically appear in Preview on your Mac.

This is very easy and nearly foolproof. Your devices need to be on the same iCloud account, and up-to-date with software, iOS 18 or greater, and MacOS 18 or greater.

Screen Sharing with FaceTime

January 2026 Meeting Topic

Screen sharing with FaceTime can be a great tool for helping or collaborating over the Internet. It allows two-way (or multi-way) audio and/or video chats. It also allows you to view or control someone else’s screen (with permission). If you ever need to help someone who doesn’t live with you this is a great tool.

Prerequisites

FaceTime itself works on Macs, iPhones and iPads. You can do a FaceTime call to a Windows user also, but that mode doesn’t support screen sharing.

On Apple devices, both parties must have an Apple ID and be signed into that on those devices. Most Apple users do have an Apple ID, and their devices are usually signed in.

Your device must have a microphone. A camera is helpful. All iPhones, iPads, iMacs and Mac laptops have a camera and a microphone, but some desktop Macs do not have those built in. You can use FaceTime audio and screen sharing on a Mac with a microphone only but no camera. This is despite a message that says “To use FaceTime, connect a camera.

It seems weird that to do screen sharing (in either direction), you must have a microphone, but that’s the way it works at present.

If you try a FaceTime call without having a microphone, it may appear to work at first, but when the other party answers, you’ll get “Call Failed“.

FaceTime screen sharing requires iOS 18 or newer on iPhone, and iPad OS 18 or newer on iPads.

Messages and FaceTime

You can launch a FaceTime call from within the Messages app. This is probably the most reliable way to get started with screen sharing.

By exchanging text messages with the other party, you are greasing the skids by making sure that you have their correct Apple ID contact information. You can also ask them if this is a good time for a FaceTime call, and ask them to start using their Mac instead of their iPhone, if you want to share the Mac screen. It’s usually easier to deal with screen sharing on a larger screen. But if you want to share an iPhone or iPad screen, that works too.

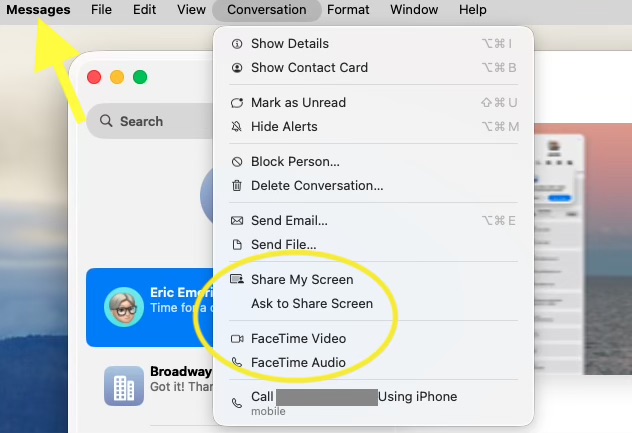
Once everybody is ready, and using the devices you want, you can start a FaceTime Audio or Video call from the Conversation menu in the Messages App.

Screen Sharing and Facetime options are in the Conversation Menu of the Messages App.

When you screen share from Messages, it actually begins a FaceTime call. The recipient than has to answer that call before the system will ask for screen sharing permission. If asked to share your screen, you can accept, decline, or choose to share only a particular window.

In the example below, screen sharing is in progress. You see a FaceTime window above, and a shared Safari window below. The local user is sharing their screen with the remote user. Screen Sharing controls are visible at the top of the screen, and at the top of the shared window.

When screen sharing on the Mac, you can choose to share your entire screen or a specific window. Sharing only a specific window is good for privacy, but also as a practical matter, reduces the screen real estate occupied on the receivers screen, showing only the relevant information. This is especially important when the sending system has a larger screen than the receiving system. There’s little point sharing your 4K Mac screen to an iPhone. It would appear tiny.

FaceTime on iPad/iPhone

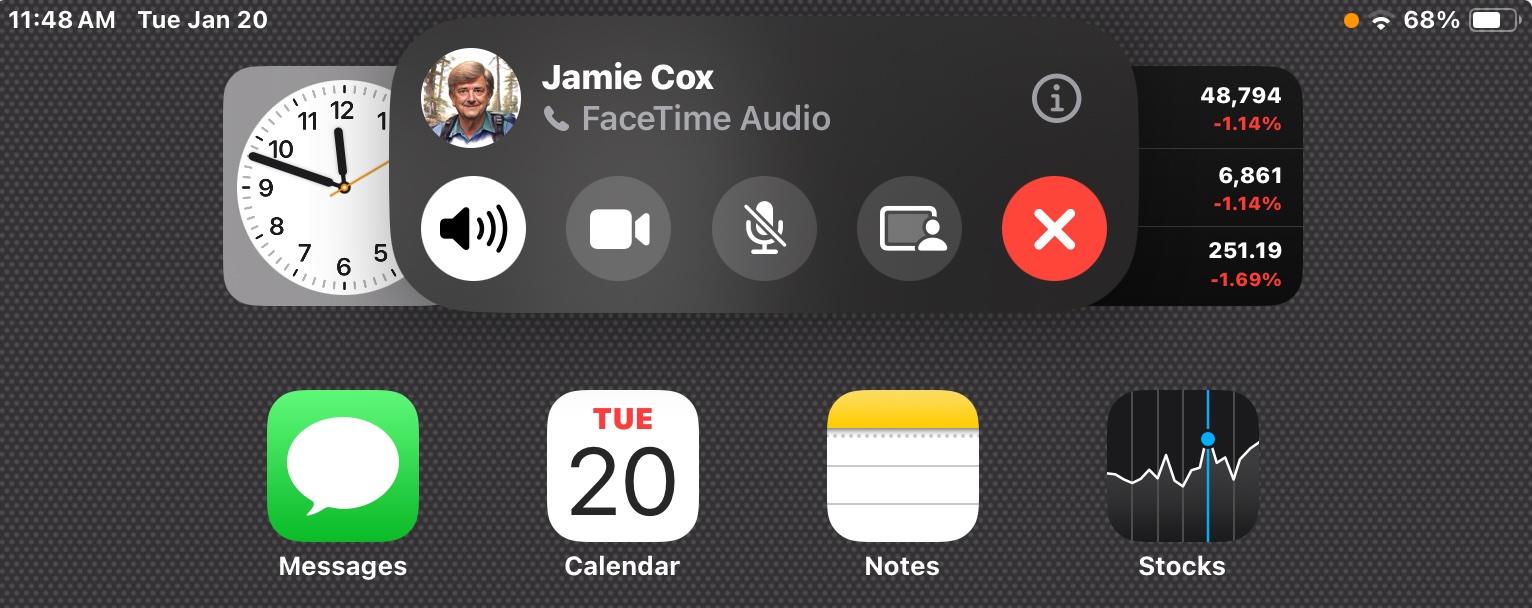
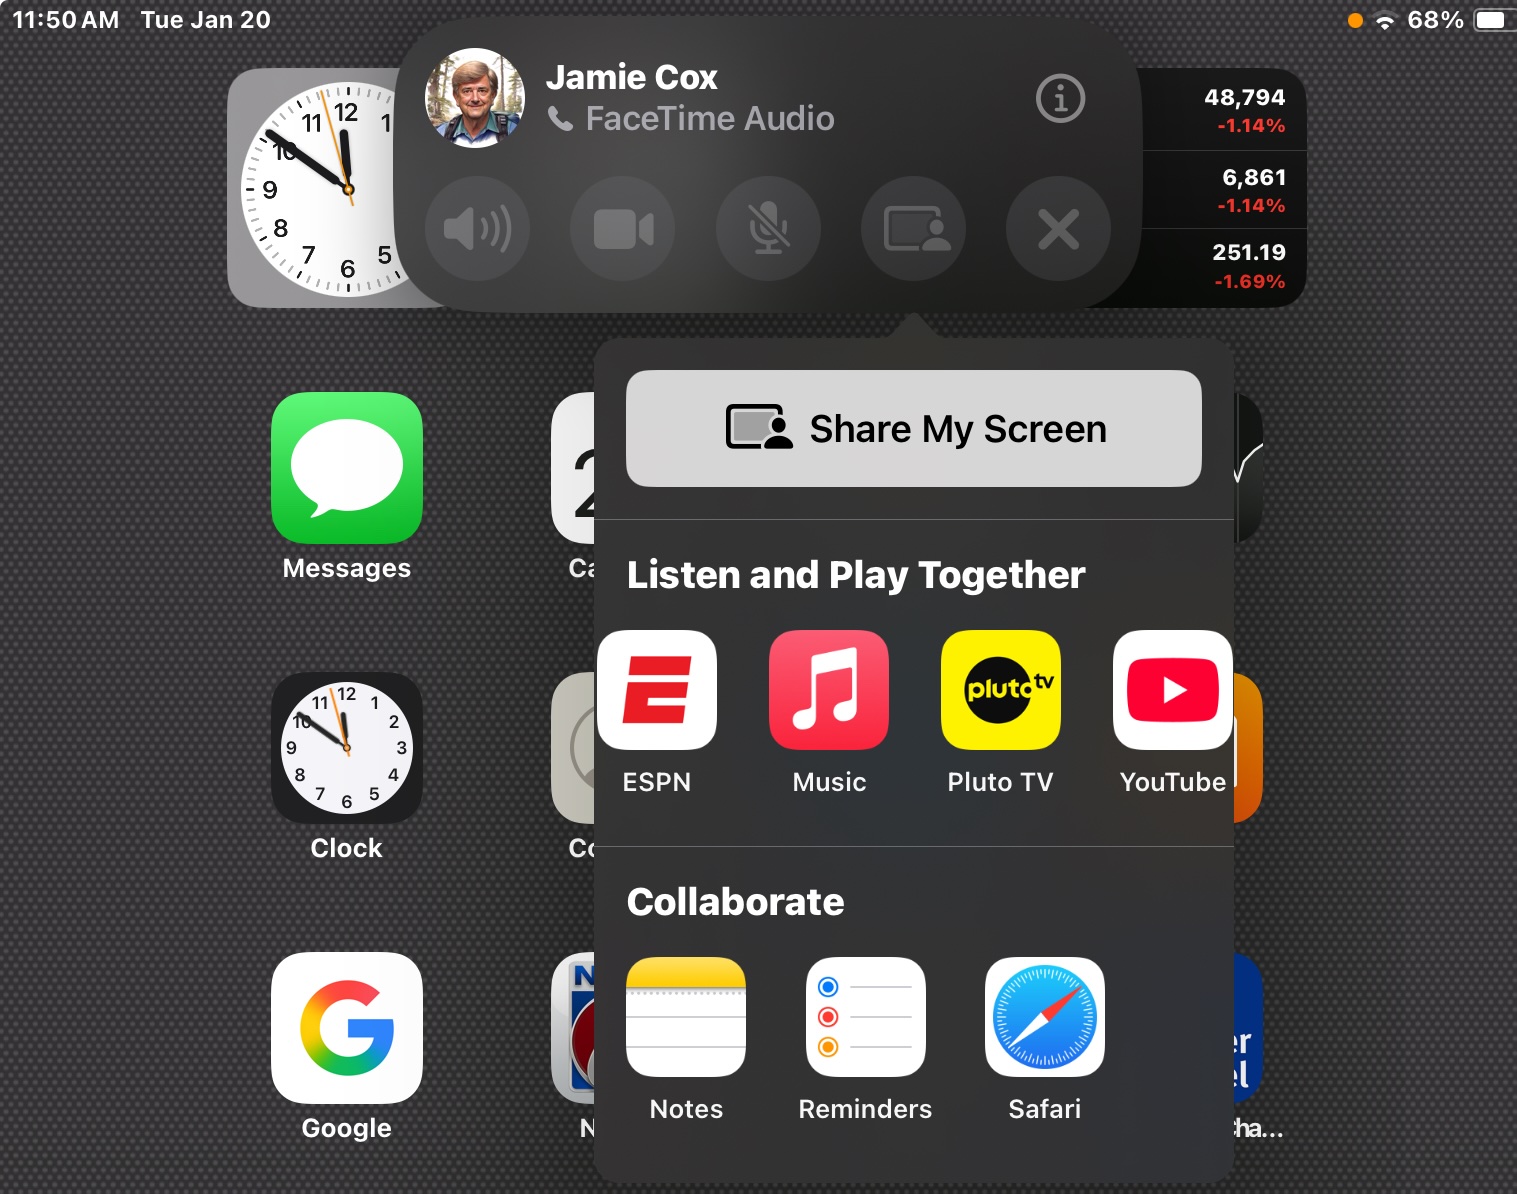
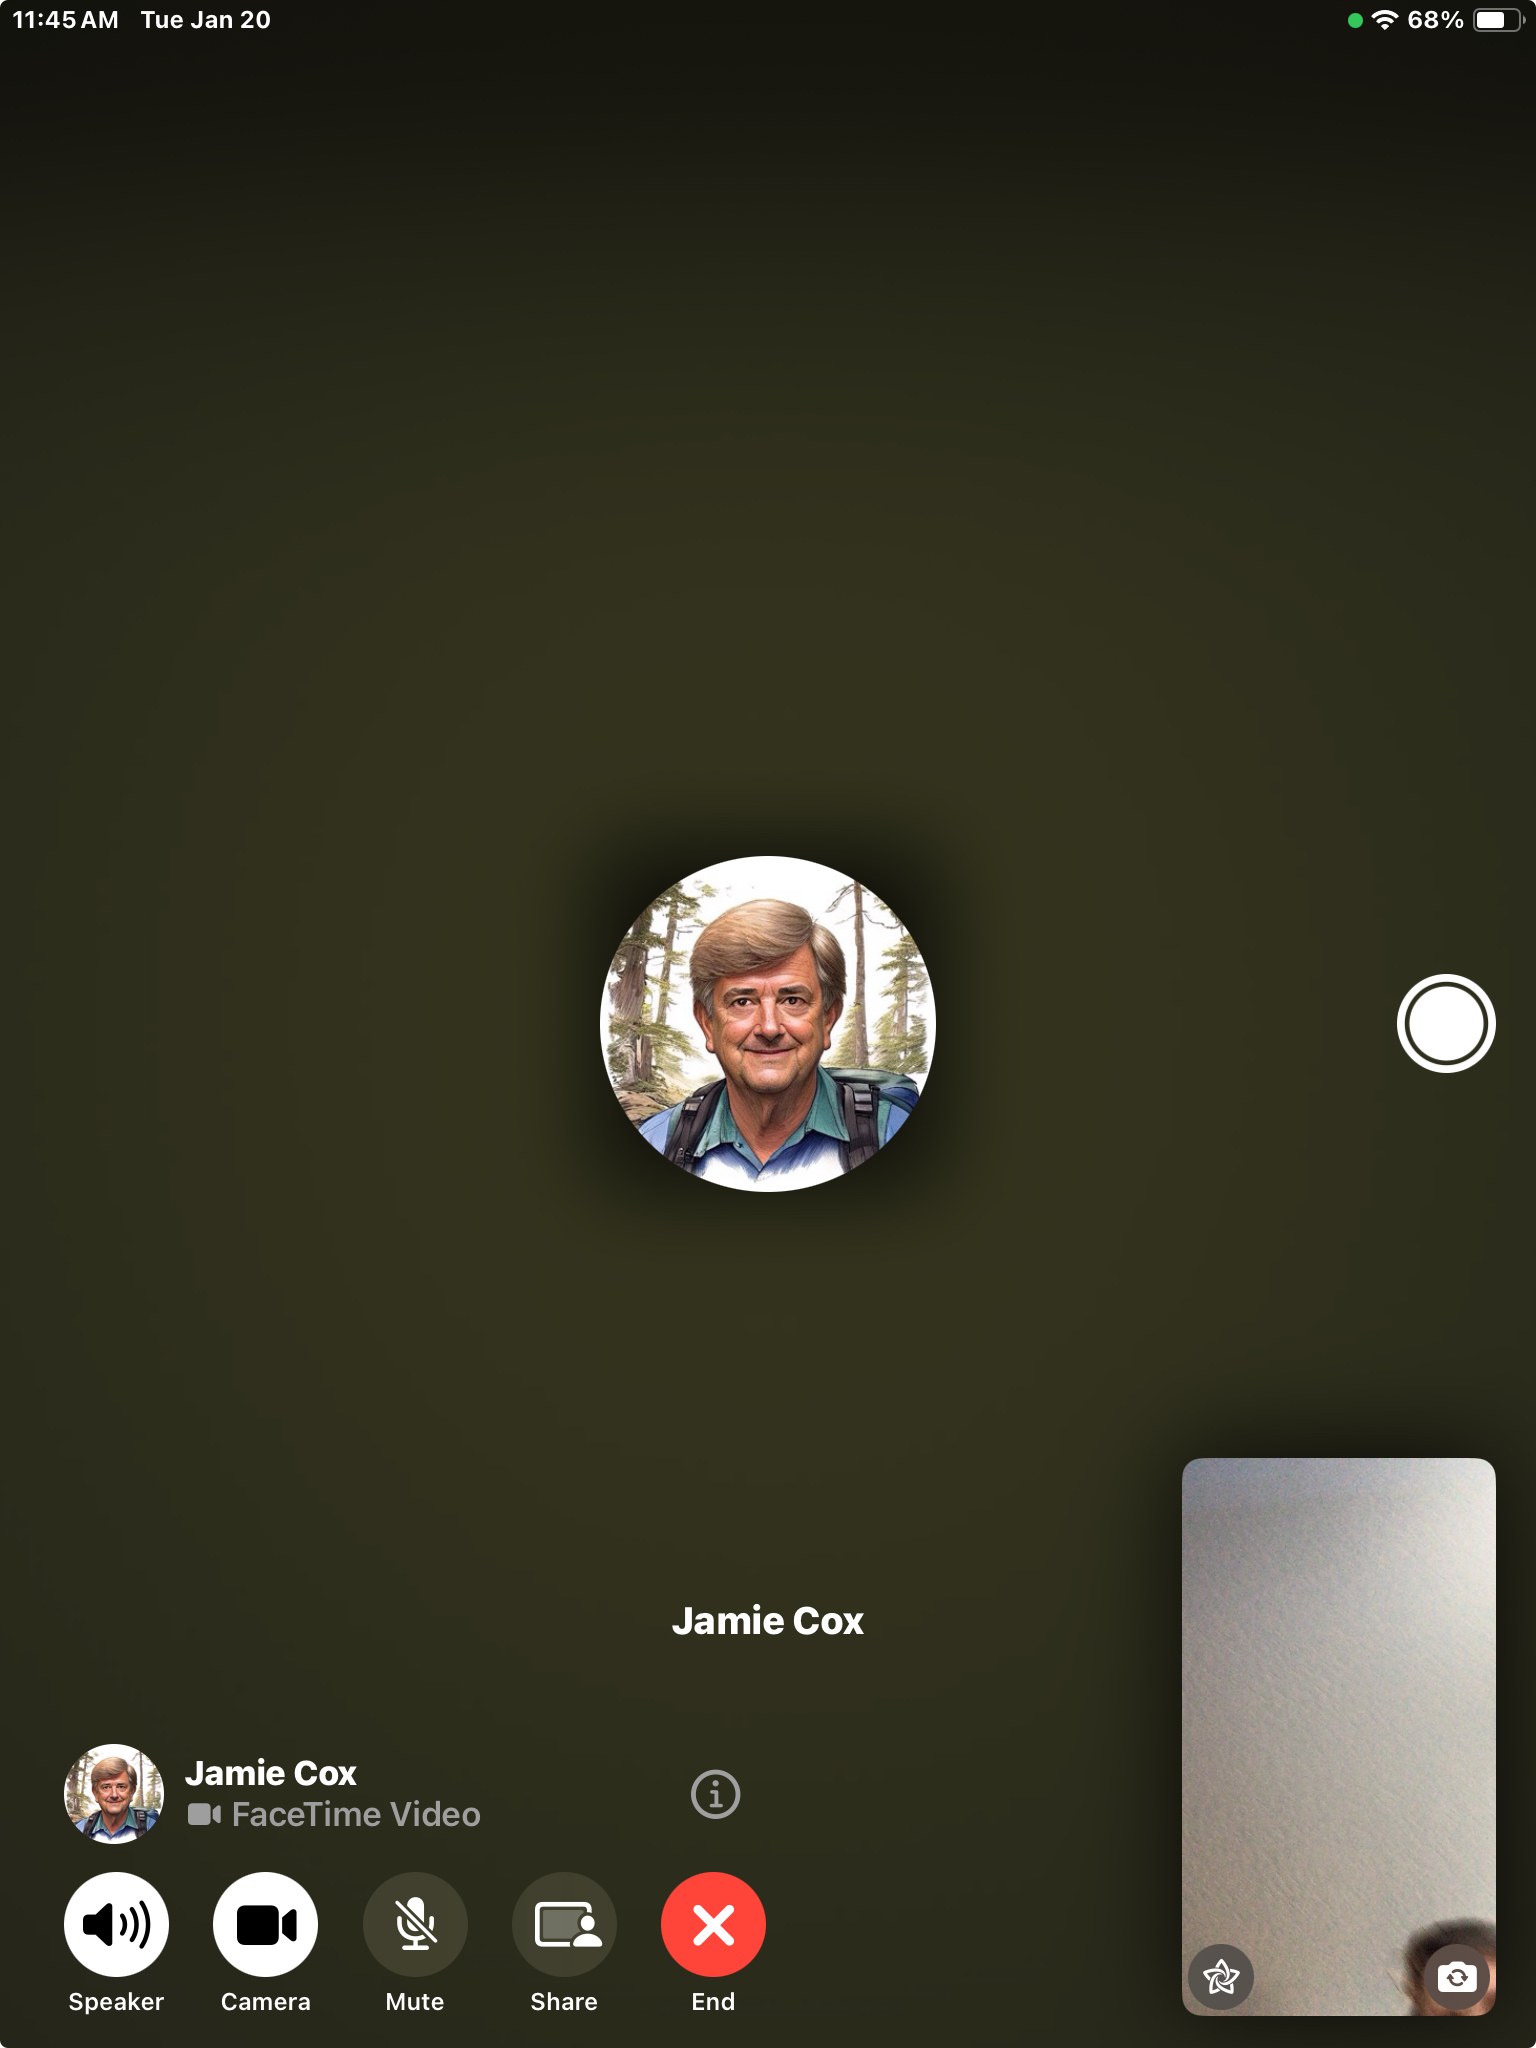
Here’s the FaceTime controls on an iPad. The red X hangs up the call. To the left of that is the screen sharing icon. Pressing that brings up the menu below, where you will want to press Share My Screen.

If you don’t see the screen sharing icon, try switching to a video call, even if both parties don’t have cameras. This sometimes makes the sharing icon appear.

Here’s what a FaceTime Video call looks like on an iPad. In this case, the other device did not have a camera. Note the small green dot at upper right. This is the universal indicator that some App is using your camera. If it appears yellow, that means an App is using your microphone. The region at lower right contains your own camera feed. (from this iPad)

Note that for iOS/iPadOS version 17, Screen Sharing is supported, but not remote control.

Microphones for Macs

If your Mac doesn’t have a microphone, you can use just about any USB microphone. Many are available. If you have a Mac Mini, be aware that it does have built-in speakers, although they are pretty weak. You will want your microphone cord long enough to get it away from the speakers and closer to you.

A great substitute for a USB microphone is a Bluetooth headset or Air Pods. That is recognized as a microphone for FaceTime purposes, and works really well, providing noise isolation.

Air Pods are a great choice for a video or audio call even if your device has a built-in microphone.

Share Your Screen

So, now you are happily sharing your screen, or your caller’s screen. You can converse back and forth discussing and explaining what you both see on screen. This is what you came for. Enjoy!

Photos App – Store, Sync, Search & Share

Photos App Icon

MacMAD Meeting Topic for November 2025

Apple’s Photos App is deeply integrated into our daily use of our iPhones. At MacMAD, we get a lot of questions about photo storage, sync and general usage of the Photos App. So, this month we’re going to go over some of the common ones.

Here is the presentation in Keynote format.

Assistive Access – July 2025

Last night we talked about Assistive Access, a greatly simplified operating mode for iPhone and iPad. Here are links to Assistive Access info:

We’ve already gotten an important question on Assistive Access: How do I turn it off, and get out of Assistive Access? You can exit Assistive access by triple-clicking the side button (power button). This brings up the option to exit. You’ll need to enter the 4-digit assistive access code that you originally setup to exit back to your usual user interface.

Also, a question came up about converting a lot of photos. Here is the solution we showed in the meeting:

Turn Any macOS Folder into an Image Converter (Mac Rumors)

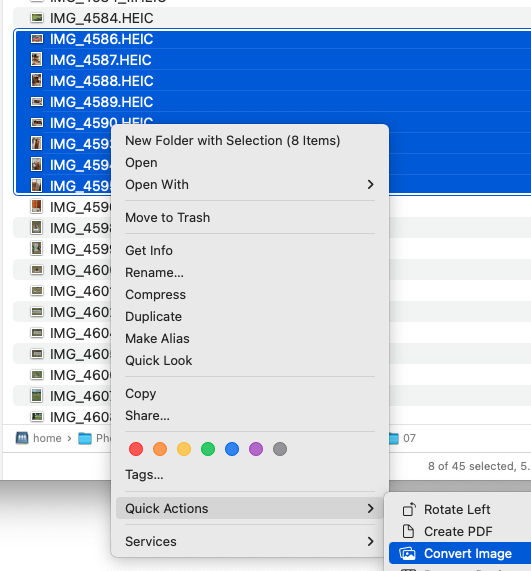
Also, the macOS Finder has a convenient way to convert multiple images at once. Select some files, then right-click, or Ctrl-click to bring up the contextual menu. Then go down to Quick Actions and select Convert Image. You will see options to convert to JPEG, etc.

Several people asked questions about photo albums in Photos on the iPhone. One tip that might help you make albums appear more prominantly for you:

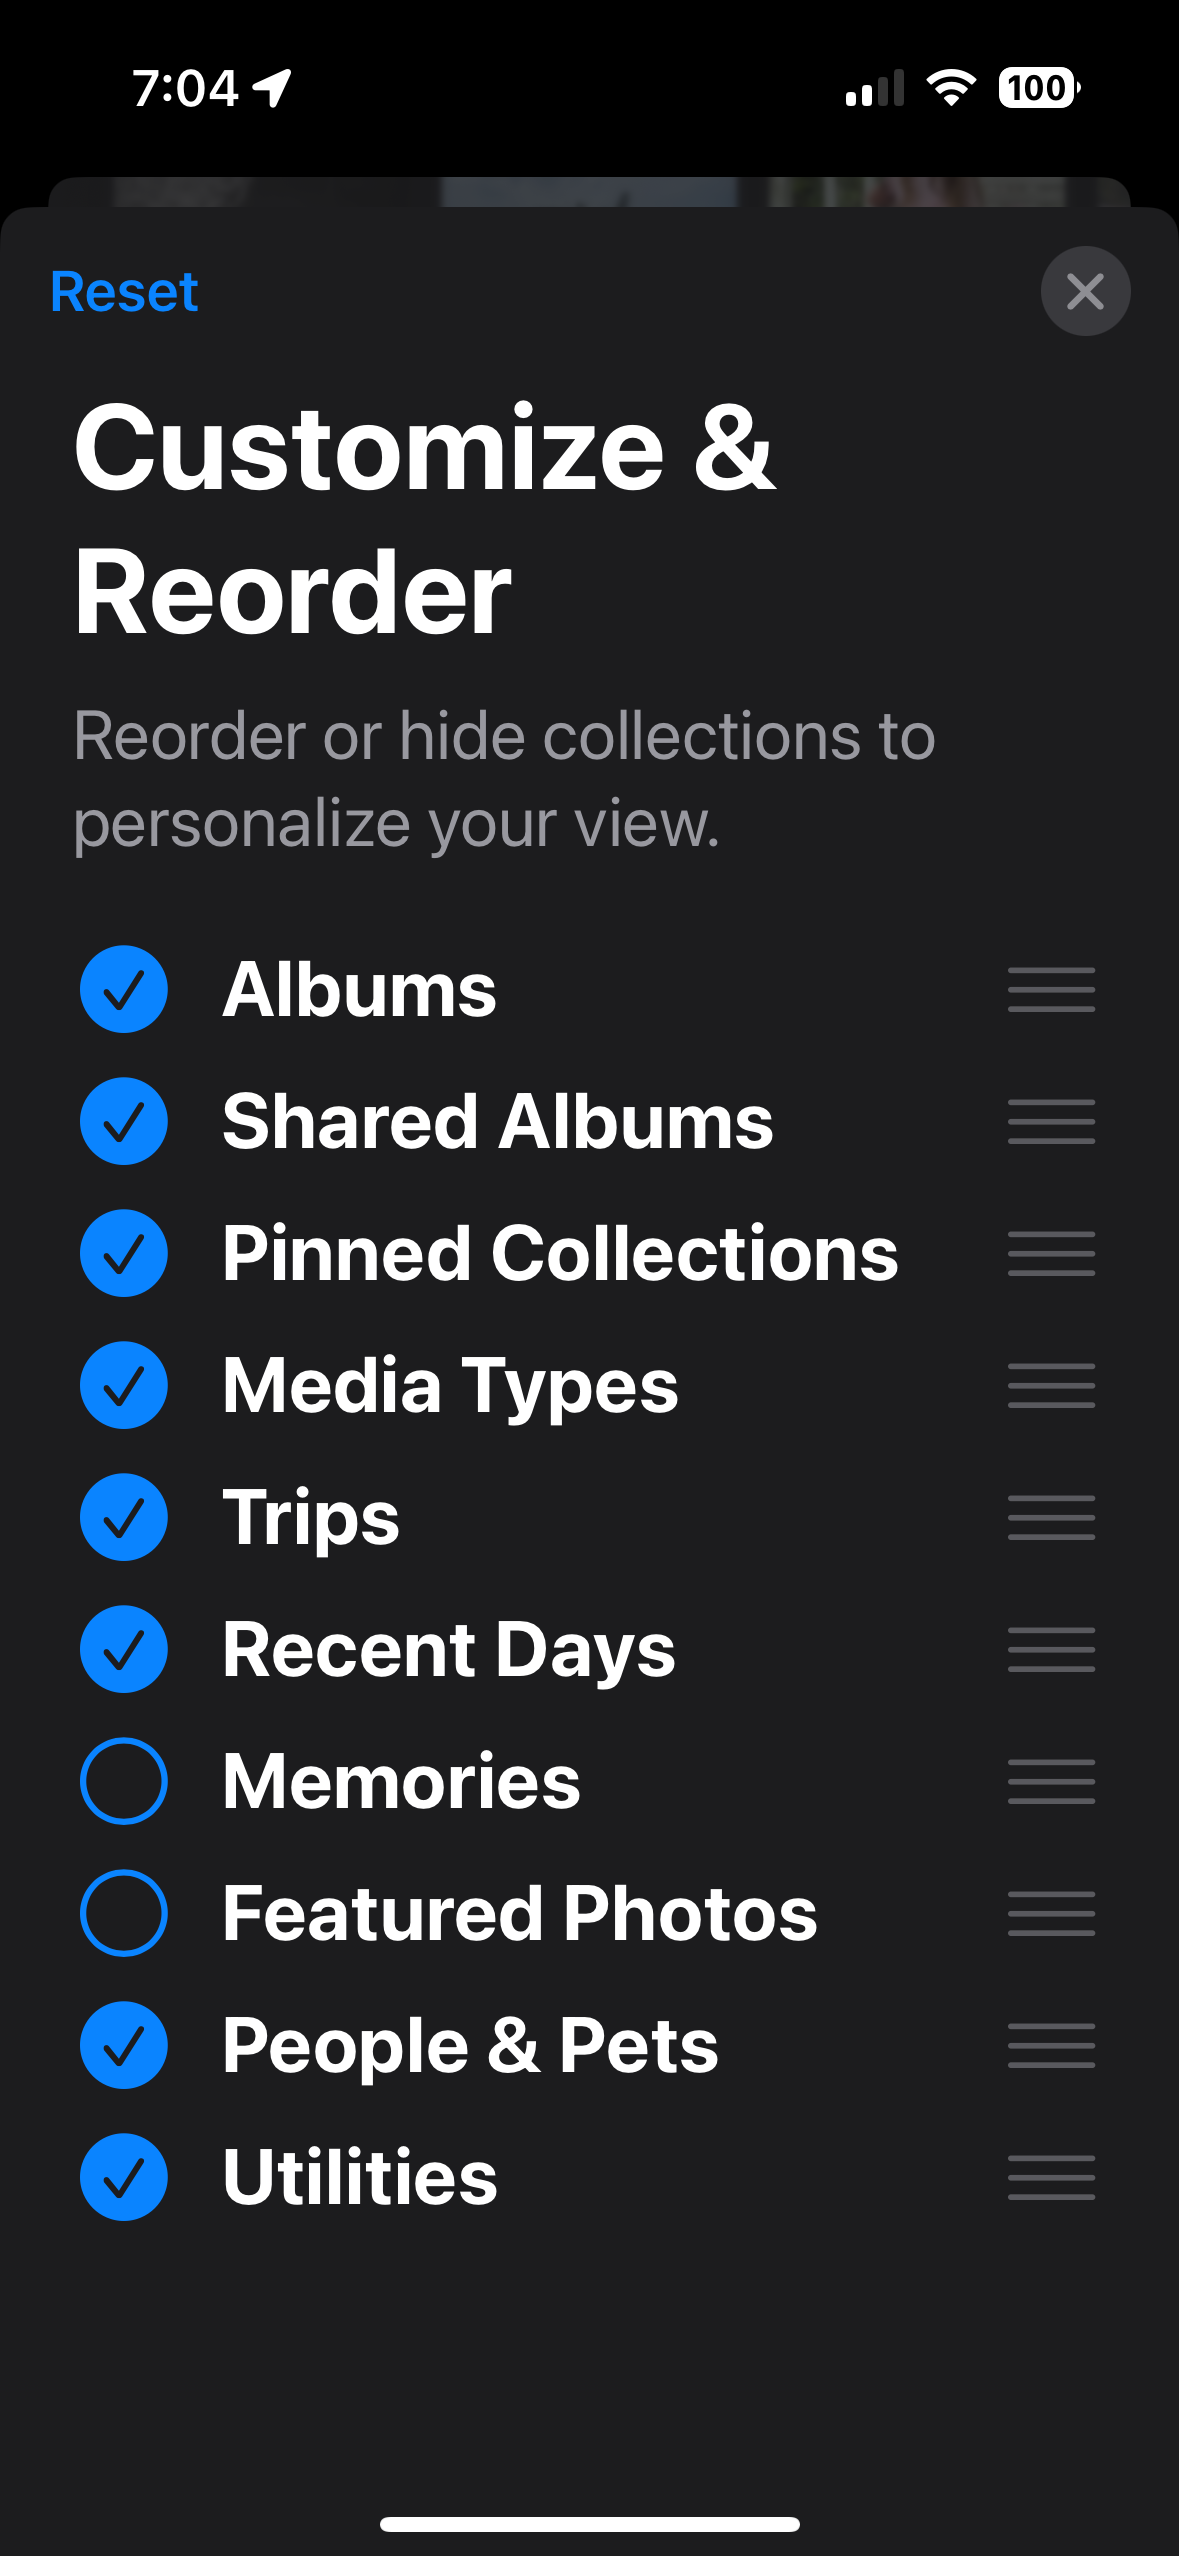
In Photos, scroll all the way to the bottom where you will eventually see Customize & Reorder.

On that screen, you can select which views of your photos you want to appear in Photos, and drag them into the order you prefer. I have put Albums at the top here, and turned off Memories and Featured Photos. It’s entirely personal preference, and you can adjust this as you like.

As always, here’s the complete iPhone User’s Guide from Apple. On that page, either use the search, or click Table of Contents to get started. If you read that, you’ll be ahead of everybody in understanding the iPhone. Note that the User’s Guide is always for the latest version of iOS. If you are using an older version, it won’t be exactly applicable.