Courtesy of XKCD.com
Courtesy of XKCD.com
Due to various technical difficulties, our Virtual Meeting will now be THURSDAY, October 22, at 7:00 via Zoom.
MacMAD members will receive the meeting ID and password by email.
The meeting will cover recent changes to iOS (iPhone and iPad).
MacMAD will hold a virtual presentation meeting on Tuesday, October 20, 2020, at 7:00 PM. This is our usual Tuesday night meeting date.
Eric Emerick will present on recent system changes and announcement from Apple.
The meeting will be via Zoom. You can participate via your iPhone, iPad or Macintosh.
We will send out an email to all members before the meeting with a link and Meeting ID you will need to join the meeting.
If you haven’t used Zoom before, it is a popular video conferencing App and platform. It would be best if you downloaded, installed, and tested the app before meeting time.
To get started, visit https://zoom.us/download#client_4meeting
Zoom is popular because it is easy to use. They have good instruction videos on the Zoom web site.
However, If you need help getting Zoom set up on your device, please contact me well in advance (days) of the meeting and I will help you get started.
For help, email [email protected]
or, call Jamie Cox
321-432-0878 (leave a voice message)
Or, you can download the free book, Take Control of Zoom Essentials.
I use an external drive with my Mac to supplement the internal storage. I have been using the external drive primarily to store my Photos Library and iTunes Library, but I have a lot of other files there also. (Here’s an article about putting your Photos Library on an external drive.)
I bought a new 1TB External SSD to replace the mechanical 1TB drive I had been using. I figured this would be a nice speed-up, and more in line with what my Mac is capable of.
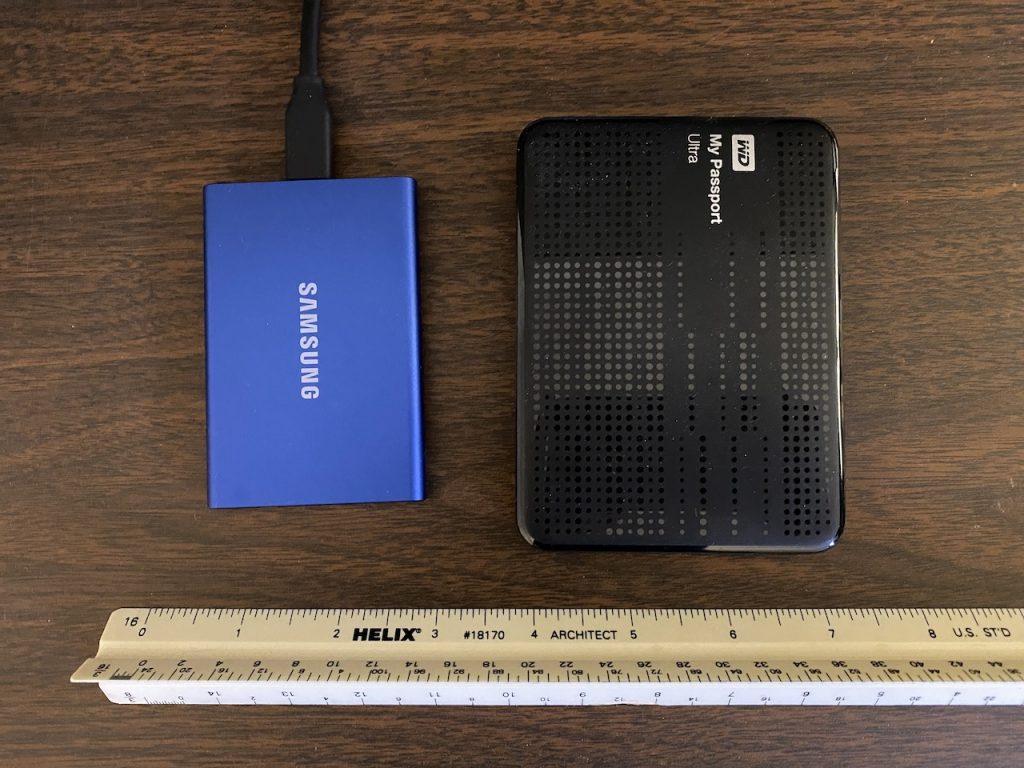
From the photos on-line when I ordered the SSD, I expected it to be larger — about the size of a regular 3.5″ external drive. It is much smaller. It’s about the size of a stack of four or five credit cards. This would be a great thing for travel.
I knew that I should format a new SSD with the newer APFS format for use with MacOS (currently 10.15 Catalina). So, after reading up on that, I fired up Disk Utility, selected APFS, and hit Format. I immediately realized my mistake. I was formatting my original external drive with my data on it, not the new one! It only took a few seconds to lose everything on that drive.
Lesson Learned: Make Very Sure Which Drive You are Formatting!
The good news is that I had a backup. (You have backups, right?)
Lesson Learned Previously: Always Have Backups
After initially trying to restore from backup using Carbon Copy Cloner, I ended up just copying the files to the new SSD using the Finder. But I didn’t have enough space on the drive and deleting big files and folders didn’t seem to make any difference in the amount of free space. I finally found that Carbon Copy Cloner had created some invisible space hogs on that drive called Snapshots.
Lesson Learned: If Deleting Files Doesn’t Increase Free Space, Look for Snapshots
Snapshots can also be created by Time Machine.
Lesson Learned: CCC Creates Snapshots which you can remove from within CCC.
Once I got rid of the snapshots, I was able to restore everything to the new drive easily.
Now I wanted to make some changes to help prevent similar accidents in the future. I give my drives unique descriptive names. I also wanted to give my hard drives unique icons. Any external drive I attach normally shows up with the same generic icon. If they all look alike, it makes mistakes like formatting the wrong drive more likely. I used icons that physically resemble the drives they represent, but you can use pictures of your cat, or whatever images you like.
I found this article explaining how to change the icon of drives. I ended up finding a lot of nice icons at Deviant Art. Often, the icons or images you find online are not in the correct format for MacOS. I used Image2Icon to convert them. You can find it on the Mac App Store, but I already had it via SetApp.
Since subscribing to SetApp, I always look in there first for any unique Apps I need. I usually find something that does what I want.
So, now my drives have unique icons like this:
Lesson Learned: You can and should give your external drives unique icons.
Besides external hard drives, you can also assign special icons to thumb drives or camera cards. Again, that seems very helpful in keeping them straight in your mind.
However, I have found that the procedure of pasting a new icon onto the icon of my hard drives does not work for some drives.
I found that for some drives, you can paste the icon file, but for other types of drives, you must copy and paste an actual image. If pasting the icon file doesn’t work, you can open the icon image using preview, make a selection, copy that, and paste that into the icon in the drives “Get Info” window. That seems to work.
I’m still finding that I can’t change the icon of partitions on an APFS partitioned drive. If anyone knows how to do this, please leave a comment. Thanks.
Recently, I digitized some historic school yearbooks and I want to share some tips on how I did that. It was less work than I thought, and it went pretty fast due to some automation. There is certainly more than one way to do this, but this worked for me.
My goals going in were:
* Good Quality Images
* PDF Output with Searchable Text
* A Separate Image in the final document for each page in the book
* Automate as much as possible
I used a DSLR camera to photograph the pages. I’m not going to go into a lot of detail on the photography aspect, although it is important. You want a lot of light coming from an angle. I used off-camera flash, with a wireless flash trigger. The camera and the flash were on tripods, and the yearbook was on a low coffee table. The camera was looking straight down onto the book. There are many camera settings and lighting settings that will work.
I wanted to be able to go through the entire book and not have to do anything else except turn a page and click the shutter. A wireless remote for your camera helps, although for the last book I digitized, I couldn’t find my remote and did it manually, with a 2-second delay to prevent camera shake. That was not too bad.
I taped some rulers to the table to keep the book firmly in the same position so it wouldn’t move between shots.
To save time, I photographed two facing pages at a time, on one image. These were separated later in software. There was plenty of resolution for this to still yield a quality image.
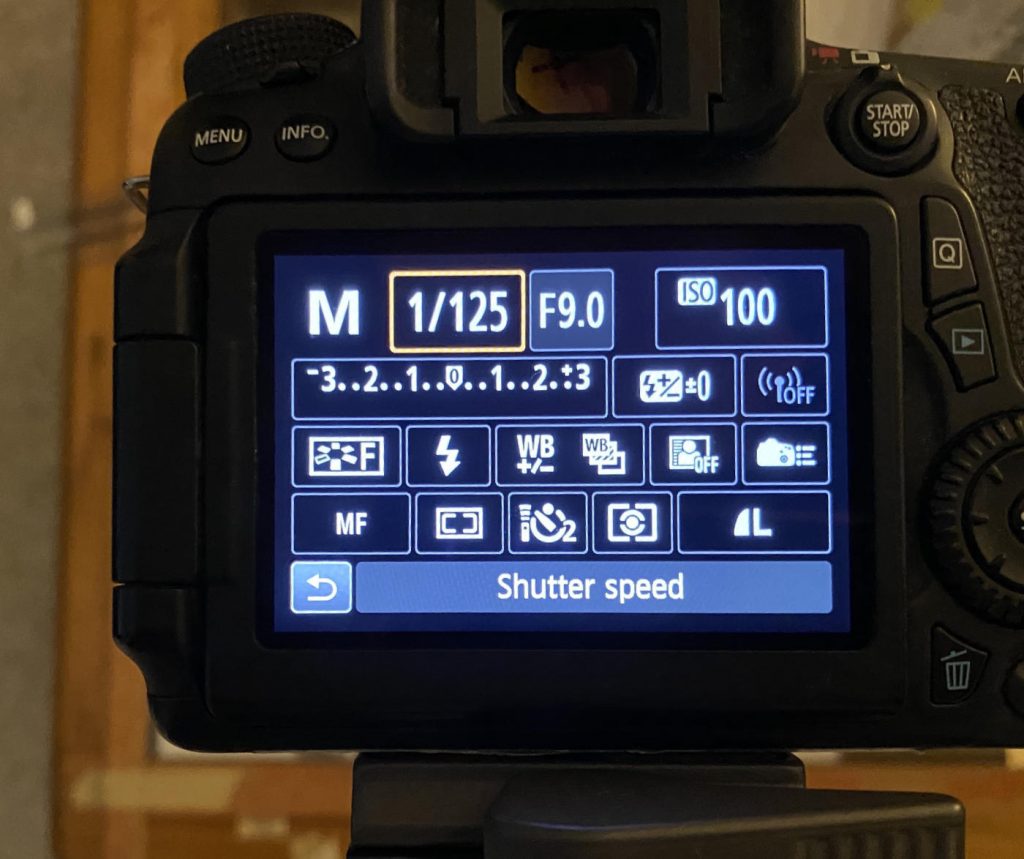
I set my camera to record JPEG images rather than RAW, because they are smaller and easier to deal with, and because I knew I had the exposure correct and wouldn’t need to adjust it in software.
Affinity Photo
Renamer
PDFpen
SetApp  (Renamer and PDFpen are available in SetApp)
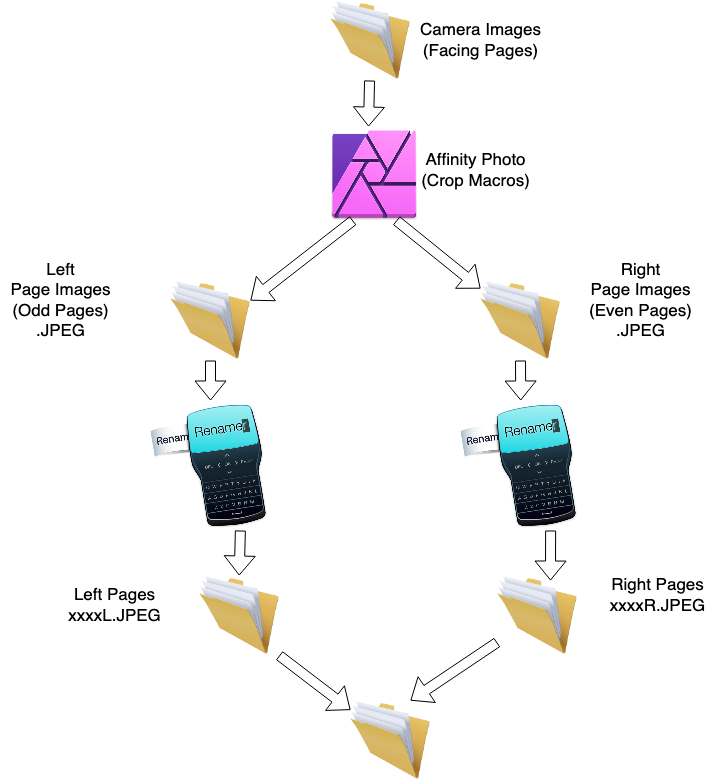
I brought the camera images onto my Mac. Then I used the Affinity Photo App to separate and crop the images of the individual pages. I used two main features of Affinity Photo: Macros and Batch Jobs.
First I recorded a macro. I selected an image about 1/4 of the way through the book. I recorded a macro in which I cropped and rotated the left side of that image as a single page. I saved that macro as something like YBCropLeft. Then I repeated the process for the right-hand image, and saved that macro as YBCropRight. But I didn’t save any changes to any images yet.
Because of the way a physical book lies on the table, the ideal crop for all pages is not identical. To mostly compensate for this, I went through this process twice for each book, once for the first halt, and again for the second half. Each time I picked an image about half-way through that half of the book as my prototype for recording the macros. The first prototype was 1/4 into the book, and the second prototype was 3/4 into the book.
Now I used the Batch Job feature of Affinity Photo, which is in the menus at File:New Batch Job…
I dragged all the images from the 1st half of the book into the sources pane. I selected the YBCropLeft macro (and Applied it). I clicked “Save as JPEG” and picked a new, different folder for the output files.
When you run the batch job, you’ll be amazed at how quickly it processes all of those files. The resulting files will still have the same names that came out of the camera, e.g. IMG_1234.jpeg. But, now they are cropped to the left side only.
Affinity Photo doesn’t give you any naming options for the output of a batch job. This is where Renamer comes in. I used Renamer to quickly add an “L” to the end of all the output file names. So, for example, IMG_1234.jpeg became IMG_1234L.jpeg. This is so we can keep them straight and don’t have two files both with the same name.
Now, repeat the batch job, this time using the YBCropRight macro. Put the output into another new folder.
Again, use Renamer. This time, rename all the right side files to have an “R” at the end, so the names will become something like IMG_1234R.jpeg.
So, now, we repeat the entire process for the 2nd half of the book. Record two new Left and Right macros. Run two new batch jobs, sending the output to yet another pair of empty folders. Rename them to L and R as appropriate.
Now, copy all the R files and the L files from both halves of the book into one big folder. There shouldn’t be any duplicate file names. “L” happens to alphabetize ahead of “R”, so, the left side of each image will be alphabetically just ahead of the right side of that image, which is exactly what we want.
Now, if you had any oddball pages that didn’t fit the pattern, go ahead and digitize them, and contrive a file name so that they fit in the correct spot. For example, you might name the image of the front cover something beginning with “A”, so it will be in the front, and the back cover something like “Z”, so it will come last. If your book has a centerfold or map insert or similar, copy it separately and name it something that puts it at the appropriate spot in the alphabetical list of images. Or, you can just wait and insert it into the PDF at the appropriate place.
Now is the time for PDFpen. Open PDFpen and open a blank, new document. In a Finder window, select all the images (I had hundreds of them, one per page, and drag them all to the empty PDFpen document window. PDFpen will just slurp all those into one big PDF. The free Apple App Preview might be able to do this step also, but it didn’t seem as robust about it as PDFpen.
Proofread the document, making sure the pages are all in the right place and are all right-side-up, etc. PDFpen makes it easy to drag pages into the order you want, if they are incorrect for some reason.
Save your work.
The feature that we really needed PDFpen for is OCR (Optical Character Recognition). This will allow turning a bunch of pixels into searchable and selectable text in your document. For some reason, PDFpen hides this powerful feature with a weird User Interface quirk. If you look at the Edit menu in PDFpen, you will see OCR Page. But, we want to go ahead and OCR the entire document! That option isn’t visible unless you press the Option key. Then you will see the OCR Document item under the edit menu.
Go ahead and do that. It takes a few minutes, depending on size, and gives a “bing” when it is done.
Save your work again. This is your final, searchable PDF document.
Although some things have open up, we still feel that the risk of in-person meetings outweighs the benefits.
At this writing (July 20, 2020), COVID-19 is more prevalent in our community than ever, and our members are mostly in the age group most at risk.
MacMAD is extending the paid membership of all members month-to-month until we begin to have in-person meetings again.
How can you help another computer user from a distance? I am going to show you a super easy way to help another Mac user using software that came with your computer.
Sometimes we get questions about computer problems from friends and family. It would be so easy if we were in the same room and could see and interact with their screen. But if they are far away, or in 2020, staying isolated because of Coronavirus, how do you help them?
If you and the other person both have Macs, and you can send and receive messages using the Messages app, then the answer is just a click away.
To connect to your friend’s computer, we are going to use the Messages App (formerly known as iMessage). This application comes with every Macintosh. It isn’t obvious, but the humble Messages app has a superpower. It can remote control a computer screen.
It might be good to first verify that you can send and receive messages to and from the remote computer. You must be connecting to your friend via their email address, which should be associated with their Apple ID.
If you see the blue text bubble(s) when messaging your friend, the next steps should go smoothly. If you see green text bubbles, or can’t send and receive messages at all, see the Difficulties section below.
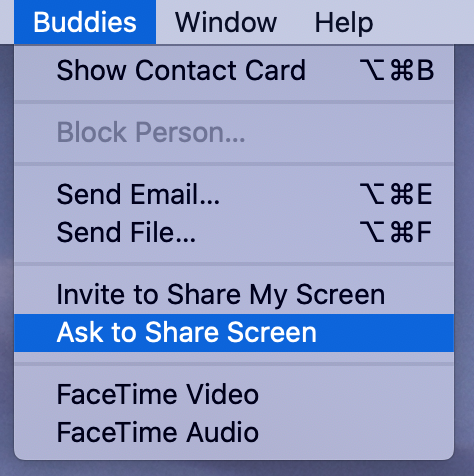
To begin screen sharing, make sure that the correct friend’s conversation is highlighted in the Messages window. Then, select Ask to Share Screen from Messages’ Buddies menu.
This will cause a message to appear in the upper right of your friend’s screen asking them to allow screen sharing:

When they click Accept, they will get one more message:
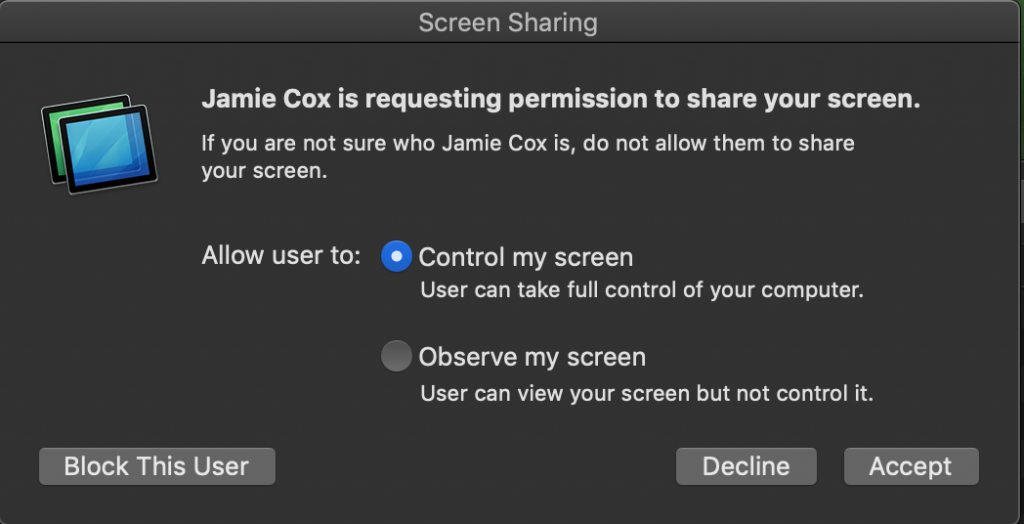
For troubleshooting with a trusted friend, it is usually easier if the recipient allows you to control their screen as well as observe it. Control is the default.
Once they click Accept, screen sharing will begin.
Either party can end screen sharing. Remember that if the computer restarts, or if you quit the Messages app, screen sharing will end and need to be restarted.
I have successfully talked some very inexperienced computer users through this process on the phone. They only have to be able to see when they receive a text message, and then click Accept twice. After that, you will be able to help them.
You’ll probably be talking to your friend on the phone to get this started. When screen sharing starts, it also starts an on-line voice conversation. You should be prepared to end the phone call when this happens to prevent echo, feedback and confusion. You will still be able to speak to each other via the computer (if both computers have microphones and speakers — most do).
If this is not working as expected, check the following:
These are the Keynote slides from MacMAD’s February 2020 (updated 2022) meeting on using Gestures on iOS and Macintosh. Note: this presentation contains some short videos so is rather large (~160 MB). The link is to a Keynote presentation file shared in iCloud.
The same slides in PDF format.
See also: Basic iPhone Gestures (2017).
No, no weapons here. Unless you count our individual capable minds when it comes to solving problems. Computer problems. More succinctly, hardware that gives our operating system problems. First, a little back-ground.
I use my iMac Pro and MacBook Pro mainly for creating and editing video. FCPX and DaVinci Resolve Studio are my software tools of choice. Anyone involved in editing video knows it requires serious computing power and external hardware in the form of external RAID storage (48TB LaCie Big Disk). And to get the color perfect, a calibrated high end monitor (Flanders CM250) which requires an I/O interface (AJA Io 4K Plus). For great audio, 2 Focal monitors are controlled by a Universal Audio Arrow I/O device via Thunderbolt 3. I also have an external hub for the many ports I need for video and audio (CalDigit TS3 Plus). Sometimes, these pieces of hardware can have hiccups when interfacing with Mac OS. Rarely, but it happens, as it did for a few weeks lately.
The Problem. I leave my iMac Pro on overnight. A few weeks ago, when I would first try to wake the computer from it’s much deserved rest, I noticed that the machine was starting from boot and I got a message that it had shut down because of a problem. They never tell you what the problem is, we long for the day!
Now some would probably look to the OS or poorly written software as the first probable culprit but that line of inquiry would take a lot of time and I could see me on the phone with Apple for hours as my blood pressure peaks to an unhealthy crest. Checking hardware is easier and would most likely, in my mind, expose the problem. First I had to make sure the corresponding software for each piece of hardware was up to date and compatible with my OS. Easy peasy, all was good. So every evening I would disconnect each external device but one, and wake up to see if the machine was sleeping, or dead. If sleeping and fine (they were), I then connected two of the devices in every combination. I wish I could tell you the mystery was solved, but the results were ambiguous at best. With only one of the devices connected at a time, all was well. But when I started to combine hardware in two’s, the results were erratic and showed no clear path to the solution. I had resigned myself to either putting up with the inconvenience or shutting it down each evening in a proper fashion. Then I looked over at my RAID box and saw the little 1TB SSD connected to it on it’s 2nd Thunderbolt port and sitting atop of it, hidden by the box of tissue yet on top of it. I forgot to mention it above just like I forgot about it in the chain of hardware in my workflow. I use it mainly for quick drag ‘N drop backup of individual files as I work through the day. I thought, “That can’t be the problem, can it, this little drive”? Of course it could, and it was. It’s been one full week without a crash since I unmounted the drive (it is still connected though, weird) I’m not sure why, though I think it has to do with the fact that it’s a Thunderbolt 2 device connected via an adapter to the RAID box via Thunderbolt 3.
What have I learned? Well, a few times I was sure it was the most expensive item (LaCie Big Disk) in the chain that was causing the problem, and some of the testing seemed to point to it but there was always a morning where the result refuted the conclusion. So watch out for confirmation bias. In the end it was the littlest and most inconsequential item that caused the issue. Also, patience and thoroughness are two prized qualities of the troubleshooter. Without it, well, you may need to stock up on your blood pressure meds.
Here are the slides from Dennis’ iCloud presentation of Nov 19, 2019, at the monthly MacMAD meeting.
Naturally, the link is to the Keynote slide show in iCloud.