Digitizing Old Photographs

MacMAD Meeting Topic February, 2023

If you have photographs taken before you started using a digital camera, probably before about 2005, those photos may never have been digitized and are not available for viewing and sharing in your on-line digital world.

What’s your best strategy for getting those digitized and into your computer or phone?
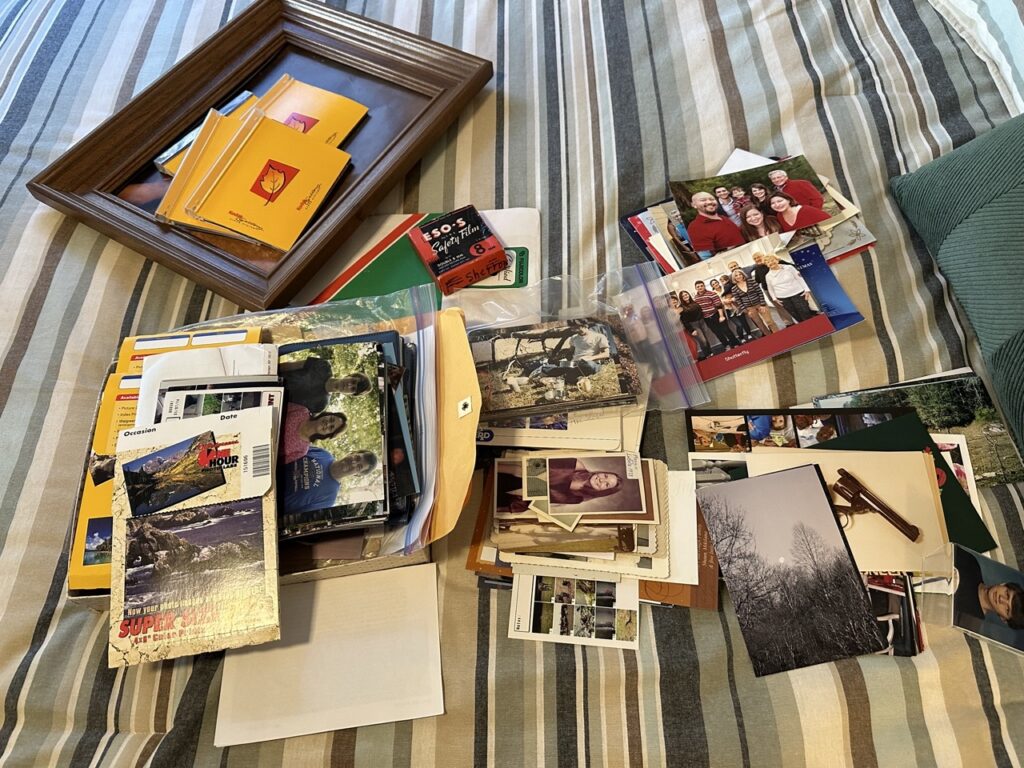
Pile of photos

This Could Take a While

Even the small pile of pictures above contains over a hundred photographs. You should expect that digitizing them all will take a while, even in the best case.

Service, Camera or Flatbed Scanner?

There are three basic strategies:

  • 1.) Send them out to a service to be digitized
  • 2.) Digitize them with a flatbed scanner
  • 3.) Digitize them using your iPhone camera or another digital camera

Digitizing services can be expensive but are worthy of serious consideration. They can save you a lot of time and frustration. Because they charge by the photo, you should be selective as to which photos you send them. This is by far the fastest method. If you have a lot of photos and don’t want to spend years working on them, just get your wallet out.

A flatbed scanner gives high-quality results and you are in charge of the quality, the cropping and everything else. You’ll get the best results that your originals, your equipment and your abilities allow.

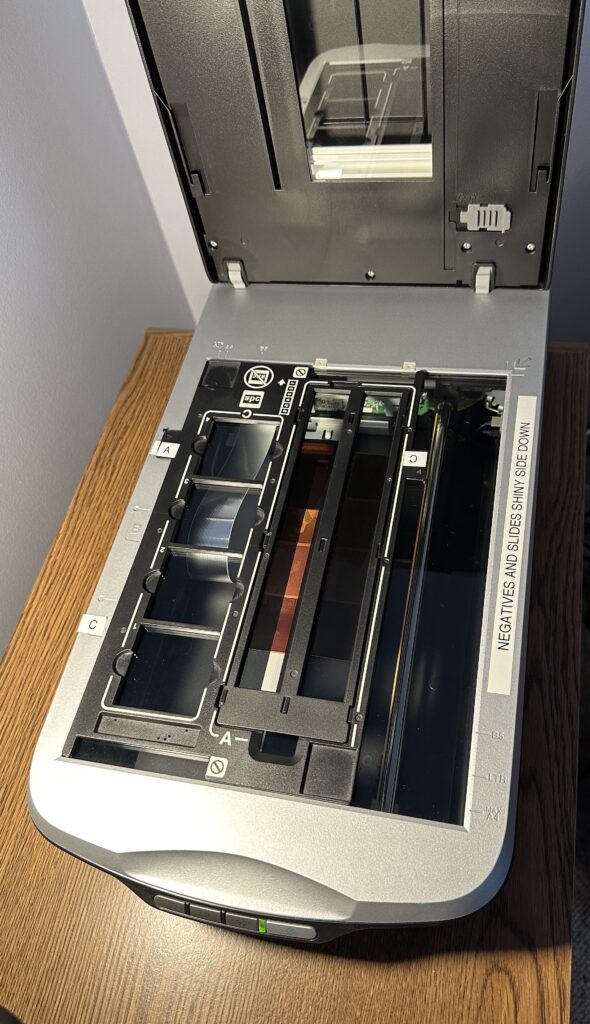
A scanner with a transparency feature allows you to also scan slides and negatives.

Flatbed Scanner Ready to Scan Negatives

Using your phone or a camera to “scan” or take a photograph of the original can produce reasonably high quality copies. This method has some advantages you should consider:

  • It’s faster than a scanner
  • Can digitize large or awkward photos that don’t fit on the scanner
    • Can digitize photos in a frame
  • You can digitize while traveling without a flatbed scanner
  • Can produce better results for originals printed on matte paper
  • Works if you don’t own a computer

Using a phone or camera can also produce poor results unless you take the time to get proper lighting.

Organize – Before and After

As you take your originals out of the albums or envelopes to be digitized, look for context. Who’s in the photos? Where were they taken? What was the date? You should write on the back of the originals for future reference. Don’t just write “grandmother”. That’s not very helpful. Maybe “Mrs. Mary Jane (Doe) Smith” would be better. Use a non-smearing ink pen that doesn’t require too much pressure to write. I like Bic Round Stic ball-point pens for this.

After digitizing a photo, write something on the back of the photo saying so, like “digitized in 2023”. This will keep you from wasting time or money scanning the same photo again.

Assign long meaningful file names to your photo files. If you give them meaningful names, you and your descendants might be able to find them later. VueScan will create files with a serial number like 2023-02-17-0007. This would be the seventh photo scanned on February 17, 2023. I keep those serial numbers as a suffix to my file names to avoid having multiple photos all with the same name. Suppose I have a bunch of photos of John Doe, all taken in 1999. If I name them “John Doe, 1999”, they would all have the same name which will cause problems when I try to put them into a folder together. But if they have a unique suffix, no problem.

Long file names are allowed, so take advantage of it.

The Best Way to Restore an Old Photograph is to Find a Better Original

Prioritize and Select

Take some time to find the best existing versions of your photos to digitize. That version may be a print, or a negative, or a slide. In the 2000s, some film development services included a CD-ROM with your photos on it. If you find one of those, you can save yourself a lot of time and trouble, although the CD images may not be high-resolution by today’s standards.

Prioritize slides. Slides are often photographic gold. Usually whoever was shooting slides had a nice camera and was a better-than-average photographer. Slides often haven’t been seen since the slide projector broke decades ago. So, there could be some nice surprises. And, if they have been stored in a closed box, they might be cleaner and in better shape than prints which might be torn, faded and dirty. Slide film often captures and preserves color better than print film.

Sort your photos so you are digitizing a batch of similar photos at once. It is easier if you don’t have to change your settings between photos. So, separate the black and white photos from the color photos, and the 3x5s from the 4x6s.

Be selective. Many of your photos are losers. Skip them. Digitize the best versions of each series.

Sample Workflow

  • Scan with VueScan to TIF files in Downloads Folder
  • Add descriptive filenames
  • Crop, adjust and clean-up in Affinity Photo
  • Export final photos as JPG into Download Folder
  • Copy final JPGs to preferred storage folder(s)
  • Delete temporary TIFs and JPGs from Downloads
  • (you do have a backup plan, right?)
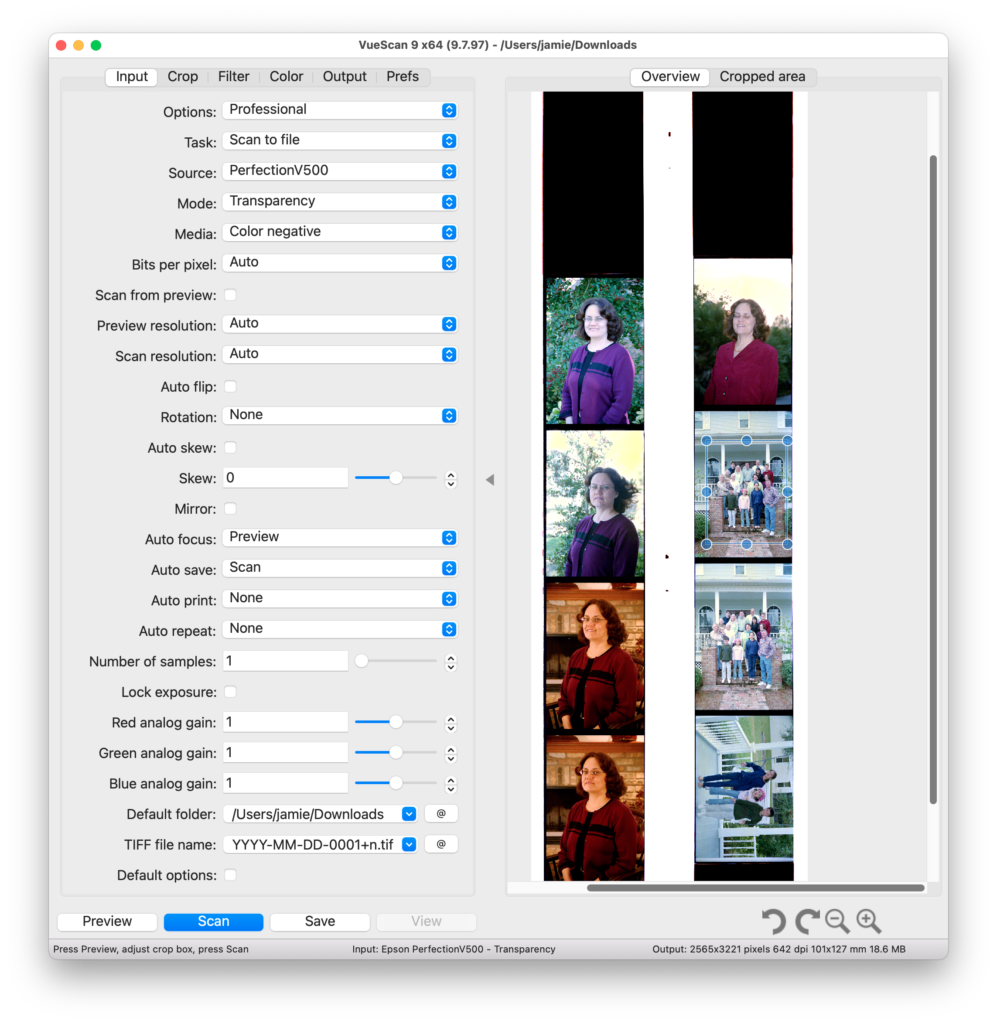
VueScan’s Complex “Professional” Options Scanning Negatives
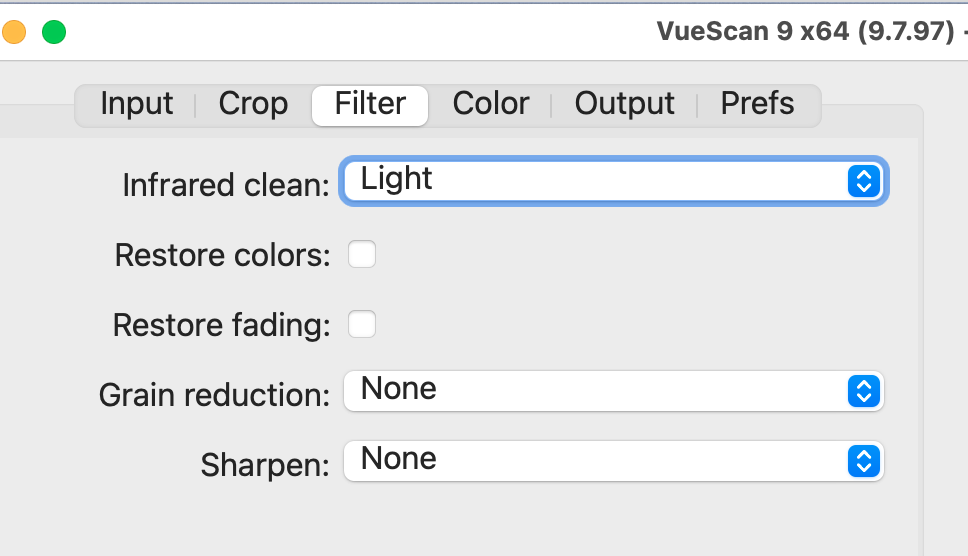
Useful Filter Options in VueScan

The Infrared clean option is good on negatives and slides. It largely eliminates dust. It does require an extra scan step, so takes twice as long to scan. I think it’s worth it for almost all slides and negatives. A similar option is available in other software.

Restore colors and Restore fading can be amazing for old prints. You have to try these to see if they help your specific photos or not. The Restore colors option does a better job than I have been able to do with photo editing software.

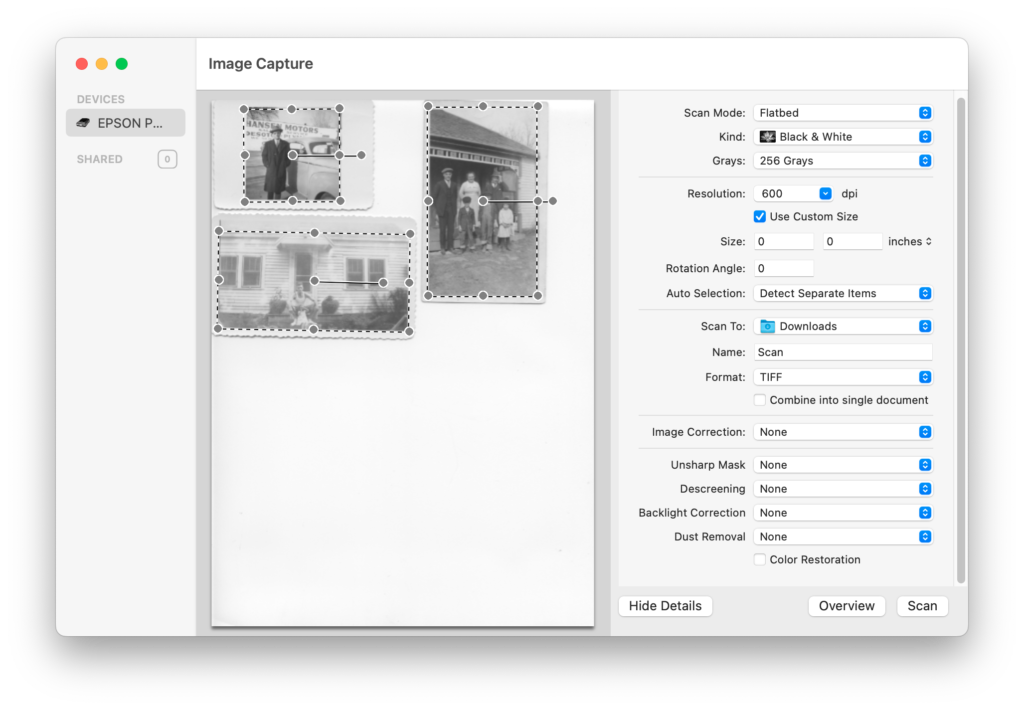
Image Capture Screen and Options

Above is the Image Capture software included with MacOS. It is easy to use, and automatically identifies multiple images to be scanned.

Tips for Digitizing with your phone or camera

Find good lighting. Indirect sky light is best, but avoid direct sun. A shady porch where lots of sky is visible is ideal.

If you are setting up your own lights try to position them off to each side of the photo shining at a 45° angle. If you only have one, that’s okay, but one on each side is better.

Don’t use flash unless:

  • You have an off-camera flash
  • You are using the PhotoScan App or similar with anti-glare feature

Flatbed Scanner Example

Epson Perfection V600 $276 at Amazon – Scans Photos, Negatives and Slides

Epson makes good scanners, but their software support for MacOS is pretty terrible. You should plan on using 3rd party scanning software (below) eventually. The Epson scanning software is pretty nice, but whether or not it will work on any given version of MacOS is a gamble.

Scanning Software for Mac

VueScan Software Versions $24.95 to $99.95

VueScan works with almost any scanner model and is kept up to date.

Image Capture (User Guide) – (Image Capture is included with MacOS)

Affinity Photo 2 Photo Editor $69.99 (Not for scanning, just for editing afterwards.) A powerful image editing program.

Mail-In Digitizing Services

Kodak Mail-In Digitizing Box

Memories Renewed – Well Reviewed by Consumer Reports and Wirecutter

Scanning Software for iPhone

PhotoScan IconPhotoScan – (Google) Free in App Store. Removes glare from scan.

Camera App (built-in, comes with iPhone)
Find Duplicate Photos with Gemini 2

A question came up at last month’s MacMAD meeting on how to save space by finding and removing duplicate photos on the Mac.

One way to do this is with Gemini 2 from MacPaw software.

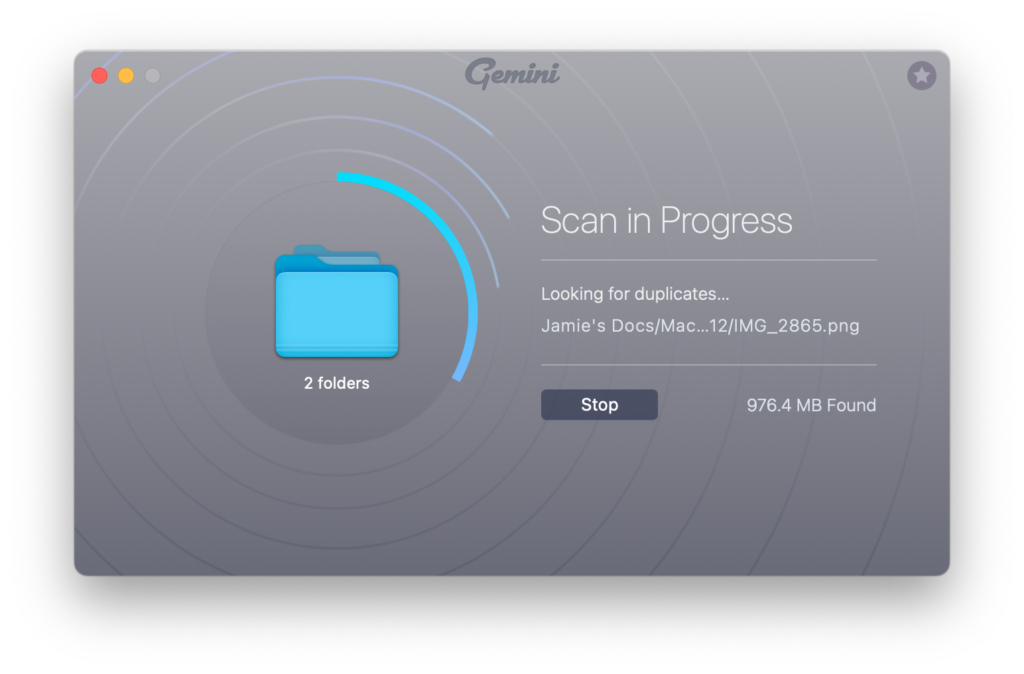
You tell Gemini which folder or folders you want it to scan, including your Photo library. It scans them pretty darn fast.

Scanning Your Files

It finds duplicate files of all kinds, not just photos.

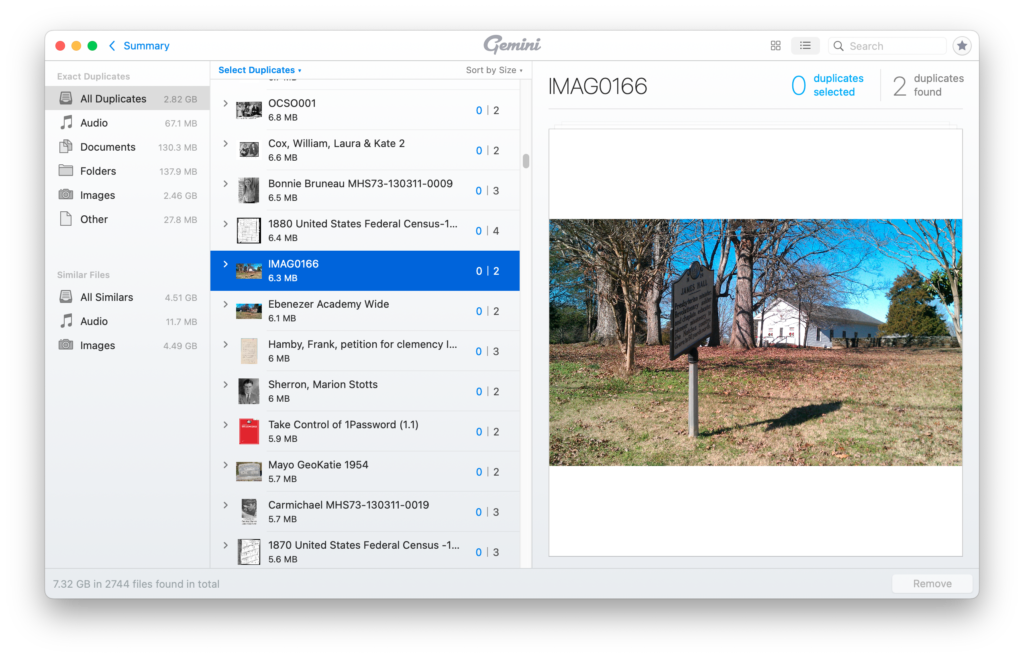
Gemini’s Main Screen with List of Duplicates

You can sort and search these in various ways. You can then select groups of the duplicates for deletion.

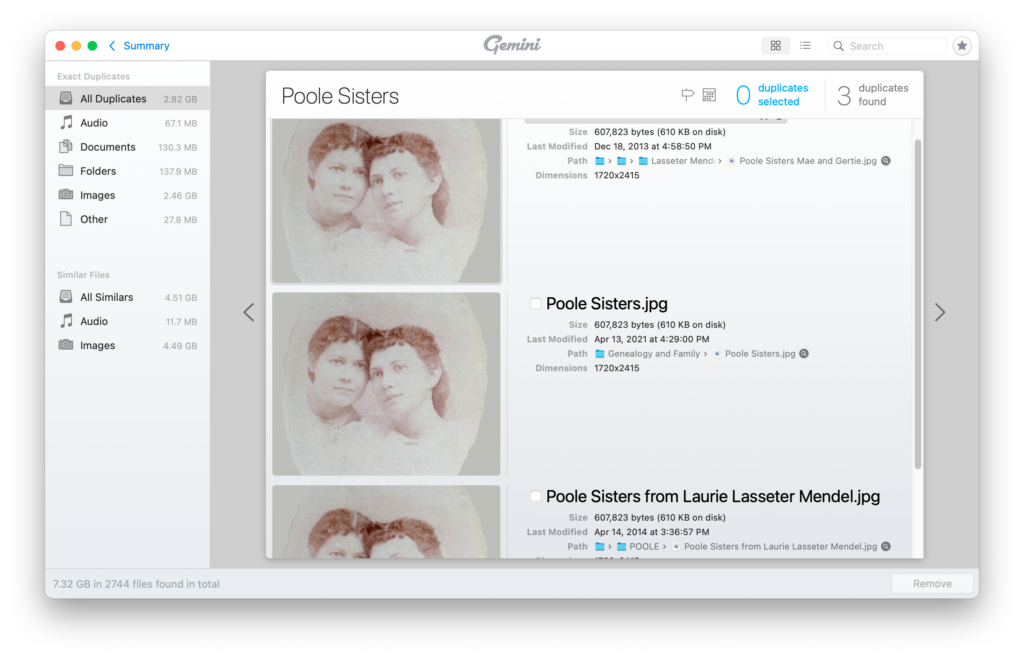
Details of a Duplicated Photo

You should be very cautious about deleting duplicates en masse. The duplicates may be in folders belonging to specific applications which expect to find them in those locations. Or, you may want to have duplicates in specific locations for your own organizational purposes.

It probably isn’t worthwhile trying to remove all duplicates. If you can find a few large files that can be deleted, or find entire folders that you no longer need, you may recover a lot of space with a minimum of effort and risk.

Gemini 2 is available on a subscription basis starting at $19.95 per year, or an outright purchase starting at $44.95. It is also available through a subscription to SetApp (also from MacPaw).

Use iPhone as Web Cam with Detail

I have a MacMini which has no built-in camera. During the pandemic, I have been doing more on-line teleconferencing (mostly Zoom and Facetime meetings). I have used various cameras and various software to connect them to my computer.

I recently came across Detail, from Detail.co . This application allows you to use your iPhone or iPad as a web camera for your Mac. This is the best solution I have seen yet, and the iPhone has a good-quality camera, so my video looks good.

The Mac application does much more than that, which is both an advantage and disadvantage. It is a disadvantage in that it makes it harder to learn to use. There is a video tutorial on the site. The quick summary is to download the Detail app from the iOS or iPad OS App store on your iPhone or iPad, and also download the app for Macintosh from the web site. The app can work wirelessly, or via a USB cable (recommended).

You may want a tripod adapter for your phone. I bought this one and it seems like a good one. You might want to use that with a small desktop tripod like this, if you don’t have one.

Detail is not free, and they are kind of cagey about the price. I actually don’t know how much or how often they charge. There is a 14 day free trial period. I discovered and got access to Detail through my Setapp subscription, which is excellent for just-in-time discovery of useful, curated apps.

Digitizing a Book

Recently, I digitized some historic school yearbooks and I want to share some tips on how I did that. It was less work than I thought, and it went pretty fast due to some automation. There is certainly more than one way to do this, but this worked for me.

My goals going in were:

* Good Quality Images
* PDF Output with Searchable Text
* A Separate Image in the final document for each page in the book 
* Automate as much as possible

I used a DSLR camera to photograph the pages. I’m not going to go into a lot of detail on the photography aspect, although it is important. You want a lot of light coming from an angle. I used off-camera flash, with a wireless flash trigger. The camera and the flash were on tripods, and the yearbook was on a low coffee table. The camera was looking straight down onto the book. There are many camera settings and lighting settings that will work.

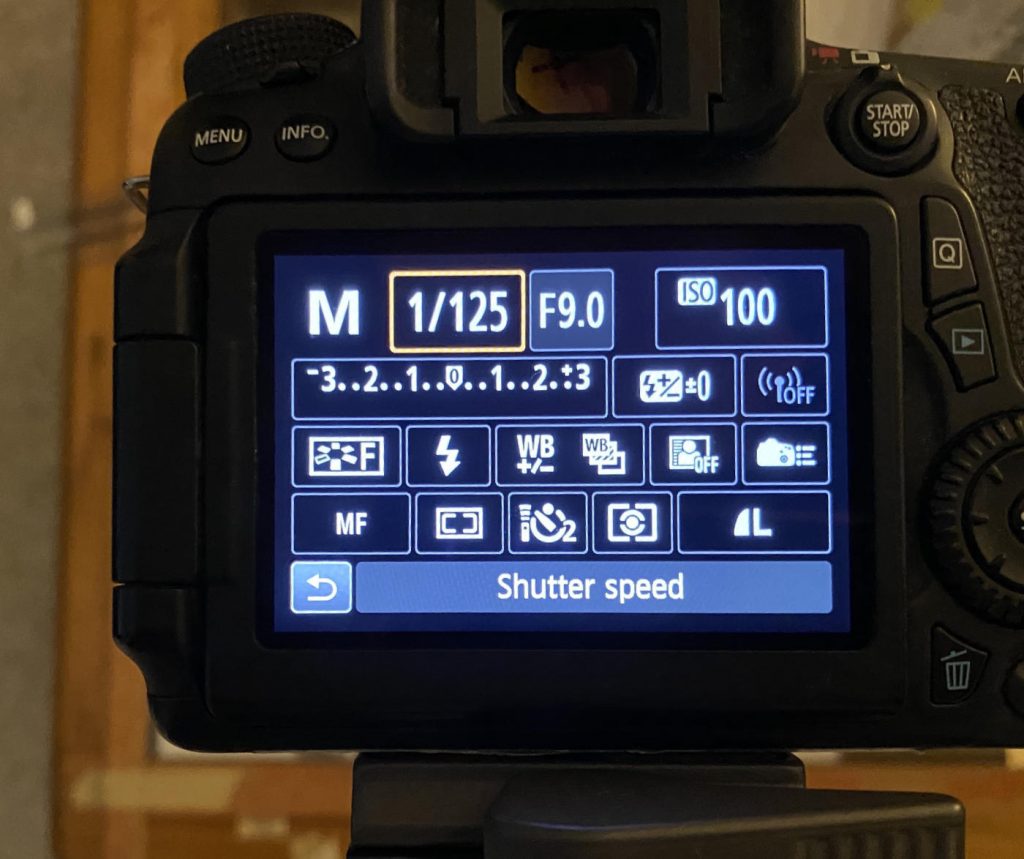
My Camera Settings

I wanted to be able to go through the entire book and not have to do anything else except turn a page and click the shutter. A wireless remote for your camera helps, although for the last book I digitized, I couldn’t find my remote and did it manually, with a 2-second delay to prevent camera shake. That was not too bad.

I taped some rulers to the table to keep the book firmly in the same position so it wouldn’t move between shots.

To save time, I photographed two facing pages at a time, on one image. These were separated later in software. There was plenty of resolution for this to still yield a quality image.

I set my camera to record JPEG images rather than RAW, because they are smaller and easier to deal with, and because I knew I had the exposure correct and wouldn’t need to adjust it in software.

Software Tool Kit

Affinity Photo 
Renamer 
PDFpen  
SetApp  (Renamer and PDFpen are available in SetApp) 
Workflow

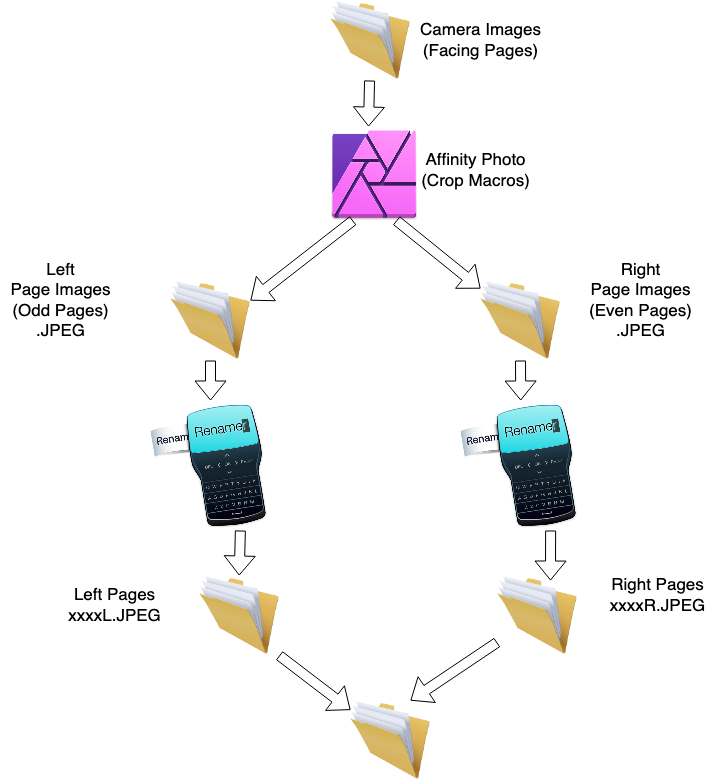
I brought the camera images onto my Mac. Then I used the Affinity Photo App to separate and crop the images of the individual pages. I used two main features of Affinity Photo: Macros and Batch Jobs.

First I recorded a macro. I selected an image about 1/4 of the way through the book. I recorded a macro in which I cropped and rotated the left side of that image as a single page. I saved that macro as something like YBCropLeft. Then I repeated the process for the right-hand image, and saved that macro as YBCropRight. But I didn’t save any changes to any images yet.

Because of the way a physical book lies on the table, the ideal crop for all pages is not identical. To mostly compensate for this, I went through this process twice for each book, once for the first halt, and again for the second half. Each time I picked an image about half-way through that half of the book as my prototype for recording the macros. The first prototype was 1/4 into the book, and the second prototype was 3/4 into the book.

Now I used the Batch Job feature of Affinity Photo, which is in the menus at File:New Batch Job…
I dragged all the images from the 1st half of the book into the sources pane. I selected the YBCropLeft macro (and Applied it). I clicked “Save as JPEG” and picked a new, different folder for the output files.

When you run the batch job, you’ll be amazed at how quickly it processes all of those files. The resulting files will still have the same names that came out of the camera, e.g. IMG_1234.jpeg. But, now they are cropped to the left side only.

Affinity Photo doesn’t give you any naming options for the output of a batch job. This is where Renamer comes in. I used Renamer to quickly add an “L” to the end of all the output file names. So, for example, IMG_1234.jpeg became IMG_1234L.jpeg. This is so we can keep them straight and don’t have two files both with the same name.

Now, repeat the batch job, this time using the YBCropRight macro. Put the output into another new folder.

Again, use Renamer. This time, rename all the right side files to have an “R” at the end, so the names will become something like IMG_1234R.jpeg.

So, now, we repeat the entire process for the 2nd half of the book. Record two new Left and Right macros. Run two new batch jobs, sending the output to yet another pair of empty folders. Rename them to L and R as appropriate.

Now, copy all the R files and the L files from both halves of the book into one big folder. There shouldn’t be any duplicate file names. “L” happens to alphabetize ahead of “R”, so, the left side of each image will be alphabetically just ahead of the right side of that image, which is exactly what we want.

Now, if you had any oddball pages that didn’t fit the pattern, go ahead and digitize them, and contrive a file name so that they fit in the correct spot. For example, you might name the image of the front cover something beginning with “A”, so it will be in the front, and the back cover something like “Z”, so it will come last. If your book has a centerfold or map insert or similar, copy it separately and name it something that puts it at the appropriate spot in the alphabetical list of images. Or, you can just wait and insert it into the PDF at the appropriate place.

Now is the time for PDFpen. Open PDFpen and open a blank, new document. In a Finder window, select all the images (I had hundreds of them, one per page, and drag them all to the empty PDFpen document window. PDFpen will just slurp all those into one big PDF. The free Apple App Preview might be able to do this step also, but it didn’t seem as robust about it as PDFpen.

Proofread the document, making sure the pages are all in the right place and are all right-side-up, etc. PDFpen makes it easy to drag pages into the order you want, if they are incorrect for some reason.

Save your work.

The feature that we really needed PDFpen for is OCR (Optical Character Recognition). This will allow turning a bunch of pixels into searchable and selectable text in your document. For some reason, PDFpen hides this powerful feature with a weird User Interface quirk. If you look at the Edit menu in PDFpen, you will see OCR Page. But, we want to go ahead and OCR the entire document! That option isn’t visible unless you press the Option key. Then you will see the OCR Document item under the edit menu.

Go ahead and do that. It takes a few minutes, depending on size, and gives a “bing” when it is done.

Save your work again. This is your final, searchable PDF document.

How to Upload Images Right-Side-Up

A frequently asked question on the Internet is:

“My photo appears correct on my computer, but when I uploaded it to [website], it is sideways. How can I make my image upload in the correct orientation?”

This problem is surprisingly universal, it affects many different web sites and users of Windows, Macintosh, tablets and smartphones are all affected. It most often affects photos that were taken in portrait orientation.

Local Image Correct Orientation
Uploaded Image Sideways

The problem is caused by the varying interpretations of the image rotation tags in the EXIF data accompanying digital photos. This problem is not likely to go away anytime soon because the meaning of the rotation tags is somewhat ambiguous, and there is disagreement about what the correct way to handle them ought to be. Some software thinks it should apply the tags, other programs or sites think they should ignore the tags or remove the tags.

There is an easy solution for users: Edit the photo in your photo editor of choice (with the possible exception of Windows Picture Viewer). Rotate it to be right-side-up if necessary. Then make some other change that affects the image. Tweak the contrast or the color. Crop the image slightly. Almost any change will work. Then, save it.

The saved image will have its pixels oriented properly and have no Orientation tag, or have the default Horizontal tag. Everybody agrees on how to display an image like that. When you upload it, it will display the same as you saw it on your computer.

If you edit an image, but only rotate it, your editor will probably just change the Orientation tag without changing the image pixels. Unfortunately, not every program or site will interpret the Orientation tag the same way as your image editor.

If you make a change to the actual image, it forces the program to completely re-write the image from scratch, which results in an image with the default orientation.

Photography Topics with Arnold Dubin May 2018

Arnold gave us a good presentation Tuesday night on various photography topics. He was nice enough to give us a copy of his slides in PDF format.

Take a look to see some of his photos, what cameras he uses, pros and cons of JPEG vs. RAW, backup strategies and some hints on organizing photos in Light Room.


Nova Flash Review


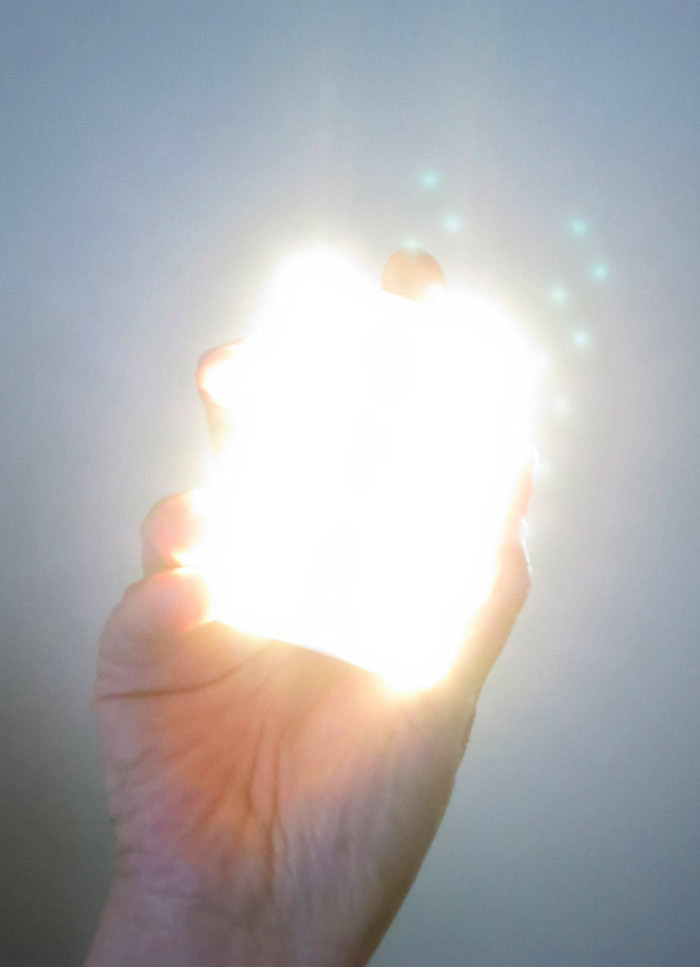
This thing is very bright -- this is not the brightest setting. I did not add any pixie dust to this photo.
The Nova Flash in action. It’s very bright�– this is not the brightest setting. I did not add any pixie dust to this photo.

I am a backer on Kickstarter for the $59 wireless Nova Flash from https://www.novaphotos.com/. The hardware recently shipped to backers, so I have had a chance to try it out.

Since I have been interested in off-camera flash in general, I backed and bought the Nova flash. The Nova brings the general advantages of off-camera flash to the iPhone and Android platforms. Off-camera flash improves your photos by moving the light source away from the lens. Your subject has more natural shadows and detail. Off-camera flash is at its best in portraits, where subjects lose that deer-in-the-headlights look and have more natural skin tones. An off-camera flash can also give your portraits a nice catch-light reflection in the eyes.

The Nova flash works with a dedicated Nova camera app which fires the flash using Bluetooth radio control.

The initial release of the Nova is oriented towards the iPhone, with a very�basic camera app for the Android. I only tested with the Android version for this review.

Nova requires iOS 7 or Android 4.3 or greater. It requires that your hardware support Bluetooth 4.0 low energy. For this reason, the Nova requires newer iOS devices:�iPhone 4S/5/5C/5S, iPad 3/4/Mini/Air or the iPod Touch 5G. �I tested on the Motorola Moto X, running Android 4.4.


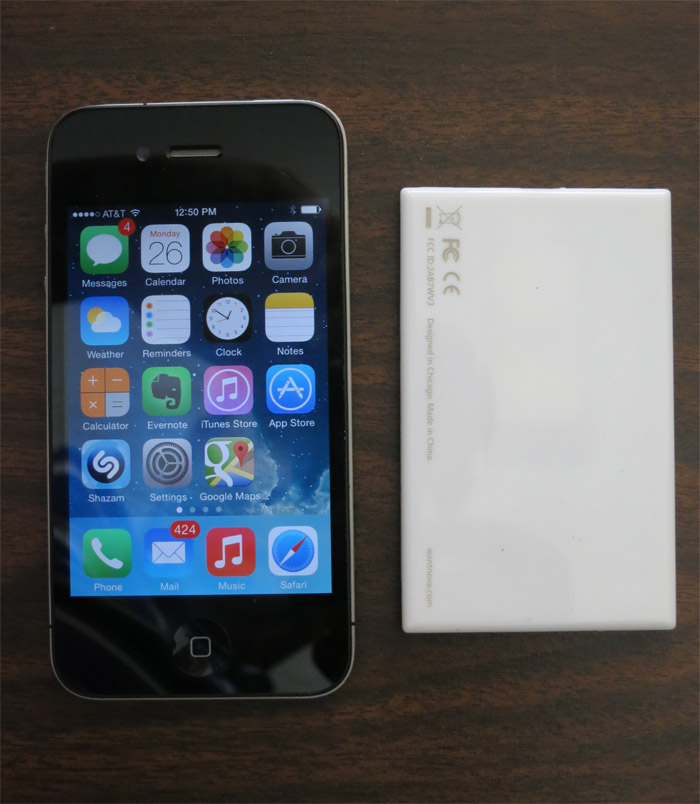
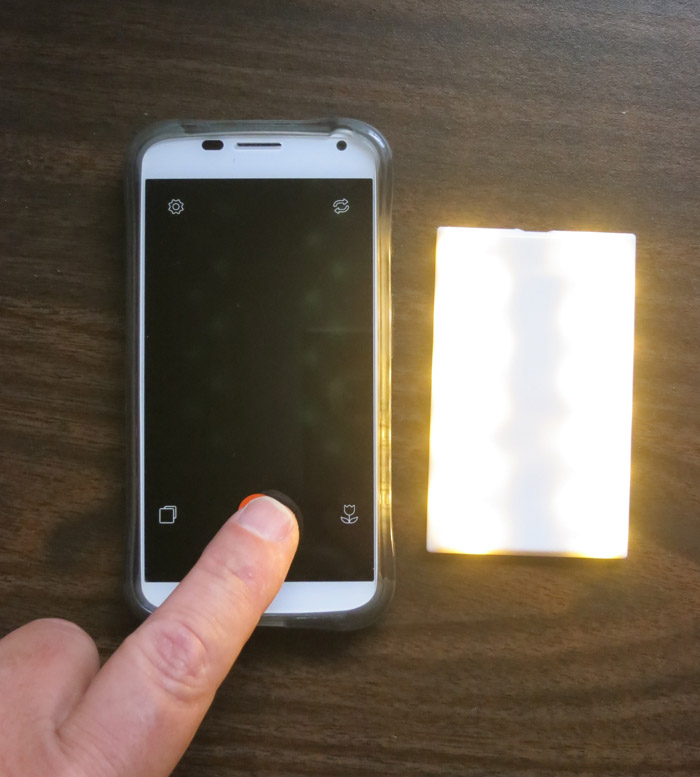
Nova Flash and iPhone
The Nova flash next to an iPhone 4. The Nova requires a newer model for Bluetooth compatibility.


The Nova hardware is super simple. It’s a thin white plastic case with�no user controls or buttons at all. It has a micro USB port which is used to charge the internal battery. It is extremely compact which should encourage you to take it along frequently. The translucent case allows the LED lights�to shine through with a nice diffuse glow.

Nova App on Android taking a photo
Taking a photo with Nova


Below are before and after photos taken with the regular Android camera app, and with Nova.


Stock Android camera, no flash
Before: Stock Android camera, no flash

The face is underexposed without flash. I took another�photo using the stock camera app, with the built-in flash, but it was a total disaster — shiny skin, closed eyes, really awful, trust me. Mercifully, I deleted it.


Nova App, Medium Flash Brightness
After: Nova App, Medium Flash Brightness

The Nova flash provided a nice fill-flash here and really made a much nicer photo.

Serious backlight problem
Before: Serious backlight problem

After: Backlighting somewhat overcome
After: Backlighting somewhat overcome by Nova Flash

The Nova acts more like a radio controlled LED flashlight than a traditional photo flash. When you take a picture, the flash comes on for a couple of seconds, during which time the photo is taken. So, you won’t be stopping any fast action with this flash. The long illumination time appears to allow the camera to adapt to the new lighting situation and take a properly exposed photo. The good thing about this is your subject has time to get over any blink reflex before the photo.

Nova Flash Summary

What’s Hot:

  • $59 price
  • Compact size, light weight
  • Bright enough to make a real difference

What’s Not:

  • Occasional trouble connecting via Bluetooth – restart App or turn�Bluetooth on/off to recover
  • No indication of battery state. This would be a nice addition to the app.

Update: June 2016 Not Recommended

The Nova Flash just went on the trash heap of otherwise nice products condemned by a bad battery. Mine sat in the drawer for 6 months. When I was ready to use it again, it wouldn’t charge up or operate. The battery is not replaceable. Since the unit doesn’t have an off switch, the battery discharges drastically when not in use.� I can’t recommend getting this, since the same thing is virtually guaranteed to happen to every unit eventually.


A Flash of Light in the Cemetery

Genealogists and historians photograph tombstones. Tombstones are literally history carved in stone. A lot of people are out there photographing tombstones. As of this writing, the popular site FindAGrave.com lists about 90 million graves, and millions of those have photographs submitted by ordinary people. Around 50,000 grave photographs are submitted to FindAGrave every day.

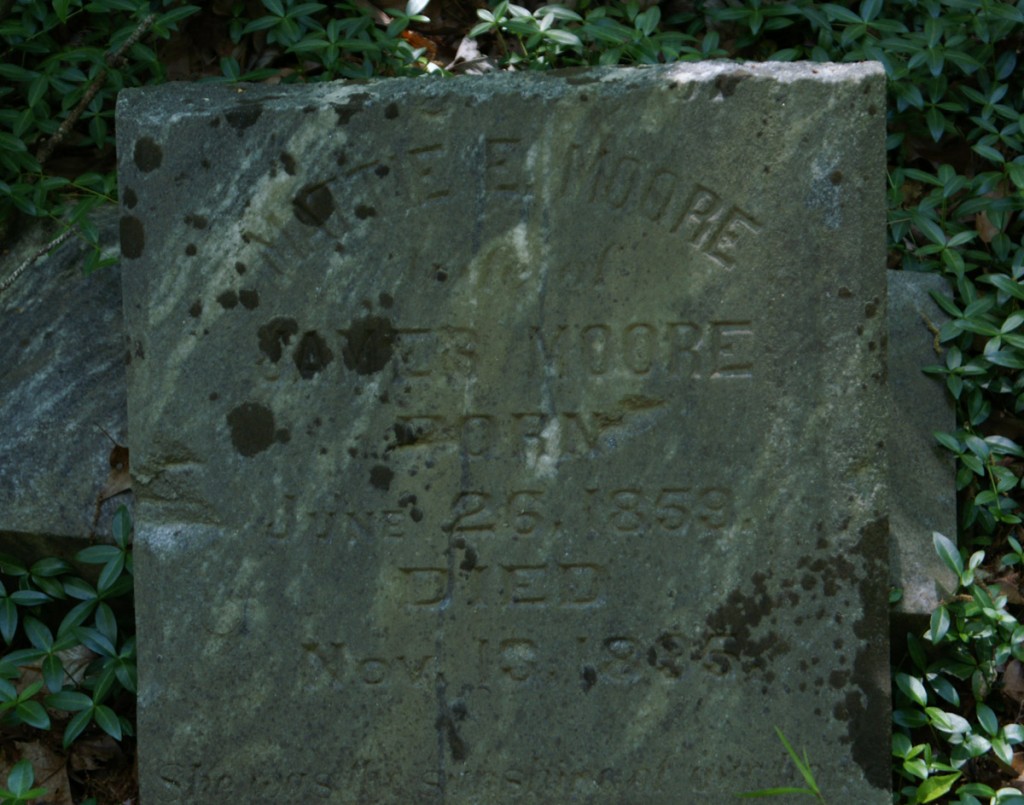
Typical photo, no flash. ISO 400, f/5.6 at 1/160
Typical tombstone photo, no flash. ISO 400, f/5.6 at 1/160. It’s okay, but barely readable.

Unfortunately, many tombstone photographs are very disappointing. Many of the most interesting tombstones are old, worn and discolored. It is common for the inscription to be unreadable in the photograph. You cannot fix the typical, low-contrast tombstone photo in Photoshop or other image editing programs. You might make it slightly more readable, but mostly you’ll be enhancing the appearance of moss and lichens on the surface of the stone. Frequently, the inscription is also unreadable in person, on site. This article will show you how to take photographs of tombstones that are not just a little bit better, but a vast improvement over the na�ve approach. You can even take photographs which allow you to read inscriptions that you could not read when you were there in person.

Lights!�

The key is proper lighting. In the movie industry, they say “Lights!, Camera!, Action!” in that order. Notice that the lights come first. We’re trying to photograph a nearly flat surface with a slight bit of carved relief. If you photograph a tombstone on a sunny day, you’ll have light from any which way, and often scattered light from various parts of the sky. This can give the stone a very flat, low-contrast appearance. To bring out the carved relief, you need the light to strike the face of the tombstone at a very shallow angle. You absolutely do not want to use a camera-mounted flash, or your camera’s built-in flash. These will remove all the shadows that you need to emphasize.

Artists and human-factors experts determined long ago that the human mind perceives relief most easily if the lighting comes from the upper left.

Hold the flash in about this position.

So, you need to control the lighting in such a way that the strongest light source is from the upper left as seen by the camera and strikes the stone at an angle nearly parallel to the face of the stone. The easiest way to do this is with an off-camera flash unit. It can be wired or wireless, but if you use a wired unit, you will need a flash cable that is long enough to keep it out of the photo. You could use tripods for the flash and/or the camera, but the easiest method is to recruit a photographer’s assistant to hold the flash unit over the tombstones.

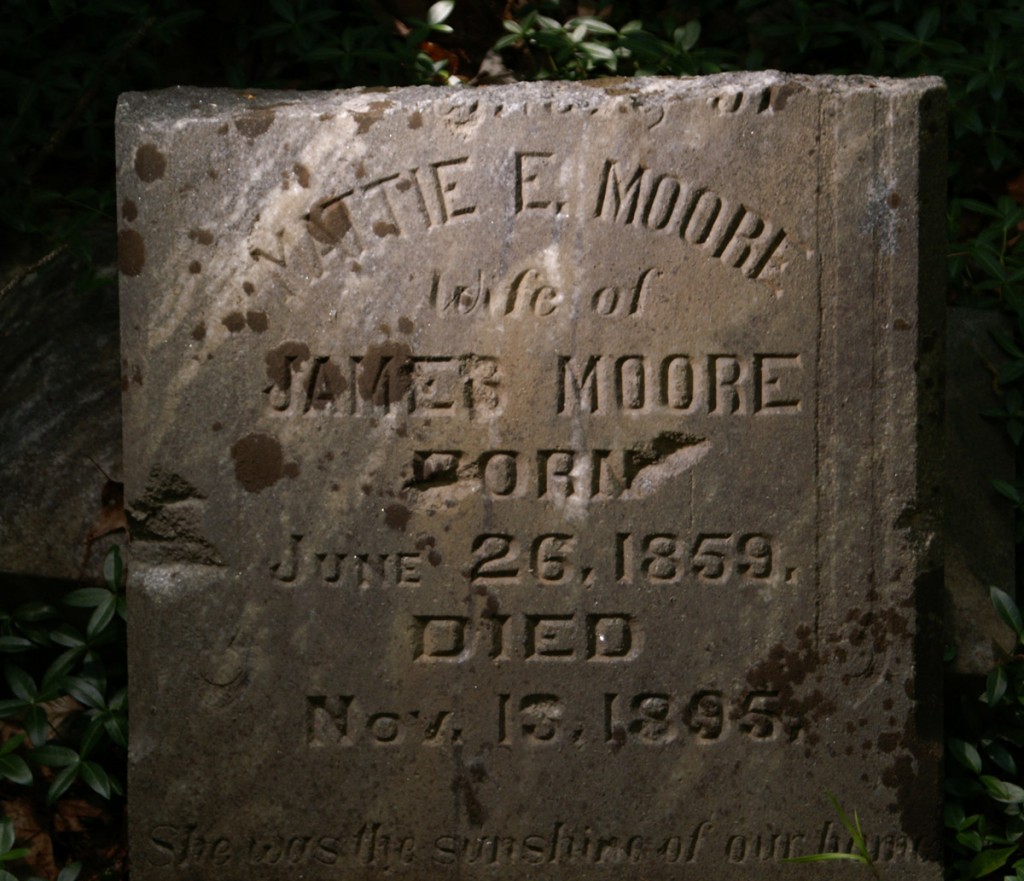
Much Better: Diagonal Flash: ISO 400 f5.6 at 1/500
Much Better: Diagonal Flash: ISO 400 f5.6 at 1/500. �Notice the “Wife of” text which was almost invisible before. The dark spots from the first photo are still visible, but they are less opaque now — you can read through them. Notice that the foliage behind the stone is now very dark (underexposed) where the flash didn’t reach. This is a good sign that we have minimized the effect of ambient sunlight.

High-Speed Sync (or not)

(June 2013: Good News: I revised the text to not emphasize high-speed sync. It’s expensive, and you don’t really need it.)�

What we’re trying to do here is arrange things so that the flash can overpower daylight. �The shorter the exposure, the greater advantage the flash has over the sun. The flash puts out all of its light in about 1/1000 of a second, while the sun shines all the time. Shortening the shutter speed dims the contribution of the sun, but hardly affects the flash at all, up to a point.

My photos here were taken with a Konica-Minolta Maxxum 5D and Minolta Program 5600 flash. This camera is getting kind of old. In fact, it is out of production, with Sony having taken over the Konica-Minolta line. I used this camera instead of my newer Canon specifically because this one has wireless, high-speed flash, and I have the corresponding flash unit.

The high-speed sync feature seems like a good idea until you realize that it also usually diminishes the effectiveness of the flash. If your camera and flash have high-speed sync, great, but don’t overdo it.

The good news is that at the close range we’re going to be using, common flash units can have an advantage over sunlight in the range of 3-5 f-stops. That’s a nice margin to work with. So, here’s how to set up your camera when using a simple, non-high-speed flash setup:

  • Set the flash to maximum output
  • Set the flash to its 35mm or 50mm angle (these are the defaults for many flashes)
  • Set the camera’s ISO to a fixed, low value, say ISO 100.
  • Put the camera’s exposure on manual
  • Set the fastest shutter speed which doesn’t require high-speed sync, say 1/200
  • Adjust the aperture (f/ stop) such that the photo would be about �2 stops under-exposed without flash. A good starting point would be f/22.

You’ll have to make adjustments for the lighting in your particular situation, but underexposing mostly through fast shutter speed is our way of emphasizing the flash while de-emphasizing the sunlight. �It will take a few test shots to get the best settings and get the flash aimed right, but that’s the great thing about digital — it’s cheap to keep trying. If your shot is over-exposed, you should reduce the flash intensity, move the flash further away, or use a smaller aperture (larger f-stop number). In any case, keep the shutter speed the same.

Here’s an example of what this technique can do for you. Don’t try this in Photoshop! It’s not happening.

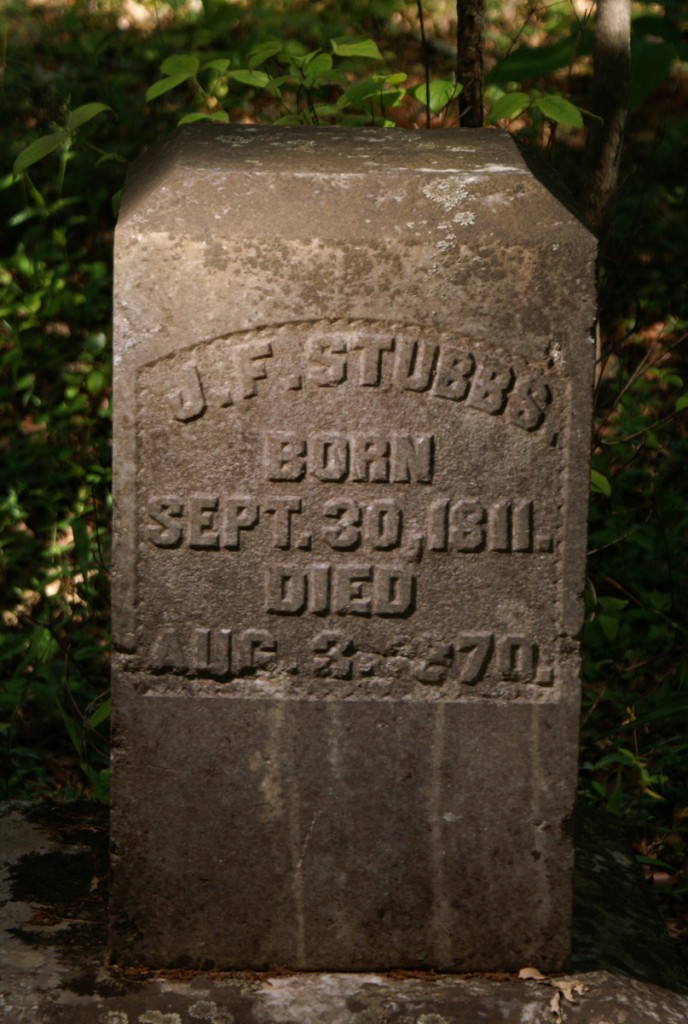
These two photos are of the same gravestone. The first was taken by veteran Find A Grave contributor Scott A. Steinbrink. He was apologetic for the photo, but noted he had an “awesome” camera, and that the photo matched what he saw in person. He’s absolutely right — there’s nothing wrong with his camera, and his photo is as good as many that I have taken — but there is a better way. The second photo was taken of the same stone in 2013 using the technique described in this article.

ISO 80 f/3.2 at 1/80
BEFORE: �ISO 80 f/3.2 at 1/80. �No Flash. Photo by Scott A. Steinbrink 2011.

Clearly readable with diagonal flash.
AFTER: �Clearly readable with diagonal flash. �ISO 400 f/5.6 at 1/500 in shady woods.


-Jamie Cox (ajmexico on Find A Grave)

June 1, 2013 update notes:

  • Some cameras require two flash units or a separate transmitter and a flash unit to do wireless flash. 🙁
  • If your camera and flash already do high-speed sync, aka FP flash, with the flash mounted on the camera, the simplest, risk-free approach may be to buy a long “off-camera” cable specific for your camera brand (Nikon or Canon). These are about $50.�
  • The Nikon D40 can use up to 1/500 as its regular sync speed, even though it doesn’t have HSS.
  • NOTE: October 2014: The D40X, however has the same 1/200 flash sync speed as most cameras.
  • The ~$30 NPT-04 Wireless trigger from Cowboy Studio will let you use just about any old flash as your remote wireless flash. It’s cheaper than a cable.
  • I have seen a lot of people saying to use a mirror or other reflector for tombstone photography. Phooey on that. The light from a reflector can never be as bright as the sun. Your flash can be several times brighter. If the sun is overhead, you can’t get any downward light from a reflector. The flash lets you control the light’s direction completely.
  • NOTE: October 2014: I have now seen some satisfactory before and after shots using a mirror. There are provisos: The sun has to be behind the stone, so the reflected light doesn’t have to compete with direct sunlight, and the mirror needs to be as large as the tombstone. �A diffuse reflector won’t work nearly as well as an actual mirror. But, it does work, and you can use any camera.
  • To learn all about flash photography in complete detail, see�http://strobist.blogspot.com/�.
  • After writing this, I found this straight-forward presentation of the same idea:�http://rootsandrambles.blogspot.com/2011/11/how-to-take-better-gravestone-
  • photos.html�This is a nice article.
  • NEW: Feb 2014: I posted a YouTube Video with step-by-step instructions for photographing tombstones with off-camera flash.
  • NEW: March 2014: I wrote a newer article on using off-camera flash.

October 10, 2014 update notes: