Using FaceTime on Apple TV

January 2026

Interested in having a FaceTime chat on the big screen? It seems like a good idea to sit in your living room and see your contacts big as life on your TV. However, your Apple TV doesn’t have a camera or a microphone, which are necessary for FaceTime.

Apple has addressed that problem with a feature called Continuity Camera, in which your iPhone’s camera and microphone can be used to extend the capability of your Apple TV.

As usual, there are certain provisos. Your devices must be running recent versions of iOS & TV OS. Operating systems must be at least iOS 17 and tvOS 17. Your devices must be connected to the same network and same Apple ID, yada yada. Your mileage may vary.

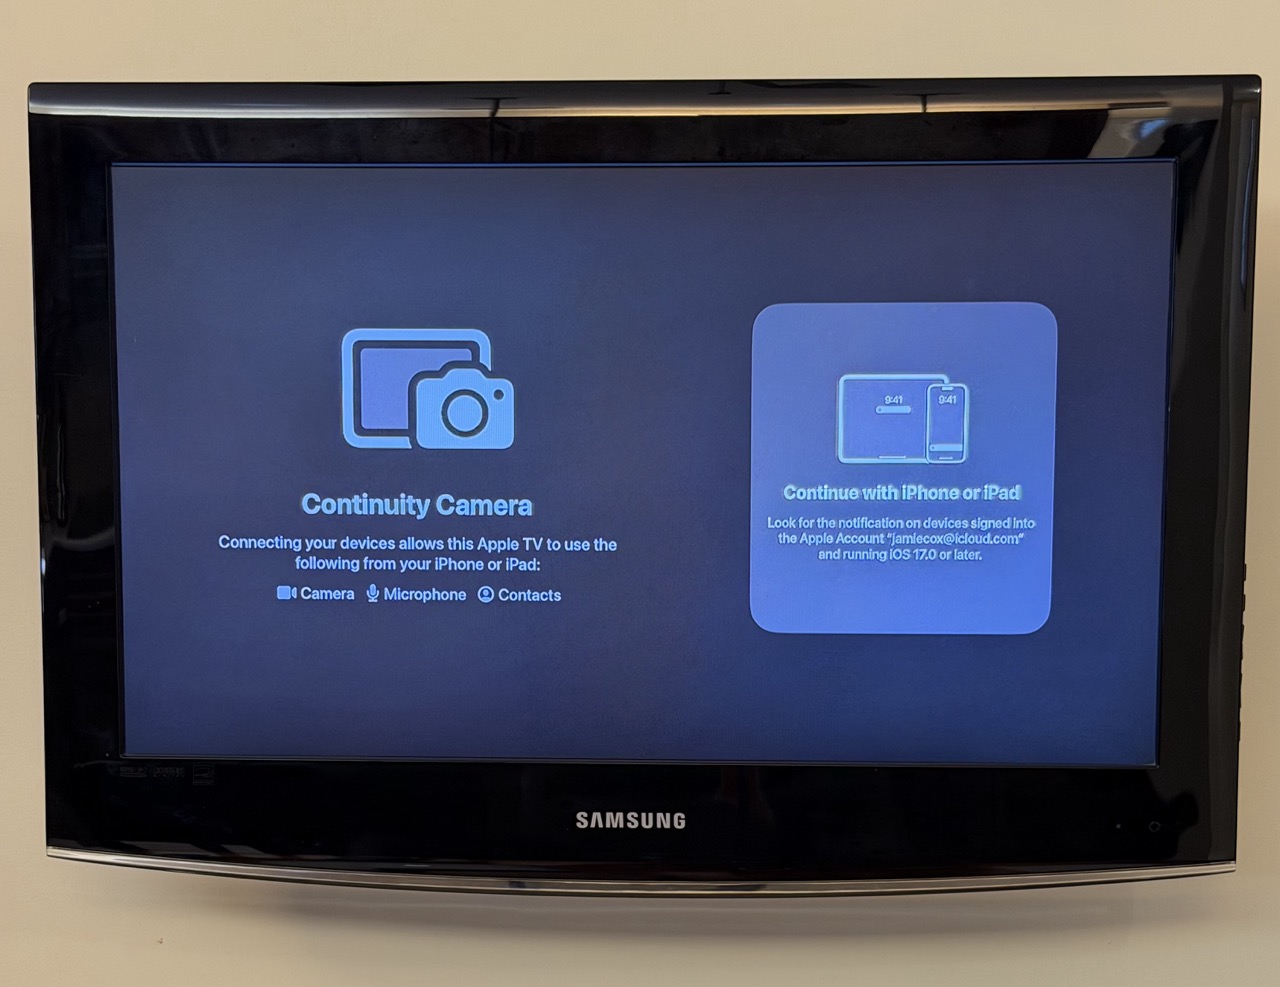
Once you open the FaceTime app on your Apple TV, you’ll see a chance to connect with your iPhone (or iPad).

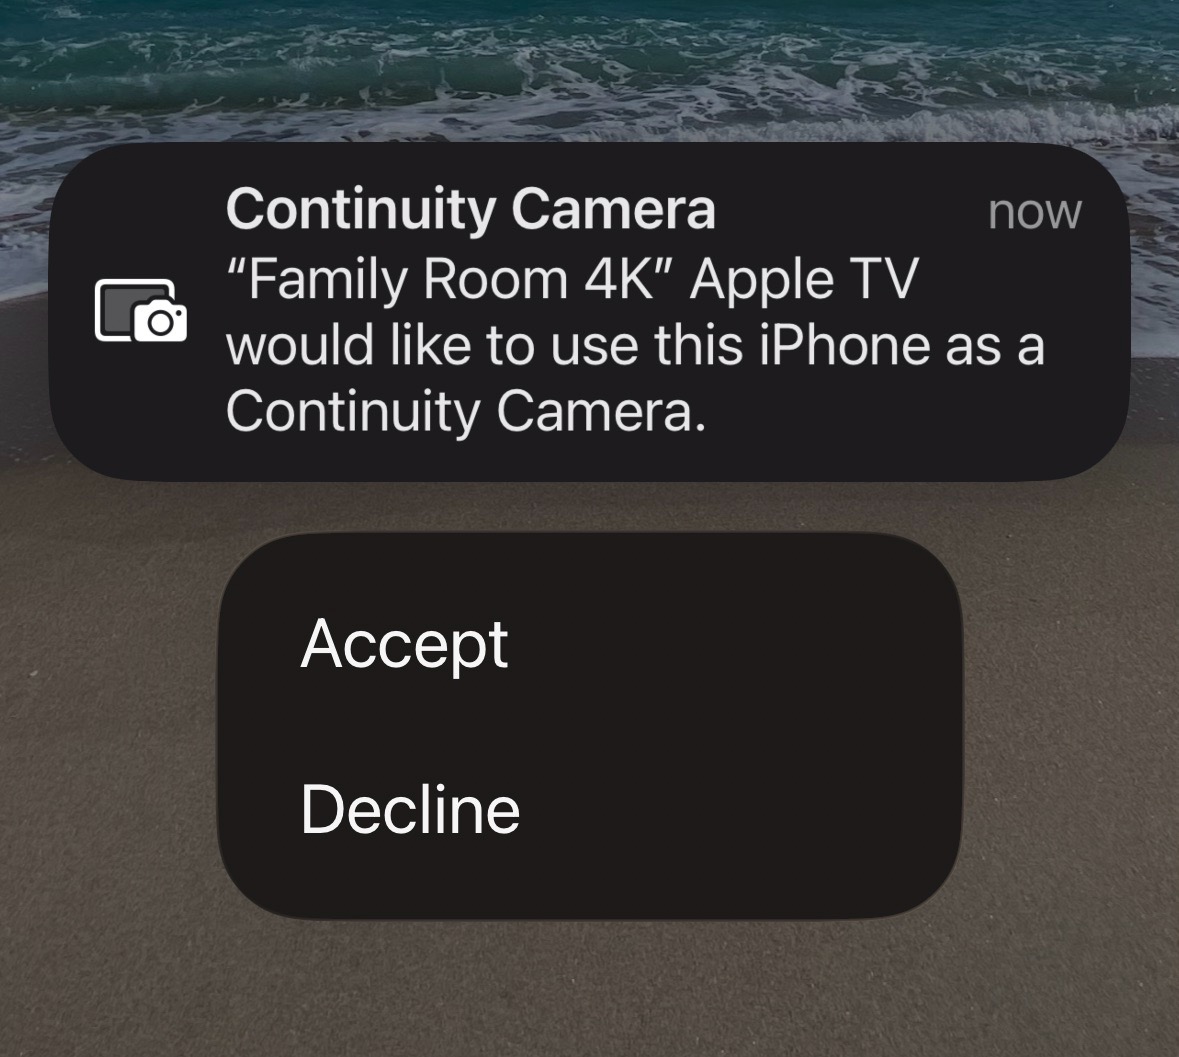
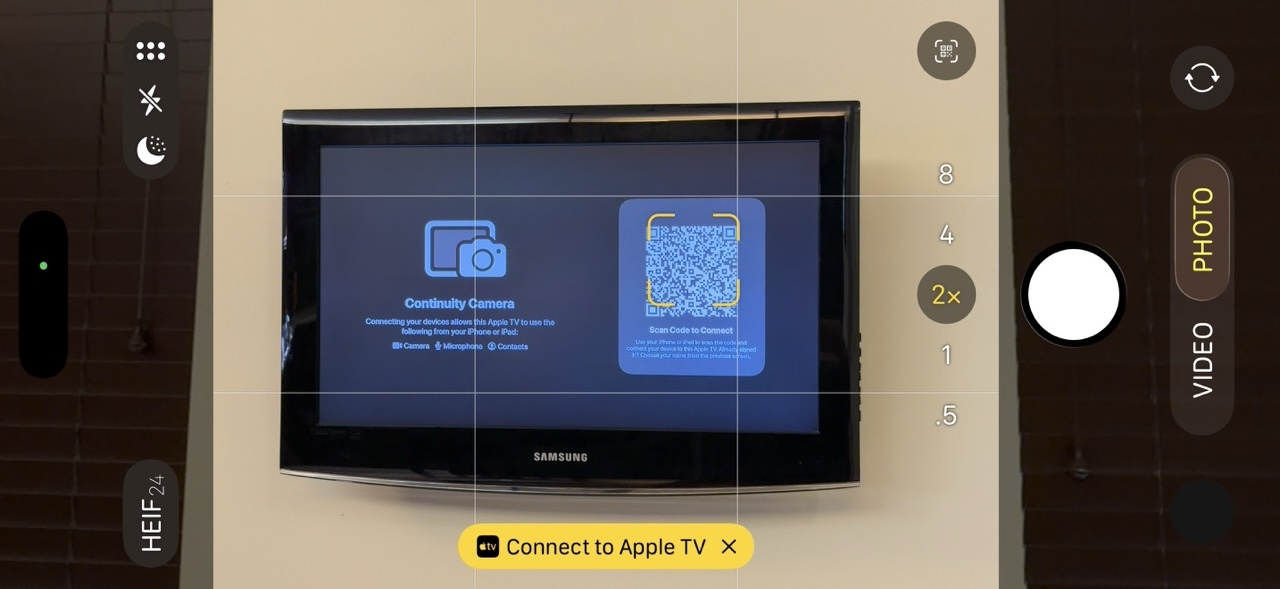
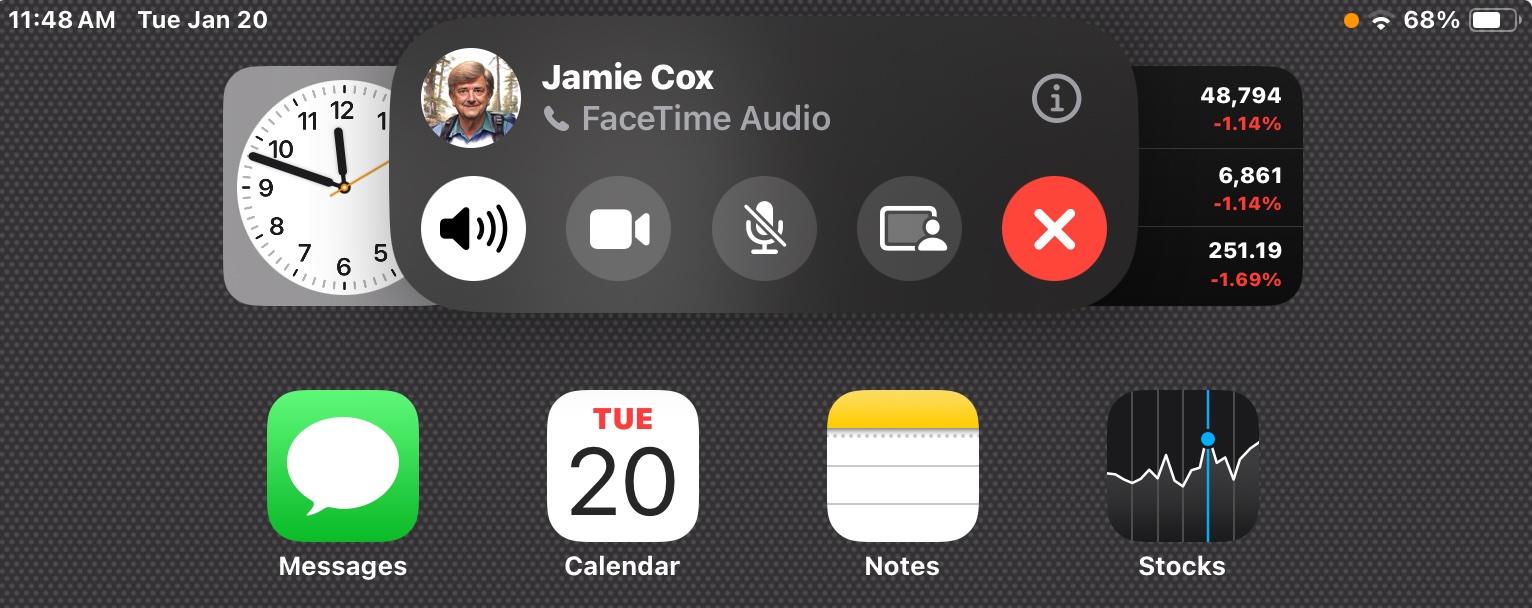
The screen below shows what pops up on your iPhone.

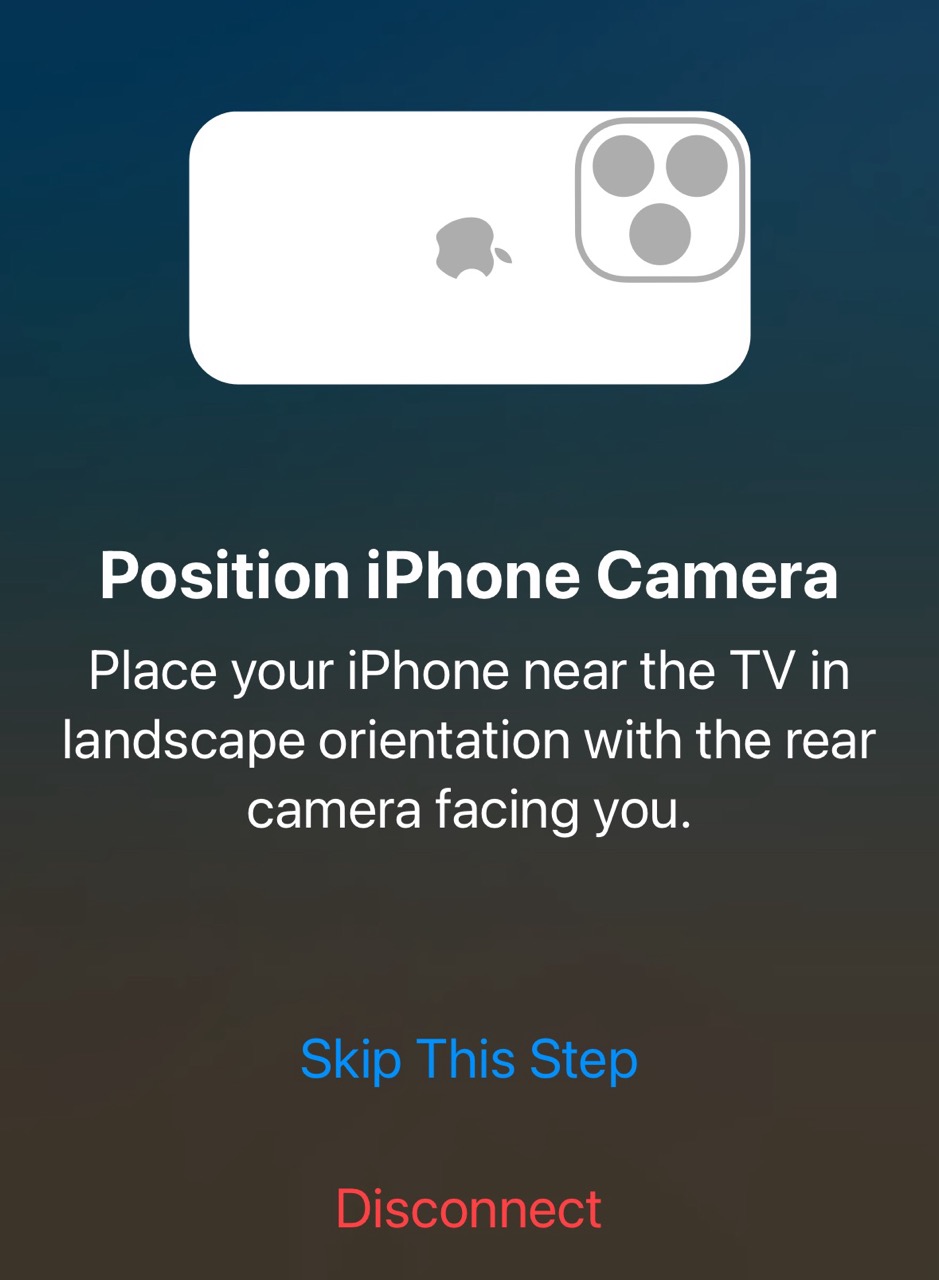
Once you accept, you’ll get the prompt below to position your iPhone camera appropriately for use by FaceTime. This is potentially the hardest part. It’s difficult to get your phone propped up in the right position unless you have some sort of mount or tripod.

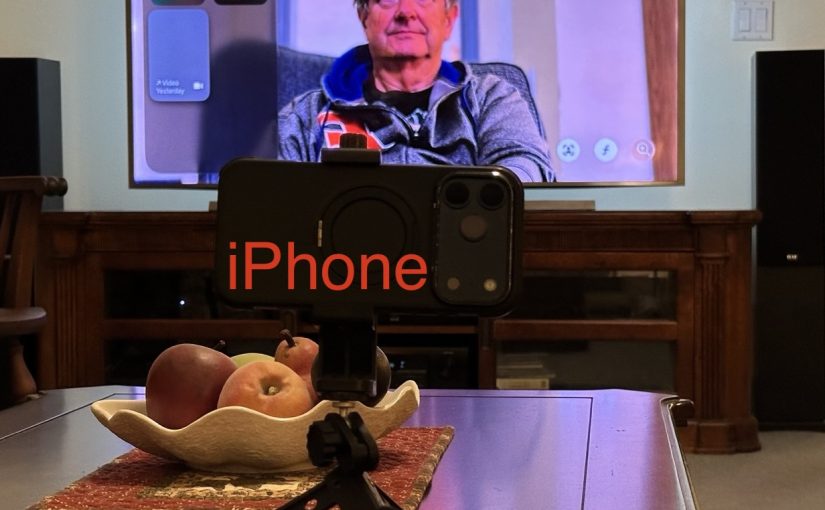
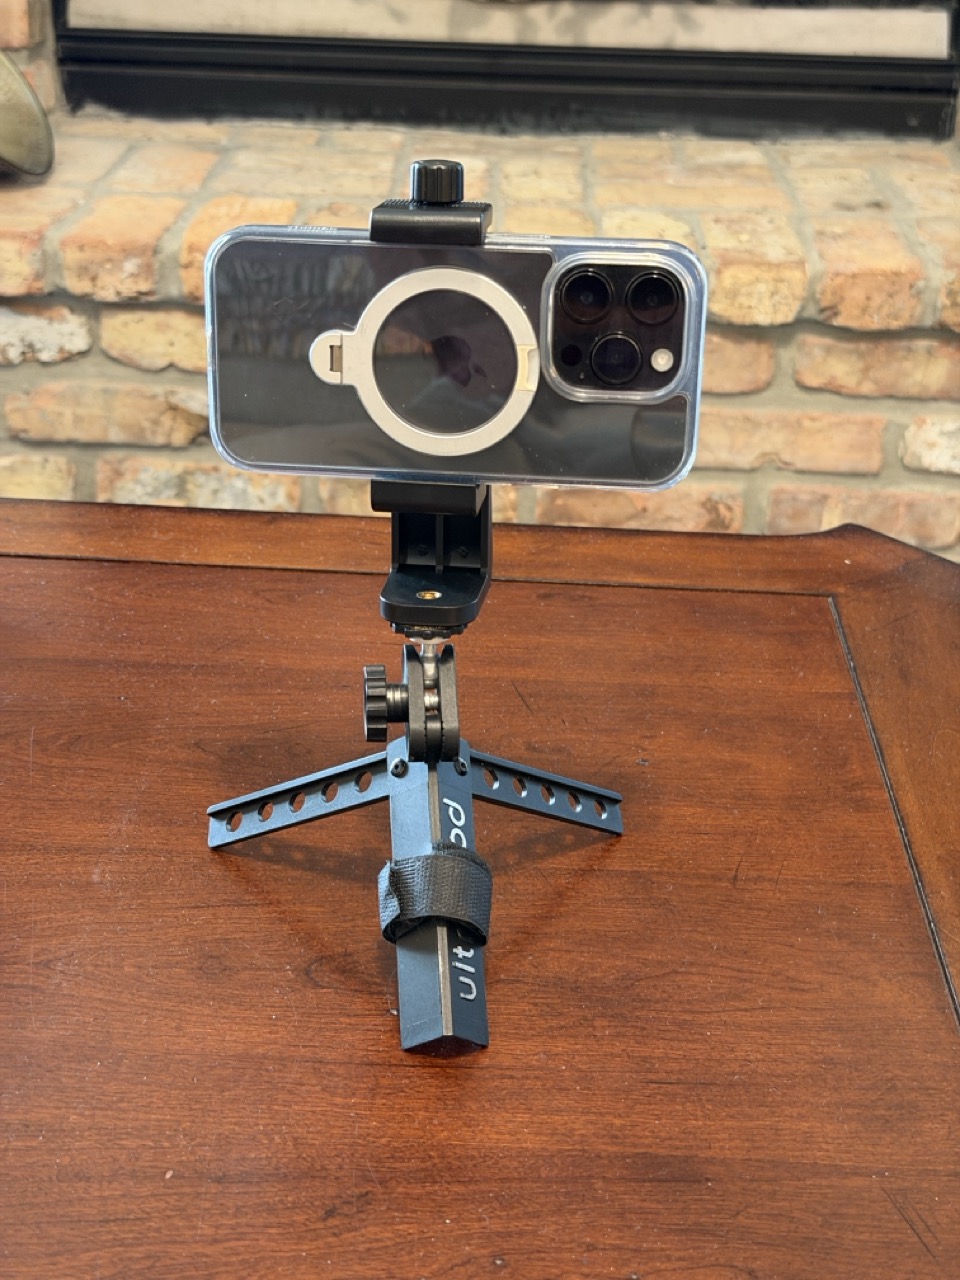
Below is my phone mount on a mini tripod. The tripod had a ball-swivel head, which is what you want to get the camera pointed in the correct direction. This product on Amazon seems to be a very similar setup.

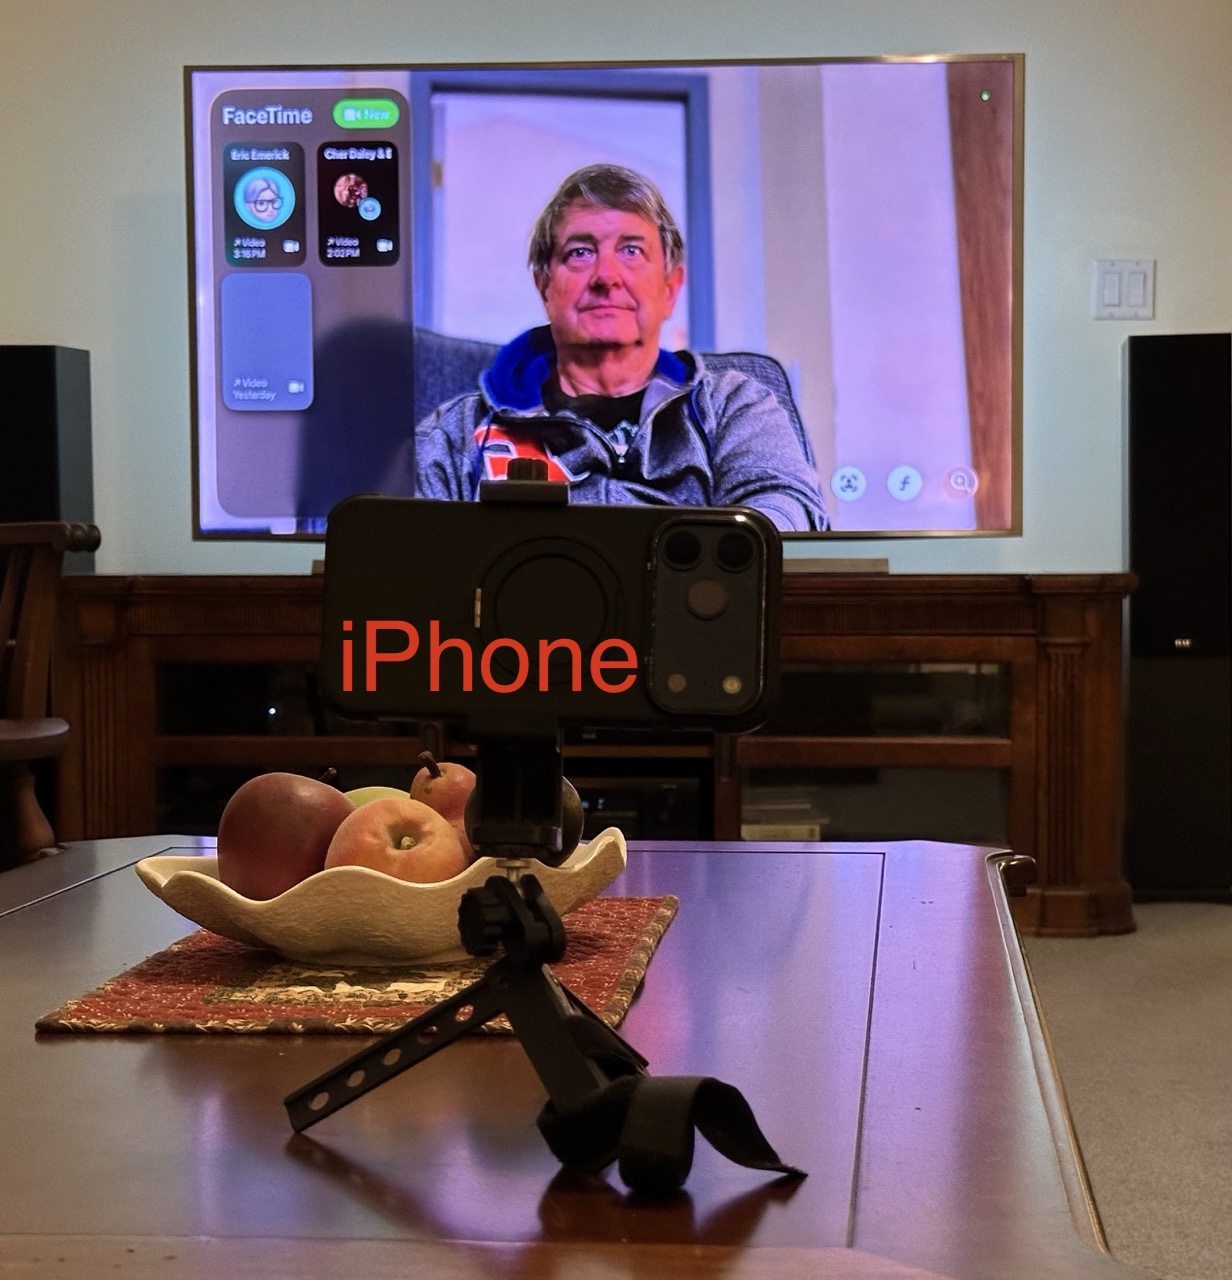
Once you have your phone mounted, you’re ready to FaceTime. Below is what it looks like in a FaceTime call. Since my chair is pretty far from the TV, I placed the iPhone camera on a table closer to me to capture a better image.

Versions of the iPhone from iPhone 11 on, will use a feature called Center Stage, to automatically keep the camera image centered on you, even if you move around a bit.

Problems, etc.

The above is the best-case scenario where everything works as expected.

If your phone isn’t on the same iCloud account as the Apple TV, you are guided to scan a QR code to connect. Frankly, I was never able to get that scenario to work.

Error messages I got:

“There was a problem loading your recent calls. You may need to restart your iOS device or Apple TV.”

“To continue, go to FaceTime Settings on your iOS device, then sign in to your Apple Account.” (I was already signed in and didn’t see any sign-in option in the FaceTime Settings.)

Other Tripods

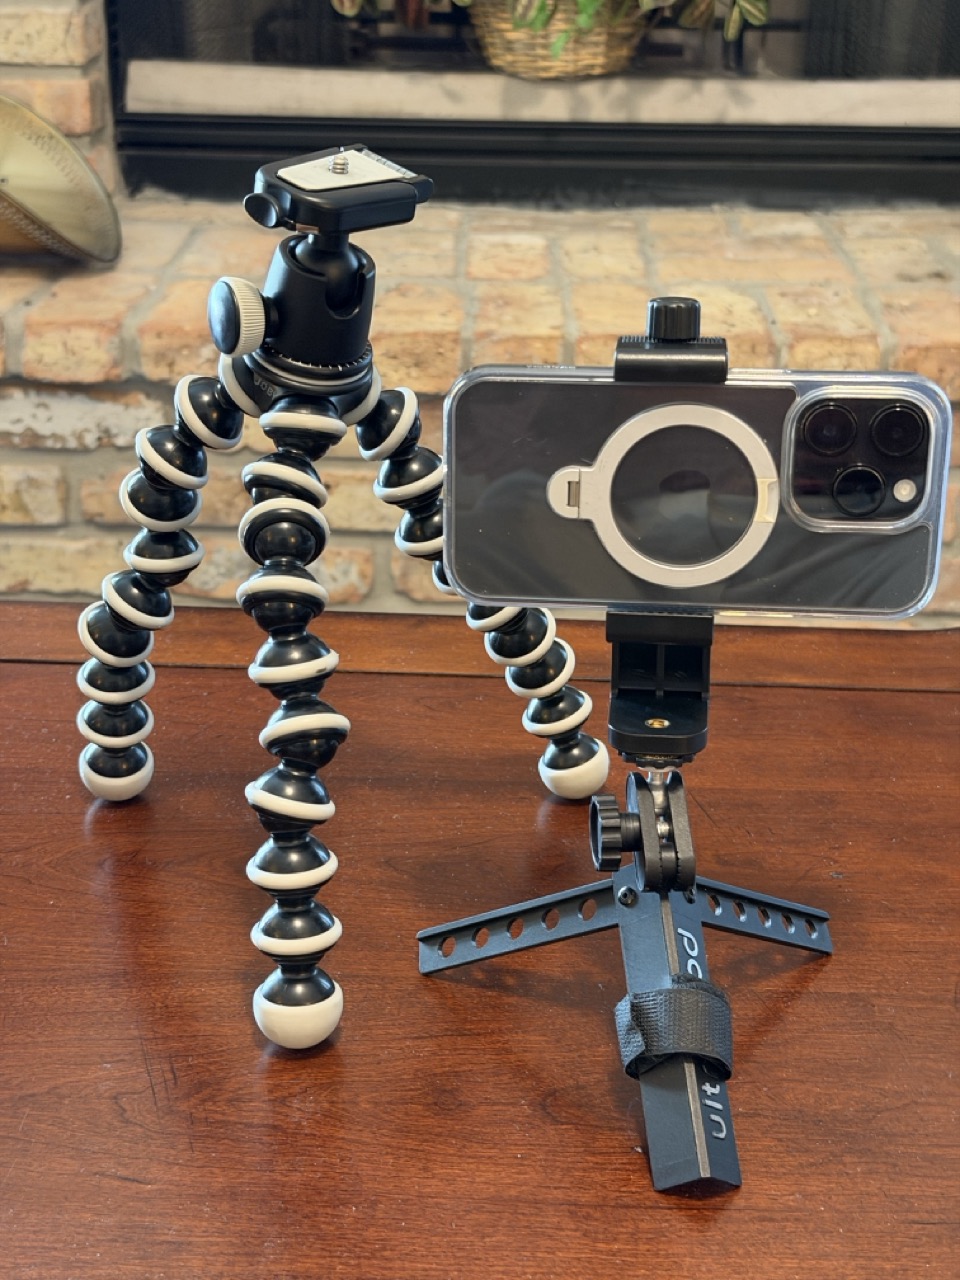
Your setup might work better with a full-sized camera tripod, or something in between, like this Gorilla Pod.

FaceTime with Apple TV is a cool feature, but it does require some patience to get it set up the first time. Enjoy.

Screen Sharing with FaceTime

January 2026 Meeting Topic

Screen sharing with FaceTime can be a great tool for helping or collaborating over the Internet. It allows two-way (or multi-way) audio and/or video chats. It also allows you to view or control someone else’s screen (with permission). If you ever need to help someone who doesn’t live with you this is a great tool.

Prerequisites

FaceTime itself works on Macs, iPhones and iPads. You can do a FaceTime call to a Windows user also, but that mode doesn’t support screen sharing.

On Apple devices, both parties must have an Apple ID and be signed into that on those devices. Most Apple users do have an Apple ID, and their devices are usually signed in.

Your device must have a microphone. A camera is helpful. All iPhones, iPads, iMacs and Mac laptops have a camera and a microphone, but some desktop Macs do not have those built in. You can use FaceTime audio and screen sharing on a Mac with a microphone only but no camera. This is despite a message that says “To use FaceTime, connect a camera.

It seems weird that to do screen sharing (in either direction), you must have a microphone, but that’s the way it works at present.

If you try a FaceTime call without having a microphone, it may appear to work at first, but when the other party answers, you’ll get “Call Failed“.

FaceTime screen sharing requires iOS 18 or newer on iPhone, and iPad OS 18 or newer on iPads.

Messages and FaceTime

You can launch a FaceTime call from within the Messages app. This is probably the most reliable way to get started with screen sharing.

By exchanging text messages with the other party, you are greasing the skids by making sure that you have their correct Apple ID contact information. You can also ask them if this is a good time for a FaceTime call, and ask them to start using their Mac instead of their iPhone, if you want to share the Mac screen. It’s usually easier to deal with screen sharing on a larger screen. But if you want to share an iPhone or iPad screen, that works too.

Once everybody is ready, and using the devices you want, you can start a FaceTime Audio or Video call from the Conversation menu in the Messages App.

Screen Sharing and Facetime options are in the Conversation Menu of the Messages App.

When you screen share from Messages, it actually begins a FaceTime call. The recipient than has to answer that call before the system will ask for screen sharing permission. If asked to share your screen, you can accept, decline, or choose to share only a particular window.

In the example below, screen sharing is in progress. You see a FaceTime window above, and a shared Safari window below. The local user is sharing their screen with the remote user. Screen Sharing controls are visible at the top of the screen, and at the top of the shared window.

When screen sharing on the Mac, you can choose to share your entire screen or a specific window. Sharing only a specific window is good for privacy, but also as a practical matter, reduces the screen real estate occupied on the receivers screen, showing only the relevant information. This is especially important when the sending system has a larger screen than the receiving system. There’s little point sharing your 4K Mac screen to an iPhone. It would appear tiny.

FaceTime on iPad/iPhone

Here’s the FaceTime controls on an iPad. The red X hangs up the call. To the left of that is the screen sharing icon. Pressing that brings up the menu below, where you will want to press Share My Screen.

If you don’t see the screen sharing icon, try switching to a video call, even if both parties don’t have cameras. This sometimes makes the sharing icon appear.

Here’s what a FaceTime Video call looks like on an iPad. In this case, the other device did not have a camera. Note the small green dot at upper right. This is the universal indicator that some App is using your camera. If it appears yellow, that means an App is using your microphone. The region at lower right contains your own camera feed. (from this iPad)

Note that for iOS/iPadOS version 17, Screen Sharing is supported, but not remote control.

Microphones for Macs

If your Mac doesn’t have a microphone, you can use just about any USB microphone. Many are available. If you have a Mac Mini, be aware that it does have built-in speakers, although they are pretty weak. You will want your microphone cord long enough to get it away from the speakers and closer to you.

A great substitute for a USB microphone is a Bluetooth headset or Air Pods. That is recognized as a microphone for FaceTime purposes, and works really well, providing noise isolation.

Air Pods are a great choice for a video or audio call even if your device has a built-in microphone.

Share Your Screen

So, now you are happily sharing your screen, or your caller’s screen. You can converse back and forth discussing and explaining what you both see on screen. This is what you came for. Enjoy!

Photos App – Store, Sync, Search & Share

Photos App Icon

MacMAD Meeting Topic for November 2025

Apple’s Photos App is deeply integrated into our daily use of our iPhones. At MacMAD, we get a lot of questions about photo storage, sync and general usage of the Photos App. So, this month we’re going to go over some of the common ones.

Here is the presentation in Keynote format.

Assistive Access – July 2025

Last night we talked about Assistive Access, a greatly simplified operating mode for iPhone and iPad. Here are links to Assistive Access info:

We’ve already gotten an important question on Assistive Access: How do I turn it off, and get out of Assistive Access? You can exit Assistive access by triple-clicking the side button (power button). This brings up the option to exit. You’ll need to enter the 4-digit assistive access code that you originally setup to exit back to your usual user interface.

Also, a question came up about converting a lot of photos. Here is the solution we showed in the meeting:

Turn Any macOS Folder into an Image Converter (Mac Rumors)

Also, the macOS Finder has a convenient way to convert multiple images at once. Select some files, then right-click, or Ctrl-click to bring up the contextual menu. Then go down to Quick Actions and select Convert Image. You will see options to convert to JPEG, etc.

Several people asked questions about photo albums in Photos on the iPhone. One tip that might help you make albums appear more prominantly for you:

In Photos, scroll all the way to the bottom where you will eventually see Customize & Reorder.

On that screen, you can select which views of your photos you want to appear in Photos, and drag them into the order you prefer. I have put Albums at the top here, and turned off Memories and Featured Photos. It’s entirely personal preference, and you can adjust this as you like.

As always, here’s the complete iPhone User’s Guide from Apple. On that page, either use the search, or click Table of Contents to get started. If you read that, you’ll be ahead of everybody in understanding the iPhone. Note that the User’s Guide is always for the latest version of iOS. If you are using an older version, it won’t be exactly applicable.

Settings and Control Center Basics

This is the MacMAD Meeting topic for March, 2025, as of iOS 18.3.2.

Settings is a big topic. I’m going to mostly talk about iOS (iPhone) settings. There are literally thousands of separate items in the Settings app for iPhone.

Terminology

Settings for iOS are located in the Settings app. Settings for MacOS are in System Settings, formerly known as System Preferences.

Expect it: There’s a Setting for That

Settings affect everything you do with your device. Many behaviors we know and expect from iOS are optional and can be turned on, off, or adjusted.

One of my favorite rules of thumb for working with computers and smart phones is: It probably already does what you want and if not, it can be adjusted to do that. If you are wishing for a feature every time you use your device, you are probably not the first. The designers and developers also have to use these devices and they have included many of the features that they want as users.

Expect a lot, and you’ll get a lot.

How Settings are Organized

Search is at the top. That’s good because Search is often the easiest way to find the setting you want.

Next comes the Apple Account / Apple ID / iCloud settings. I think of this as being first because it’s important to Apple’s bottom line. Encouraging people to use their Apple account ultimately contributes to Apple’s income, so they put that right at the top.

Take a look at the Subscriptions section to find everything you are subscribed to, not only from Apple, but from any Apps in the App Store. You might find you are subscribed to something you no longer need.

After the Apple Account settings come about 27 system settings that seem randomly organized. They are divided into sections which each seem to mostly be in alphabetic order, but not always. This disorder is one of the reason many users throw their hands up and despair of ever finding anything in Settings.

At the end of the list comes the Apps section. Inside the Apps settings, everything is strictly in alphabetic order, which is good, because you may have dozens or hundreds of Apps installed, each with their own settings. The exception is hidden apps, which appear in a special section at the end of the list.

A Few Favorite Settings

Silence Unknown Callers – This is in Apps ->Phone->Silence Unknown Callers. If you turn this on, it sends calls from numbers which are not in your contacts straight to voicemail. Your phone won’t ring. Also, notice Apps->FaceTime->Silence Unknown Callers. This one is lesser known, and spammers have started using FaceTime lately.

Screenshot

General -> About This often-overlooked section has lots of useful information and controls. What model of phone do I have? It’s in there. When does my Apple warranty expire? It’s in there. How full is my phone’s storage?

Accessibility – This (large) section is mostly for people with some sort of disability of sight, hearing, motor control, etc. But there are some gems in here that might be useful to everyone. Accessibility -> Face ID & Attention -> Require Attention for Face ID. This seems more like a security feature. I have this turned on which makes it less likely my phone will be unlocked without me knowing it.

Accessibility -> Side Button -> PRESS AND HOLD TO SPEAK (Siri). I have Siri selected here. When I hold the side button, the Siri Icon appears, and I’m speaking directly to her without having to say her name first.

Settings -> Notifications – Here’s the answer to those frequent questions like “How do I get rid of those red numbers on my App icons?” and “How can I get rid of all these popups on my screen from Facebook?”

Those numbers on App icons are called badges. They are a form of notification. You can turn those on or off for each App individually in the Notifications section of Settings.

App Icons with Badges

We live in a marketplace of attention. Companies with Apps typically want you to pay attention to their app. Your attention is worth money to them. So they often try to capture your attention with lots of notifications. Of course, this becomes overwhelming when you have dozens or hundreds of Apps clamoring for your attention. iOS allows you to selectively enable or disable notifications from Apps.

Notifications in Notification Center

For many of the worst offenders, like Facebook or other social media apps, your best option is to turn off notifications for those Apps altogether.

Control Center

Control Center is a quick way to access settings and other features of your phone.

Control Center “Favorites” Screen

Pull down from upper right to open Control Center on iPhones with Face ID. Swipe up from the bottom of the screen on iPhones with a home button.

Some of my favorites here are the Magnifier, Apple TV Remote and QR Code Scanner.

Screenshot

You can customize Control Center with your preferences, including controls to launch your favorite Apps, and controls that use Shortcuts to accomplish other tasks, like the “Silence/Allow Unknown Callers” buttons above.

Mac OS Keyboard Commands

Also on the program tonight was Mac OS Keyboard commands. Here is a copy of Eric’s slides on Keyboard Shortcuts.

See Also

Apple’s Complete iPhone User Guide

Complete Diagram of Settings (iOS 11) created by Podfeet.com

Back To Basics for iPhone & iPad

MacMAD Presentation Meeting for Tuesday, September 17, 2024

Helpful Basics On-Line

Tonight’s meeting is primarily an on-line demo. But, here are some supplementary on-line references oriented towards the basic iPhone or iPad user.

iOS 18 and iPadOS 18 have just been released, so the User’s Guides will probably be updated accordingly. For the beginning user, the biggest difference is probably that the Control Center looks slightly different now.

Workflows

On-Line Demos of common tasks.

Use Settings to:

  • See your device’s model (is this an iPhone 11 or iPhone 12?)
  • See your device’s warranty status
  • See how much of your device storage you are using
  • See how much of your iCloud storage you are using
  • Sign in to iCloud – You are probably already signed in.

Note – Almost ALL iPhone & iPad owners have an iCloud account, whether you know it or not. If you are paying any amount monthly for iCloud, you have an iCloud+ account.

More On-Line Demos

  • Take a photo and send it to someone via eMail or text (e.g. sharing with family)
  • Open an email and add the sender to your contacts.
  • Open a contact and send them email.
  • Open a contact and navigate to their address.
  • Buy and install a new App from the App store.
  • Add a credit card to Apple Wallet .. Pay someone with Apple Wallet
  • Visit a Website. Bookmark it. Create a login at a web site. Log out and back in. (iPad)
  • Create a Calendar Appointment for a recurring event

The Meeting Slides (Keynote format)

Chat Apps

November 2023 Meeting Topic

Text messaging of various types has become very popular since the beginning of mobile phones. The popularity of chat apps has really taken off with additional features such as group chat, photos, and audio and video chat.

The line between Chat Apps and social media such as Twitter (X), has become blurred as more features are added.

Popular Chat Apps

  • Messages/FaceTime (Apple)
  • Signal
  • WeChat
  • WhatsApp Messenger
  • Telegram
  • Messenger (Meta/Facebook)
  • Google Chat

Why Choose A Particular App?

Convenience: Messages is built into your Apple products. It’s easy to use. There may be no reason to change, especially if your friends use Apple devices also.

Security and Privacy: Signal is your best choice for absolute security, with end-to-end encryption, a security-focused company, and publicly reviewed code. Apple’s Messages is also very secure, but perhaps less so against governments. The Signal protocol has also been adopted by WhatsApp and Google Messages (on Android).

International Travel: WhatsApp is popular overseas and with travelers. You can use WhatsApp with an international data plan. Since it does not use conventional SMS text messaging, you won’t get charged for the texts. WeChat is nearly universal in China and the far east. It is widely used for checkout and payments as well as messaging. Telegram is popular in India, Asia, Africa and parts of Europe.

Features

  • Group Chat
  • Audio/Video Chat
  • Broadcast to large group
  • Stickers, emojis, reactions
  • File Transfer
  • Document Sharing/Team Collaboration
  • Send money

Under the Hood

The original text messaging protocol was SMS (Simple Messaging System). You’re probably still using SMS if you exchange messages with non-iPhone users (probably Android). SMS has a 160 character limit for each message. MMS (Multimedia Messaging Service) is an extension of SMS which allows “texting” of photos and videos (Low-resolution). SMS and MMS messages count as “text messaging” on your cellular plan, and do not use your data plan.

RCS (Rich Communication Services) is a more modern protocol widely used on Android phones. Apple has announced that its Messages App will be compatible with RCS beginning sometime in 2024. RCS messages use cellular data (or WiFi) (not “texts”). However, none of the chat App protocols will probably make a significant dent in your cellular data usage. When RCS is available in Messages, Apple users and their Android friends will see an improvement in the quality of photos and videos sent and received.

The other Chat Apps are each using their own protocols to exchange messages using Internet data over cellular or WiFi. The quantity of data used is probably insignificant.