Here is the link to Apple’s list of Mac Keyboard Shortcuts from Tuesday’s meeting.
Category: Tips and Tricks
The Best Shared Shopping List App You Already Have!
I set out recently to find a shared iOS shopping list App to replace my family’s paper grocery shopping list. I had some pretty simple requirements:
- Easy-to-use sharing between family members using different iCloud accounts
- Ability to review the list in the store and mark items off
- Ability to review and revive completed items (We’ve got milk this time, but we’ll need it again soon)
I spent some time in the App store looking at reviews and didn’t see anything I wanted to buy. Some otherwise useful apps had a bad reputation for crashing. Others were just too complex. Some needed a subscription and a sign-on for sharing to work. It’s just creepy that the vendor would be watching everything on your shopping list.
Eventually I found it. An app that was already on my phone that met all my requirements and didn’t need any additional sign-ups, plus you can use Siri to add items to the list by voice.
The app is:� Reminders — the humble Apple Reminders app that comes with iOS.
Here’s an overview from iMore on how to set Reminders up for sharing.
A couple of tips:
- You can have more than one list.
- Remember the name of your lists: “Shopping List” and “Grocery List” aren’t the same to Siri.
- When you invite someone to share your list, they may have to sign on to iCloud on the web the first time to accept the invitation, but after that it can be strictly iPhone-to-iPhone.
- Everyone invited has equal ability to add, delete and edit items on the list.
- Tap at the bottom of the reminders App screen to see your other reminder lists.
Enjoy!
Basic iPhone Gestures
I’ve met several people who say they just want to use Facebook or email, but are having problems using their iPhone. They are often surprised by the results of their actions, and sometimes flail away at the screen in frustration.
Trying to use Apps on the iPhone (or iPad) without understanding the basic gestures is like hopping in a car, wanting to drive across town, without being quite sure what those pedals on the floor do.
Here’s a quick rundown of the iPhone controls and what to expect from them. I’ve separated gestures you make on the touch screen from operations involving the power button, the home button and the whole phone. Many of the functions I have indicated below can be customized in Settings, but these are the default actions. Gestures may have special meaning within certain Apps, but these are the most common usages.
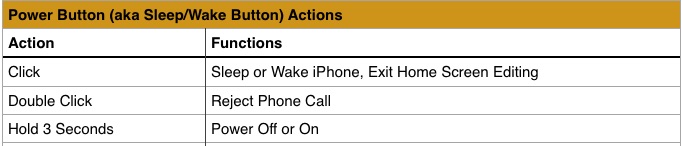
Starting at the very beginning, here’s how to use the power button, located on the upper right side of your phone. Holding the power button for 3 seconds brings up the Slide to Power Off screen. If your phone is powered down, you will need to hold the power button for a few seconds until you see the Apple logo and the phone begins powering on.
Here’s what you can do with the Home Button at the bottom center of the iPhone/iPad. Touch ID is only available in the iPhone 5s and newer. For a click, press hard. For a tap, just touch it lightly. Only a light touch is needed for the fingerprint sensor. If anybody knows some function that requires only a single tap of the home button, please leave me a comment.

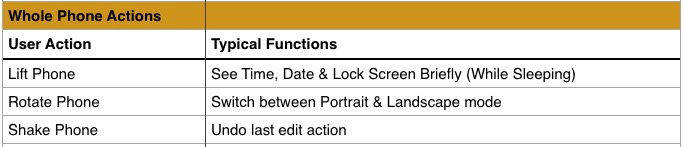
There are a few things you can do with your whole phone, without pushing any buttons. When you phone is asleep, lifting it to a vertical position momentarily turns on the screen so you can see the time, date and notifications.
Here are the gestures for the iPhone touch screen. These are the most commonly used and the area where people have the most trouble. In particular, the iPhone is very sensitive to any sideways or vertical motion of your finger when you touch the screen. If it notices any motion, your gesture is interpreted as a swipe instead of a tap. Tapping is probably the most common gesture, so it’s important to master it. When tapping make sure you move your finger up and down only, without sliding it sideways at all.
One of the most common problems with the touch screen is unintended actions. The screen is very sensitive to the slightest touch. In fact, it will sometimes sense a touch if your finger is just near the screen. So, keep all your fingers away from the screen until you actually want to do something.
Remove your finger promptly when tapping or you will get a Press & Hold. If you want to use Press & Hold, you don’t have to press hard, just rest your finger — again, no sliding. This is probably most useful to open the sharing menu for a photo.
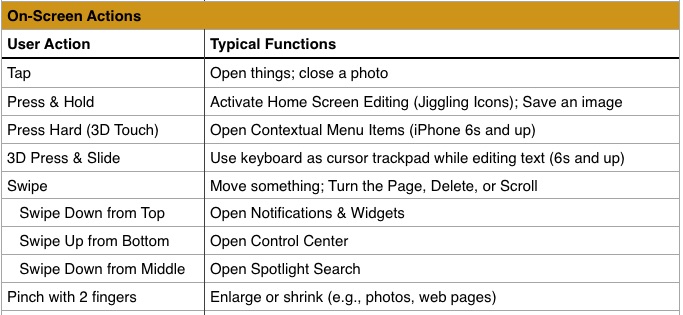
These are special, iPad-only gestures:

For a device with such an easy-to-use reputation, this is a pretty big list. But, make sure you understand these and you will have a much easier time using your device.
Fight Calendar Spam
Recently, I have been receiving mysterious spam calendar invitations like the one below. You may have received them also.
 I never saw a corresponding email. Even worse, the only options are accept or decline. Either one sends a message back to the spammer, confirming my email address! This junk is coming through your iCloud account. Here are instructions for preventing this type of spam from The Dangling Pointer blog. �
Since this is associated with your iCloud calendar, it affects both iOS and Macintosh.
They probably didn’t get your email address from anywhere. It appears they are trying big lists of likely email addresses @icloud.com.
Tutorials Online
There are several sources of helpful Macintosh and iOS (iPhone and iPad) tutorials available to you online.
Apple has a series of short tutorials on various subjects. They used to have video tutorials. I don’t see those anymore. Instead, they have short well-illustrated tutorial pages. These are accessible from the Apple Support page.
If you prefer video tutorials, take a look at www.themacu.com . The videos on their Quick Lessons blog are free. There’s a nice list of interesting topics. You can buy their longer tutorials through the App store. Their App is called TMU Tutorials. Macintosh “All Access” is $19.99.
ScreenCastsONLINE has quite a complete collection of thorough Mac and iOS tutorial videos. A subscription to ScreenCasts Online is $21 per quarter.
There is also a free ScreenCastsONLINE YouTube channel with useful tips of the week.
If you watch someone else using an App, you usually have that Aha moment when you think “I could do that!”.� So, take a look at some of these useful tutorials and get more out of your Mac, iPad or iPhone.
Help! I’m Out of Memory
I often hear beginners say that their computer is out of memory. This is often a clue that they are beginners. Computers contain two different types of “memory” and you need to carefully distinguish between them. I could give a detailed technical explanation, but it would be obsolete in a few years, and wouldn’t be all that helpful. Instead, I’ll describe how they are used, what the symptoms are when you run short and finally, what to do about it.
RAM vs. Storage
Current computers contain two main types of memory, RAM (Random Access Memory) and non-volatile storage. This is true for Macs, PCs, iPads and iPhones, etc. Confusion arises because these very different things are both measured in the same units, Megabytes and Gigabytes. If someone says their computer or phone has 16 Gigabytes, you should be thinking: “16 Gigabytes of what”?
Storage (Hard Drive Space)
Storage is what old-timers think of as their hard drive. Since iPhones and some Macs really don’t have hard drives, Apple simply uses the term Storage, which I think is a really good choice. So, what is storage? Storage is where things go when you save them, close them or download them. Things stay in storage until you delete them. Storage has a firmly limited size, and when you try to exceed it you will get a definite message. If you see a message on the Mac about a specific device (probably Macintosh HD) being out of space, this refers to storage.
RAM
RAM is where things go while you open them, edit them, view them or play them. RAM is lightning fast, but it is temporary. Things usually don’t stay in RAM long, and it is all erased when the device is powered off. Apps and documents flit in and out of RAM as you navigate between them. The operating system of your computer or device works hard to make sure you don’t run out of RAM. If everything doesn’t fit, it will compromise by keeping things that should be in RAM in slower storage temporarily. So, you probably won’t ever see a message about being low on RAM. Instead, things will just slow down, usually dramatically. The worst slowdowns are likely to occur when running a single memory-hog program like a video or photo editor. Running a guest operating system like running Windows under Parallels will use up your RAM quickly.
Gigabytes of Advertising
Apple’s marketing definitely de-emphasizes RAM. It is not mentioned at all for iOS devices, and for Macs, it’s down in the fine print, where it is called “memory”. When shopping for an iPhone 6, say, you will see a 16 GB, 64 GB, and 128 GB model. Those are Gigabytes of storage, not RAM. iPhones have RAM, and newer models may have more RAM than older ones, but Apple never mentions it.
How to Check
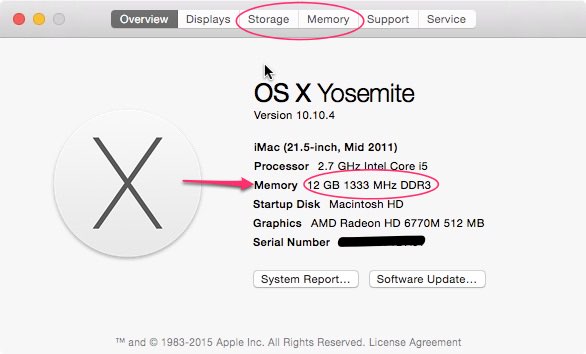
On the Mac, you can see how your RAM and Storage stack up by going to the Apple Menu, and selecting About This Mac. In the Overview pane, you will see your computer’s installed RAM where it says Memory. You will also see an item at the top, Storage. Next to that you may or may not see one that says Memory. The Memory item only appears on computers with memory slots that allow additional RAM to be installed. If you don’t see that, your Mac already has all the RAM it’s ever going to have. That’s the way most of them are now, especially the laptops.
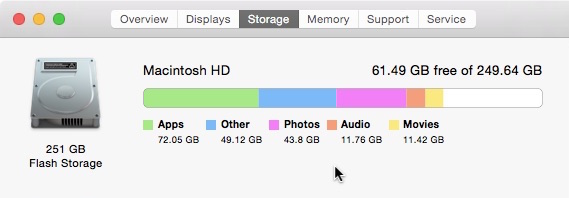
The Storage pane of About This Mac show an overview of how much storage you have, how much is being used for what and how much remains free. You should try to keep at least, say, 15% of your storage free. If it ever gets full, your computer can become almost completely unusable.
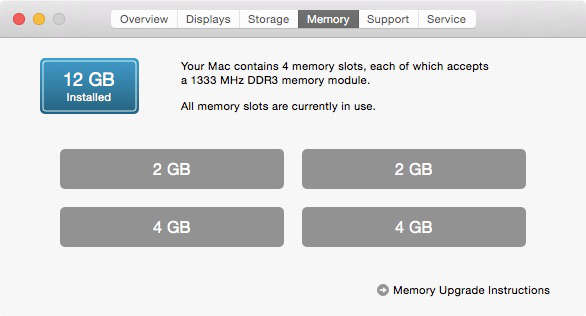
The memory pane of About This Mac shows your options for upgrading RAM. This pane only appears on Macs with upgradable RAM.
I’m Out of RAM!
First of all, you’re probably not out of RAM. Most beginners are very unlikely to need more RAM than their computer has unless the computer is several years old. If you really are low on RAM, you can do one of three things. First, install more RAM if that’s possible in your computer. It’s not possible on iOS devices. Second, if your RAM isn’t upgradable, upgrade to a whole new device with more RAM. Third, you can limit your RAM usage. First, quit all applications that you are not using. Consider if you can reduce the size of the documents you are working with. Can you edit that giant novel in separate chapters, one at a time? Can you work with lower-resolution photos or videos? Maybe you could split up your photo library into smaller sections. Those type of things are likely to reduce demands on your RAM.
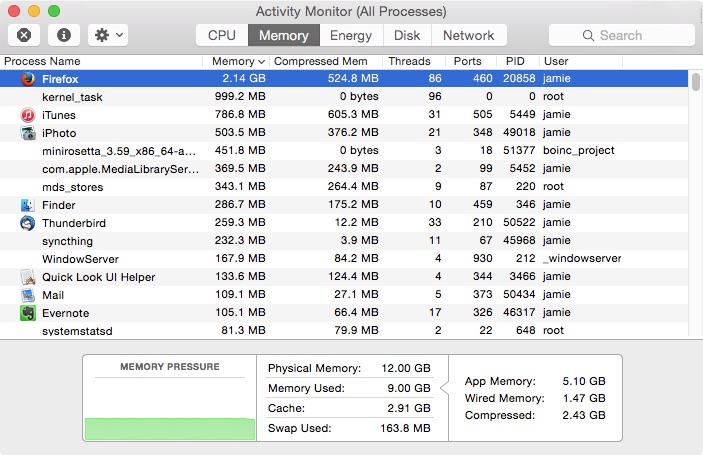
If you are worried about needing? more RAM on the Mac, you should open Activity Monitor and visit the Memory tab. The Memory Pressure feature in Yosemite has done a lot to reassure me that I’m in little danger of running out of RAM.
I’m Out of Storage!?
This is all too common. Your first thought should be to delete something you don’t need. Your Downloads folder is a good place to start. Things tend to pile up in there. They all came from the Internet anyway, so if you find you need them, you can always download them again. Empty the trash. Storage belonging to trashed files isn’t freed until the trash is emptied. Empty the trash in applications, like iPhoto, that have their own trash.
While scanning your folders for stuff to be deleted, sort by size. Finding and deleting the biggest files first will save you a lot of time.
Another option is to add external storage. This is not possible for iOS devices, usually, but it is easy for Macs. You should move some of those big files to an external hard drive.
Bluetooth Mouse Disconnect Problem
Are you having a problem with your Apple Bluetooth mouse disconnecting frequently from your Mac? The battery is fine, but you have to keep clicking to get it to connect again? The solution is so easy. Get your cell phone away from your mouse!
The cell phone emits enough radio noise to jam the Bluetooth signal from your mouse. Smartphones are just packed with radio transmitters. Besides its own Bluetooth transmitter, a phone has a WiFi transmitter (2.4 or 5 GHz), a cell network transmitter and maybe a NFC transmitter. The cellular transmitter is used periodically to maintain contact with the cell site even if you are not making or receiving a call.
That cellular transmitter is powerful — it has to reach a cell site a mile or so away. That’s probably the one that kills your mouse (or keyboard).
It is so easy to sit down and put your phone right next to the mouse without thinking. Moving it just a couple of feet away is probably enough to eliminate the problem.
Stack Exchange: Ask Different
Macintosh and iOS users should be aware a useful on-line resource: Ask Different. Ask Different is part of Stack Exchange, an armada of different Question & Answer forums on various topics. Ask Different is the place to ask or answer questions related to Apple devices. The questions and answers are crowd-reviewed and rated so that the best ones bubble to the top.
Registration is not required to search and view the questions and answers on Stack Exchange, but it is free.
Stack Exchange is the best forum on the internet since all these idiots joined back in ’94. Now get off my lawn.
Economical Printing – Brother Monochrome Laser
A couple of years ago, I ditched my problematic color laser printer and went monochrome. I bought a Brother DL-2270DW. This is a basic monochrome laser printer. The W is for wireless, so it doesn’t need to be near my network equipment to work. It doesn’t do any other fancy stuff, like print from iOS or Google Cloud Print.
Monochrome laser printers are much smaller, simpler and cheaper than the color models, primarily because you only need one cheaper cartridge instead of four expensive ones. Color is kind of nice, but I don’t really need it. I don’t feel that it was worth the hassle and expense.
I won’t even consider inkjet printers for home use any more. The ink is exorbitantly expensive, and most of it is wasted while fighting with clogged jets. If you use an ink jet printer every day, the jets tend to stay clear, but if it sits for a while, the jets are clogged by the next time you try to use it.
I had already decided not to bother with photo printing at home, since I can send photos to my corner Walgreen’s store to be printed for a few cents a copy. Their expensive photo printer does a better job than anything I could buy. I print very few photographs — maybe $10 or $20 worth a year.
My household does a medium amount of printing — more than some, less than others. We print a page or two almost every day we’re at home, and sometimes a lot more.
In two or three years, we have printed about 4000 pages with the Brother. That’s 8 reams of paper. In that time, I have replaced toner twice. The starter cartridge gave out at 580 pages, and the next cartridge went another 2,200 pages. Also in that time, I have had exactly two paper jams, one of which was definitely my fault.
I’ve been buying LINKYO cartridges. These are neither the cheapest, nor the most expensive. They are a name brand, but not not the manufacturer’s own brand. They are rated for 2,600 pages, and sell for $15-20 each.
So, I’ve spent in total :
- $120 for the printer (with starter cartridge)
- $35 for toner
- $155 total
- = $155 / 4000pages = $0.039 per page (not counting paper)
Paper expense would be about the same for any printer, adding, say, another $0.01 per page.
The cost per page continues to decline every day I can keep printing and don’t have to buy a new printer. But if I had to buy a new one and start over today, I’d still say I got a pretty good deal.
Color inkjets will cost you between $0.25 and $0.50 cents per page just for the ink alone. [Consumer Reports]� If I had printed my 4000 pages on a color inkjet, I would have paid at least $845 more to do so.
My recommendation when shopping for a printer is: Don’t shop for a printer. Shop for the cartridges or other consumables. Find a cartridge that is widely used and available for a good cost. Then find a printer that uses that cartridge.
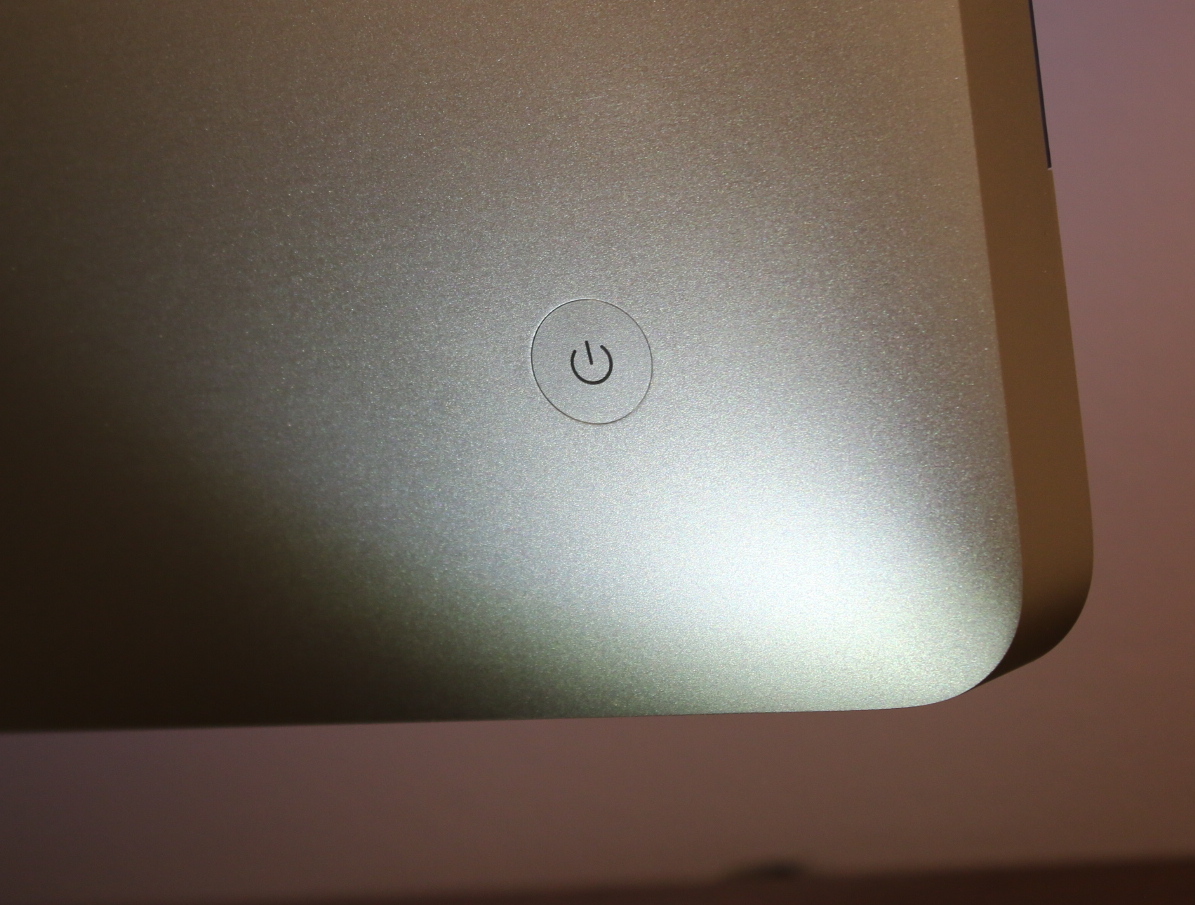
How to Turn On an iMac
Otherwise knowledgeable users are baffled by one silly question when confronted with an iMac: How do I turn the computer on? Where’s the power switch? It’s not a stupid question. Apple has hidden the power button cleverly where you can’t possibly see it. It’s also very difficult to feel the button because it is flush with the case. If you do look back there, it’s probably hidden behind the curve of the case.
Anyway, here it is on a Mid 2011 iMac. It’s been in a similar position for several years. Glad to help, and don’t worry, we won’t tell anyone you had to look here to find out to turn on a Macintosh.