MacMAD’s October, 2016 Meeting topic is VPNs (Virtual Private Networks). Here are some accompanying links and information.
People generally use a VPN for these reasons:
Security and privacy when using a public network, such as at a coffee shop or hotel.
To allow access to online content which is subject to geographical restrictions.
To allow remote access to a private local network such as your home network or your employer’s network
Provide privacy at home (prevent your ISP from knowing what you are up to)
VPN Features to Look For
Automatic connection and reconnection – prevents accidental leakage of unencrypted data
Choice of VPN endpoint – What country would you like to be in today?
Self Installation/Configuration – Avoids lots of technical settings
Client and Server
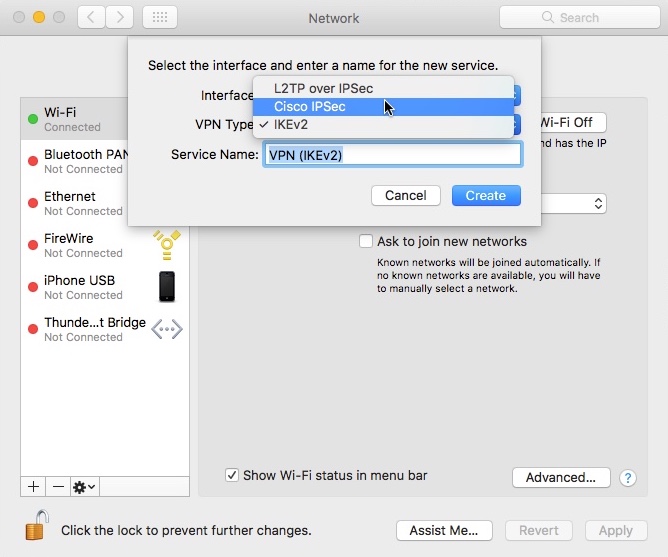
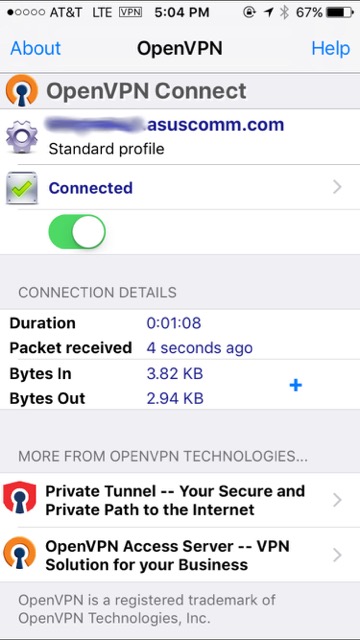
VPNs follow a client-server model. The client app usually runs on your computer or portable device. The server can be either a commercial VPN service or you can run your own VPN server at home on your router (some models) or on another computer. There are many (hundreds) commercial VPN providers. The following list is not at all complete.
Here are the slides from our presentation on Genealogy at the May 2016 meeting. Thanks to everyone who turned out in torrential rains to hear this! If you missed it, or just want to look at the slides again, here they are.
Followed by the story of what genetic genealogy revealed about my own family. (I’m providing just the slides first, followed by a YouTube video with the slides + narration, below.)
I often hear beginners say that their computer is out of memory. This is often a clue that they are beginners. Computers contain two different types of “memory” and you need to carefully distinguish between them. I could give a detailed technical explanation, but it would be obsolete in a few years, and wouldn’t be all that helpful. Instead, I’ll describe how they are used, what the symptoms are when you run short and finally, what to do about it.
RAM vs. Storage
Current computers contain two main types of memory, RAM (Random Access Memory) and non-volatile storage. This is true for Macs, PCs, iPads and iPhones, etc. Confusion arises because these very different things are both measured in the same units, Megabytes and Gigabytes. If someone says their computer or phone has 16 Gigabytes, you should be thinking: “16 Gigabytes of what”?
Storage (Hard Drive Space)
Storage is what old-timers think of as their hard drive. Since iPhones and some Macs really don’t have hard drives, Apple simply uses the term Storage, which I think is a really good choice. So, what is storage? Storage is where things go when you save them, close them or download them. Things stay in storage until you delete them. Storage has a firmly limited size, and when you try to exceed it you will get a definite message. If you see a message on the Mac about a specific device (probably Macintosh HD) being out of space, this refers to storage.
RAM
RAM is where things go while you open them, edit them, view them or play them. RAM is lightning fast, but it is temporary. Things usually don’t stay in RAM long, and it is all erased when the device is powered off. Apps and documents flit in and out of RAM as you navigate between them. The operating system of your computer or device works hard to make sure you don’t run out of RAM. If everything doesn’t fit, it will compromise by keeping things that should be in RAM in slower storage temporarily. So, you probably won’t ever see a message about being low on RAM. Instead, things will just slow down, usually dramatically. The worst slowdowns are likely to occur when running a single memory-hog program like a video or photo editor. Running a guest operating system like running Windows under Parallels will use up your RAM quickly.
Gigabytes of Advertising
Apple’s marketing definitely de-emphasizes RAM. It is not mentioned at all for iOS devices, and for Macs, it’s down in the fine print, where it is called “memory”. When shopping for an iPhone 6, say, you will see a 16 GB, 64 GB, and 128 GB model. Those are Gigabytes of storage, not RAM. iPhones have RAM, and newer models may have more RAM than older ones, but Apple never mentions it.
How to Check
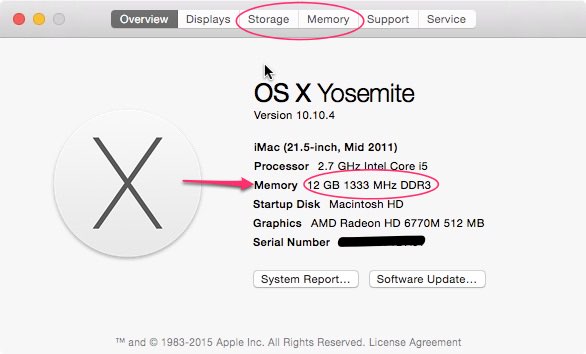
On the Mac, you can see how your RAM and Storage stack up by going to the Apple Menu, and selecting About This Mac. In the Overview pane, you will see your computer’s installed RAM where it says Memory. You will also see an item at the top, Storage. Next to that you may or may not see one that says Memory. The Memory item only appears on computers with memory slots that allow additional RAM to be installed. If you don’t see that, your Mac already has all the RAM it’s ever going to have. That’s the way most of them are now, especially the laptops.
About This Mac Overview
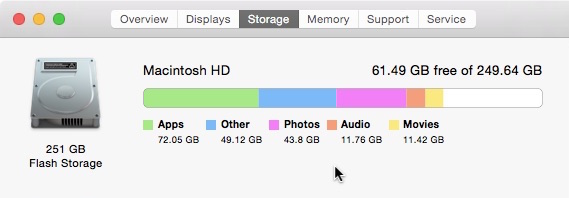
The Storage pane of About This Mac show an overview of how much storage you have, how much is being used for what and how much remains free. You should try to keep at least, say, 15% of your storage free. If it ever gets full, your computer can become almost completely unusable.
About This Mac, Storage Pane
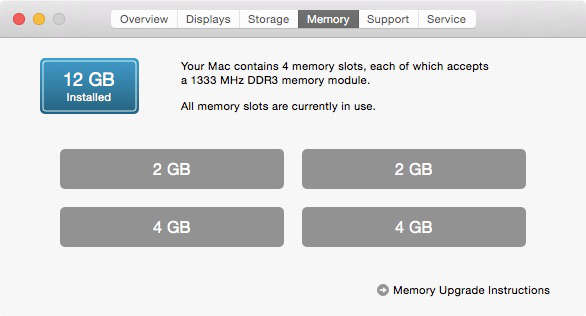
The memory pane of About This Mac shows your options for upgrading RAM. This pane only appears on Macs with upgradable RAM.
Memory pane of About This Mac
I’m Out of RAM!
First of all, you’re probably not out of RAM. Most beginners are very unlikely to need more RAM than their computer has unless the computer is several years old. If you really are low on RAM, you can do one of three things. First, install more RAM if that’s possible in your computer. It’s not possible on iOS devices. Second, if your RAM isn’t upgradable, upgrade to a whole new device with more RAM. Third, you can limit your RAM usage. First, quit all applications that you are not using. Consider if you can reduce the size of the documents you are working with. Can you edit that giant novel in separate chapters, one at a time? Can you work with lower-resolution photos or videos? Maybe you could split up your photo library into smaller sections. Those type of things are likely to reduce demands on your RAM.
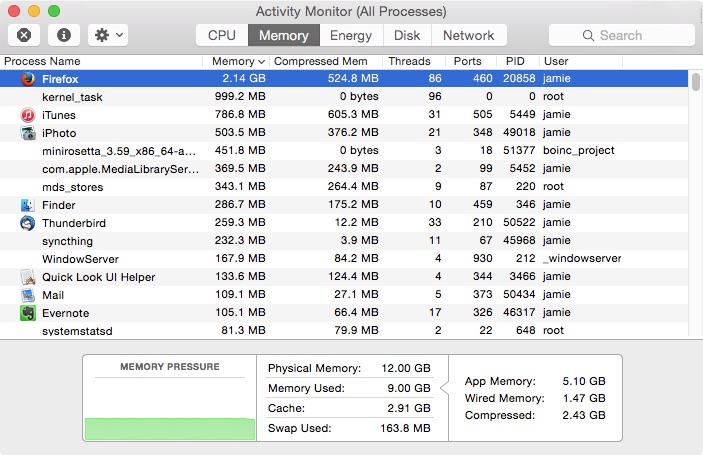
If you are worried about needing? more RAM on the Mac, you should open Activity Monitor and visit the Memory tab. The Memory Pressure feature in Yosemite has done a lot to reassure me that I’m in little danger of running out of RAM.
Activity Monitor Memory Pressure
I’m Out of Storage!?
This is all too common. Your first thought should be to delete something you don’t need. Your Downloads folder is a good place to start. Things tend to pile up in there. They all came from the Internet anyway, so if you find you need them, you can always download them again. Empty the trash. Storage belonging to trashed files isn’t freed until the trash is emptied. Empty the trash in applications, like iPhoto, that have their own trash.
While scanning your folders for stuff to be deleted, sort by size. Finding and deleting the biggest files first will save you a lot of time.
Another option is to add external storage. This is not possible for iOS devices, usually, but it is easy for Macs. You should move some of those big files to an external hard drive.
Are you having a problem with your Apple Bluetooth mouse disconnecting frequently from your Mac? The battery is fine, but you have to keep clicking to get it to connect again? The solution is so easy. Get your cell phone away from your mouse!
The cell phone emits enough radio noise to jam the Bluetooth signal from your mouse. Smartphones are just packed with radio transmitters. Besides its own Bluetooth transmitter, a phone has a WiFi transmitter (2.4 or 5 GHz), a cell network transmitter and maybe a NFC transmitter. The cellular transmitter is used periodically to maintain contact with the cell site even if you are not making or receiving a call.
That cellular transmitter is powerful — it has to reach a cell site a mile or so away. That’s probably the one that kills your mouse (or keyboard).
It is so easy to sit down and put your phone right next to the mouse without thinking. Moving it just a couple of feet away is probably enough to eliminate the problem.
If you will be buying a new Mac or iOS device soon, it really pays to get your ducks in a row as far as your Apple ID goes. Your Apple ID is more important than ever in the new operating systems, Yosemite for the Mac, and iOS 8 for the iPhone and its ilk.
Apple ID Is Your Single Credential for all Things Apple
If you have, or have ever had an iCloud account, Dot-Mac account, or Me.com account, you have an Apple ID.
Your single Apple ID is used for all these things:
To access your email
To buy music, movies and books & iOS apps from the iTunes Store
To login to your computer
For instant Messaging and FaceTime
To access iCloud, including Photos and Find My iPhone and Find My Mac
To buy hardware from store.apple.com
To buy Mac software from the App store
To sign in to the Apple Support Communities
For Apple Pay
I’m probably forgetting something that should be in this list. It’s also used for developer access, if you are a registered developer with Apple.
Decide Which ID You Want To Use
If you’ve been using the Mac for a while, you may have more than one Apple ID. You probably want to settle on a single ID for your on-line life.
If you have been sharing an Apple ID with a significant other, you should get separate IDs. (It’s not that I don’t love you, but how can I send you a message if you don’t have your own ID?) Apple’s family sharing lets you share iTunes purchases with family members with their own accounts, so there’s no reason to use the same ID any longer.
Email Addresses
Although Apple has changed their mind several times about what domain they want users to use for email, they have done a good job of making it transparent. Email sent to [email protected], or [email protected] can be received at [email protected]. John Doe� can also use any of those to log on to his one iCloud account.
Apple could phase those older domains out some day, so use @iCloud as much as possible going forward.
It’s good policy for personal email addresses to belong to one and only one person. Some couples share an email address, but it’s a bad idea. One person can miss an email because the other one read it or deleted it. It can be awkward for your friends who are not sure which person they are addressing in an email. It’s certainly awkward if a couple separates for any reason — Who gets the email address?� And, when the inevitable happens, and one person passes away, it can be extremely weird for you to send, or your friends to receive, email from the account of a dead person.
Use Really Good Password Practices
The strength of your password is the only thing keeping bad guys from buying a new Mac and charging it to your credit card. Since your Apple ID is so important, you want to make sure you have a good password. Don’t use the same password for your Apple ID as you use for any other service! I’d say that 10-12 characters is long enough for a password these days. Make sure your password or simple modifications to it are not in any dictionary.� Mix in some numbers, caps and special characters.
In new installs, your login password on your Mac is� your Apple ID password by default.� That’s a pretty good idea, because it makes� you remember your Apple ID, since you’ll use it every day to login. If you just set up a new Mac, or just installed a new OS from scratch, you’ll likely get to a point where the machine restarts, and you are asked for a login password. If you’re like me, you’ll think “Panic! I don’t know the password because I haven’t created a password for this machine yet.” Well, don’t panic. The login password is your Apple ID password.
For greater protection,� you can enable two-factor authentication (aka two-step verification) for your Apple ID. This provides much better security for your Apple account. It eliminates social engineering attacks where the attacker is able to find out the answers to those lame security questions� (your mother’s maiden name, etc.), and get Apple to reset your password. With Apple’s two-step verification, your security becomes entirely up to you. Apple cannot help you if you forget. You are responsible for remembering your password. You will also be given a recovery code which you are responsible for keeping in a safe place where you can find it if needed.
Two-factor authentication isn’t for everyone. Read the instructions carefully before enabling it. You will have to use application-specific passwords for certain things. Make sure that doesn’t scare you before you commit to the change.
I was doing a Keynote presentation recently, and had a problem with colors on a projector attached via a Thunderbolt-to-VGA adapter connected to a MacBook Pro. The first few slides in Keynote looked fine, but the first slide which contained a color photo, the colors in the photo were scrambled — sort of like a color negative. The black, white and gray on that slide and the on other slides looked fine.
I tried two different projectors and three VGA cables and the problem remained the same. The problem was also not just Keynote. It was any color image, including the default Mavericks desktop background (the wave). I think Keynote was actually masking the problem because my slides were mostly gray scale.
I was playing around with the color calibration controls (System Preferences/Displays/Color), in a desperate attempt to fix this, when the screen faded to black. When it came back, everything was fine. I didn’t think I had done anything which should be expected to fix anything that weird.
I had also lowered the screen resolution which didn’t seem to have any immediate improvement.
I failed to get a photograph of the problem. If anyone sees this happen again and can take a photo, I’d like to see it. I have reported this to Apple via feedback. It sounds very similar to a problem people were reporting back in about 2010.
I see no reason this wouldn’t happen on any other external monitor besides a projector.
[Edit: If you give public presentations in front of groups, you should have some color on your warm-up slides so you can notice if the projector colors are bad before you get into the main part of your presentation. Having a color photo on the first slide would have helped. ]
Apple is doing its best to get users to use�iCloud. It does have its uses. iCloud saved my day when I was able to open Keynote as an iCloud web app on a Windows PC, and do my presentation from iCloud just like I was in Keynote on my Mac. That was nice.
Sometimes, though, there is just no substitute for having your own files on your own hard drive. There’s no place like home. Apple makes it surprisingly hard to move files between iCloud and your own storage. Unlike, say, Dropbox, iCloud doesn’t integrate with the Finder. Really? Third party software works better with MacOS than iCloud does? Don’t ask me why Apple would ever do that.
The document-oriented Apple apps that use iCloud are Preview, TextEdit, iMovie, Keynote, Pages and Automator.
Instead of using the Finder, iCloud documents can only be manipulated from within Applications. You can use the Move To… or Export… menu options to move or copy a single�open file from iCloud to local storage or vice versa.
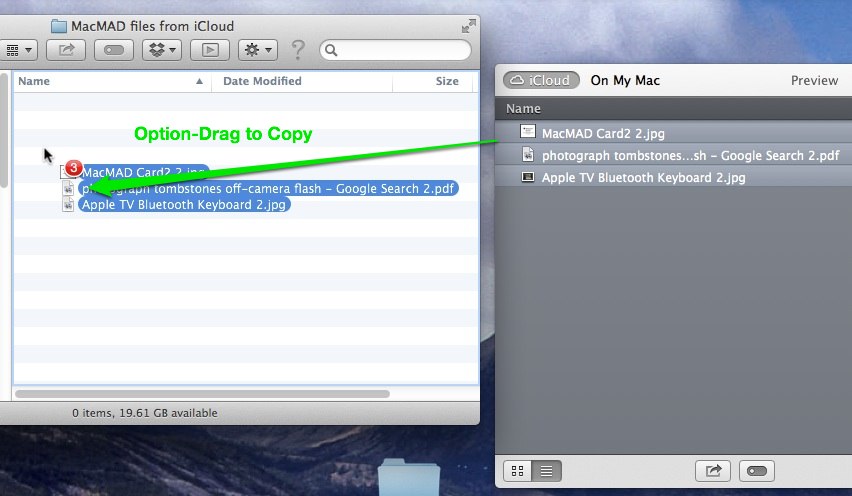
The screenshot below shows how to drag�multiple files from iCloud to the Finder. The window on the right is the open-file dialog for the Preview Application. On the left is a finder window. The default behavior is to move the files. If you want to copy instead, hold the option key while dragging.
Dragging files from Open-File Dialog to Finder
Since each application can only see its own files in iCloud, you must repeat this operation in each application that has files to be moved.
You may notice that there are no folders or directories in iCloud — just a big list of files.
Apple seems determined to move users away from the file system paradigm. Since the file system is probably the most successful and widely used abstraction in all of�computing, it’s certainly daringly Avant Garde of Apple to try to ignore it. However, I’m afraid that they are doing so to increasingly limit user’s options and further corral us�into Apple’s walled garden.
The file system is a powerful abstraction in which the relationship between files and applications that act on those files is not pre-determined. It puts a lot of power into the hands of the user who gets to decide who does what to what file, and which file goes where. The current, featureless iCloud takes that power away.