Here are the links from this month’s MacMAD presentation. This is a demo, so there aren’t many slides. These are in Keynote format, shared via iCloud.
Category: MacOS
How to Run SpinRite on a Mac
If you are reading this, you probably know why you want to run SpinRite. SpinRite is a hard drive recovery utility intended to run stand-alone on Windows machines. There is really nothing comparable to it for the Macintosh, especially in its ability to recover data from corrupted hard drives.
The other instructions I found on the web for SpinRite on the Mac were variously outdated, contained bad links or were overly complicated. I had to hunt around multiple web sites to find bits and pieces of the instructions. Here is my attempt to write a coherent single set of instructions for SpinRite on the Mac.
I don’t want you to go through this process with false expectations. There are some limitations to SpinRite and to running it on the Mac.
SpinRite 6.0 is glacially slow on today’s large hard drives. A full scan on level 2 of a 1 TB drive with no bad sectors took 35 hours and 46 minutes. If the drive has bad sectors, or you use level 4, it will take much longer.
SpinRite 6.0 can’t handle drives larger than 2 TB at all.
SpinRite hasn’t been updated by its author since 2004. Steve Gibson says he plans to release updated versions 6.1 (much faster and supports larger drives) and 7 (with support for the Mac), but it could be a while.
SpinRite can operate on internal and external drives, including USB drives. The S.M.A.R.T. aware features of SpinRite will not work in the virtual machine environment we will use on the Mac. However, this does not prevent SpinRite from recovering bad sectors, or refreshing marginal ones.
The good news is that you can continue to use your Mac while SpinRite, in a virtual machine, works on a hard drive. This is better than the usual situation where a physical Windows machine is dedicated to running SpinRite for the duration. However, you must not try to use SpinRite on your system boot drive (or any mounted drive). If you need to use it on your internal boot drive, you will either have to boot from another drive or connect your Mac to another Mac in target disk mode and run SpinRite from the other Mac.
Overview
[Edit May, 2022]: These instructions were written for Intel-based Macs. I haven’t tried to do this on a Mac with Apple Silicon, e.g. M1. If you try it, leave a comment on how it worked or not.
This is an advanced topic. I assume if you are planning to run SpinRite that you are somewhat familiar with running DOS-based programs, such as SpinRite, and that you are willing to use the Mac’s Terminal command line.
You must perform these steps from an administrator account, or one with sudo access (usually only admin accounts). (At least from step 4 on.)
Use caution with connecting physical and virtual drives! Make sure that you are connecting the correct drives to your virtual machine, and that you are running SpinRite on the drive you intend. If you connect a RAW drive to a virtual machine while it is mounted by MacOS, you risk utter destruction of data on that drive. (Although VirtualBox seemingly tries to prevent you from doing this.)
Here is the executive summary of what you are going to do:
-
- Get SpinRite
- Get VirtualBox
- Get FreeDOS (sort of a MS-DOS replacement)
- Install FreeDOS into VirtualBox
- Install SpinRite into VirtualBox
- Connect your problem drive to Virtual Box, so SpinRite can work on it
Instructions
0. Get SpinRite – Buy and download SpinRite from grc.com if you don’t already have it.
1. Download and Install VirtualBox
https://www.virtualbox.org/ (It’s free)
- Download the latest version for OS X (currently 5.2.22)
- Install it.
- Open VirtualBox
- Create a new machine for DOS
- Accept the defaults (32 MB RAM, 500 MB expandable virtual hard disk)
- In Settings/System/Processor for the new machine, set the Execution Cap slider to about 45%. This keeps the virtual machine from spinning up your fans and running down your battery.
2. Get FreeDOS – Download and install FreeDOS from freedos.org. (It’s free)
Select the CDROM “standard” installer distribution. You’ll get a file something like FD12CD.iso.
The current version 1.2 is acceptable. You are going to install FreeDOS into the VirtualBox virtual machine you created above.
3. Install FreeDOS into Virtual Box
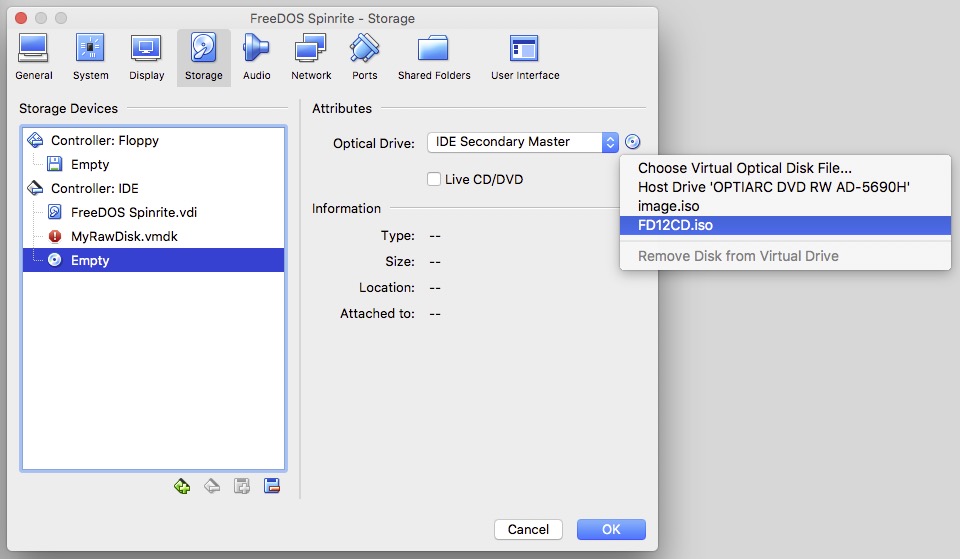
In Virtual Box, Click on your FreeDOS machine. Select Settings/Storage. Click on the empty optical drive icon. To mount your FreeDOS image click on the CD icon on the far right, and choose it using Choose Virtual Optical Disk File
Select the FreeDOS ISO image (FD12CD.iso).
 You are now going to boot your virtual machine for the first time to install FreeDOS onto your virtual hard drive. It will help to understand some features of the Virtual Box user interface. You will need to click in the virtual machine window to allow you to type into it. When you do that, the virtual machine will “capture” your mouse and keyboard. To release the mouse and keyboard, to do anything else on your Mac, you can press the left ⌘ (command) key.
There is a bug between VirtualBox and FreeDOS that will cause the virtual machine to crash with a messy string of Invalid Opcode messages if you simply follow the prompts. There is a workaround, and here it is.
Select your virtual DOS machine in Virtual Box. Press Start. The virtual machine window will appear, and it should boot into the FreeDOS installer screen. There is a countdown running (50 seconds) which you need to stop. Click in the virtual machine window and press the TAB key. That will stop the timer. You are now editing the Install to harddisk menu option. Add the word raw (lower case) after the command line. Press return.
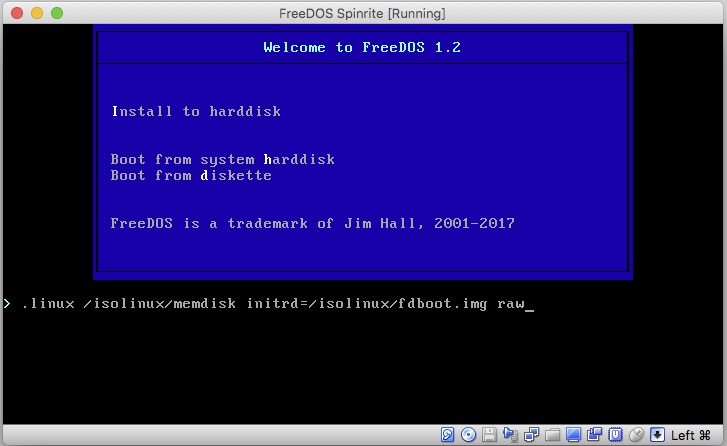 You should now be in the installer at the preferred language prompt. Proceed.
When asked if you want to partition Drive C:, select Yes. And also select Yes – Please reboot now. Once again, intercept the countdown with a tab and add raw to the command line.
You will be back to the installer preferred language prompt. Proceed. This time you will be asked if you want to format C:. Say Yes. Then choose your keyboard format (perhaps different from your preferred language).
At the prompt What FreeDOS packages do you want to install?, Choose Base packages only. This is sufficient for SpinRite.
Naturally, you will choose Yes – Please install FreeDOS 1.2.
When the install is complete, you will be asked if you want to reboot. Don’t do it yet. Wait until step 4b, below.
4. Install SpinRite Into VirtualBox
4a. You will Create a CD image with spinrite.exe on it. This will be used to get SpinRite.exe into the Virtual machine. When SpinRite runs, it can create an ISO containing itself. If you already have a SpinRite ISO created by SpinRite on a Windows machine you may use that and skip the rest of this step (skip to 4b).
Create a folder named “spinrite” in your Mac Downloads folder. Put spinrite.exe (from step 0) into that folder.
Open a Terminal window. Enter this command into the terminal:
hdiutil makehybrid -o ~/Desktop/image.iso ~/Downloads/spinrite/ -iso -joliet
(Enter the command all on one line.) This will create a file on your desktop named image.iso containing spinrite.exe . This image is of a type acceptable to Virtual Box. If you create an image with Disk Utility instead, it will not work.
4b. In VirtualBox Manager, select your DOS machine, and pick Settings/Storage. Again, using the optical disk icon on the far right, choose the image.iso file we created on your desktop in step 4a, above. Click OK to save settings.
Now, back in the virtual machine, select Yes-Please reboot now and press enter. You don’t need to intercept the boot process anymore. Wait for the machine to boot into FreeDOS and the C:\> prompt.
The SpinRite “CD” should now be mounted as drive D:. Type the DOS command:
copy d:\spinrite.exe c:\spinrite.exe
This will copy Spinrite to your virtual C: drive. At this point, you now have a virtual machine with a virtual hard drive containing SpinRite, and you no longer need the image.iso image. You may remove that from the virtual drive if you like.
5. Connect the Problem Drive to VirtualBox and SpinRite
[Edit: May, 2022]: With newer versions of MacOS, Catalina (10.15) Big Sur(11), Monterey (12) and newer, you will run into problems with SIP (System Integrity Protection) in the following steps, because it will prevent you from modifying the permissions on files in /dev . You can turn off SIP via the recovery partition. There are instructions here.
In the terminal, create a shell script as follows:
cat > srscript.sh
Then, copy the script below, and paste it into the terminal.
#!/bin/bash
# This script creates a virtual disk image connected to a physical disk for connection to VirtualBox
read -p "Enter Disk name, e.g. disk8: " SpinRiteDisk
# make sure disk is unmounted
/usr/sbin/diskutil unmountDisk /dev/$SpinRiteDisk
sudo vboxmanage internalcommands createrawvmdk -filename "$HOME/Desktop/VirtualRaw$SpinRiteDisk.vmdk" -rawdisk /dev/$SpinRiteDisk
sudo chmod 777 "$HOME/Desktop/VirtualRaw$SpinRiteDisk.vmdk"
sudo chmod 777 /dev/$SpinRiteDisk
/usr/sbin/diskutil unmountDisk /dev/$SpinRiteDisk
echo "Look on Desktop for raw disk file"
Then type
ctrl-D (End-of-file)
Now make your script executable with:
chmod +x srscript.sh
Make sure the drive to be tested is connected and powered on. You need to figure out what the device ID associated with the drive under test is. It will be of the form “diskX”, for example, it might be “disk5”. You can find this in Disk Utility, in the lower right corner.
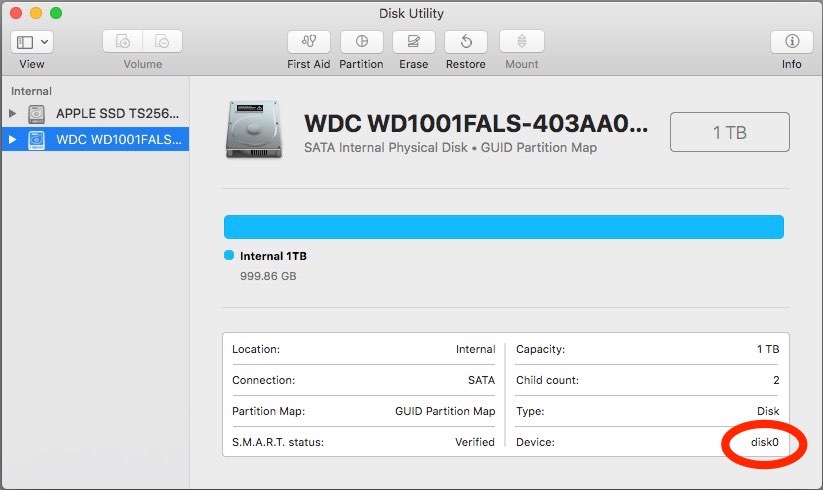
If you see a suffix, e.g., disk5s1, ignore the suffix. This is the disk name you will need in the next step.
While you are in Disk Utility, go ahead and unmount all partitions on the drive to be tested, if any are mounted.
In the terminal, run the script:
./srscript.sh
Because the script contains sudo commands, you will be prompted for a password. Enter your Mac signon password. As mentioned above, this will only work for admin accounts, or accounts for which the user has been added to the file /etc/sudoers . When prompted, enter the device ID (disk name), e.g. disk5 . A vmdk file icon will appear on your desktop named appropriately.
In VirtualBox, go to the storage settings for your virtual machine.
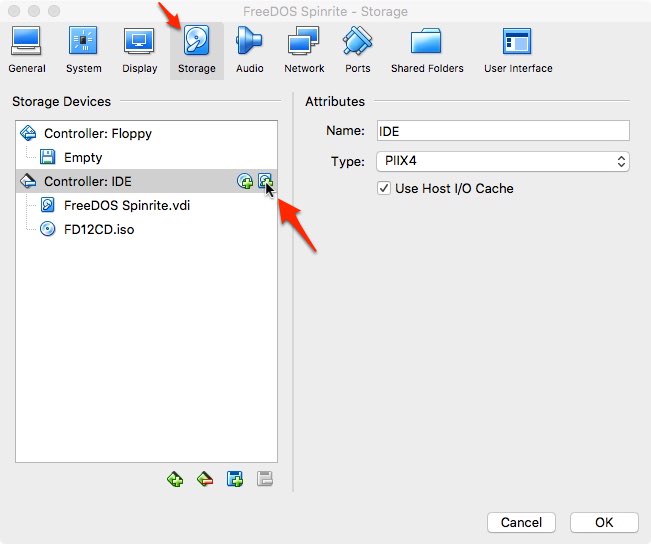
Click the hard-drive-plus icon to add a new hard drive to the virtual IDE controller. At the prompt, select Choose Existing Disk, and then select the VirtualRawdiskx file you created on your desktop earlier.
If the FreeDOS CD is still mounted in your virtual machine, as shown above, remove it from the virtual drive so that your machine boots from your virtual hard drive. If you click on the .iso, the remove option then appears if you click the optical disk icon in the far right of the dialog box.
Very likely, at this point, your target disk may have remounted itself. Eject/Unmount it before proceeding. VirtualBox will complain about being unable to access the VirtualDrive if partitions on the physical drive are still in use. Eject it using DiskUtility or the Finder.
In VirtualBox, start your virtual machine. It should boot up to the FreeDOS command prompt.
Issue the DOS command:
spinrite
You are now running SpinRite on a Mac! As promised earlier, SpinRite will have no access to S.M.A.R.T. data in this scenario.
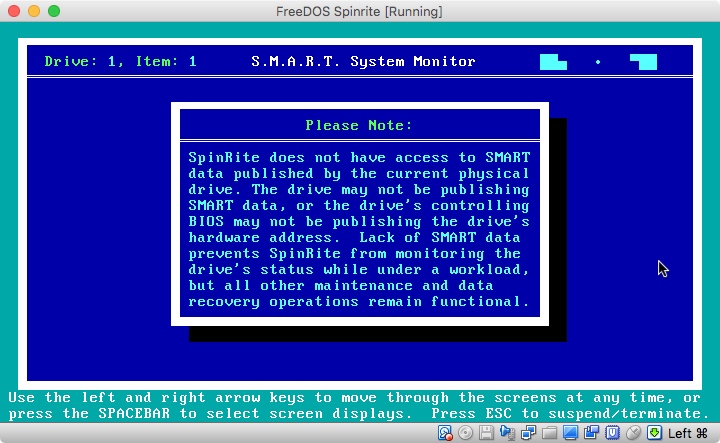
When SpinRite is done (much, much later), you should restore the correct disk permissions. Leaving the raw disk permissions with world access is a security risk.
In the terminal you can restore them with, for example:
sudo chmod 640 /dev/disk5
If disk5 was your target disk. Check that the permissions are correct with
ls -l /dev/disk*
The raw disk files should all have the same permissions:
brw-r-----
I hope these instructions were helpful for you. Thanks for reading.
Error Situations
1.) If, on powering up your virtual machine, if it fails with VERR_ACCESS_DENIED opening your vmdk file, it is probably because the permissions for your raw disk file are not set properly. They may get reset if you reboot, for example. So go back and do something like:
sudo chmod 777 /dev/diskx
2.) If, on powering up your virtual machine, it fails with VERR_RESOURCE_BUSY, it probably means that the hard drive under test is mounted on your Mac. Unmount it and try again.
3.) If, when starting Spinrite, you get the message from Spinrite:
This PC is using a protected mode memory manager that is
incompatible with SpinRite 6.1's built-in memory manager.
Please edit this system's CONFIG.SYS file to disable any
protected mode memory manager, reboot the system & rerun.
You should restart the virtual machine, and make sure to select option:
3 - Load FreeDOS low with some drivers (Safe Mode).
FreeDos will default to an incompatible protected memory mode.
Reference Material:
Extended installation Instructions for FreeDOS are here:
How to Shut Down Mac with no mouse
How can you safely shut down your Mac if your mouse stops working?
On most Macs, you can press and hold the power key to power down immediately. I’m assuming you want to do something more graceful.
If needed, press ⌘+tab to visit each open application, and use ⌘S to save your work.
If you are not signed into an administrator’s account, you will need to sign into such an account. To do that, type ^⌘Q (Control-Command-Q). That will put you on the lock screen. To get the list of accounts, press esc. Then use the up and down arrow keys to select an administrator’s account. Press return. Enter the administrator’s password. Now you are ready to proceed with the rest of the instructions.
Press ⌘+spacebar to open spotlight search.
Type
terminal
- Press return to open the terminal.
In the terminal window type:
sudo shutdown -h now
-
- Press return.
Enter your account password. Your Mac will shut down.
Can you think of an easier way?
This tip was created and tested on MacOS 10.6.5. It should work on any version of MacOS X since spotlight was introduced.
Thanks to Stefan SEJH Hinz for the spotlight tip!
Mac Keyboard Shortcuts Sept Meeting
Here is the link to Apple’s list of Mac Keyboard Shortcuts from Tuesday’s meeting.
June 2018 WWDC Notes
At this month’s meeting we are reviewing the announcements from Apple’s World Wide Developer’s Conference Keynote. As usual, MacMAD is providing links so that you don’t need to take notes in the meeting.
The announcements fell into three subject areas:
The Apple TV and Apple Watch (PDF)
iOS 12 – New system for the iPhone and iPad (Pages document) or (view as PDF)
MacOS Mojave – New system for the Macintosh (RTF Text Edit document)
January 2018: Apple Mail App
We’re going back to basics in January with Apple’s email application Mail. We’re talking about both the Mac and iOS apps.� Here are the slides from tonight’s meeting in Keynote format. No note taking required!
Meeting Topic: High Sierra
Last night’s October 2017 MacMAD meeting covered the changes in iOS 11 and High Sierra. �Here are the slides on the High Sierra changes.
Meeting Topic: iTunes 12.7 September 2017
Our MacMAD meeting topic this month is iTunes. There are some interesting changes in the latest version. In particular, Apple has removed the purchase and management of iOS Apps from iTunes. This is a good step in the right direction to make iTunes less complicated and more focused.
Here is tonight’s Keynote presentation.
Stellar Phoenix Mac Data Recovery
This is a guest post from Dennis Crowley
I have been given the opportunity to review Stellar Phoenix Mac Data Recovery Software. The Stellar Data Recovery Home page claims the software will perform safe and accurate recovery of lost documents, photos, music files, or videos that have been accidentally or intentionally deleted from Mac computer. While I did not review all the claims made by Stellar Data Recovery I did test the ability to recover deleted files.
I deleted some photo, Word, music and PDF files from my iMac and three days later tried to recover them. I was skeptical, so prior to deleting the files I copied them to a flash drive to insure they would not be lost. I ran the software, selected the appropriate drive and to my surprise all the deleted files were recovered and retained the original names.
The software comes with an online User Manual. Although the software is slightly expensive the cost is offset by the ability to recover priceless photos or documents.
Stellar Phoenix Mac Data Recovery Software is a good product and does what it claims.
Meeting Topic: Apple’s Numbers Spreadsheet App
March 21, 2017 Meeting Topic Overview: Numbers
by Jamie Cox

There are three ways to run Numbers:
- On the Macintosh
- On iOS (iPhone or iPad)
- From a Web Browser on iCloud
�How to Get�Numbers
Numbers�probably came with your Mac or iOS device, or get�Numbers�via the Mac App Store�($19.99),�or get�Numbers��via the iTunes App Store�($9.99).

Competition / Alternatives to �Numbers
- Microsoft Excel(Office)�� For giant documents and giant companies (Now with iOS version)
- Open Office�� Free and Open Source Office suite
- NeoOffice���Commercialized version of Open Office customized for the Mac
- GoogleDocs�� Cloud-based, free
Controversy Since iWork ’09
When the new version of Numbers�for the Mac came out some features were dropped. Most of them have not been added back in. Reviews of the apps have been definitely mixed. Numbers only gets a 3-star rating on the App store (both versions).
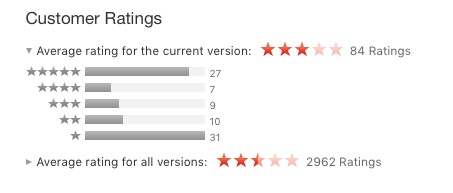
Two-and-a-half to three stars�is a pretty terrible rating, especially for an Apple app. As you can see, the ratings are very mixed with most reviewers giving either one star or�five-star ratings. The ratings for the iOS version are very similar.

The one-star reviews are mostly from people upset�about advanced features removed from the previous version. The five-star reviews tend to be�from people who have come to the application fresh, with no special expectations.
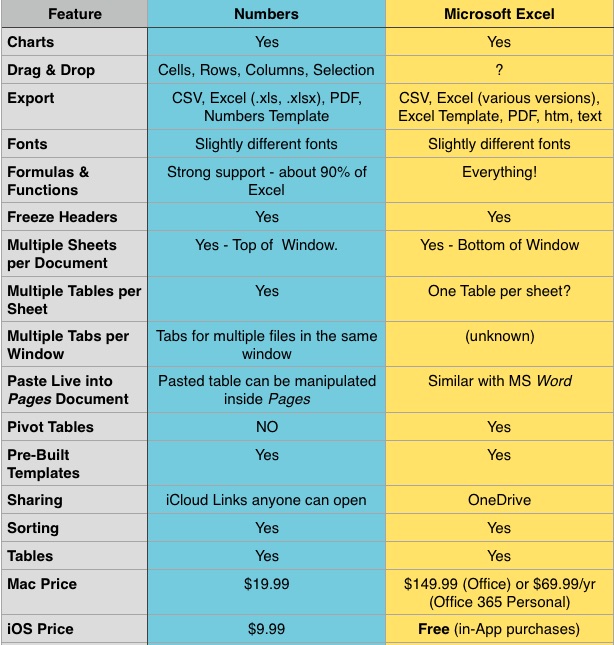
Numbers includes hundreds of distinct features. The chart below highlights just a few�of my�favorite features as compared with Microsoft Excel.
Documents, Sheets and Tables
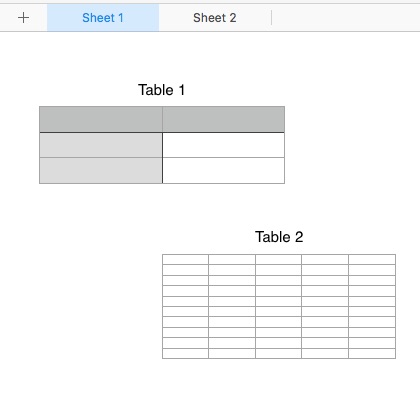
Numbers documents can have multiple sheets. Each sheet can have multiple tables. When you create a new Numbers document, it has one sheet with one table on that sheet.
If you have used Excel, having multiple sheets should be familiar. The main difference is that the sheets appear at the top of the window instead of at the bottom.
The concept of having multiple tables on a single sheet may be new to users of older spreadsheet programs. It is a very nice feature, which allows you to separate groups of data or �formulas which are of different types instead of lumping them all into the same grid of rows and columns. You can arrange the tables on the page however you like.
Formatting Controls
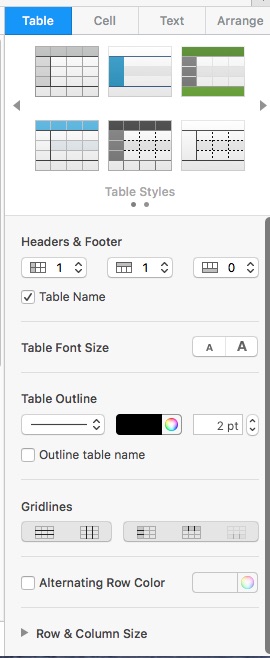
Numbers uses a consistent set of formatting controls very similar to those in the Pages word �processor we discussed last month. These are presented �in a pane on the right hand side of the window. These controls look simple, but all together, they have a lot of power. In addition to the pre-defined Table and Text styles, you can create and save your own preferred styles.
Formula Editing
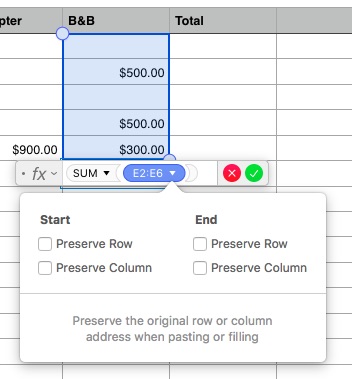
Type an equals sign to enter formula editing mode for a cell. Color coding appears showing the source cells used in your formula. This �makes it easier to understand if your formula is correct or to see the source �of errors.
When you copy or fill a formula into additional cells, Numbers automatically adjusts cell references relative to the current cell. If you want to override that to select an absolute row, �absolute �column, or absolute cell, you can use the Preserve Row/Preserve Column options.
Importing Files From Excel
A common task in Numbers would be to open an Excel document created�by someone else. This can work fairly well, but is not completely painless.
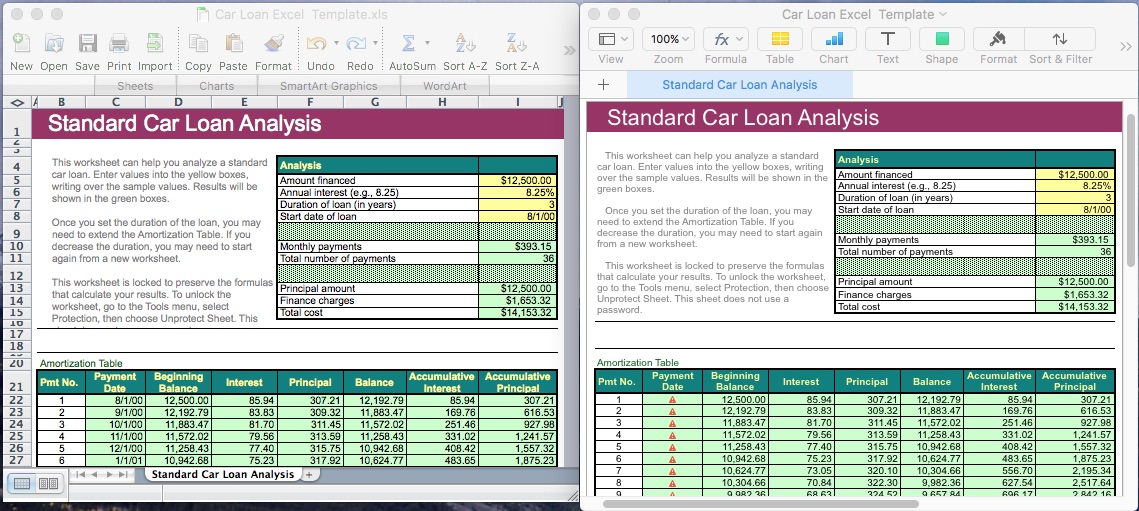
This imported okay, and the amortization calculations agreed, but the date formulas were not imported correctly and would have to be re-done in numbers.
Large Files
One of our members asked how Numbers was at handling large files imported from Excel. To test this I created a large spreadsheet in Excel with 40,000 rows and about 14 columns. The file size in Excel was 3.7 Megabytes. Numbers opened it without complaint, but it took about 30 seconds. When saved as a native Numbers document, its size increased to 6.3 Mbytes, but the native document opened in Numbers in about five seconds.
Although I didn’t get any warnings in Numbers, I did get one “Not enough memory” message in Excel while cutting, pasting and filling to create the document. Excel handled it gracefully without crashing.
iOS Numbers App
The Numbers app on iOS is deliberately very similar to the version for �Macintosh.
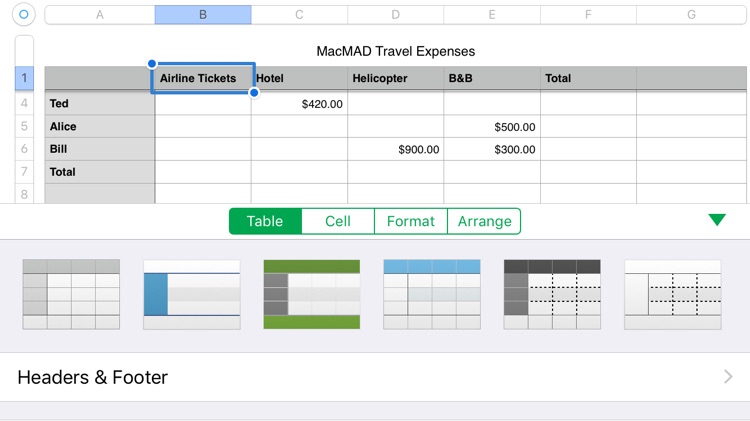
FYI, Excel also has an iOS app which is free in the App store. It looks like this:
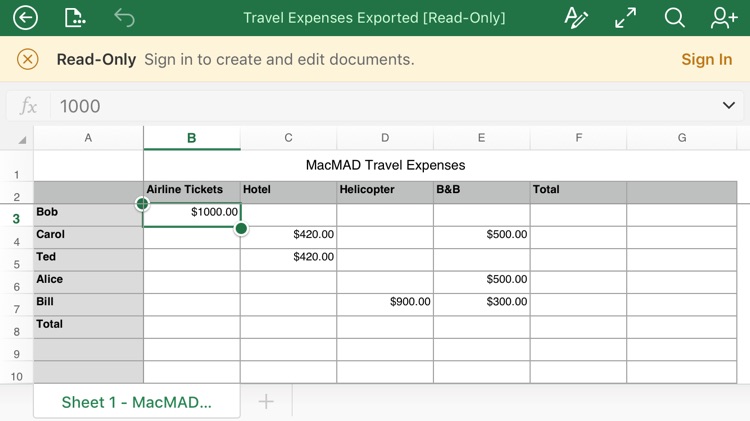
The Excel app is apparently read-only until you register for and log in to a Microsoft Office 365�account.
�Conclusion
If you want a spreadsheet program to perform the usual tasks of calculation, sorting and organizing, and you don’t have much prior experience with spreadsheets, �you will find Numbers a very useful application. It’s especially easy to learn because of�consistent controls across Mac and iOS versions and consistency with Pages and Keynote.
If you know what a pivot table is, or have a lot of spreadsheets already in Excel format, you may be dissatisfied with the limitations of Numbers.