Here are the slides from our November meeting. We had a nice presentation by Rick Glasby on Apple Car Play, the iOS extension available in many new cars and 3rd party car audio installations.
Car Play works with your iPhone to give you a hands-free navigation and entertainment environment while you drive.
Apple released iOS 11.0.3 on Wednesday, October 11, 2017. The description of the release is as follows:
iOS 11.0.3 includes bug fixes for your iPhone or iPad. This update:
Fixes an issue where audio and haptic feedback would not work on some iPhone 7 and 7 Plus devices
Addresses an issue where touch input was unresponsive on some iPhone 6s displays because they were not serviced with genuine Apple parts
It so happens that I repaired my iPhone 6s screen recently with an apparently reputable, but non-Apple replacement screen.
Old screen, miscellaneous tools and the new screen installed.
Since the repair, I had noticed a few times when the touch screen became completely unresponsive. This was disconcerting at first, because an iPhone that doesn’t respond to any tap, touch, drag, etc. is pretty much a useless brick. However I found that just waiting about 1 minute or so with the screen off would bring it back to life. Since it didn’t happen but a few times, and since I knew a workaround, I didn’t complain to anybody.
Apparently, this was happening to enough people to reach the ears of Apple.
I want to give Apple a big thank you for putting in a software fix to work around a hardware problem that was not their fault. They could have done nothing. Some companies have gone so far as to deliberately disable unauthorized 3rd party hardware. Not Apple. Apple stuck by their customers, and this customer intends to stick by Apple.
Apple customers who used 3rd party replacement screens escaped with only a stern talking-to:
Note: Non-genuine replacement displays may have compromised visual quality and may fail to work correctly. Apple-certified screen repairs are performed by trusted experts who use genuine Apple parts.
While we’re on the subject of screen repair. Although I did successfully repair my own iPhone screen, I can’t really recommend doing it yourself. The process involved a jeweler’s magnifier, a guitar pick, a suction cup and six or eight nearly microscopic screws. I came extremely close to letting the magic smoke out of my iPhone. (Smoke must be what makes it work, because if the smoke ever comes out, it doesn’t work any more!)
I got away for about $50, but the folks who install a genuine Apple screen for, say, $150 are earning their money.
In the process of helping older people with their iPhones and iPads, I have noticed certain problems common to many older users and solutions for some of those problems.
Unintended Actions
The first type of problem is unintended actions. This is when someone intends to do one thing, but accidentally does another. This can be as simple as typing the wrong character, but often includes major things like accidentally opening another app or pressing delete instead of save. I often see accidental swipes. The user intends to press a button or icon, but, perhaps due to poor motor control, instead swipes. Depending on the context, and where a swipe occurs, surprising things happen: the search window pops up, an email is deleted, etc.
One person asked me what the control center was and why it keeps popping up from the bottom of the screen. This was happening when she accidentally swiped up from the bottom of the screen invoking the control center.
You can make this less likely by turning off the control center from within apps. It can still appear on the home screen, but won’t pop up within any app. This setting is in Settings:Control Center:Access Within Apps.
I turned that off on my own phone and realized that I had probably been invoking Control Center more often by mistake than on purpose.
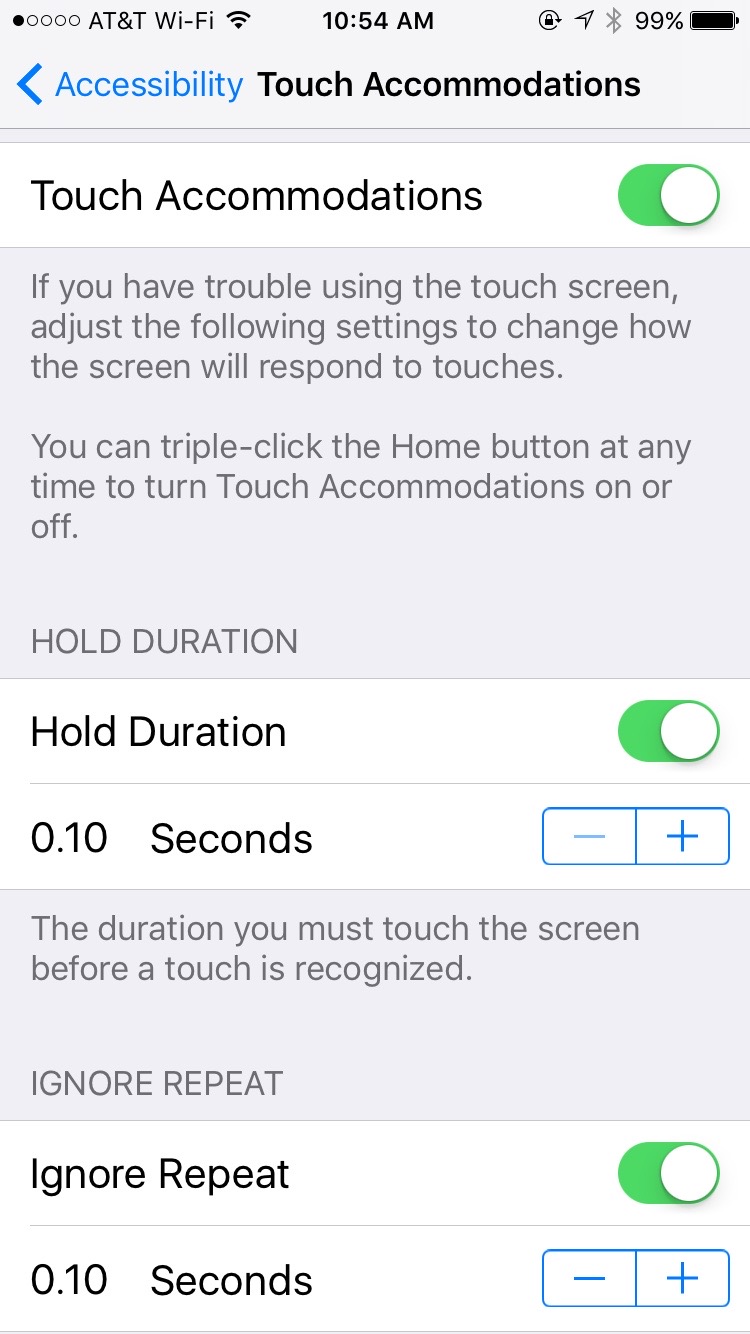
Touch Accommodations
Another very useful setting is in Settings:General:Accessibility:Touch Accommodations. If you turn on Touch Accommodations, the whole touch screen interface becomes less sensitive, and requires more deliberate actions. Buttons and other controls won’t activate until you press them for at least 1/10 of a second. That doesn’t sound like very long, but it makes a huge difference. Many accidental swipes and clicks will be eliminated.
Once enabled, you can adjust the delays. The default durations are probably okay for most people. If the user has severe tremors, then these settings can be increased. It might take a little bit of time to get used to this mode, but it can be worth it.
The iOS Touch Accommodations Setting Screen
Overlooked Controls
The second category of problem is the “Oh, I didn’t know you could push that.” problem. iOS conceals many options behind innocuous looking symbols or words which are actually buttons that you can click, leading to useful functions. Often, people don’t notice those, or don’t realize that they are buttons.
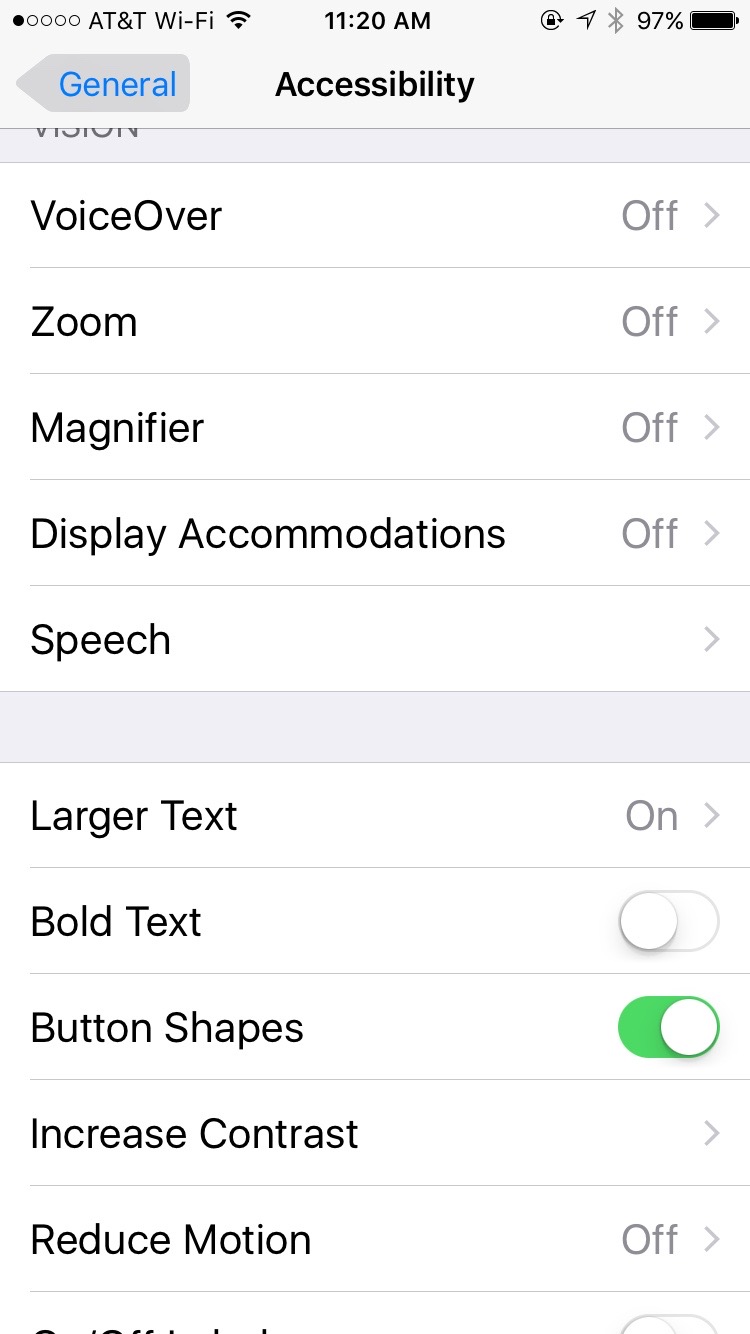
There is a setting, General:Accessibility:Button Shapes, which outlines text buttons with a grey shape, making them look more like buttons. For example, notice how the word General has a gray background in the screen shot below.
Button Shapes turned on. Notice the “General” button at top.
Try these settings for yourself or for your older friends and relatives. They could lead to a calmer, less frustrating experience with the iPhone or iPad.
I set out recently to find a shared iOS shopping list App to replace my family’s paper grocery shopping list. I had some pretty simple requirements:
Easy-to-use sharing between family members using different iCloud accounts
Ability to review the list in the store and mark items off
Ability to review and revive completed items (We’ve got milk this time, but we’ll need it again soon)
I spent some time in the App store looking at reviews and didn’t see anything I wanted to buy. Some otherwise useful apps had a bad reputation for crashing. Others were just too complex. Some needed a subscription and a sign-on for sharing to work. It’s just creepy that the vendor would be watching everything on your shopping list.
Eventually I found it. An app that was already on my phone that met all my requirements and didn’t need any additional sign-ups, plus you can use Siri to add items to the list by voice.
The app is:� Reminders — the humble Apple Reminders app that comes with iOS.
Remember the name of your lists: “Shopping List” and “Grocery List” aren’t the same to Siri.
When you invite someone to share your list, they may have to sign on to iCloud on the web the first time to accept the invitation, but after that it can be strictly iPhone-to-iPhone.
Everyone invited has equal ability to add, delete and edit items on the list.
Tap at the bottom of the reminders App screen to see your other reminder lists.
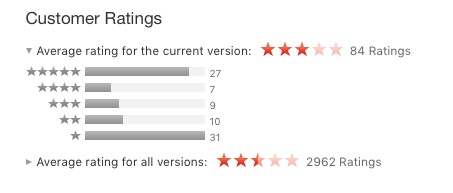
When the new version of Numbers�for the Mac came out some features were dropped. Most of them have not been added back in. Reviews of the apps have been definitely mixed. Numbers only gets a 3-star rating on the App store (both versions).
Ratings for Numbers on the Mac App Store
Two-and-a-half to three stars�is a pretty terrible rating, especially for an Apple app. As you can see, the ratings are very mixed with most reviewers giving either one star or�five-star ratings. The ratings for the iOS version are very similar.
Guide to Star Ratings
The one-star reviews are mostly from people upset�about advanced features removed from the previous version. The five-star reviews tend to be�from people who have come to the application fresh, with no special expectations.
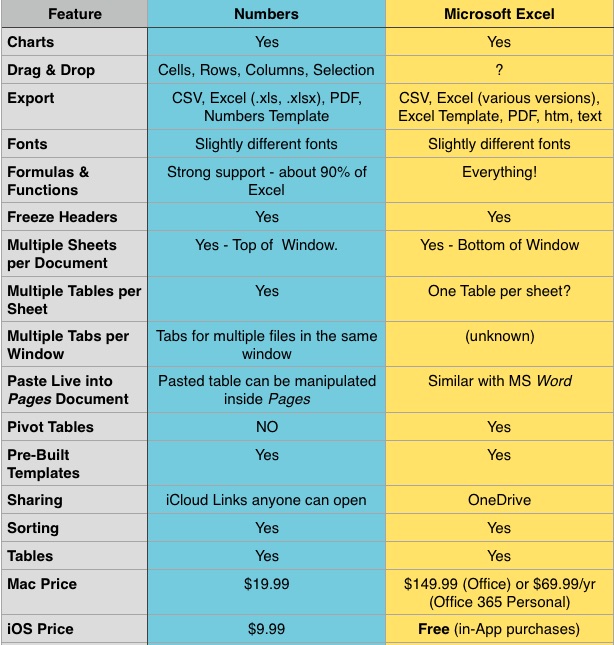
Numbers includes hundreds of distinct features. The chart below highlights just a few�of my�favorite features as compared with Microsoft Excel.
Comparison of Features Between Numbers and Microsoft Excel
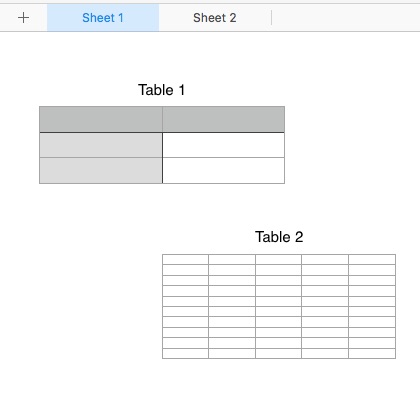
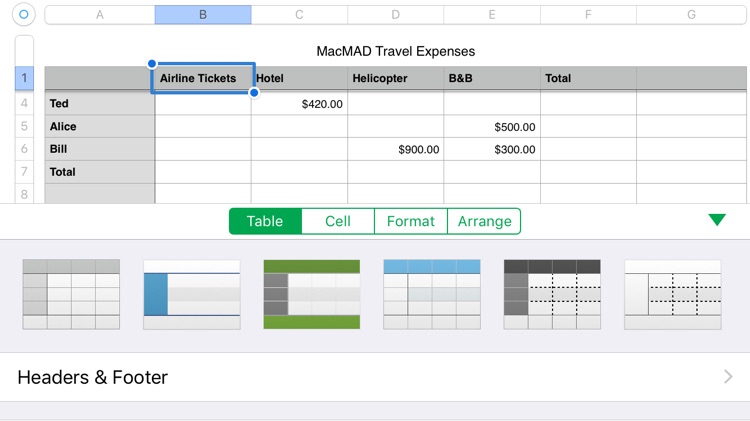
Documents, Sheets and Tables
Numbers documents can have multiple sheets. Each sheet can have multiple tables. When you create a new Numbers document, it has one sheet with one table on that sheet.
If you have used Excel, having multiple sheets should be familiar. The main difference is that the sheets appear at the top of the window instead of at the bottom.
The concept of having multiple tables on a single sheet may be new to users of older spreadsheet programs. It is a very nice feature, which allows you to separate groups of data or �formulas which are of different types instead of lumping them all into the same grid of rows and columns. You can arrange the tables on the page however you like.
This document has two sheets. Sheet 1 has two tables.
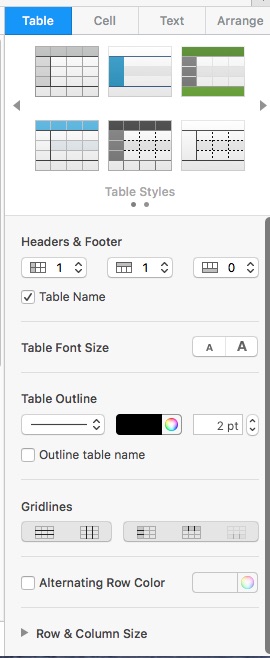
Formatting Controls
Table Style Controls
Numbers uses a consistent set of formatting controls very similar to those in the Pages word �processor we discussed last month. These are presented �in a pane on the right hand side of the window. These controls look simple, but all together, they have a lot of power. In addition to the pre-defined Table and Text styles, you can create and save your own preferred styles.
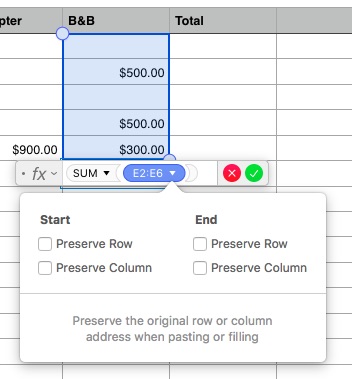
Formula Editing
Type an equals sign to enter formula editing mode for a cell. Color coding appears showing the source cells used in your formula. This �makes it easier to understand if your formula is correct or to see the source �of errors.
When you copy or fill a formula into additional cells, Numbers automatically adjusts cell references relative to the current cell. If you want to override that to select an absolute row, �absolute �column, or absolute cell, you can use the Preserve Row/Preserve Column options.
The Numbers Formula Editor
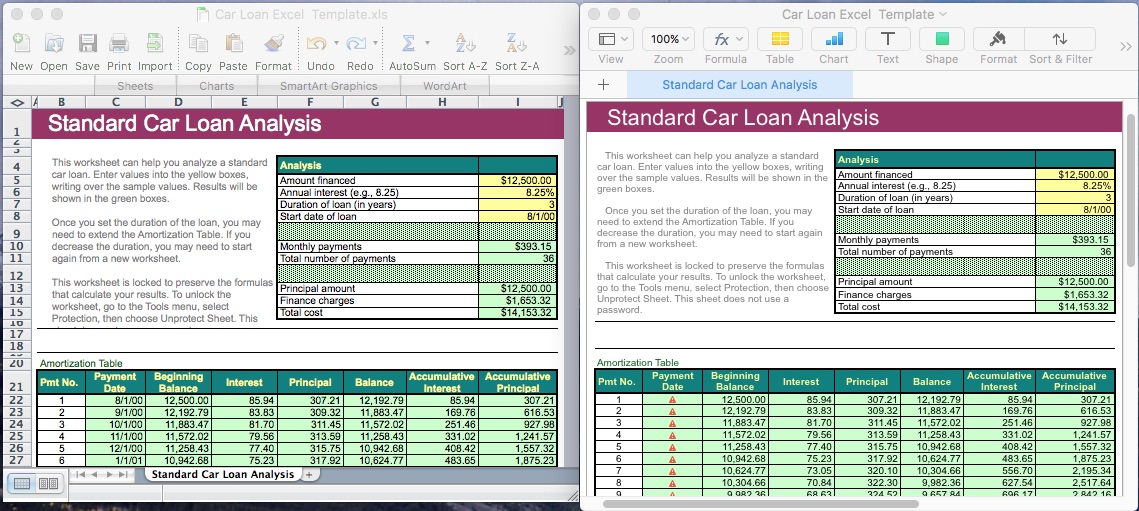
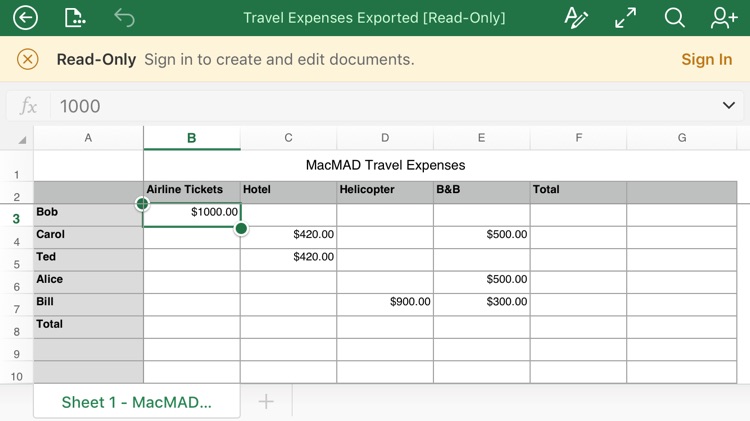
Importing Files From Excel
A common task in Numbers would be to open an Excel document created�by someone else. This can work fairly well, but is not completely painless.
Original Excel Template on left, Numbers Import on right
This imported okay, and the amortization calculations agreed, but the date formulas were not imported correctly and would have to be re-done in numbers.
Large Files
One of our members asked how Numbers was at handling large files imported from Excel. To test this I created a large spreadsheet in Excel with 40,000 rows and about 14 columns. The file size in Excel was 3.7 Megabytes. Numbers opened it without complaint, but it took about 30 seconds. When saved as a native Numbers document, its size increased to 6.3 Mbytes, but the native document opened in Numbers in about five seconds.
Although I didn’t get any warnings in Numbers, I did get one “Not enough memory” message in Excel while cutting, pasting and filling to create the document. Excel handled it gracefully without crashing.
iOS Numbers App
The Numbers app on iOS is deliberately very similar to the version for �Macintosh.
Numbers App on iPhone
FYI, Excel also has an iOS app which is free in the App store. It looks like this:
Excel on the iPhone
The Excel app is apparently read-only until you register for and log in to a Microsoft Office 365�account.
�Conclusion
If you want a spreadsheet program to perform the usual tasks of calculation, sorting and organizing, and you don’t have much prior experience with spreadsheets, �you will find Numbers a very useful application. It’s especially easy to learn because of�consistent controls across Mac and iOS versions and consistency with Pages and Keynote.
If you know what a pivot table is, or have a lot of spreadsheets already in Excel format, you may be dissatisfied with the limitations of Numbers.
Although Pages has a deceptively clean and simple design, it does a lot of things you might have expected�to need separate applications�for. Pages includes these functions:
Word Processing (obviously)
Page Layout
Spreadsheet
Charting
Photo Editing
Publishing
Collaboration Software
Integration with iCloud
Work on your document from all your devices.
Pages Has Two Document Types
All Pages documents are either:
Word Processing Documents, or
Page Layout Documents (have no body)
Word Processing documents have body text which is a continuous flow of text within the document. It may flow around images, tables, etc.
Page Layout documents have no body. All text in a page layout document exists as part of �something else: a text box, a shape, or a table.
Consistent Text Operations
Text can exist in:
The document body,
Text boxes
Shapes,
Tables,
The header and footer
All are treated consistently�as far as styles and formatting.
I’ve met several people who say they just want to use Facebook or email, but are having problems using their iPhone. They are often surprised by the results of their actions, and sometimes flail away at the screen in frustration.
Trying to use Apps on the iPhone (or iPad) without understanding the basic gestures is like hopping in a car, wanting to drive across town, without being quite sure what those pedals on the floor do.
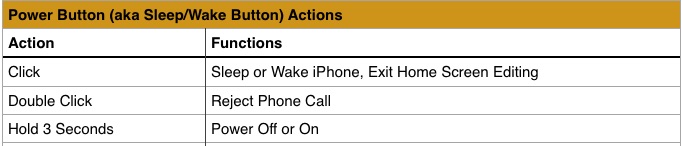
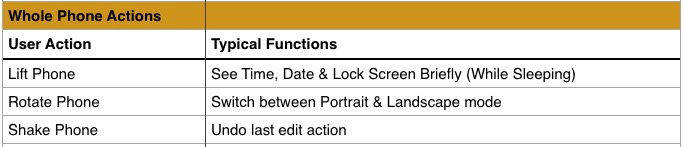
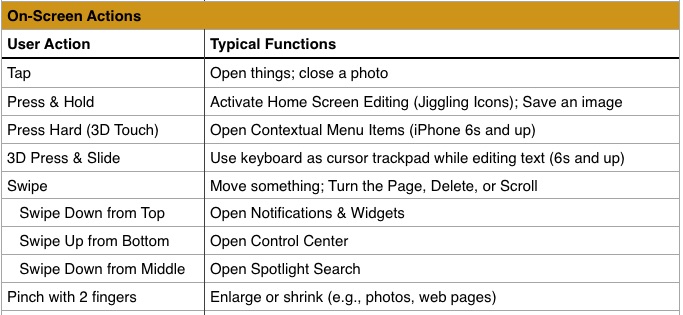
Here’s a quick rundown of the iPhone controls and what to expect from them. I’ve separated gestures you make on the touch screen from operations involving the power button, the home button and the whole phone. Many of the functions I have indicated below can be customized in Settings, but these are the default actions. Gestures may have special meaning within certain Apps, but these are the most common usages.
Starting at the very beginning, here’s how to use the power button, located on the upper right side of your phone. Holding the power button for 3 seconds brings up the Slide to Power Off screen. If your phone is powered down, you will need to hold the power button for a few seconds until you see the Apple logo and the phone begins powering on.
Here’s what you can do with the Home Button at the bottom center of the iPhone/iPad. Touch ID is only available in the iPhone 5s and newer. For a click, press hard. For a tap, just touch it lightly. Only a light touch is needed for the fingerprint sensor. If anybody knows some function that requires only a single tap of the home button, please leave me a comment.
There are a few things you can do with your whole phone, without pushing any buttons. When you phone is asleep, lifting it to a vertical position momentarily turns on the screen so you can see the time, date and notifications.
Here are the gestures for the iPhone touch screen. These are the most commonly used and the area where people have the most trouble. In particular, the iPhone is very sensitive to any sideways or vertical motion of your finger when you touch the screen. If it notices any motion, your gesture is interpreted as a swipe instead of a tap. Tapping is probably the most common gesture, so it’s important to master it. When tapping make sure you move your finger up and down only, without sliding it sideways at all.
One of the most common problems with the touch screen is unintended actions. The screen is very sensitive to the slightest touch. In fact, it will sometimes sense a touch if your finger is just near the screen. So, keep all your fingers away from the screen until you actually want to do something.
Remove your finger promptly when tapping or you will get a Press & Hold. If you want to use Press & Hold, you don’t have to press hard, just rest your finger — again, no sliding. This is probably most useful to open the sharing menu for a photo.
These are special, iPad-only gestures:
For a device with such an easy-to-use reputation, this is a pretty big list. But, make sure you understand these and you will have a much easier time using your device.
MacMAD’s October, 2016 Meeting topic is VPNs (Virtual Private Networks). Here are some accompanying links and information.
People generally use a VPN for these reasons:
Security and privacy when using a public network, such as at a coffee shop or hotel.
To allow access to online content which is subject to geographical restrictions.
To allow remote access to a private local network such as your home network or your employer’s network
Provide privacy at home (prevent your ISP from knowing what you are up to)
VPN Features to Look For
Automatic connection and reconnection – prevents accidental leakage of unencrypted data
Choice of VPN endpoint – What country would you like to be in today?
Self Installation/Configuration – Avoids lots of technical settings
Client and Server
VPNs follow a client-server model. The client app usually runs on your computer or portable device. The server can be either a commercial VPN service or you can run your own VPN server at home on your router (some models) or on another computer. There are many (hundreds) commercial VPN providers. The following list is not at all complete.
I often hear beginners say that their computer is out of memory. This is often a clue that they are beginners. Computers contain two different types of “memory” and you need to carefully distinguish between them. I could give a detailed technical explanation, but it would be obsolete in a few years, and wouldn’t be all that helpful. Instead, I’ll describe how they are used, what the symptoms are when you run short and finally, what to do about it.
RAM vs. Storage
Current computers contain two main types of memory, RAM (Random Access Memory) and non-volatile storage. This is true for Macs, PCs, iPads and iPhones, etc. Confusion arises because these very different things are both measured in the same units, Megabytes and Gigabytes. If someone says their computer or phone has 16 Gigabytes, you should be thinking: “16 Gigabytes of what”?
Storage (Hard Drive Space)
Storage is what old-timers think of as their hard drive. Since iPhones and some Macs really don’t have hard drives, Apple simply uses the term Storage, which I think is a really good choice. So, what is storage? Storage is where things go when you save them, close them or download them. Things stay in storage until you delete them. Storage has a firmly limited size, and when you try to exceed it you will get a definite message. If you see a message on the Mac about a specific device (probably Macintosh HD) being out of space, this refers to storage.
RAM
RAM is where things go while you open them, edit them, view them or play them. RAM is lightning fast, but it is temporary. Things usually don’t stay in RAM long, and it is all erased when the device is powered off. Apps and documents flit in and out of RAM as you navigate between them. The operating system of your computer or device works hard to make sure you don’t run out of RAM. If everything doesn’t fit, it will compromise by keeping things that should be in RAM in slower storage temporarily. So, you probably won’t ever see a message about being low on RAM. Instead, things will just slow down, usually dramatically. The worst slowdowns are likely to occur when running a single memory-hog program like a video or photo editor. Running a guest operating system like running Windows under Parallels will use up your RAM quickly.
Gigabytes of Advertising
Apple’s marketing definitely de-emphasizes RAM. It is not mentioned at all for iOS devices, and for Macs, it’s down in the fine print, where it is called “memory”. When shopping for an iPhone 6, say, you will see a 16 GB, 64 GB, and 128 GB model. Those are Gigabytes of storage, not RAM. iPhones have RAM, and newer models may have more RAM than older ones, but Apple never mentions it.
How to Check
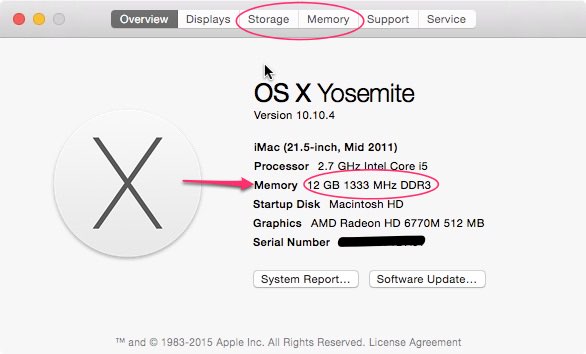
On the Mac, you can see how your RAM and Storage stack up by going to the Apple Menu, and selecting About This Mac. In the Overview pane, you will see your computer’s installed RAM where it says Memory. You will also see an item at the top, Storage. Next to that you may or may not see one that says Memory. The Memory item only appears on computers with memory slots that allow additional RAM to be installed. If you don’t see that, your Mac already has all the RAM it’s ever going to have. That’s the way most of them are now, especially the laptops.
About This Mac Overview
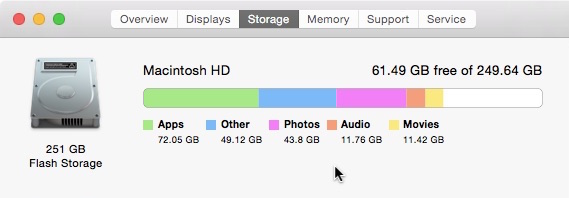
The Storage pane of About This Mac show an overview of how much storage you have, how much is being used for what and how much remains free. You should try to keep at least, say, 15% of your storage free. If it ever gets full, your computer can become almost completely unusable.
About This Mac, Storage Pane
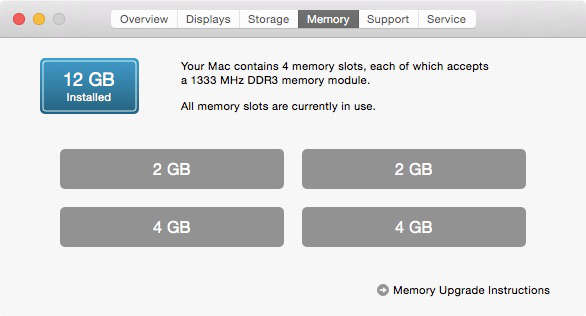
The memory pane of About This Mac shows your options for upgrading RAM. This pane only appears on Macs with upgradable RAM.
Memory pane of About This Mac
I’m Out of RAM!
First of all, you’re probably not out of RAM. Most beginners are very unlikely to need more RAM than their computer has unless the computer is several years old. If you really are low on RAM, you can do one of three things. First, install more RAM if that’s possible in your computer. It’s not possible on iOS devices. Second, if your RAM isn’t upgradable, upgrade to a whole new device with more RAM. Third, you can limit your RAM usage. First, quit all applications that you are not using. Consider if you can reduce the size of the documents you are working with. Can you edit that giant novel in separate chapters, one at a time? Can you work with lower-resolution photos or videos? Maybe you could split up your photo library into smaller sections. Those type of things are likely to reduce demands on your RAM.
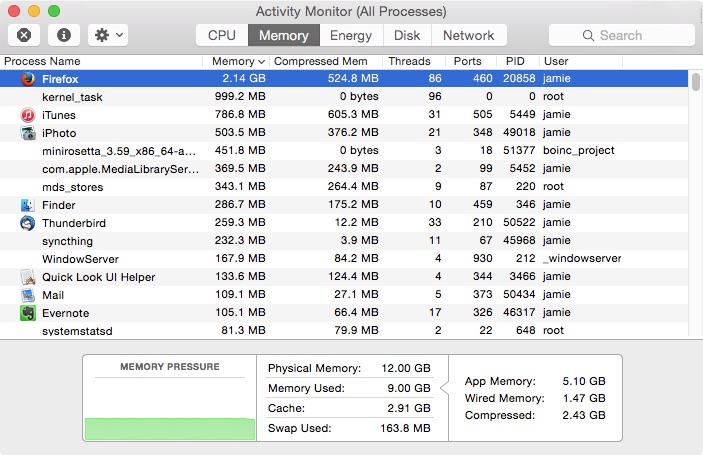
If you are worried about needing? more RAM on the Mac, you should open Activity Monitor and visit the Memory tab. The Memory Pressure feature in Yosemite has done a lot to reassure me that I’m in little danger of running out of RAM.
Activity Monitor Memory Pressure
I’m Out of Storage!?
This is all too common. Your first thought should be to delete something you don’t need. Your Downloads folder is a good place to start. Things tend to pile up in there. They all came from the Internet anyway, so if you find you need them, you can always download them again. Empty the trash. Storage belonging to trashed files isn’t freed until the trash is emptied. Empty the trash in applications, like iPhoto, that have their own trash.
While scanning your folders for stuff to be deleted, sort by size. Finding and deleting the biggest files first will save you a lot of time.
Another option is to add external storage. This is not possible for iOS devices, usually, but it is easy for Macs. You should move some of those big files to an external hard drive.