We’re going back to basics in January with Apple’s email application Mail. We’re talking about both the Mac and iOS apps.� Here are the slides from tonight’s meeting in Keynote format. No note taking required!
We’re going back to basics in January with Apple’s email application Mail. We’re talking about both the Mac and iOS apps.� Here are the slides from tonight’s meeting in Keynote format. No note taking required!
Here are the slides from our November meeting. We had a nice presentation by Rick Glasby on Apple Car Play, the iOS extension available in many new cars and 3rd party car audio installations.
Car Play works with your iPhone to give you a hands-free navigation and entertainment environment while you drive.
Last night’s October 2017 MacMAD meeting covered the changes in iOS 11 and High Sierra. �Here are the slides on the High Sierra changes.
Apple released iOS 11.0.3 on Wednesday, October 11, 2017. The description of the release is as follows:
iOS 11.0.3 includes bug fixes for your iPhone or iPad. This update:
- Fixes an issue where audio and haptic feedback would not work on some iPhone 7 and 7 Plus devices
- Addresses an issue where touch input was unresponsive on some iPhone 6s displays because they were not serviced with genuine Apple parts
It so happens that I repaired my iPhone 6s screen recently with an apparently reputable, but non-Apple replacement screen.

Since the repair, I had noticed a few times when the touch screen became completely unresponsive. This was disconcerting at first, because an iPhone that doesn’t respond to any tap, touch, drag, etc. is pretty much a useless brick. However I found that just waiting about 1 minute or so with the screen off would bring it back to life. Since it didn’t happen but a few times, and since I knew a workaround, I didn’t complain to anybody.
Apparently, this was happening to enough people to reach the ears of Apple.
I want to give Apple a big thank you for putting in a software fix to work around a hardware problem that was not their fault. They could have done nothing. Some companies have gone so far as to deliberately disable unauthorized 3rd party hardware. Not Apple. Apple stuck by their customers, and this customer intends to stick by Apple.
Apple customers who used 3rd party replacement screens escaped with only a stern talking-to:
Note: Non-genuine replacement displays may have compromised visual quality and may fail to work correctly. Apple-certified screen repairs are performed by trusted experts who use genuine Apple parts.
While we’re on the subject of screen repair. Although I did successfully repair my own iPhone screen, I can’t really recommend doing it yourself. The process involved a jeweler’s magnifier, a guitar pick, a suction cup and six or eight nearly microscopic screws. I came extremely close to letting the magic smoke out of my iPhone. (Smoke must be what makes it work, because if the smoke ever comes out, it doesn’t work any more!)
I got away for about $50, but the folks who install a genuine Apple screen for, say, $150 are earning their money.
Our MacMAD meeting topic this month is iTunes. There are some interesting changes in the latest version. In particular, Apple has removed the purchase and management of iOS Apps from iTunes. This is a good step in the right direction to make iTunes less complicated and more focused.
Here is tonight’s Keynote presentation.
In the process of helping older people with their iPhones and iPads, I have noticed certain problems common to many older users and solutions for some of those problems.
The first type of problem is unintended actions. This is when someone intends to do one thing, but accidentally does another. This can be as simple as typing the wrong character, but often includes major things like accidentally opening another app or pressing delete instead of save. I often see accidental swipes. The user intends to press a button or icon, but, perhaps due to poor motor control, instead swipes. Depending on the context, and where a swipe occurs, surprising things happen: the search window pops up, an email is deleted, etc.
One person asked me what the control center was and why it keeps popping up from the bottom of the screen. This was happening when she accidentally swiped up from the bottom of the screen invoking the control center.
You can make this less likely by turning off the control center from within apps. It can still appear on the home screen, but won’t pop up within any app. This setting is in Settings:Control Center:Access Within Apps.
I turned that off on my own phone and realized that I had probably been invoking Control Center more often by mistake than on purpose.
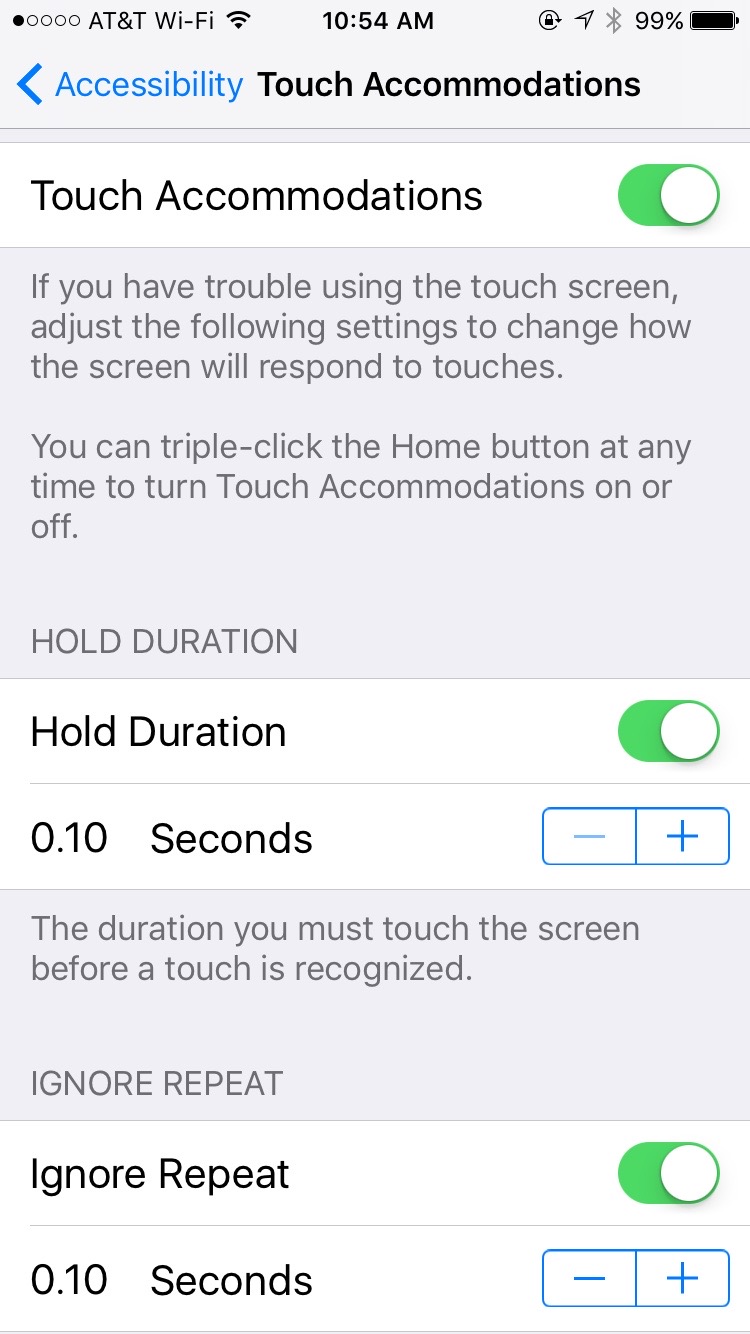
Another very useful setting is in Settings:General:Accessibility:Touch Accommodations. If you turn on Touch Accommodations, the whole touch screen interface becomes less sensitive, and requires more deliberate actions. Buttons and other controls won’t activate until you press them for at least 1/10 of a second. That doesn’t sound like very long, but it makes a huge difference. Many accidental swipes and clicks will be eliminated.
Once enabled, you can adjust the delays. The default durations are probably okay for most people. If the user has severe tremors, then these settings can be increased. It might take a little bit of time to get used to this mode, but it can be worth it.
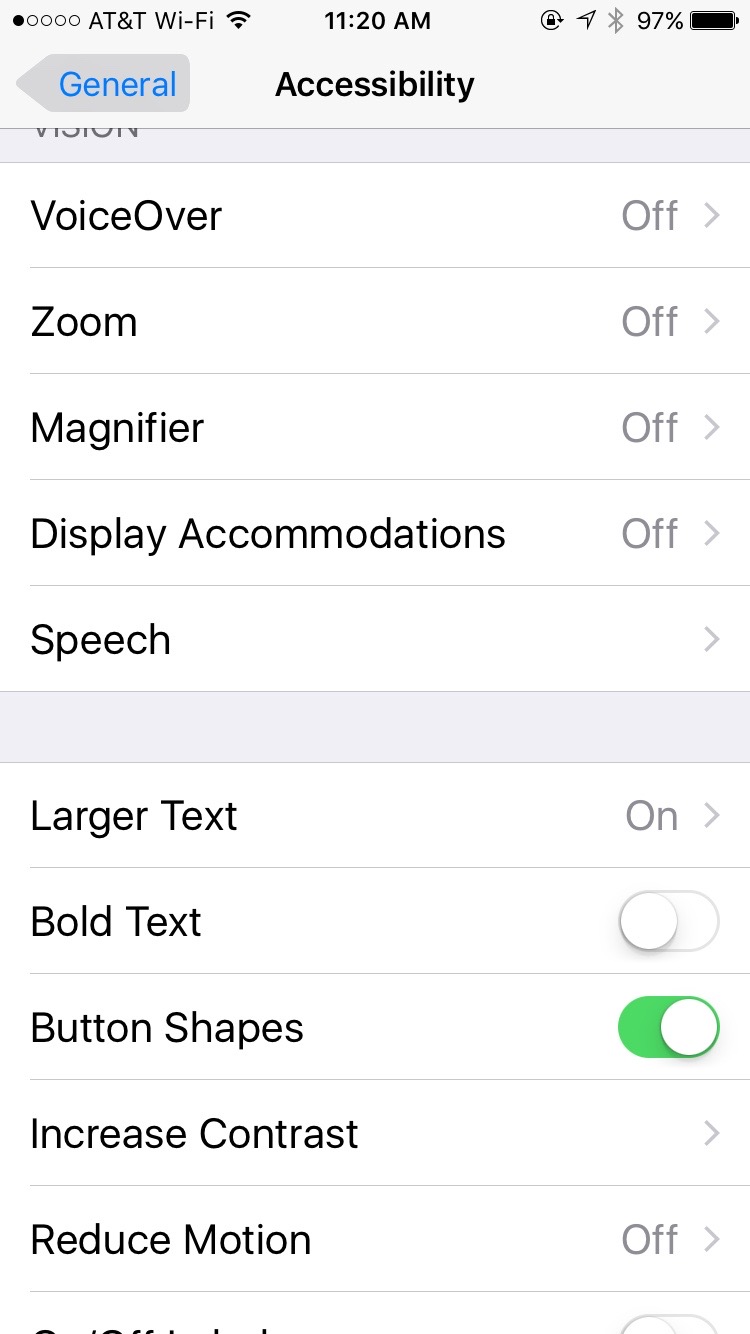
The second category of problem is the “Oh, I didn’t know you could push that.” problem. iOS conceals many options behind innocuous looking symbols or words which are actually buttons that you can click, leading to useful functions. Often, people don’t notice those, or don’t realize that they are buttons.
There is a setting, General:Accessibility:Button Shapes, which outlines text buttons with a grey shape, making them look more like buttons. For example, notice how the word General has a gray background in the screen shot below.
Try these settings for yourself or for your older friends and relatives. They could lead to a calmer, less frustrating experience with the iPhone or iPad.
This is a guest post from Dennis Crowley
I have been given the opportunity to review Stellar Phoenix Mac Data Recovery Software. The Stellar Data Recovery Home page claims the software will perform safe and accurate recovery of lost documents, photos, music files, or videos that have been accidentally or intentionally deleted from Mac computer. While I did not review all the claims made by Stellar Data Recovery I did test the ability to recover deleted files.
I deleted some photo, Word, music and PDF files from my iMac and three days later tried to recover them. I was skeptical, so prior to deleting the files I copied them to a flash drive to insure they would not be lost. I ran the software, selected the appropriate drive and to my surprise all the deleted files were recovered and retained the original names.
The software comes with an online User Manual. Although the software is slightly expensive the cost is offset by the ability to recover priceless photos or documents.
Stellar Phoenix Mac Data Recovery Software is a good product and does what it claims.
Your Apple ID is your single set of credentials for everything from Apple, including:
This is pretty important stuff, right? You don’t want your credentials to fall into the wrong hands!� Until recently, those credentials consisted of only your username and password, which seldom change. If a bad guy got hold of those, he’d have complete access to your Apple identity.
To help prevent that, Apple set up Two-Factor Authentication (2FA).� With 2FA, in addition to username and password, you must also give a verification code. Verification codes are sent to your phone or other trusted device. The verification code is different each time you log on.
Two-Factor Authentication is optional for users. However, you may now be forced to use it if you use certain apps — those which access your iCloud account.
Some apps require access to your files in iCloud, and therefore need your iCloud credentials to do so. This is fine, but you don’t want them to have the keys to your entire kingdom, do you? You don’t want a calendar app to order a new Macintosh, or delete your photos.
To control such apps, Apple now requires them to access iCloud using a One-Time password. This allows them to bypass 2FA, but using a special password which is only useable by that app for limited purposes. Once you give a one-time password to an app, and it uses it, it can never be used again for any other purpose.
You do not need to store or remember one-time passwords. If for some reason you need to re-authorize an app, you can simply generate a new one-time password for it.� Dennis explains how to do all this in these slides from this month’s meeting:

If you go to Walt Disney World this summer,� I think you’ll find that all the credit card terminals there accept Apple Pay. At Epcot, I paid for a tee shirt with Apple Pay, and even for a coke from a refreshment stand. That saved me from ending up with a bunch of small change.
The San Angel Inn Restaurante in the Mexico pavillion at World Showcase also accepted Apple� Pay. I had already paid with a physical credit card when I saw the contactless payment logo. The waiter brought the portable terminal to the table European-style. He confirmed that they can accept Apple Pay. “It’s faster,� too.”
When you are in an unfamiliar store, you can get a pretty good idea of whether to try Apple Pay based on the credit card reader you see. If you see a Verifone brand credit card reader, especially if it looks like this, it is very likely to accept Apple Pay. Recognize it by the slight hood over the keypad. Some merchants have these machines and the clerks don’t even know that Apple Pay will work until it happens.
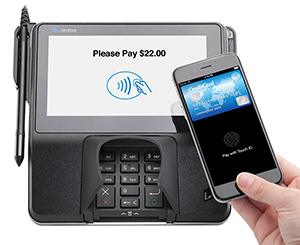
On the other hand, if you see Ingenico equipment, which is very common, Apple Pay will definitely not work at that terminal.
Happy shopping!
I set out recently to find a shared iOS shopping list App to replace my family’s paper grocery shopping list. I had some pretty simple requirements:
I spent some time in the App store looking at reviews and didn’t see anything I wanted to buy. Some otherwise useful apps had a bad reputation for crashing. Others were just too complex. Some needed a subscription and a sign-on for sharing to work. It’s just creepy that the vendor would be watching everything on your shopping list.
Eventually I found it. An app that was already on my phone that met all my requirements and didn’t need any additional sign-ups, plus you can use Siri to add items to the list by voice.
The app is:� Reminders — the humble Apple Reminders app that comes with iOS.
Here’s an overview from iMore on how to set Reminders up for sharing.
A couple of tips:
Enjoy!