If you are shopping for phone plans, here’s my referral code for US Mobile. I like their service. They are much cheaper than the big boys, but use the same networks, and they do have a plan that supports a cellular Apple Watch.
I also like Mint Mobile cell service. They have different plans, and are usually the cheapest.
For a limited time use my wife’s referral link to get $15 off any 3-month plan with code 15NOW at checkout, plus $15 in renewal credit to use later. Terms apply.
Proton mail is the most privacy-focused email provider I know. They also feature a password manager and a VPN service. Get a two-week free trial with my referral link.
Why should you get an Apple Watch if you already have an iPhone?
The iPhone did a lot to kill the market for wristwatches. If you already have an iPhone in your pocket that shows the time, among its many other functions, why wear a watch? People were using their iPhone as a glorified pocket watch and leaving their wristwatch at home.
That started to turn around with the introduction of the Apple Watch.
So, why would you want an Apple Watch?
It provides hands-free access to many of the same functions as the iPhone:
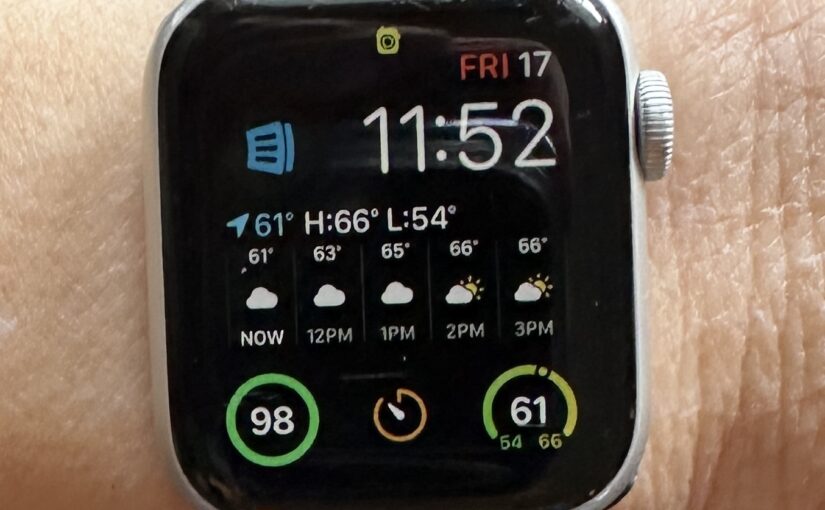
Time and Date
Notifications
Texts
Emails
Phone Calls
Weather
Siri and HomeKit
Apple Pay
Unlock your Mac
Many more functions provided by Apps from Apple & 3rd parties
You no longer have to dig your phone out of your pocket or purse to use these functions.
Health and Safety
Fall Detection
Car Crash Detection
Pulse Measurement
Detection of AFIB (atrial fibrilation of the heart)
Emergency Calling*
ECG (EKG)
Blood Oxygen Measurement **
Sleep Tracking
Workout and Fitness Tracking
* On Cellular models, or if in range of the paired iPhone ** Pending resolution of patent lawsuits
Driving and Navigation
Apple Watch (and iPhone) can act as a car key for many car models.
Haptic wrist-taps for turn-by-turn directions
In the car, driver can know when to turn without voice prompts annoying passengers
Especially useful when walking or biking
Works with or without Maps app on iPhone
Compass App
Choosing an Apple Watch
Models:
Series 1 thru 10 (new one every year 2015-2025)
Apple Watch SE & SE2 (lower-cost models)
Apple Watch Ultra 1 & 2 (2022 & 2023)
Options:
With or Without Cellular – Watches without Cellular are called “GPS”
Cellular service plan required to use the phone and data features of Cellular models
Sizes: Small or Large – mostly a fashion choice & screen size
Materials: Aluminum, Titanium or Stainless Steel
All Ultras are Large, Titanium and have Cellular
Charging & Battery
All Apple Watches charge via a Mag Safe charging puck. There is no “charge port” on the watch.
Battery life is about 1 day for most models, and 2-3 days for the Ultras.
Your watch may not ship with a charger. Be sure you have one.
Apple Watch charging speeds vary by model and charger. The latest, the Apple Watch Series 10, charges up to 80% in 30 minutes using a modern charger. The Ultra takes longer to charge its larger battery.
Water & Swimming
The Apple Watch tolerates water. All recent models are safe to get wet or even swim with. There is a setting you should turn on if you expect to take it in the water, but the watch will turn water mode on itself if it detects water.
The Ultra models are rated for scuba diving.
Apps, Faces and Complications
Like the iPhone, the Apple Watch supports Apps. Many iPhone Apps have an Apple Watch counterpart.
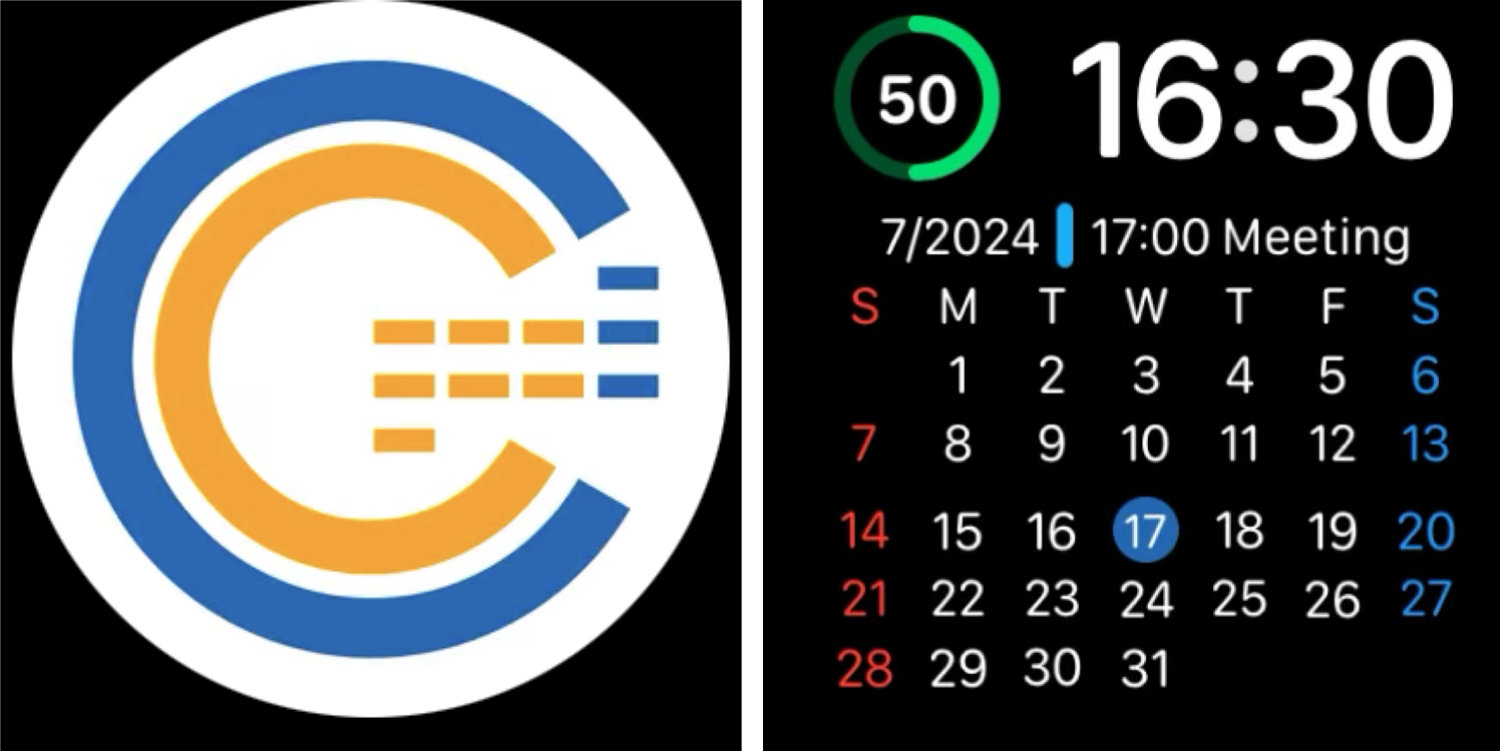
You can customize your watch by selecting among various watch faces. Some are analog, some are digital. Some are utilitarian and some are fashionable.
Any particular watch face can be further customized by selecting complications. These are regions of the watch face that act as buttons, or display information from a particular App. Complications can display items like weather, calendar, battery state, and heart rate. Third-party complications are available and might install as an Apple Watch App, or an iPhone App.
Some watch faces are only available for the Apple Watch Ultra.
iPhone Required
You must have an iPhone to set up and use the Apple Watch. The Watch App on the iPhone is the primary means to control settings on the watch.
Some functions of the watch may be limited unless it is in range of the paired iPhone. The Cellular models have more autonomy because they have their own connection to the Internet.
Watch Bands
When buying an Apple Watch, you will have to select a band. This decision is not critical since bands are removable and replaceable. There is a thriving market of 3rd party Apple Watch bands many of which have good appearance and functionality at a fraction of the price of Apple’s bands.
The band you buy should:
Fit your wrist, and
Fit your watch
Watch case sizes and band sizes are measured in millimeters
Two basic sizes of band attachments, small and large
Small = 38, 40 and 41 mm
Large = 42, 44 and 45 mm
The wrong band size will work, but might look funny. You should choose bands that match the size category (small or large)
Variations of this question are some of the most common questions we get here at MacMAD. “What Mac should I buy?”, “Which iPad is the best?”, etc.
There is a great new site for this called Apple Buying Advice. It’s one of those sites that does one thing and does it well. I hope it withstands the test of time and avoids the temptations of click-bait headlines and over-complicated analysis. Right now, it is very simple and straight forward. Try it!
I want to document the process I went through recently when I sent my iPhone in for repair. That’s a similar process to getting an entirely new phone. There were some unexpected issues you should be aware of. This is going to be pretty long, so here’s some key points first.
Important Points
While you still have your old phone, whether or not you expect to get a new one soon, make a backup of your phone. If your phone unexpectedly fails, or is lost or stolen, you will have to get a new one. You can backup your phone to your computer or to iCloud. If you specify a password for the backup, you will get a more complete backup than if you do not. I recommend using the password. Write it down.
If you are using two-factor-authentication (2FA) login for any sites, create backup codes to access those sites. Look at your authentication apps (e.g., Google Authenticator, 1Password and Last Pass Authenticator) and make a list of all the sites you are using with those apps. Your 2nd Factor information may not be restored to your new phone. Make sure you know how you will sign on to your sites without it.
If any of your sites use text messages or phone calls as an alternate 2nd factor for login, consider assigning another phone number, such as your spouse’s phone for these, since if you are without your phone, you can’t receive those messages.
Make sure you know your Apple ID username/password, your iPhone’s passcode, and the password to your latest iPhone backup. Write them down. Your Apple ID credentials are the same as you use for iCloud logon.
Your Old Phone
If you are sending your iPhone away, out of your control, for any reason, including repair, or sale or trade, you should follow Apple’s Instructions here. Your phone should then be a blank slate, just as it was when it was brand new, with none of your personal data in it. Be aware, that if you have an Apple Watch, this will render your Apple Watch completely useless until you pair it with another iPhone. (Is this true for cellular model watches also?)
Remove the case from your iPhone if it has one. Remove the screen protector, if any.
Remove the SIM card from your old phone. Save it. You will need it for the new/repaired phone.
Received the New/Repaired Phone
I had backed up my iPhone to my Mac. When I got the phone back, although it was the same phone (I recognized minor scratches on the back), it had a new serial number from Apple, and for all practical purposes, it was a different phone.
The process below will be different if you are restoring from iCloud, or if you make any of several choices differently than I did, but this will give you an idea.
This process was longer and more complex than I would have liked. I had to enter multiple passwords multiple times, and deal with confusing dialogs, but I got done eventually.
Begin by installing the SIM card into the phone.
Next, power on the phone. Enter your language and country when prompted.
I chose “Set up Manually” since I had no other iOS device present.
Enter your WiFi password.
You’ll see a message “…It may take a few minutes to activate your phone”.
You’ll click through the Data and Privacy notification screen.
Next, setup touch ID or face ID, depending on your phone model.
You must create a passcode. You can re-use the passcode you had before. I chose “custom alphanumeric code” for greater security.
Enter the passcode twice. (To prove you really know it, and entered it correctly.)
Restoring Apps and Data
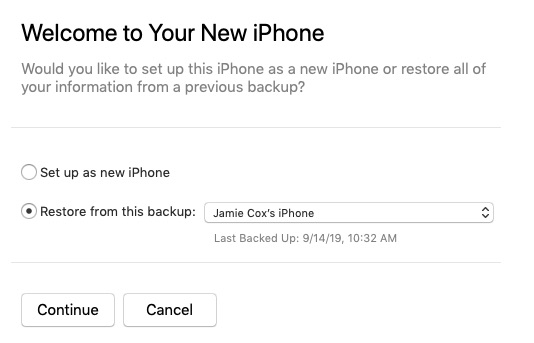
The phone presents you with the following options:
Restore from iCloud Backup
Restore from iTunes Backup
Move Data from Android
Don’t Transfer Apps & Data
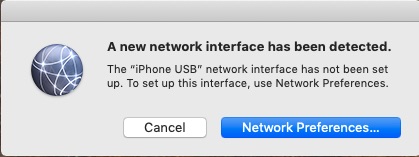
I selected Restore from iTunes Backup, and connected my phone by USB to my Mac.
An irrelevant and distracting dialog pops up on the Mac.
“New Network Interface” Dialog
Cancel that to see the meaningful dialog behind it. As of MacOS Mojave, the actions below take place in iTunes. In MacOS Catalina, it is expected to take place directly in the Finder.
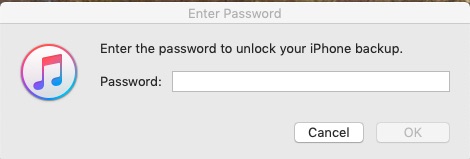
New iPhone DialogEnter password for the Backup
I selected my most recent backup to restore, and had to enter the password. Even though I had saved the password to my keychain when I created it, I still had to enter it manually here. Don’t forget your backup password, or remember where you saved it.
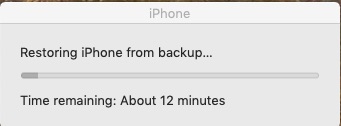
Restoring took about 12 minutes
The phone restarts automatically after the restore, and you are presented with multiple popups.
Cancel the network popup, again.
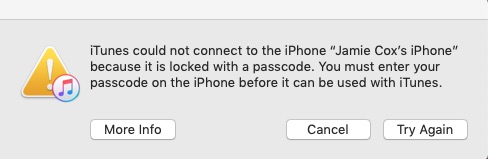
On the iPhone, press Home to upgrade, and enter your passcode on the phone (your iPhone passcode).
This was the one place where things actually went wrong in this process for me. After a progress bar, the Apple logo appeared on the iPhone. After a long wait, iTunes said Syncing TV Shows to “Jamie Cox’s iPhone” (Step 4 of 4), and Waiting for items to copy. I was looking at a 100% progress bar for many minutes. (I only had a couple TV episodes on my phone.)
I gave up waiting and clicked Done in iTunes. The phone wouldn’t power down with a long press on the side power button. (This was an iPhone 7) This proved to me that it really was hung, and would never have finished no matter how long I waited. I held Power and Volume Down for a reset. I then unplugged the phone from USB. When the phone started up, I had to enter my iPhone passcode. I was then at the Update Completed screen on the phone.
Things are back on track now where you should be if the phone doesn’t hang.
General New iPhone Setup
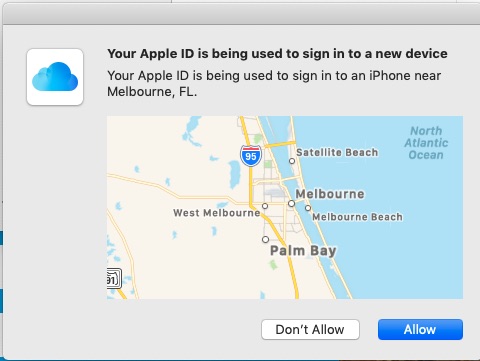
At this point, you will be prompted to enter your Apple ID password. You may also receive this security prompt on the Mac:
Apple ID Allow Dialog
After clicking Allow, on the Mac, you then get a 6-digit code which you need to enter on the iPhone. (If you have two-Factor Authentication enabled on your iCloud account.)
Then agree to the Terms and Conditions screen.
Then you see the Location Services screen. (I chose Enable Location Services.)
Now, you will see the Welcome to iPhone Screen. Choose Get Started.
Now, finally, you are at the iPhone home screen, with icons loading.
On the Mac, you may get a couple more popups. First, asking if you want to add your phone number to iMessage and FaceTime. (I clicked Yes.) Second, notifying you that “Your Apple ID and phone number are now being used for iMessage and FaceTime on a new iPhone.”
At this point, I put the case back on my phone.
Re-Pairing the Apple Watch
Initiate pairing by moving your phone close to the watch. Let the phone’s camera see the pattern on the watch face.
I selected Restore from Backup, to get my watch back to where it was previously.
You’ll have to agree to the Apple Watch Terms and Conditions screen on the iPhone.
Then enter your Apple ID password on the iPhone. (For me, the steps in this sections failed the first three times. I then restarted both the iPhone and the watch. After that, it worked.)
After your Apple ID is verified, you will get to the Shared Settings screen. Tap OK.
You will be asked to create a passcode for your watch. (I used the same code I had before.) You must enter it twice.
You may see the Heart Health screen on the iPhone. Tap continue.
You may see the Apple Pay screen on iPhone. Tap Continue. Then you will have a chance to enter credit cards or set them up later in the Apple Watch App. (I chose to set them up later.)
You’ll see the SOS and Fall Detection screen. Pay attention, this could be important later. I enabled Fall Detection. It can save your life later.
What Wasn’t Restored
All my credit cards were missing from the Apple Wallet after the restoration, both on iPhone and Apple Watch. However, my loyalty cards and passes were still present in Wallet. Apparently Credit Cards are not stored in the Apple Watch or iPhone backups, even when the encrypted backup option is selected. This is probably a security measure by Apple.
As I mentioned before, my Two-Factor Authentication information was not restored in Google Authenticator or Last Pass Authenticator Apps. So, I could no longer generate codes for those sites I had been using with those apps. The 1Password app still had all my passwords as well as 2nd factor codes for those sites which used those. Your mileage may vary depending on your version of 1Password and how you sync it.
My Home Kit devices remained set up in iPhone as before, no problem.
If you had installed a configuration profile, such as the Spectrum WiFi access profile, it isn’t restored, and you will have to follow the instructions from the provider to get it installed on your new phone.
Your WiFi credentials are not restored. You will have to re-login to your favorite WiFi networks.
You will have to re-pair your Bluetooth devices, such as headphones, speakers, and car stereos.
Entering Passwords
During the restore process, you will have to enter passwords or passcodes at least 10 times, assuming you don’t make any mistakes, and everything goes perfectly.
iPhone Backup Password 1 time
WiFi Password 1 time
iPhone Passcode 4 times
Apple ID 2 times
Watch Passcode 2 times
Before you start, make sure you know your existing passwords, or what you want them to be, and write them down in a safe place.
Conclusion
So, I hope this overview of the process of getting a new iPhone was helpful to you. This process seems like it is longer and more difficult than it should be, but knowing it in advance should help. Please leave a comment if this was useful, or if you see anything wrong or anything I left out.
At this month’s meeting we are reviewing the announcements from Apple’s World Wide Developer’s Conference Keynote. As usual, MacMAD is providing links so that you don’t need to take notes in the meeting.