Genealogists and historians photograph tombstones. Tombstones are literally history carved in stone. A lot of people are out there photographing tombstones. As of this writing, the popular site FindAGrave.com lists about 90 million graves, and millions of those have photographs submitted by ordinary people. Around 50,000 grave photographs are submitted to FindAGrave every day.

Unfortunately, many tombstone photographs are very disappointing. Many of the most interesting tombstones are old, worn and discolored. It is common for the inscription to be unreadable in the photograph. You cannot fix the typical, low-contrast tombstone photo in Photoshop or other image editing programs. You might make it slightly more readable, but mostly you’ll be enhancing the appearance of moss and lichens on the surface of the stone. Frequently, the inscription is also unreadable in person, on site. This article will show you how to take photographs of tombstones that are not just a little bit better, but a vast improvement over the na�ve approach. You can even take photographs which allow you to read inscriptions that you could not read when you were there in person.
Lights!�
The key is proper lighting. In the movie industry, they say “Lights!, Camera!, Action!” in that order. Notice that the lights come first. We’re trying to photograph a nearly flat surface with a slight bit of carved relief. If you photograph a tombstone on a sunny day, you’ll have light from any which way, and often scattered light from various parts of the sky. This can give the stone a very flat, low-contrast appearance. To bring out the carved relief, you need the light to strike the face of the tombstone at a very shallow angle. You absolutely do not want to use a camera-mounted flash, or your camera’s built-in flash. These will remove all the shadows that you need to emphasize.
Artists and human-factors experts determined long ago that the human mind perceives relief most easily if the lighting comes from the upper left.

So, you need to control the lighting in such a way that the strongest light source is from the upper left as seen by the camera and strikes the stone at an angle nearly parallel to the face of the stone. The easiest way to do this is with an off-camera flash unit. It can be wired or wireless, but if you use a wired unit, you will need a flash cable that is long enough to keep it out of the photo. You could use tripods for the flash and/or the camera, but the easiest method is to recruit a photographer’s assistant to hold the flash unit over the tombstones.
High-Speed Sync (or not)
(June 2013: Good News: I revised the text to not emphasize high-speed sync. It’s expensive, and you don’t really need it.)�
What we’re trying to do here is arrange things so that the flash can overpower daylight. �The shorter the exposure, the greater advantage the flash has over the sun. The flash puts out all of its light in about 1/1000 of a second, while the sun shines all the time. Shortening the shutter speed dims the contribution of the sun, but hardly affects the flash at all, up to a point.
My photos here were taken with a Konica-Minolta Maxxum 5D and Minolta Program 5600 flash. This camera is getting kind of old. In fact, it is out of production, with Sony having taken over the Konica-Minolta line. I used this camera instead of my newer Canon specifically because this one has wireless, high-speed flash, and I have the corresponding flash unit.
The high-speed sync feature seems like a good idea until you realize that it also usually diminishes the effectiveness of the flash. If your camera and flash have high-speed sync, great, but don’t overdo it.
The good news is that at the close range we’re going to be using, common flash units can have an advantage over sunlight in the range of 3-5 f-stops. That’s a nice margin to work with. So, here’s how to set up your camera when using a simple, non-high-speed flash setup:
- Set the flash to maximum output
- Set the flash to its 35mm or 50mm angle (these are the defaults for many flashes)
- Set the camera’s ISO to a fixed, low value, say ISO 100.
- Put the camera’s exposure on manual
- Set the fastest shutter speed which doesn’t require high-speed sync, say 1/200
- Adjust the aperture (f/ stop) such that the photo would be about �2 stops under-exposed without flash. A good starting point would be f/22.
You’ll have to make adjustments for the lighting in your particular situation, but underexposing mostly through fast shutter speed is our way of emphasizing the flash while de-emphasizing the sunlight. �It will take a few test shots to get the best settings and get the flash aimed right, but that’s the great thing about digital — it’s cheap to keep trying. If your shot is over-exposed, you should reduce the flash intensity, move the flash further away, or use a smaller aperture (larger f-stop number). In any case, keep the shutter speed the same.
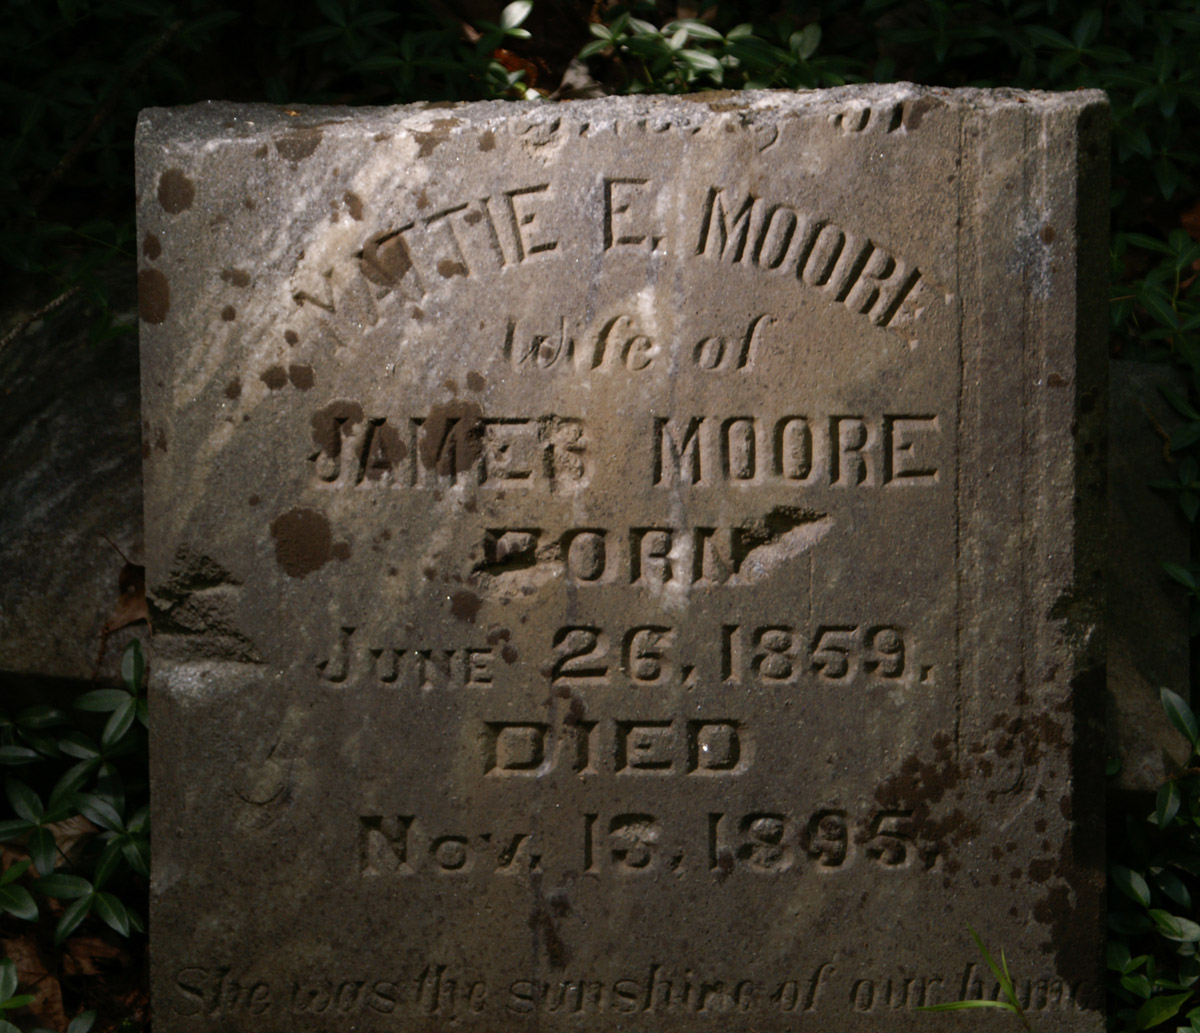
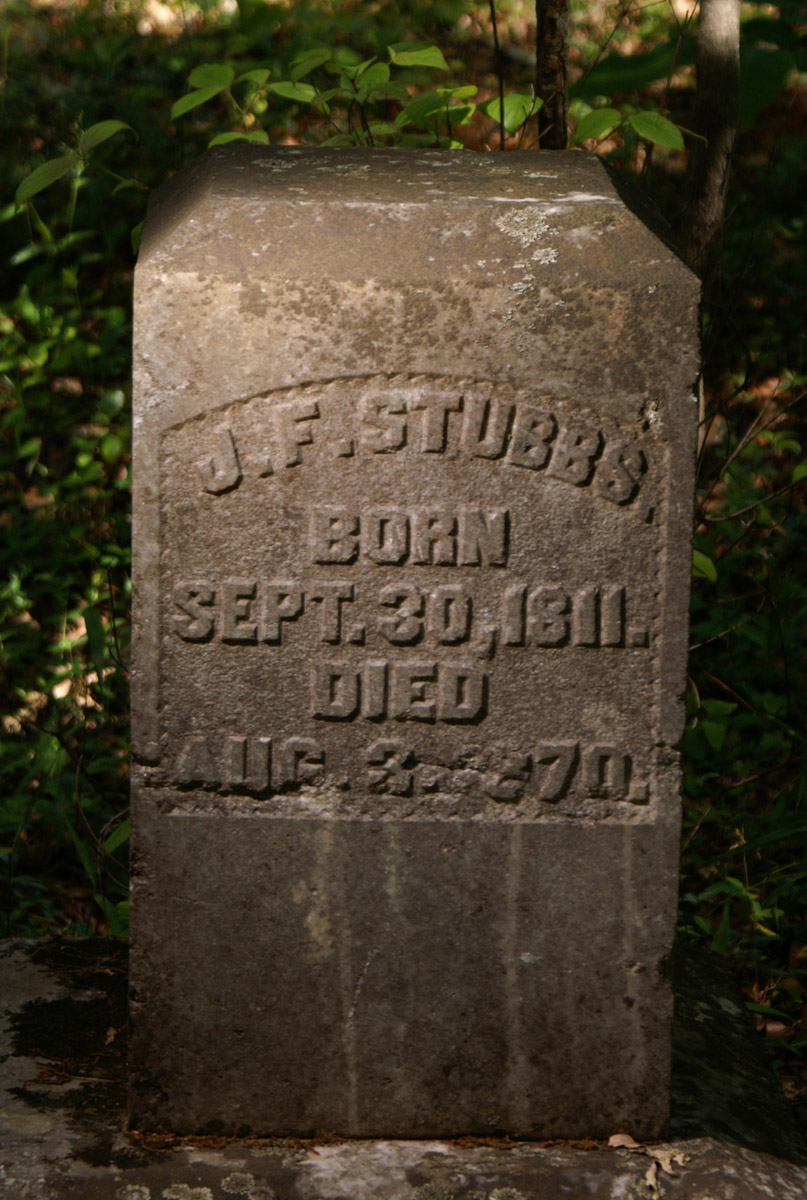
Here’s an example of what this technique can do for you. Don’t try this in Photoshop! It’s not happening.
These two photos are of the same gravestone. The first was taken by veteran Find A Grave contributor Scott A. Steinbrink. He was apologetic for the photo, but noted he had an “awesome” camera, and that the photo matched what he saw in person. He’s absolutely right — there’s nothing wrong with his camera, and his photo is as good as many that I have taken — but there is a better way. The second photo was taken of the same stone in 2013 using the technique described in this article.

-Jamie Cox (ajmexico on Find A Grave)
June 1, 2013 update notes:
- Some cameras require two flash units or a separate transmitter and a flash unit to do wireless flash. 🙁
- If your camera and flash already do high-speed sync, aka FP flash, with the flash mounted on the camera, the simplest, risk-free approach may be to buy a long “off-camera” cable specific for your camera brand (Nikon or Canon). These are about $50.�
- The Nikon D40 can use up to 1/500 as its regular sync speed, even though it doesn’t have HSS.
- NOTE: October 2014: The D40X, however has the same 1/200 flash sync speed as most cameras.
- The ~$30 NPT-04 Wireless trigger from Cowboy Studio will let you use just about any old flash as your remote wireless flash. It’s cheaper than a cable.
- I have seen a lot of people saying to use a mirror or other reflector for tombstone photography. Phooey on that. The light from a reflector can never be as bright as the sun. Your flash can be several times brighter. If the sun is overhead, you can’t get any downward light from a reflector. The flash lets you control the light’s direction completely.
- NOTE: October 2014: I have now seen some satisfactory before and after shots using a mirror. There are provisos: The sun has to be behind the stone, so the reflected light doesn’t have to compete with direct sunlight, and the mirror needs to be as large as the tombstone. �A diffuse reflector won’t work nearly as well as an actual mirror. But, it does work, and you can use any camera.
- To learn all about flash photography in complete detail, see�http://strobist.blogspot.com/�.
- After writing this, I found this straight-forward presentation of the same idea:�http://rootsandrambles.blogspot.com/2011/11/how-to-take-better-gravestone-
- photos.html�This is a nice article.
- NEW: Feb 2014: I posted a YouTube Video with step-by-step instructions for photographing tombstones with off-camera flash.
- NEW: March 2014: I wrote a newer article on using off-camera flash.
October 10, 2014 update notes:
- Removed more references to high speed sync. It’s just not needed, and confusing. Even though I used 1/500 for some of my example photos, it’s safer to�stick to 1/200.
- NEW: October 2014:�My instructional Flickr Album How to Take Better Tombstone Photos
- There are some example photos and tips from the Motorcycling Genealogist here:�http://motorcycling-genealogist.blogspot.com/2014/10/a-better-way-to-photograph-tombstones.html