Basic iPhone Gestures

I’ve met several people who say they just want to use Facebook or email, but are having problems using their iPhone. They are often surprised by the results of their actions, and sometimes flail away at the screen in frustration.

Trying to use Apps on the iPhone (or iPad) without understanding the basic gestures is like hopping in a car, wanting to drive across town, without being quite sure what those pedals on the floor do.

Here’s a quick rundown of the iPhone controls and what to expect from them. I’ve separated gestures you make on the touch screen from operations involving the power button, the home button and the whole phone. Many of the functions I have indicated below can be customized in Settings, but these are the default actions. Gestures may have special meaning within certain Apps, but these are the most common usages.

Starting at the very beginning, here’s how to use the power button, located on the upper right side of your phone. Holding the power button for 3 seconds brings up the Slide to Power Off screen. If your phone is powered down, you will need to hold the power button for a few seconds until you see the Apple logo and the phone begins powering on.

Here’s what you can do with the Home Button at the bottom center of the iPhone/iPad. Touch ID is only available in the iPhone 5s and newer. For a click, press hard. For a tap, just touch it lightly. Only a light touch is needed for the fingerprint sensor. If anybody knows some function that requires only a single tap of the home button, please leave me a comment.

There are a few things you can do with your whole phone, without pushing any buttons. When you phone is asleep, lifting it to a vertical position momentarily turns on the screen so you can see the time, date and notifications.

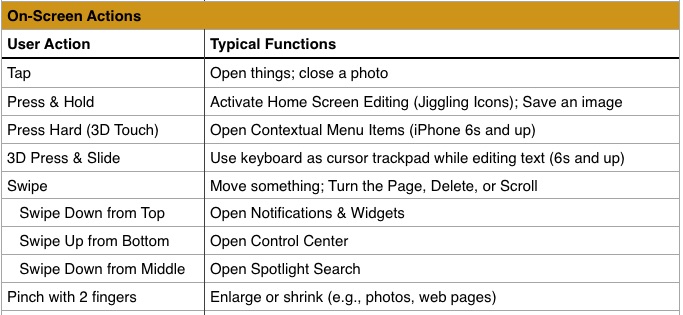
Here are the gestures for the iPhone touch screen. These are the most commonly used and the area where people have the most trouble. In particular, the iPhone is very sensitive to any sideways or vertical motion of your finger when you touch the screen. If it notices any motion, your gesture is interpreted as a swipe instead of a tap. Tapping is probably the most common gesture, so it’s important to master it. When tapping make sure you move your finger up and down only, without sliding it sideways at all.

One of the most common problems with the touch screen is unintended actions. The screen is very sensitive to the slightest touch. In fact, it will sometimes sense a touch if your finger is just near the screen. So, keep all your fingers away from the screen until you actually want to do something.

Remove your finger promptly when tapping or you will get a Press & Hold. If you want to use Press & Hold, you don’t have to press hard, just rest your finger — again, no sliding. This is probably most useful to open the sharing menu for a photo.

These are special, iPad-only gestures:

For a device with such an easy-to-use reputation, this is a pretty big list. But, make sure you understand these and you will have a much easier time using your device.

Tutorials Online

There are several sources of helpful Macintosh and iOS (iPhone and iPad) tutorials available to you online.

Apple has a series of short tutorials on various subjects. They used to have video tutorials. I don’t see those anymore. Instead, they have short well-illustrated tutorial pages. These are accessible from the Apple Support page.

If you prefer video tutorials, take a look at www.themacu.com . The videos on their Quick Lessons blog are free. There’s a nice list of interesting topics. You can buy their longer tutorials through the App store. Their App is called TMU Tutorials. Macintosh “All Access” is $19.99.

ScreenCastsONLINE has quite a complete collection of thorough Mac and iOS tutorial videos. A subscription to ScreenCasts Online is $21 per quarter.

There is also a free ScreenCastsONLINE YouTube channel with useful tips of the week.

If you watch someone else using an App, you usually have that Aha moment when you think “I could do that!”.� So, take a look at some of these useful tutorials and get more out of your Mac, iPad or iPhone.


Beginner’s Guide to Email Usernames and Passwords

Beginner’s Guide to Email Usernames and Passwords

Email is one of the most basic services that people expect on their Mac, iPhone or iPad. It is also one of the things that many beginners have trouble with. If you have a good understanding of your own email accounts you will have an easier time using all on-line services.

The Basic What’s What of Email

Email Address

An email address is a string of characters that the email system can use to send or receive email. Usually an email address belongs to a single person or to a company.

Here is a typical email address:� [email protected]

Email addresses must be in this specific format:� The first part is a username then one at sign: @, then a domain name. Email addresses must not contain any spaces.

Email addresses are usually given in all lower case.

When you create a new email address, always create it in all lower case

However, the part of the email address after the @ is not case sensitive for the purposes of sending email. So, mail sent to any of the following addresses should all reach the same recipient.

[email protected]

[email protected]

[email protected]

The username part of an email address (the part before the @) is often treated as case sensitive by email clients and servers, so always use the same capitalization.

Email addresses are public. They are not secret. They should not be used as passwords.

Your Email Provider

You should know who your email provider is. It is usually a well known company.� Most people have email provided by their Internet Service Provider (ISP). Many people have email accounts with more than one provider.

Sample email addresses for common email providers:

Google – [email protected]

Apple – [email protected]

Yahoo! – [email protected]

Notice that the email domain is not necessarily identical to the company name.

Customers of Bright House Networks in central Florida have email addresses like:

[email protected]

The rr stands for Road Runner, which is Bright House’s name for their internet service.

Remember your Email Address and Password – Exactly

It seems obvious, but you need to memorize your email address and password or write them down someplace safe, preferably both. If you can’t access your email, you may lose access to other services as well. Your email account is the key to your on-line kingdom. Pay attention.

Your Email Password

After your email address, the other thing you’ll need to access your email account is your password. When you first create your email account you will be asked to create a password. You should do so very carefully, and write it down in a safe place. Passwords should be kept secret.

  • Capitalization of characters in passwords always matters

  • Do not reuse any part of your username or email address in your password

  • When logging on, your password must match exactly the expected password

Unfortunately the exact rules for what is allowed or required in passwords varies depending on the site or email provider you are using. The following rules are a good starting point.

  • Create a password at least 10 characters long

  • Use a mixture of UPPER and lower case letters, numbers and symbols

  • Avoid dictionary words and names

Example passwords:

Randomly generated: Nm4$tL&vWv

Easier to type on iOS: mtvv4$&NLW�� (don’t need to shift keyboards as often)

Too Easy to Guess: ABC.def.123

Very bad: 7/December/1941 �� (especially if that’s your birthday)

Watch out for letters and numbers that can be easily confused. Is that a lower-case ell or a one?� A zero or an oh? It might be best to avoid using these confusing letters/numbers in your passwords. Be sure to be extremely clear about these distinctions when you write down your password, so you can decipher it when you need to enter it again.

Logging On

You will want to log on to the Mail app on your Mac or iPhone. Your credentials will be your email address and password.

Most email providers also provide a web mail service where you can connect to their mail system directly without using an app. Usually this is good for situations when you want to read your mail while using someone else’s computer. However some people use email that way all the time — it’s your preference.

For example, if you have an email account through Google’s gmail, you can log on at gmail.com, or mail.google.com. There you should enter the same email address and password you created initially.

Confusion with Other Services

Many web sites, maybe most web sites, want you to log on using an email address even if that site has nothing to do with email. Why do they do that? Because it identifies you uniquely — no two people can have the same email address. That makes it easy for the site to keep you separate from all the other people using the site, and to recognize you when you return.

For example, eBay is an auction site. It has nothing to do with email. It invites users to sign in using their “Email or username”.

You may use your email address as your username on some site, and others insist on it. Almost all sites want to you to enter your email address even if they give you a different username. This is so they can use email to help you reset your password if you forget.

Here’s the important thing:

Even though you may logon to a site using your email address, that’s just a coincidence.

Do not reuse your email password at a different site – Make a new password

Ultimately you should have a different password for each site you use, e.g. one for Facebook, one for Yahoo!, one for eBay, even if you use the same email address to log on to each one. I know it can be difficult to remember these. So, you must have a system for writing them down or remembering them.� This is why password manager apps are so popular.

For Beginners: Write down your usernames & passwords neatly for each site

There’s a lot more to say about email, but this is enough for one beginner article.


Help! I’m Out of Memory

I often hear beginners say that their computer is out of memory. This is often a clue that they are beginners. Computers contain two different types of “memory” and you need to carefully distinguish between them. I could give a detailed technical explanation, but it would be obsolete in a few years, and wouldn’t be all that helpful. Instead, I’ll describe how they are used, what the symptoms are when you run short and finally, what to do about it.

RAM vs. Storage

Current computers contain two main types of memory, RAM (Random Access Memory) and non-volatile storage. This is true for Macs, PCs, iPads and iPhones, etc. Confusion arises because these very different things are both measured in the same units, Megabytes and Gigabytes. If someone says their computer or phone has 16 Gigabytes, you should be thinking: “16 Gigabytes of what”?

Storage (Hard Drive Space)

Storage is what old-timers think of as their hard drive. Since iPhones and some Macs really don’t have hard drives, Apple simply uses the term Storage, which I think is a really good choice. So, what is storage? Storage is where things go when you save them, close them or download them. Things stay in storage until you delete them. Storage has a firmly limited size, and when you try to exceed it you will get a definite message. If you see a message on the Mac about a specific device (probably Macintosh HD) being out of space, this refers to storage.

RAM

RAM is where things go while you open them, edit them, view them or play them. RAM is lightning fast, but it is temporary. Things usually don’t stay in RAM long, and it is all erased when the device is powered off. Apps and documents flit in and out of RAM as you navigate between them. The operating system of your computer or device works hard to make sure you don’t run out of RAM. If everything doesn’t fit, it will compromise by keeping things that should be in RAM in slower storage temporarily. So, you probably won’t ever see a message about being low on RAM. Instead, things will just slow down, usually dramatically. The worst slowdowns are likely to occur when running a single memory-hog program like a video or photo editor. Running a guest operating system like running Windows under Parallels will use up your RAM quickly.

Gigabytes of Advertising

Apple’s marketing definitely de-emphasizes RAM. It is not mentioned at all for iOS devices, and for Macs, it’s down in the fine print, where it is called “memory”. When shopping for an iPhone 6, say, you will see a 16 GB, 64 GB, and 128 GB model. Those are Gigabytes of storage, not RAM. iPhones have RAM, and newer models may have more RAM than older ones, but Apple never mentions it.

How to Check

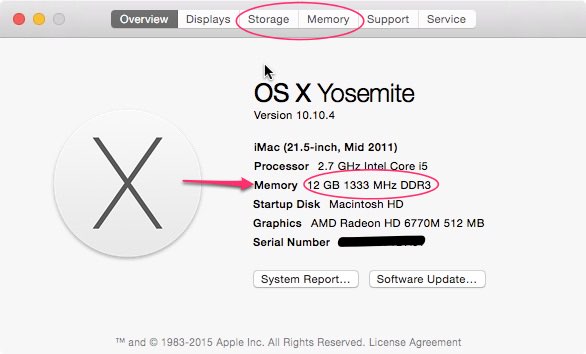
On the Mac, you can see how your RAM and Storage stack up by going to the Apple Menu, and selecting About This Mac. In the Overview pane, you will see your computer’s installed RAM where it says Memory. You will also see an item at the top, Storage. Next to that you may or may not see one that says Memory. The Memory item only appears on computers with memory slots that allow additional RAM to be installed. If you don’t see that, your Mac already has all the RAM it’s ever going to have. That’s the way most of them are now, especially the laptops.

About This Mac Overview Dialog
About This Mac Overview

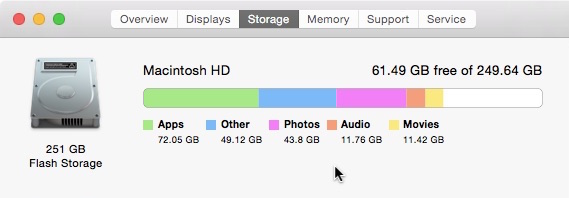
The Storage pane of About This Mac show an overview of how much storage you have, how much is being used for what and how much remains free. You should try to keep at least, say, 15% of your storage free. If it ever gets full, your computer can become almost completely unusable.

About This Mac Storage dialog
About This Mac, Storage Pane

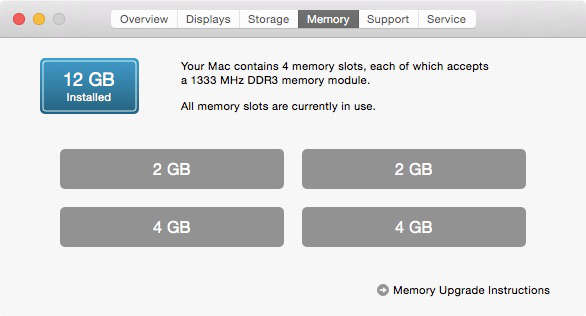
The memory pane of About This Mac shows your options for upgrading RAM. This pane only appears on Macs with upgradable RAM.

Memory pane of About This Mac

I’m Out of RAM!

First of all, you’re probably not out of RAM. Most beginners are very unlikely to need more RAM than their computer has unless the computer is several years old. If you really are low on RAM, you can do one of three things. First, install more RAM if that’s possible in your computer. It’s not possible on iOS devices. Second, if your RAM isn’t upgradable, upgrade to a whole new device with more RAM. Third, you can limit your RAM usage. First, quit all applications that you are not using. Consider if you can reduce the size of the documents you are working with. Can you edit that giant novel in separate chapters, one at a time? Can you work with lower-resolution photos or videos? Maybe you could split up your photo library into smaller sections. Those type of things are likely to reduce demands on your RAM.

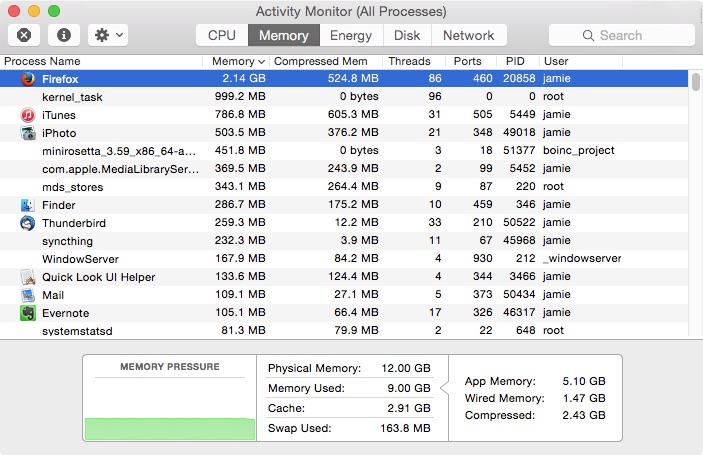
If you are worried about needing? more RAM on the Mac, you should open Activity Monitor and visit the Memory tab. The Memory Pressure feature in Yosemite has done a lot to reassure me that I’m in little danger of running out of RAM.

Activity Monitor Memory Pressure

I’m Out of Storage!?

This is all too common. Your first thought should be to delete something you don’t need. Your Downloads folder is a good place to start. Things tend to pile up in there. They all came from the Internet anyway, so if you find you need them, you can always download them again. Empty the trash. Storage belonging to trashed files isn’t freed until the trash is emptied. Empty the trash in applications, like iPhoto, that have their own trash.

While scanning your folders for stuff to be deleted, sort by size. Finding and deleting the biggest files first will save you a lot of time.

Another option is to add external storage. This is not possible for iOS devices, usually, but it is easy for Macs. You should move some of those big files to an external hard drive.