Digitizing a Book

Recently, I digitized some historic school yearbooks and I want to share some tips on how I did that. It was less work than I thought, and it went pretty fast due to some automation. There is certainly more than one way to do this, but this worked for me.

My goals going in were:

* Good Quality Images
* PDF Output with Searchable Text
* A Separate Image in the final document for each page in the book 
* Automate as much as possible

I used a DSLR camera to photograph the pages. I’m not going to go into a lot of detail on the photography aspect, although it is important. You want a lot of light coming from an angle. I used off-camera flash, with a wireless flash trigger. The camera and the flash were on tripods, and the yearbook was on a low coffee table. The camera was looking straight down onto the book. There are many camera settings and lighting settings that will work.
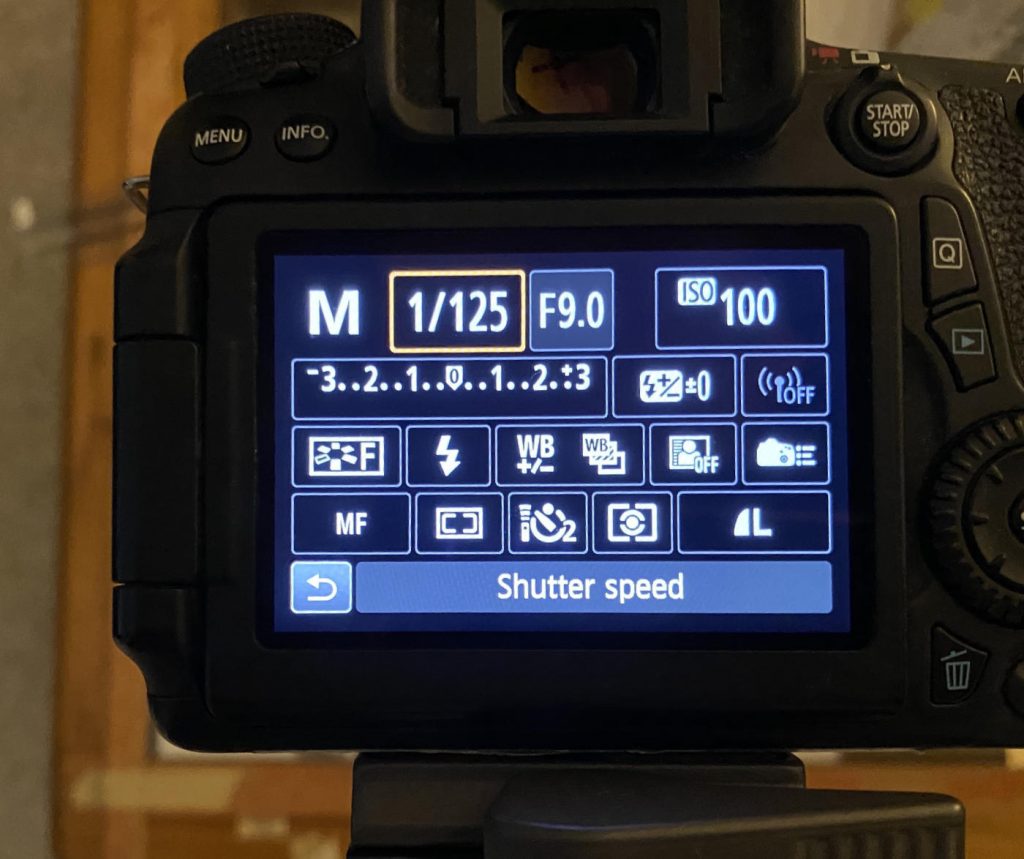
My Camera Settings

I wanted to be able to go through the entire book and not have to do anything else except turn a page and click the shutter. A wireless remote for your camera helps, although for the last book I digitized, I couldn’t find my remote and did it manually, with a 2-second delay to prevent camera shake. That was not too bad.

I taped some rulers to the table to keep the book firmly in the same position so it wouldn’t move between shots.

To save time, I photographed two facing pages at a time, on one image. These were separated later in software. There was plenty of resolution for this to still yield a quality image.

I set my camera to record JPEG images rather than RAW, because they are smaller and easier to deal with, and because I knew I had the exposure correct and wouldn’t need to adjust it in software.

Software Tool Kit

Affinity Photo 
Renamer 
PDFpen  
SetApp  (Renamer and PDFpen are available in SetApp) 
Workflow

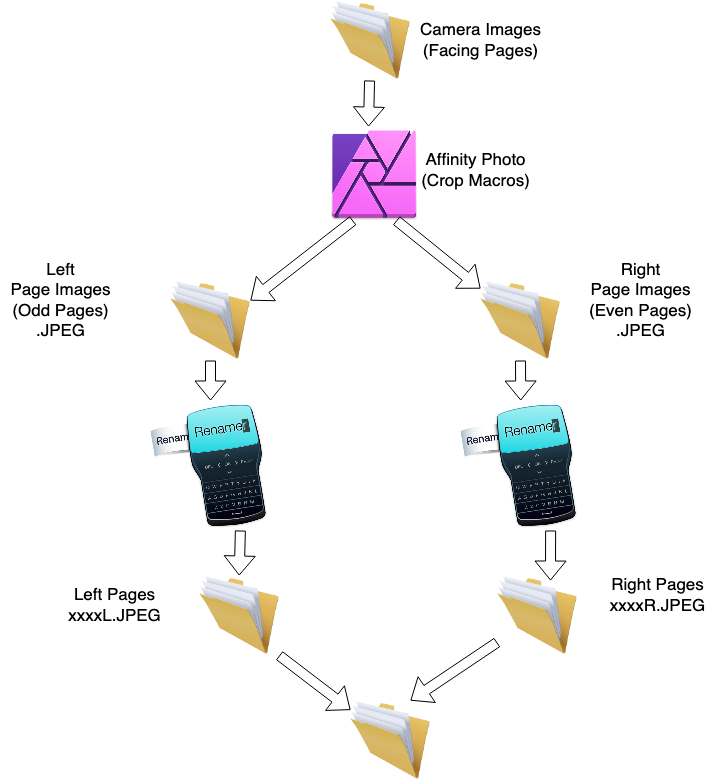
I brought the camera images onto my Mac. Then I used the Affinity Photo App to separate and crop the images of the individual pages. I used two main features of Affinity Photo: Macros and Batch Jobs.

First I recorded a macro. I selected an image about 1/4 of the way through the book. I recorded a macro in which I cropped and rotated the left side of that image as a single page. I saved that macro as something like YBCropLeft. Then I repeated the process for the right-hand image, and saved that macro as YBCropRight. But I didn’t save any changes to any images yet.

Because of the way a physical book lies on the table, the ideal crop for all pages is not identical. To mostly compensate for this, I went through this process twice for each book, once for the first halt, and again for the second half. Each time I picked an image about half-way through that half of the book as my prototype for recording the macros. The first prototype was 1/4 into the book, and the second prototype was 3/4 into the book.

Now I used the Batch Job feature of Affinity Photo, which is in the menus at File:New Batch Job…
I dragged all the images from the 1st half of the book into the sources pane. I selected the YBCropLeft macro (and Applied it). I clicked “Save as JPEG” and picked a new, different folder for the output files.

When you run the batch job, you’ll be amazed at how quickly it processes all of those files. The resulting files will still have the same names that came out of the camera, e.g. IMG_1234.jpeg. But, now they are cropped to the left side only.

Affinity Photo doesn’t give you any naming options for the output of a batch job. This is where Renamer comes in. I used Renamer to quickly add an “L” to the end of all the output file names. So, for example, IMG_1234.jpeg became IMG_1234L.jpeg. This is so we can keep them straight and don’t have two files both with the same name.

Now, repeat the batch job, this time using the YBCropRight macro. Put the output into another new folder.

Again, use Renamer. This time, rename all the right side files to have an “R” at the end, so the names will become something like IMG_1234R.jpeg.

So, now, we repeat the entire process for the 2nd half of the book. Record two new Left and Right macros. Run two new batch jobs, sending the output to yet another pair of empty folders. Rename them to L and R as appropriate.

Now, copy all the R files and the L files from both halves of the book into one big folder. There shouldn’t be any duplicate file names. “L” happens to alphabetize ahead of “R”, so, the left side of each image will be alphabetically just ahead of the right side of that image, which is exactly what we want.

Now, if you had any oddball pages that didn’t fit the pattern, go ahead and digitize them, and contrive a file name so that they fit in the correct spot. For example, you might name the image of the front cover something beginning with “A”, so it will be in the front, and the back cover something like “Z”, so it will come last. If your book has a centerfold or map insert or similar, copy it separately and name it something that puts it at the appropriate spot in the alphabetical list of images. Or, you can just wait and insert it into the PDF at the appropriate place.

Now is the time for PDFpen. Open PDFpen and open a blank, new document. In a Finder window, select all the images (I had hundreds of them, one per page, and drag them all to the empty PDFpen document window. PDFpen will just slurp all those into one big PDF. The free Apple App Preview might be able to do this step also, but it didn’t seem as robust about it as PDFpen.

Proofread the document, making sure the pages are all in the right place and are all right-side-up, etc. PDFpen makes it easy to drag pages into the order you want, if they are incorrect for some reason.

Save your work.

The feature that we really needed PDFpen for is OCR (Optical Character Recognition). This will allow turning a bunch of pixels into searchable and selectable text in your document. For some reason, PDFpen hides this powerful feature with a weird User Interface quirk. If you look at the Edit menu in PDFpen, you will see OCR Page. But, we want to go ahead and OCR the entire document! That option isn’t visible unless you press the Option key. Then you will see the OCR Document item under the edit menu.

Go ahead and do that. It takes a few minutes, depending on size, and gives a “bing” when it is done.

Save your work again. This is your final, searchable PDF document.

Helping Someone Remotely

How can you help another computer user from a distance? I am going to show you a super easy way to help another Mac user using software that came with your computer.

Sometimes we get questions about computer problems from friends and family. It would be so easy if we were in the same room and could see and interact with their screen. But if they are far away, or in 2020, staying isolated because of Coronavirus, how do you help them?

If you and the other person both have Macs, and you can send and receive messages using the Messages app, then the answer is just a click away.

The Messages App

To connect to your friend’s computer, we are going to use the Messages App (formerly known as iMessage). This application comes with every Macintosh. It isn’t obvious, but the humble Messages app has a superpower. It can remote control a computer screen.

It might be good to first verify that you can send and receive messages to and from the remote computer. You must be connecting to your friend via their email address, which should be associated with their Apple ID.

If you see the blue text bubble(s) when messaging your friend, the next steps should go smoothly. If you see green text bubbles, or can’t send and receive messages at all, see the Difficulties section below.

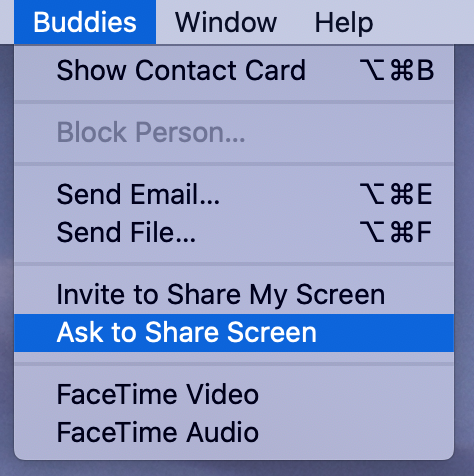
To begin screen sharing, make sure that the correct friend’s conversation is highlighted in the Messages window. Then, select Ask to Share Screen from Messages’ Buddies menu.

Ask to Share Screen menu item

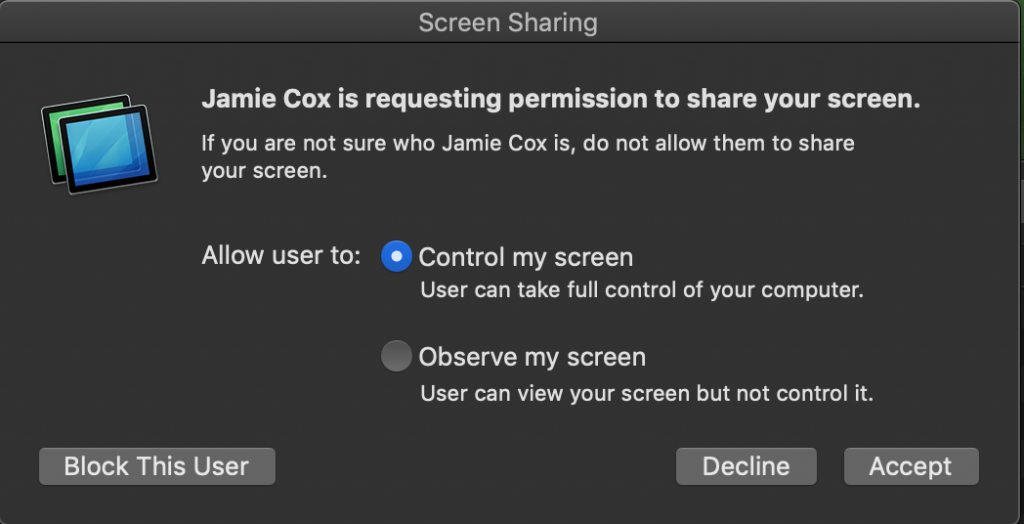
This will cause a message to appear in the upper right of your friend’s screen asking them to allow screen sharing:

Accept Screen Sharing

When they click Accept, they will get one more message:

Click Accept to allow remote control

For troubleshooting with a trusted friend, it is usually easier if the recipient allows you to control their screen as well as observe it. Control is the default.

Once they click Accept, screen sharing will begin.

Either party can end screen sharing. Remember that if the computer restarts, or if you quit the Messages app, screen sharing will end and need to be restarted.

I have successfully talked some very inexperienced computer users through this process on the phone. They only have to be able to see when they receive a text message, and then click Accept twice. After that, you will be able to help them.

You’ll probably be talking to your friend on the phone to get this started. When screen sharing starts, it also starts an on-line voice conversation. You should be prepared to end the phone call when this happens to prevent echo, feedback and confusion. You will still be able to speak to each other via the computer (if both computers have microphones and speakers — most do).

Difficulties

If this is not working as expected, check the following:

  • Both computers must be running MacOS
  • Both computers must be connected to the Internet
  • Both parties must have an Apple ID
  • Check that the email addresses being used for communication are listed in System Preferences/Apple ID under Name, Phone, Email in the Reachable at section. If not, they can be added there.

Helpful Freebies From Apple

In their quest for help with their Apple gadgets, many users overlook the free resources provided by the Apple mothership.

Apple provides a number of helpful text and video tutorials on their support page. Either select your device or topic there, or use the search on that page to find what you are looking for. Most common tasks and questions are covered.

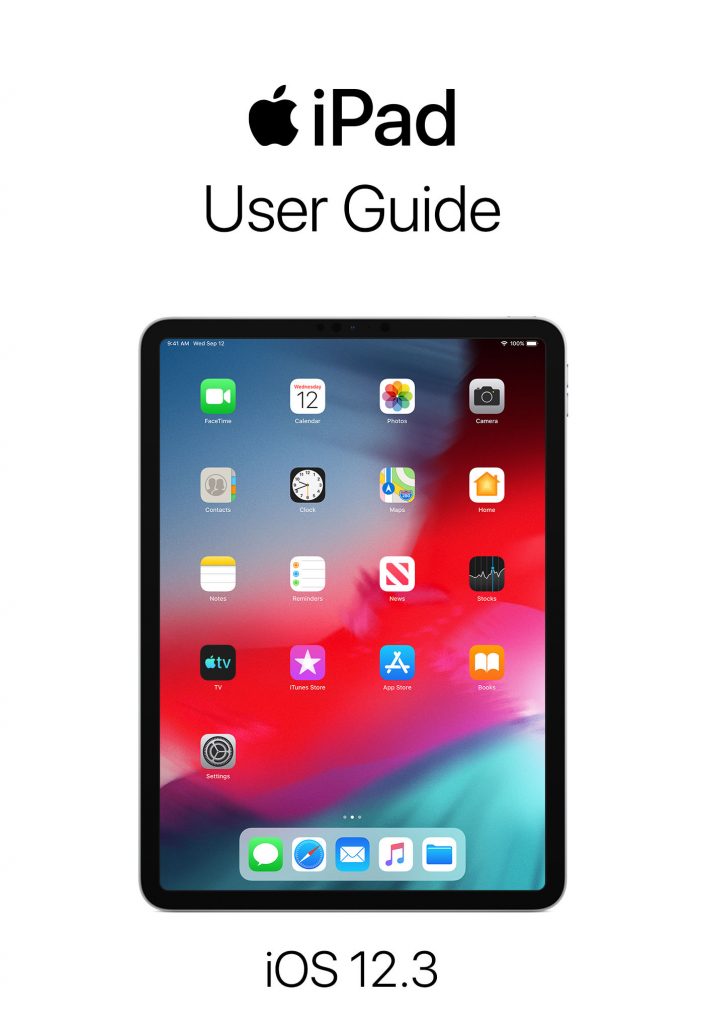
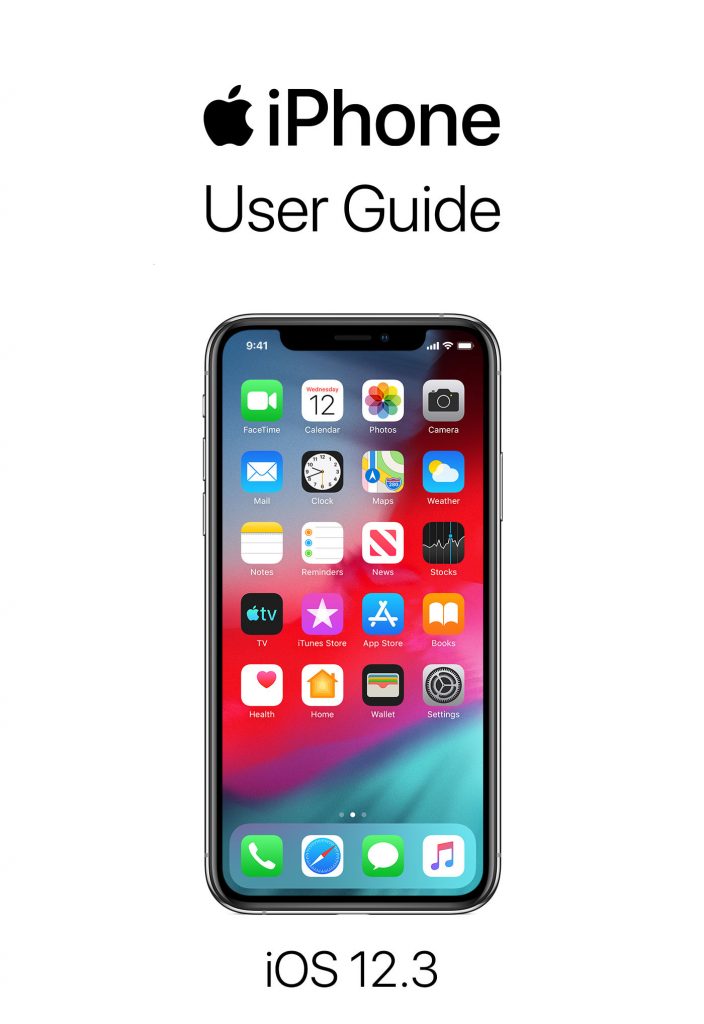
Apple also has a series of free eBooks covering many of their hardware and software products. To find these, open the Books app that came with your device. You will have to sign in with your Apple ID. (Your Apple ID is the same as your iCloud credentials, and is the one ID and password you use for all Apple services.)

You may find that you already have a User Guide for your devices in your Books library. There’s more available, though. If you click the Book Store icon, you can find more books to download. Any book which says Get instead of a price will be free. You can search for “Apple”, or “iPhone”, for example, to find applicable books. Note that there are often different versions of the same book for newer and older versions. Choose a version that matches what you have.

Here are links to some of these useful (free!) books. Enjoy.


How to Upload Images Right-Side-Up

A frequently asked question on the Internet is:

“My photo appears correct on my computer, but when I uploaded it to [website], it is sideways. How can I make my image upload in the correct orientation?”

This problem is surprisingly universal, it affects many different web sites and users of Windows, Macintosh, tablets and smartphones are all affected. It most often affects photos that were taken in portrait orientation.

Local Image Correct Orientation
Uploaded Image Sideways

The problem is caused by the varying interpretations of the image rotation tags in the EXIF data accompanying digital photos. This problem is not likely to go away anytime soon because the meaning of the rotation tags is somewhat ambiguous, and there is disagreement about what the correct way to handle them ought to be. Some software thinks it should apply the tags, other programs or sites think they should ignore the tags or remove the tags.

There is an easy solution for users: Edit the photo in your photo editor of choice (with the possible exception of Windows Picture Viewer). Rotate it to be right-side-up if necessary. Then make some other change that affects the image. Tweak the contrast or the color. Crop the image slightly. Almost any change will work. Then, save it.

The saved image will have its pixels oriented properly and have no Orientation tag, or have the default Horizontal tag. Everybody agrees on how to display an image like that. When you upload it, it will display the same as you saw it on your computer.

If you edit an image, but only rotate it, your editor will probably just change the Orientation tag without changing the image pixels. Unfortunately, not every program or site will interpret the Orientation tag the same way as your image editor.

If you make a change to the actual image, it forces the program to completely re-write the image from scratch, which results in an image with the default orientation.

How to Run SpinRite on a Mac

If you are reading this, you probably know why you want to run SpinRite. SpinRite is a hard drive recovery utility intended to run stand-alone on Windows machines. There is really nothing comparable to it for the Macintosh, especially in its ability to recover data from corrupted hard drives.

The other instructions I found on the web for SpinRite on the Mac were variously outdated, contained bad links or were overly complicated. I had to hunt around multiple web sites to find bits and pieces of the instructions. Here is my attempt to write a coherent single set of instructions for SpinRite on the Mac.

I don’t want you to go through this process with false expectations. There are some limitations to SpinRite and to running it on the Mac.

SpinRite 6.0 is glacially slow on today’s large hard drives. A full scan on level 2 of a 1 TB drive with no bad sectors took 35 hours and 46 minutes. If the drive has bad sectors, or you use level 4, it will take much longer.

SpinRite 6.0 can’t handle drives larger than 2 TB at all.

SpinRite hasn’t been updated by its author since 2004. Steve Gibson says he plans to release updated versions 6.1 (much faster and supports larger drives) and 7 (with support for the Mac), but it could be a while.

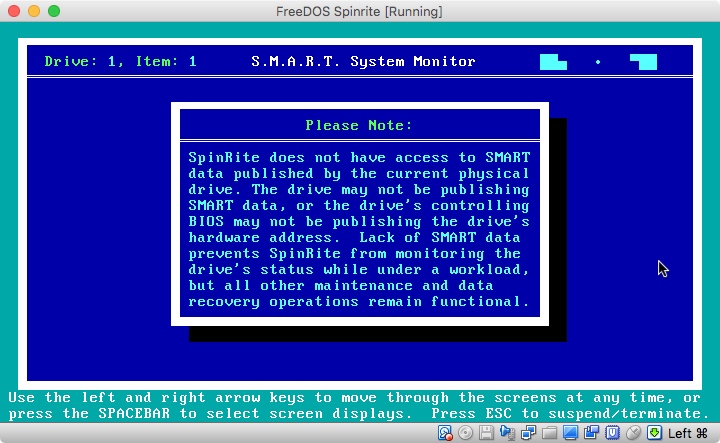
SpinRite can operate on internal and external drives, including USB drives. The S.M.A.R.T. aware features of SpinRite will not work in the virtual machine environment we will use on the Mac. However, this does not prevent SpinRite from recovering bad sectors, or refreshing marginal ones.

The good news is that you can continue to use your Mac while SpinRite, in a virtual machine, works on a hard drive. This is better than the usual situation where a physical Windows machine is dedicated to running SpinRite for the duration. However, you must not try to use SpinRite on your system boot drive (or any mounted drive). If you need to use it on your internal boot drive, you will either have to boot from another drive or connect your Mac to another Mac in target disk mode and run SpinRite from the other Mac.

Overview

[Edit May, 2022]: These instructions were written for Intel-based Macs. I haven’t tried to do this on a Mac with Apple Silicon, e.g. M1. If you try it, leave a comment on how it worked or not.

This is an advanced topic. I assume if you are planning to run SpinRite that you are somewhat familiar with running DOS-based programs, such as SpinRite, and that you are willing to use the Mac’s Terminal command line.

You must perform these steps from an administrator account, or one with sudo access (usually only admin accounts). (At least from step 4 on.)

Use caution with connecting physical and virtual drives! Make sure that you are connecting the correct drives to your virtual machine, and that you are running SpinRite on the drive you intend. If you connect a RAW drive to a virtual machine while it is mounted by MacOS, you risk utter destruction of data on that drive. (Although VirtualBox seemingly tries to prevent you from doing this.)

Here is the executive summary of what you are going to do:

    • Get SpinRite
    • Get VirtualBox
    • Get FreeDOS (sort of a MS-DOS replacement)
    • Install FreeDOS into VirtualBox
    • Install SpinRite into VirtualBox
    • Connect your problem drive to Virtual Box, so SpinRite can work on it

Instructions

0. Get SpinRite – Buy and download SpinRite from grc.com if you don’t already have it.

1. Download and Install VirtualBox


https://www.virtualbox.org/ (It’s free)

  • Download the latest version for OS X (currently 5.2.22)
  • Install it.
  • Open VirtualBox
  • Create a new machine for DOS
  • Accept the defaults (32 MB RAM, 500 MB expandable virtual hard disk)
  • In Settings/System/Processor for the new machine, set the Execution Cap slider to about 45%. This keeps the virtual machine from spinning up your fans and running down your battery.

2. Get FreeDOS – Download and install FreeDOS from freedos.org. (It’s free)

Select the CDROM “standard” installer distribution. You’ll get a file something like FD12CD.iso.

The current version 1.2 is acceptable. You are going to install FreeDOS into the VirtualBox virtual machine you created above.

3. Install FreeDOS into Virtual Box

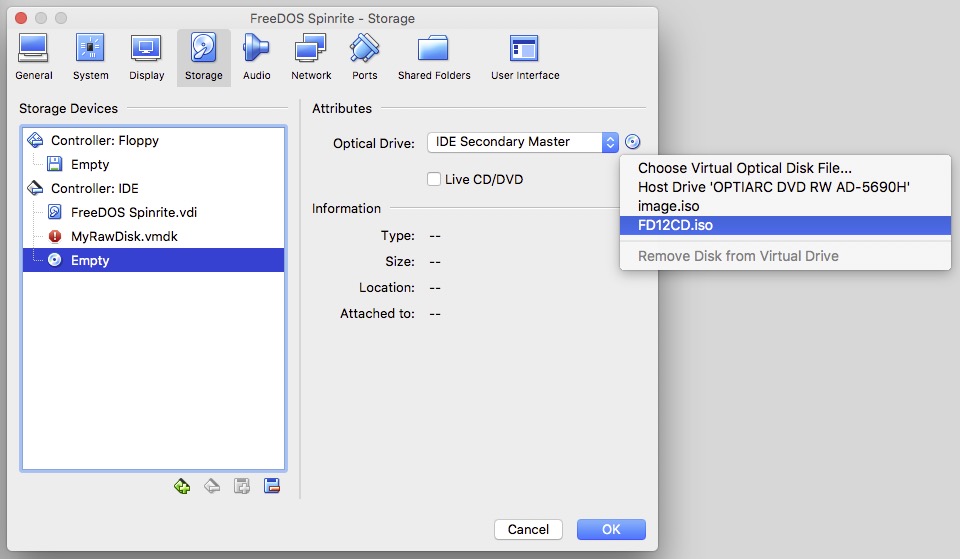
In Virtual Box, Click on your FreeDOS machine. Select Settings/Storage. Click on the empty optical drive icon. To mount your FreeDOS image click on the CD icon on the far right, and choose it using Choose Virtual Optical Disk File

Select the FreeDOS ISO image (FD12CD.iso).

You are now going to boot your virtual machine for the first time to install FreeDOS onto your virtual hard drive. It will help to understand some features of the Virtual Box user interface. You will need to click in the virtual machine window to allow you to type into it. When you do that, the virtual machine will “capture” your mouse and keyboard. To release the mouse and keyboard, to do anything else on your Mac, you can press the left ⌘ (command) key.

There is a bug between VirtualBox and FreeDOS that will cause the virtual machine to crash with a messy string of Invalid Opcode messages if you simply follow the prompts. There is a workaround, and here it is.

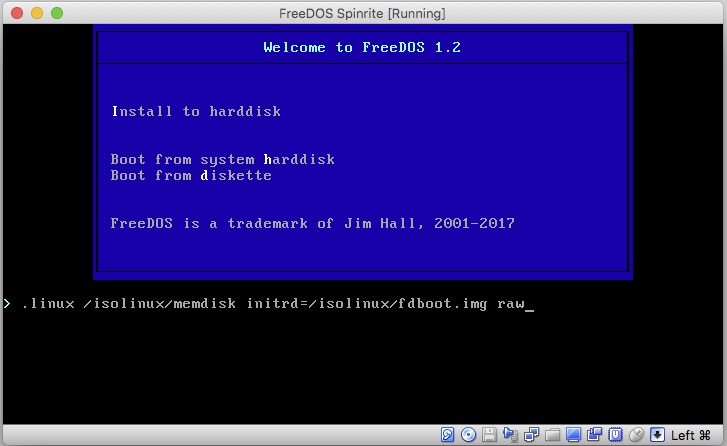
Select your virtual DOS machine in Virtual Box. Press Start. The virtual machine window will appear, and it should boot into the FreeDOS installer screen. There is a countdown running (50 seconds) which you need to stop. Click in the virtual machine window and press the TAB key. That will stop the timer. You are now editing the Install to harddisk menu option. Add the word raw (lower case) after the command line. Press return.

You should now be in the installer at the preferred language prompt. Proceed.

When asked if you want to partition Drive C:, select Yes. And also select Yes – Please reboot now. Once again, intercept the countdown with a tab and add raw to the command line.

You will be back to the installer preferred language prompt. Proceed. This time you will be asked if you want to format C:. Say Yes. Then choose your keyboard format (perhaps different from your preferred language).

At the prompt What FreeDOS packages do you want to install?, Choose Base packages only. This is sufficient for SpinRite.

Naturally, you will choose Yes – Please install FreeDOS 1.2.

When the install is complete, you will be asked if you want to reboot. Don’t do it yet. Wait until step 4b, below.

4. Install SpinRite Into VirtualBox

4a. You will Create a CD image with spinrite.exe on it. This will be used to get SpinRite.exe into the Virtual machine. When SpinRite runs, it can create an ISO containing itself. If you already have a SpinRite ISO created by SpinRite on a Windows machine you may use that and skip the rest of this step (skip to 4b).

Create a folder named “spinrite” in your Mac Downloads folder. Put spinrite.exe (from step 0) into that folder.

Open a Terminal window. Enter this command into the terminal:

hdiutil makehybrid -o ~/Desktop/image.iso ~/Downloads/spinrite/ -iso -joliet

(Enter the command all on one line.) This will create a file on your desktop named image.iso containing spinrite.exe . This image is of a type acceptable to Virtual Box. If you create an image with Disk Utility instead, it will not work.

4b. In VirtualBox Manager, select your DOS machine, and pick Settings/Storage. Again, using the optical disk icon on the far right, choose the image.iso file we created on your desktop in step 4a, above. Click OK to save settings.

Now, back in the virtual machine, select Yes-Please reboot now and press enter. You don’t need to intercept the boot process anymore. Wait for the machine to boot into FreeDOS and the C:\> prompt.

The SpinRite “CD” should now be mounted as drive D:. Type the DOS command:

copy d:\spinrite.exe c:\spinrite.exe

This will copy Spinrite to your virtual C: drive. At this point, you now have a virtual machine with a virtual hard drive containing SpinRite, and you no longer need the image.iso image. You may remove that from the virtual drive if you like.

5. Connect the Problem Drive to VirtualBox and SpinRite

[Edit: May, 2022]: With newer versions of MacOS, Catalina (10.15) Big Sur(11), Monterey (12) and newer, you will run into problems with SIP (System Integrity Protection) in the following steps, because it will prevent you from modifying the permissions on files in /dev . You can turn off SIP via the recovery partition. There are instructions here.

In the terminal, create a shell script as follows:

cat > srscript.sh

Then, copy the script below, and paste it into the terminal.

#!/bin/bash
# This script creates a virtual disk image connected to a physical disk for connection to VirtualBox
read -p "Enter Disk name, e.g. disk8: " SpinRiteDisk
# make sure disk is unmounted
/usr/sbin/diskutil unmountDisk /dev/$SpinRiteDisk
sudo vboxmanage internalcommands createrawvmdk -filename "$HOME/Desktop/VirtualRaw$SpinRiteDisk.vmdk" -rawdisk /dev/$SpinRiteDisk
sudo chmod 777 "$HOME/Desktop/VirtualRaw$SpinRiteDisk.vmdk"
sudo chmod 777 /dev/$SpinRiteDisk
/usr/sbin/diskutil unmountDisk /dev/$SpinRiteDisk
echo "Look on Desktop for raw disk file"

Then type

ctrl-D (End-of-file)

Now make your script executable with:

chmod +x srscript.sh

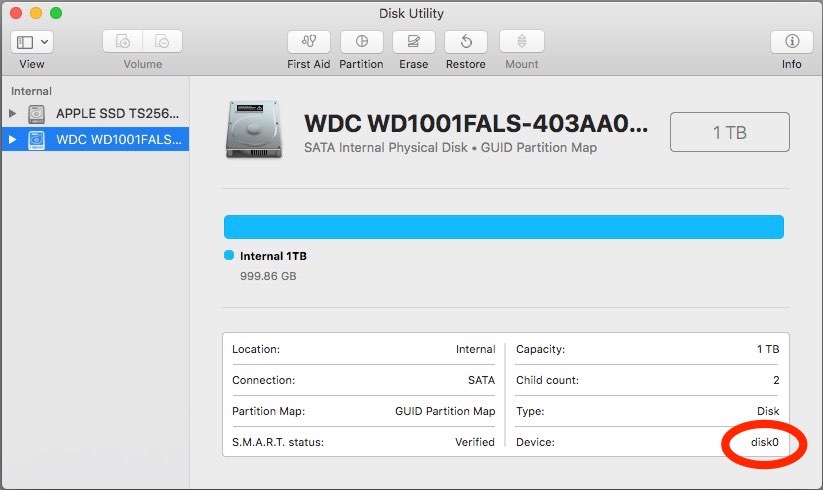
Make sure the drive to be tested is connected and powered on. You need to figure out what the device ID associated with the drive under test is. It will be of the form “diskX”, for example, it might be “disk5”. You can find this in Disk Utility, in the lower right corner.

Disk Utility Window showing disk number

If you see a suffix, e.g., disk5s1, ignore the suffix. This is the disk name you will need in the next step.

While you are in Disk Utility, go ahead and unmount all partitions on the drive to be tested, if any are mounted.

In the terminal, run the script:

./srscript.sh

Because the script contains sudo commands, you will be prompted for a password. Enter your Mac signon password. As mentioned above, this will only work for admin accounts, or accounts for which the user has been added to the file /etc/sudoers . When prompted, enter the device ID (disk name), e.g. disk5 . A vmdk file icon will appear on your desktop named appropriately.

In VirtualBox, go to the storage settings for your virtual machine.

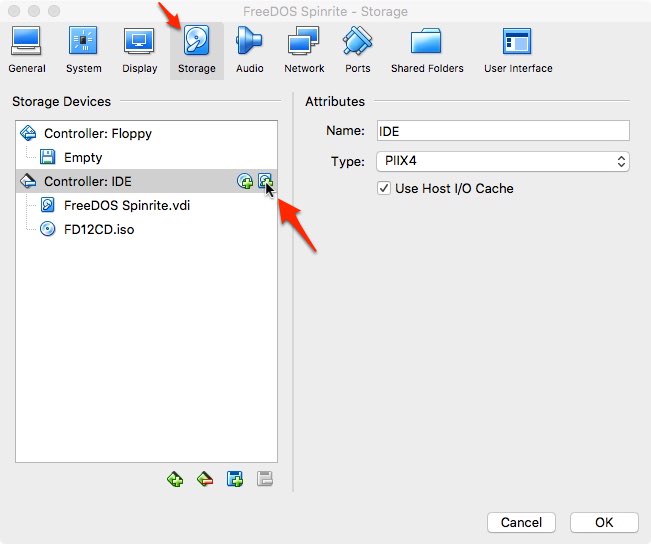
Click the hard-drive-plus icon to add a new hard drive to the virtual IDE controller. At the prompt, select Choose Existing Disk, and then select the VirtualRawdiskx file you created on your desktop earlier.

If the FreeDOS CD is still mounted in your virtual machine, as shown above, remove it from the virtual drive so that your machine boots from your virtual hard drive. If you click on the .iso, the remove option then appears if you click the optical disk icon in the far right of the dialog box.

Very likely, at this point, your target disk may have remounted itself. Eject/Unmount it before proceeding. VirtualBox will complain about being unable to access the VirtualDrive if partitions on the physical drive are still in use. Eject it using DiskUtility or the Finder.

In VirtualBox, start your virtual machine. It should boot up to the FreeDOS command prompt.

Issue the DOS command:

spinrite

You are now running SpinRite on a Mac! As promised earlier, SpinRite will have no access to S.M.A.R.T. data in this scenario.

When SpinRite is done (much, much later), you should restore the correct disk permissions. Leaving the raw disk permissions with world access is a security risk.

In the terminal you can restore them with, for example:

sudo chmod 640 /dev/disk5

If disk5 was your target disk. Check that the permissions are correct with

ls -l /dev/disk*

The raw disk files should all have the same permissions:

brw-r-----

I hope these instructions were helpful for you. Thanks for reading.

Reference Material:

Extended installation Instructions for FreeDOS are here:

http://wiki.freedos.org/install/

How to Shut Down Mac with no mouse

How can you safely shut down your Mac if your mouse stops working?

If needed, press ⌘tab to visit each open application, and use ⌘S to save your work. Press ⌘tab until the Finder is the front application.

If there is a Finder window open, fine. If not, press ⌘N to get one.

Press Control-Tab to get the text cursor into the spotlight window in the upper right.

Type

terminal

    • Use the arrow up/down keys to select the Terminal application from the search results.

Press ⌘O to open the Terminal

In the terminal window type:

sudo shutdown -h now

    • Press return.

Enter your password. Your Mac will shut down.

Can you think of an easier way?
This tip was created and tested on MacOS 10.6.5. It should work on any version of MacOS X since spotlight was introduced.

The Best Shared Shopping List App You Already Have!

I set out recently to find a shared iOS shopping list App to replace my family’s paper grocery shopping list. I had some pretty simple requirements:

  • Easy-to-use sharing between family members using different iCloud accounts
  • Ability to review the list in the store and mark items off
  • Ability to review and revive completed items (We’ve got milk this time, but we’ll need it again soon)

I spent some time in the App store looking at reviews and didn’t see anything I wanted to buy. Some otherwise useful apps had a bad reputation for crashing. Others were just too complex. Some needed a subscription and a sign-on for sharing to work. It’s just creepy that the vendor would be watching everything on your shopping list.

Eventually I found it. An app that was already on my phone that met all my requirements and didn’t need any additional sign-ups, plus you can use Siri to add items to the list by voice.

The app is:� Reminders — the humble Apple Reminders app that comes with iOS.

Here’s an overview from iMore on how to set Reminders up for sharing.

A couple of tips:

  • You can have more than one list.
  • Remember the name of your lists: “Shopping List” and “Grocery List” aren’t the same to Siri.
  • When you invite someone to share your list, they may have to sign on to iCloud on the web the first time to accept the invitation, but after that it can be strictly iPhone-to-iPhone.
  • Everyone invited has equal ability to add, delete and edit items on the list.
  • Tap at the bottom of the reminders App screen to see your other reminder lists.

Enjoy!

Basic iPhone Gestures

I’ve met several people who say they just want to use Facebook or email, but are having problems using their iPhone. They are often surprised by the results of their actions, and sometimes flail away at the screen in frustration.

Trying to use Apps on the iPhone (or iPad) without understanding the basic gestures is like hopping in a car, wanting to drive across town, without being quite sure what those pedals on the floor do.

Here’s a quick rundown of the iPhone controls and what to expect from them. I’ve separated gestures you make on the touch screen from operations involving the power button, the home button and the whole phone. Many of the functions I have indicated below can be customized in Settings, but these are the default actions. Gestures may have special meaning within certain Apps, but these are the most common usages.

Starting at the very beginning, here’s how to use the power button, located on the upper right side of your phone. Holding the power button for 3 seconds brings up the Slide to Power Off screen. If your phone is powered down, you will need to hold the power button for a few seconds until you see the Apple logo and the phone begins powering on.

Here’s what you can do with the Home Button at the bottom center of the iPhone/iPad. Touch ID is only available in the iPhone 5s and newer. For a click, press hard. For a tap, just touch it lightly. Only a light touch is needed for the fingerprint sensor. If anybody knows some function that requires only a single tap of the home button, please leave me a comment.

There are a few things you can do with your whole phone, without pushing any buttons. When you phone is asleep, lifting it to a vertical position momentarily turns on the screen so you can see the time, date and notifications.

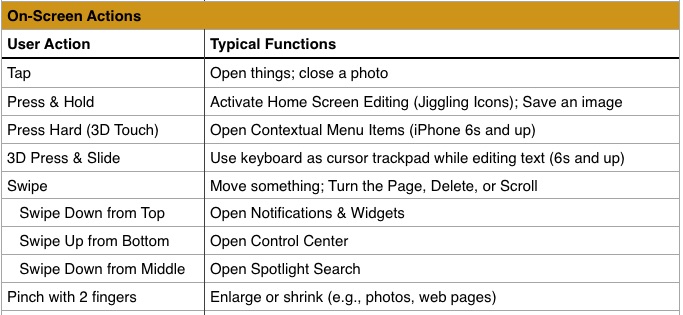
Here are the gestures for the iPhone touch screen. These are the most commonly used and the area where people have the most trouble. In particular, the iPhone is very sensitive to any sideways or vertical motion of your finger when you touch the screen. If it notices any motion, your gesture is interpreted as a swipe instead of a tap. Tapping is probably the most common gesture, so it’s important to master it. When tapping make sure you move your finger up and down only, without sliding it sideways at all.

One of the most common problems with the touch screen is unintended actions. The screen is very sensitive to the slightest touch. In fact, it will sometimes sense a touch if your finger is just near the screen. So, keep all your fingers away from the screen until you actually want to do something.

Remove your finger promptly when tapping or you will get a Press & Hold. If you want to use Press & Hold, you don’t have to press hard, just rest your finger — again, no sliding. This is probably most useful to open the sharing menu for a photo.

These are special, iPad-only gestures:

For a device with such an easy-to-use reputation, this is a pretty big list. But, make sure you understand these and you will have a much easier time using your device.

Fight Calendar Spam

Recently, I have been receiving mysterious spam calendar invitations like the one below. You may have received them also.

fullsizeoutput_6b35I never saw a corresponding email. Even worse, the only options are accept or decline. Either one sends a message back to the spammer, confirming my email address! This junk is coming through your iCloud account. Here are instructions for preventing this type of spam from The Dangling Pointer blog. �

Since this is associated with your iCloud calendar, it affects both iOS and Macintosh.

They probably didn’t get your email address from anywhere. It appears they are trying big lists of likely email addresses @icloud.com.