The MacOS System Permission Dialog

Computer users are frequently asked to enter passwords. They are often confused by these requests. Their two most common questions are:

  • Which of my many passwords does it want?
  • Is it legitimate and safe to enter my password here?

The MacOS System Permission Dialog can help you with the answers.

Which Password does it want?

When you see a dialog similar to this, you know it is from your own Mac. It wants either the username and password that you use to sign onto your Mac at startup, or the credentials of an administrator account on the computer.

Installer is trying to install new software. Enter an administrator's name and password to allow this.

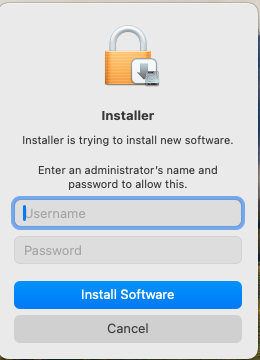
So, don’t enter your iCloud password, or the password to any of your other on-line accounts. You should use a username and password for the Mac that you are sitting in front of at the moment.

The details of this dialog may vary. It might say Installer, or some other program, and the wording may vary depending on the situation.

Is it safe?

How do you know it is safe to enter your account password in this dialog? With MacOS, Apple controls the type of dialog boxes and windows that programs are allowed to display. Programs are not allowed to display windows without title bars. That is reserved for system dialogs. Apps can ask the system to display dialogs on their behalf, and text from the App may be included in the dialog, but the overall dialog is controlled by MacOS. You will notice that these system permission dialogs do not have title bars at the top. The usual red, yellow and green dots are not present.

MacUpdater wants permission to update. Enter an administrator's name and password to allow this.

This could still be spoofed to an extent. After all, you are looking at such a dialog box right now, displayed on a web page. Would it be safe to enter your password here? No. Web pages can and do display whatever they want, as do application programs.

Although they will probably pop up in front of some other window, legitimate system dialog boxes can be dragged to the desktop, where they will display in front of your desktop pattern, without any title bar, as seen above. Malicious web sites or programs cannot duplicate this behavior.

However, to make it tricky, you may have to grab them by the very top of the window, where the title bar would be, in order to be able to move them.

The other safety test is really up to you. Even though the dialog itself is legitimate, it may be asking you for a permission you don’t want to grant. For installer permissions, only grant permission if you are knowingly in the process of installing or updating a program. Don’t agree to install a program just because a web site told you to.

Think twice before giving programs special permissions. Does a word game legitimately need permission to access your microphone and camera? Probably not. You shouldn’t grant it unless there is some real, unusual reason.

Administrator privileges are required to make changes to CCC backup tasks. Enter your password to allow this.
Carbon Copy Cloner asking for Administrator Privileges

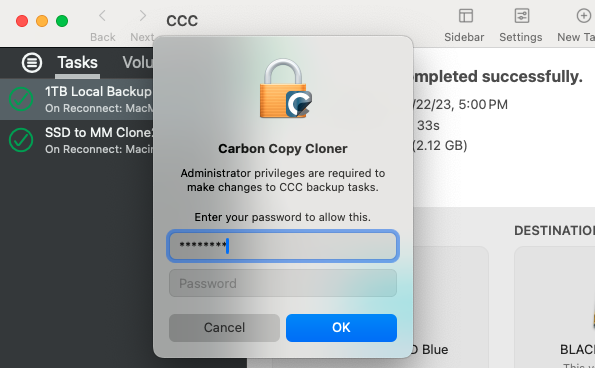
Above, the application Carbon Copy Cloner is asking for Administrator Privileges. This is a very powerful and sweeping request. You should trust the program and it should have a very good reason before granting this request. Carbon Copy Cloner has a long and good reputation, and it is performing system-level functions, so I choose to give it permission.

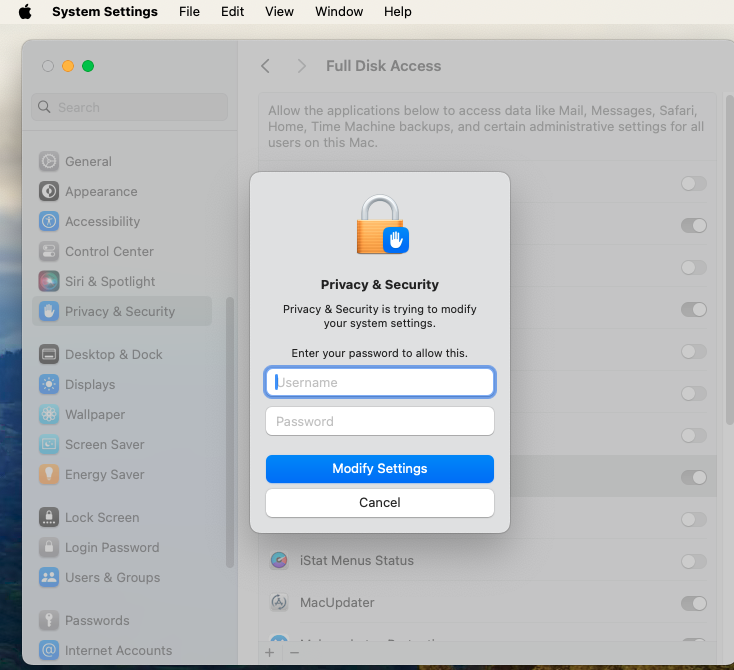
There is an exception to every rule. The legitimate dialog below from the System Settings app cannot be moved or dragged. Because it appears in the context of System Settings (a built-in and integral part of MacOS) I trust it anyway.

Privacy & Security is trying to modify your system settings. Enter your password to allow this.

I hope this discussion has given you some useful hints about entering passwords on your Mac. I hope the computer elves were good to you this Christmas and happy New Year to you.

Send Your Location via Satellite with Find My

I had a chance to try out the new feature of the Find My app that lets you send your location via Satellite. This is perhaps not so easy to demonstrate, since it requires you to be at a location without WiFi or cell service. I was traveling in some areas of North Carolina without cell coverage, so I took advantage of that to try out this new feature.

Prerequisites

  • iPhone 14 or 14 Pro (or later, presumably)
  • iOS 16.1 or later
  • Friend(s) previously added to “Share my Location” in Find My
  • Be away from cell and WiFi coverage
  • Be outdoors with a clear view of the sky

Sharing your location via Satellite in Find My doesn’t send your location to anyone in particular. It just makes your location available so that friends who already have access to your location can access it. It never asked me who I wanted to send it to. Sending your location is a one-way transmission. You do not receive anyone else’s location, or any other data, except a confirmation that your location was sent.

You start off by pressing Me at the bottom of the Find My app.

You will then see an option to Send My Location under My Location via Satellite.

In Progress. Note Satellite tracking icon at top.

Note the little green satellite tracking icon at the top.

Tapping the tracking icon brought up this screen. You turn to face left and right to keep the white dot centered in the green arc. The iPhone acquired the satellite and sent my location quickly and easily. It seemed like it would have worked without me doing anything special to aim my phone.

I hope this little preview gives you some idea of what to expect if you ever need to send your location via satellite. The most important thing is that you must set up sharing your location with friend(s) in the Find My app before leaving on your trip to a remote location.

Find Duplicate Photos with Gemini 2

A question came up at last month’s MacMAD meeting on how to save space by finding and removing duplicate photos on the Mac.

One way to do this is with Gemini 2 from MacPaw software.

You tell Gemini which folder or folders you want it to scan, including your Photo library. It scans them pretty darn fast.

Scanning Your Files

It finds duplicate files of all kinds, not just photos.

Gemini’s Main Screen with List of Duplicates

You can sort and search these in various ways. You can then select groups of the duplicates for deletion.

Details of a Duplicated Photo

You should be very cautious about deleting duplicates en masse. The duplicates may be in folders belonging to specific applications which expect to find them in those locations. Or, you may want to have duplicates in specific locations for your own organizational purposes.

It probably isn’t worthwhile trying to remove all duplicates. If you can find a few large files that can be deleted, or find entire folders that you no longer need, you may recover a lot of space with a minimum of effort and risk.

Gemini 2 is available on a subscription basis starting at $19.95 per year, or an outright purchase starting at $44.95. It is also available through a subscription to SetApp (also from MacPaw).

I Want to be Notified

This post is part of the presentation for MacMAD’s meeting for Tuesday, March 15, 2022.

There are a number of Apps, web sites and cloud services that provide useful notifications. Of course, there are many, many Apps dying to notify you about trivial things. In this post, I’ll give you a few ways to be notified about interesting things in the real world that may be useful to you.

Heart Health Notifications

This is first, because it could be very important. If you have an Apple Watch, be sure to turn on the notifications for irregular rhythm in the Apple Watch App->Heart on your iPhone. These notifications have probably saved lives by prompting people to get prompt medical attention. You might want notifications for unusually high or low heart rates also.

Financial Institutions

Your bank, credit union or brokerage may support various notifications. These can range from conveniences to important security notifications. For example the Bank of America (BofA) App has notifications for various security alerts. Make sure the alerts you want are turned on in the App, and also check that your Settings allow notifications from that App. In this case, under Settings->Notifications->BofA.

BofA App Security Alerts Configuration Screen

Local Emergency Alerts

The web site Nixle.com is used by local governments to broadcast emergency and other information of local interest. You don’t need to sign in or anything. If you send your zip code by text message to 888777, that will subscribe you to text notifications for your local area. What that means depends on where you are. Not all locations in the U.S. use the Nixle service, but many do. Here in Brevard County, you’ll get texts notifying you of things like road closures, brush fires, hurricane information, and Rocket Launches. (The Brevard Emergency Operations Center (EOC) activates for each launch in case of a launch accident.)

Nixle Text Alerts for Controlled Burn and Atlas Launch

Roads and Traffic

Your local governments may provide notifications of traffic problems in your area.

Here in Florida, the site FL511.com provides very specific customizable alerts for traffic problems on Interstates. It is only for the Interstates and other major roads. Here in Brevard it applies to I-95, US-1, A1A, and maybe the major causeway roads. You have to create an account, and sign in, but then you can create favorite routes and set up alerts for those routes in case there are any “incidents”, etc. You can specify to be alerted only within certain hours, and certain days of the week or month. You can also specify to be alerted only when travel times are expected to exceed a certain percentage of normal. Notifications can be by text or email.

On the City of Melbourne’s web site you can subscribe to email notifications for traffic advisories, etc.

Rocket Launches

The Next Spaceflight App is great for those of us on the Space Coast who like to follow local rocket launches. Because the App covers rocket launches world wide, you will probably want to specify your favorite launch sites so that you are not bombarded with launch notifications from distant continents.

Favorite Launch Locations Selection

You can specify to be notified a day before each launch, an hour before the launch, or 10 minutes before the launch, or any combination of those.

Custom Searches

You can save a specific search on eBay. This can be helpful if you are looking for something that rarely comes up for sale. When your search term is matched, you will get an email. If you save a search for a common item, you will get eBay notification messages every day. The usefulness of this may depend on how carefully you choose your search terms. Remember, you can include a minus sign to exclude certain words from your search.

Of course, you must have an eBay account and be signed in to create saved searches. I use this to search for items that may be relevant to my family genealogy. I have found several interesting items by this method.

You can also use Google Alerts to perform similar searches on any web site or on the web in general. You can focus your search more exactly using hints from Google Advanced Search. Again, it might be helpful to exclude common but undesired words with the minus sign. You can limit your search to a particular site with the site: keyword. For example, searching for:

iPhone site:macmad.org

Will find the word iPhone, but only on macmad.org.

Other Notifications

  • Weather – The Dark Sky app, now owned by Apple, has timely, local notifications
  • Package Delivery – Amazon, and UPS can notify you of package deliveries
  • Mail – USPS Informed Delivery sends you a daily preview of your mail
  • Utilities – FPL can notify you of power outages and power restoration estimates
  • Security – Burglar Alarms, Security Cameras, Motion Sensors, your car, etc.

Customize your Notifications

You can customize notifications to your preference for iOS and iPadOS in:

Settings->Notifications

In the Notifications settings, you can adjust the settings individually for each app, specifying whether it is allowed to send you notifications, and what type (badges, alerts, sounds and or banners). For notifications sent by email, you can prioritize them by adding the sender to your contacts list and marking them as a VIP (with the star). Add contacts to your VIP list using:

Mail App->Mailboxes->VIP->ⓘ

Then you can allow VIP-sent emails to give you different notifications than your other routine emails:

Settings->Notifications->Mail->Customize Notifications->VIP

This can make important notification emails pop up an alert right away.

Use iPhone as Web Cam with Detail

I have a MacMini which has no built-in camera. During the pandemic, I have been doing more on-line teleconferencing (mostly Zoom and Facetime meetings). I have used various cameras and various software to connect them to my computer.

I recently came across Detail, from Detail.co . This application allows you to use your iPhone or iPad as a web camera for your Mac. This is the best solution I have seen yet, and the iPhone has a good-quality camera, so my video looks good.

The Mac application does much more than that, which is both an advantage and disadvantage. It is a disadvantage in that it makes it harder to learn to use. There is a video tutorial on the site. The quick summary is to download the Detail app from the iOS or iPad OS App store on your iPhone or iPad, and also download the app for Macintosh from the web site. The app can work wirelessly, or via a USB cable (recommended).

You may want a tripod adapter for your phone. I bought this one and it seems like a good one. You might want to use that with a small desktop tripod like this, if you don’t have one.

Detail is not free, and they are kind of cagey about the price. I actually don’t know how much or how often they charge. There is a 14 day free trial period. I discovered and got access to Detail through my Setapp subscription, which is excellent for just-in-time discovery of useful, curated apps.

Self Help: How to Find a Lost File

You had an important file, but now you can’t find it anywhere. In this article, we’ll look at tips for finding that lost file. First, for MacOS, and then for iOS/iPadOS.

Finding a file on MacOS

Searching with Spotlight

You might be tempted to search with Spotlight (the magnifying glass icon in your menu bar). Spotlight might find your file, but by default, it returns a lot of results other than files and folders. You might not be able to see the tree for the forest in your Spotlight results. If you visit Spotlight in System Preferences, you will see that Spotlight returns results in up to 20 selectable categories, many of which are not relevant. For instance if you had a file related to a jacket in size 42 long, you might search with Spotlight for 42L. Spotlight will unhelpfully inform you that 42L = 1.48 cubic feet.

Finder Search

You can perform a search in any Finder window by clicking the magnifying glass icon in the upper right of the window, and typing your search term. This is different than Spotlight, and it searches only files.

Beginning a Finder Search for 42L

In the example above, you have typed “42L”. You will see that it has found two files, neither of which actually have 42L in the filename. However, there are two clickable options here that you should consider. If you click the dimmed word Filenames, the search is restricted to only filenames. Otherwise it will find any file that contains the search term. To start with, the search only includes the folder you happened to start in. In this case, that is the Documents folder. If you click “This Mac”, then it will expand the search to your entire computer.

Also, if you click the + to the right side, next to Save, you will get the option to further restrict your search by Kind, Last Opened Date, Last Modified Date, and a great many other attributes. For example, you could select documents whose Kind is Image. That would find only photographs or drawings.

Searching This Mac for all Image files.

By clicking the column headers in the Finder you can sort by Name, Size, Kind, Date Last Opened, etc. This can help bring likely files to the top. Consider searching by Kind, Date, Size, etc., without using a search term. You may have forgotten what the file was named exactly, or it may have been accidentally renamed. By doing this, you may find a file whose name was mangled somehow. If the file is fairly recent, it pays to look at the Recents icon in the Finder sidebar. Maybe you will recognize your file in that list. Again, you might want to sort the list.

Don’t forget to check the Trash. Files in Trash should show up when searching This Mac, but it’s worth a look.

Check the Desktop. Don’t just look at your desktop on the screen. MacOS has a feature called Stacks, which tends to hide things on your desktop. You either need to expand each of those stacks by clicking on them, or else open a Finder window, and visit your Desktop folder directly.

Plan B: Other Places to Search

Maybe the file isn’t actually on your computer, but it exists somewhere else. For example, a lot of Apps like to save files on Cloud Storage of some kind. Here are some ideas of places to look:

  • iCloud Drive
  • Microsoft OneDrive
  • Google Drive
  • Evernote
  • Dropbox
  • Network-Attached-Storage (NAS)
  • USB Stick/Flash Drive
  • Your other computer or phone or tablet
  • Camera Memory Cards
  • Virtual Machines (files in a Virtual Machine won’t be found when searching outside that machine.)

The cloud storage services are often mirrored to your local system, but not always. So, you may need to sign into their web interface and browse the files there.

Plan C: Files in Transit

Think about where your file originated in the first place. Most of the files on your computer, you didn’t create. They came from somewhere else. If someone sent you that file, it may still be available. If it’s not too embarrassing, you can always ask the sender to send it to you again. Otherwise, check your messaging apps and services:

  • e-Mail Inbox(es)
  • Apple Messages App
  • Facebook Messages
  • What’s App
  • Hangouts
  • We Chat
  • Signal

The file may still be in the message by which it originally arrived. If you originally downloaded the file from the internet, it’s probably easiest to just find it again with Google and re-download it.

If you created the file locally, did you ever send it to anyone else? If so, a copy of the file may exist in your outbox on one of the above services. Or, you can ask a recipient to send you back a copy.

Searching for a lost email is another topic in itself to be covered in a later post.

Plan D: Recover from Backup

Maybe the lost file used to be on your computer, but it was accidentally deleted. This is the scenario where backups come in handy, especially Time Machine backups. You have been performing regular backups, right?? Well, even if you haven’t, there is a good chance that Time Machine has saved your bacon. By default, Time Machine keeps some backup versions of files on your local computer even if you have never performed a Time Machine backup to an external drive (like you should!).

To recover files from Time Machine, it helps if you have some idea where in your file system the file was located. If you’re not sure, you can start with the usual suspects like the Documents folder, the Desktop or the Downloads folder. Open that folder now, in the Finder. Attach your Time Machine backup drive if you have one. Make sure that your folder of interest is the active Finder Window.

Click the Time Machine icon in the menu bar (it looks like a clock). Select Enter Time Machine. This will open sort of a time-tunnel view of that particular Finder window.

You can navigate back to some older version(s) of that folder and look for your file. If you haven’t backed up to an external drive, there may be very few snapshots available for viewing.

Finding a File on iOS or iPadOS

The key place to look for files on iOS is the Files App. It has a blue folder icon. Like MacOS, it has a Recents view which can be helpful. It can show files stored directly on your device as well as files stored on iCloud Drive. You may also have various other cloud services folders under Files. There are also the Shared, Recently Deleted (Trash), and Downloads folders. These are all worth checking.

In iOS or iPadOS, you can search for a file by swiping down from the center of the home screen. This will bring a search text box onto the screen as well as an on-screen keyboard. You can then search by typing or by voice.

I hope you were able to find your lost file, or at least to find some hints useful for next time.

Self Help: Web Site Issues

This article is part of a series on how to solve basic computer issues yourself.

Today’s article will help you with problems you may encounter on the web. A common problem is that some web site is misbehaving. Maybe you can’t logon, or maybe some feature or page of the site isn’t working properly.

In this scenario, you are probably thinking: I can’t believe that those idiots at major-fortune-500-company have a bug like this on their web site! If it’s this bad for everyone, no one can buy or use their product.

You’re probably right that if this problem was affecting everyone, it would already be fixed. So, there is probably something you can change on your computer to fix it.

After each step below, try accessing the problem site again, looking for any change or improvement.

Solution Steps

  • Keep Calm – computer problems don’t respond well to anger or curse words, but they can seldom resist an icy cool analysis.
  • Make sure you are visiting the correct site. Are you at goggle.com or giggle.com? Does the correct site name end in .com, .org, or something else?
  • Make sure your internet is working for other sites. Are you able to browse to other major web sites? Try Apple.com, for example.
  • Make sure your web browser is updated to the latest version:
    • Chrome: select Chrome/About Google Chrome
    • Safari: open the App Store and click Updates
    • Firefox: select Firefox/About Firefox
  • Open the affected site in a Private Browsing Window/ Incognito Window. This will disable extensions and ignore web history and fixes many issues:
    • Chrome: select File/New Incognito Window
    • Safari: select File/New Private Window
    • Firefox: select File/New Private Window
  • Clear your browsing history and cache. Sometimes outdated cache information breaks a site’s functionality. Note: This will log you out of all web sites, and you will have to re-login to all your favorite sites.
    • Chrome: select Chrome/Clear Browsing Data. Select All Time.
    • Safari: select Safari/Preferences. Click Privacy. Click Manage Website Data. You can choose to Remove All, or remove just the data for the affected site.
    • Firefox: select Firefox/Preferences. Click Privacy & Security. Scroll down to Cookies and Site Data. Click Clear Data.
  • Check your ad blockers and similar browser extensions. For example, if you have Ad Block+ installed, you may want to exempt your problem site to prevent accidental blockage of site features. You can try temporarily turning off extensions to troubleshoot. To see a list of your installed extensions:
    • In Chrome: visit chrome://extensions/
    • In Safari: select Safari/Preferences and click Extensions
    • In Firefox: select Tools/Add-ons and Themes
  • Resize or reorient your browser window. Maybe a button or other control you need is off-screen.
    • Try entering full-screen mode on the Mac (green button in window header).
    • Try a different screen resolution. System Preferences/Display
    • If you are on a mobile device, turn it sideways
    • If you are using the mobile version of the site, try requesting the desktop version, or vice versa (using a site-specific menu).
  • Try quitting and restarting your browser.
  • Try restarting your entire computer or device.

The steps above will solve a surprising number of strange web issues. Let us know what worked for you.

Read the Friendly Manual

Your Apple device didn’t come with a manual in the box, but they are available for free, and they are very nice.

Apple publishes manuals for all their hardware and software and makes them available in the Books App. The Books App is included on every Macintosh, iPad and iPhone.

Books Icon

There are very nice manuals for every model of Macintosh, iPhone and iPad, as well as Apple Watch, Home Pod and Apple TV.

There are users guides for iOS, Pages, Numbers, and Keynote.

Of course, there are many other books in the store about these subjects, by many different publishers, and most of them are not free.

Once you’ve opened the Books App, to find the free, Apple-published items, look for the Apple User Guides link on the right hand side of the Books App, under Quick Links. The guides are usually named either User Guide or Essentials, for example, iMac Essentials, or iPhone User Guide.

In the Quick Links Section of the Books App, Click Apple User Guides

You will definitely learn something from these. Amaze your friends and family with your expertise — Read the Manual!

March Meeting Notes

In our March virtual meeting, we talked about Continuity Camera and on-line user guides for Apple devices.

With Continuity Camera, you can use your iPhone to scan documents directly into apps on your Macintosh. It is particularly useful in Mail, Notes and Preview. If you scan paper documents into Notes in this way, they become searchable in the Notes app.

The answers to many questions about your device are contained in the user guide for your particular device, e.g. iPhone, iMac, or iPad. Apple has the user’s guides online. Apple doesn’t keep the user’s guides for older versions handy, so if you are planning to keep a device into vintage or obsolete status, download the applicable user guide before it goes out of date.

I will give you some links, but they are likely to go out of date. The consistent way to find the user’s guides is:

  1. Open https://support.apple.com/
  2. Click on your device at the top
  3. Scroll down. Near the bottom of the page, you will see something similar to this. Click on the User Guide link.

iPhone User Guide

iMac User Guides

MacBook Air User Guides

iPad User Guide

Lessons Learned

I use an external drive with my Mac to supplement the internal storage. I have been using the external drive primarily to store my Photos Library and iTunes Library, but I have a lot of other files there also. (Here’s an article about putting your Photos Library on an external drive.)

I bought a new 1TB External SSD to replace the mechanical 1TB drive I had been using. I figured this would be a nice speed-up, and more in line with what my Mac is capable of.

SSD next to 3.5 inch External drive
The SSD is Small

From the photos on-line when I ordered the SSD, I expected it to be larger — about the size of a regular 3.5″ external drive. It is much smaller. It’s about the size of a stack of four or five credit cards. This would be a great thing for travel.

I knew that I should format a new SSD with the newer APFS format for use with MacOS (currently 10.15 Catalina). So, after reading up on that, I fired up Disk Utility, selected APFS, and hit Format. I immediately realized my mistake. I was formatting my original external drive with my data on it, not the new one! It only took a few seconds to lose everything on that drive.

Lesson Learned: Make Very Sure Which Drive You are Formatting!

The good news is that I had a backup. (You have backups, right?)

Lesson Learned Previously: Always Have Backups

After initially trying to restore from backup using Carbon Copy Cloner, I ended up just copying the files to the new SSD using the Finder. But I didn’t have enough space on the drive and deleting big files and folders didn’t seem to make any difference in the amount of free space. I finally found that Carbon Copy Cloner had created some invisible space hogs on that drive called Snapshots.

Lesson Learned: If Deleting Files Doesn’t Increase Free Space, Look for Snapshots

Snapshots can also be created by Time Machine.

Lesson Learned: CCC Creates Snapshots which you can remove from within CCC.

Once I got rid of the snapshots, I was able to restore everything to the new drive easily.

Now I wanted to make some changes to help prevent similar accidents in the future. I give my drives unique descriptive names. I also wanted to give my hard drives unique icons. Any external drive I attach normally shows up with the same generic icon. If they all look alike, it makes mistakes like formatting the wrong drive more likely. I used icons that physically resemble the drives they represent, but you can use pictures of your cat, or whatever images you like.

I found this article explaining how to change the icon of drives. I ended up finding a lot of nice icons at Deviant Art. Often, the icons or images you find online are not in the correct format for MacOS. I used Image2Icon to convert them. You can find it on the Mac App Store, but I already had it via SetApp.

Since subscribing to SetApp, I always look in there first for any unique Apps I need. I usually find something that does what I want.

So, now my drives have unique icons like this:

Icons

Lesson Learned: You can and should give your external drives unique icons.

Besides external hard drives, you can also assign special icons to thumb drives or camera cards. Again, that seems very helpful in keeping them straight in your mind.

However, I have found that the procedure of pasting a new icon onto the icon of my hard drives does not work for some drives.

I found that for some drives, you can paste the icon file, but for other types of drives, you must copy and paste an actual image. If pasting the icon file doesn’t work, you can open the icon image using preview, make a selection, copy that, and paste that into the icon in the drives “Get Info” window. That seems to work.

I’m still finding that I can’t change the icon of partitions on an APFS partitioned drive. If anyone knows how to do this, please leave a comment. Thanks.